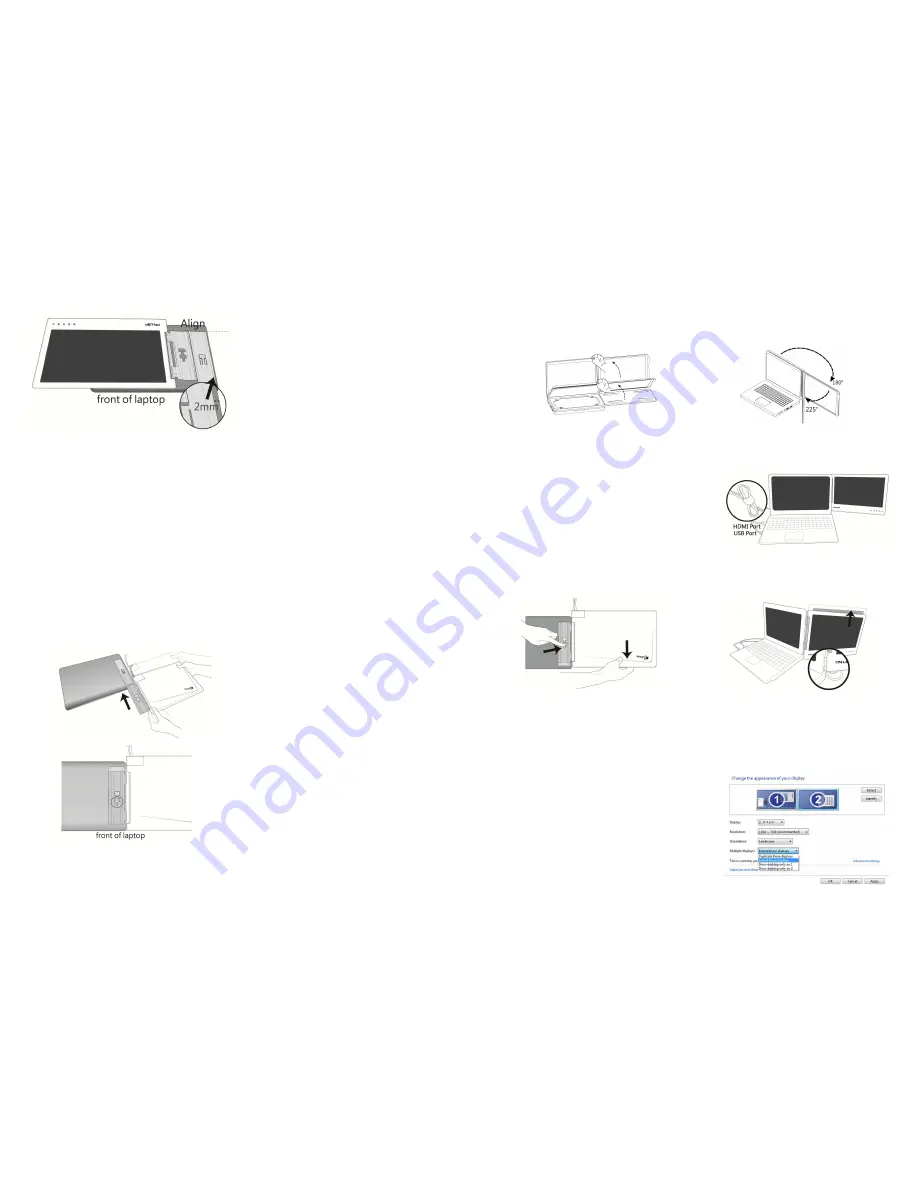
[Note: Do not reverse the direcon of the Holder Plate as this will reverse the direcon
of the On-Lap Monitor a1er installaon.]
Step2 Install the video and USB power cable
If you wish to use the HDMI port on the laptop, please use Digital Video and USB-
Powered Cable. If you wish to use the D-sub (VGA) or mini-Display Port on the lap-
top, please purchase the Analog Video and USB-Powered Cable or mini-Display Port
and USB-Powered Cable.
Connect the Image and Power connector to On-Lap video port, (1) Insert the latch
into the groove of the video power connector. (2) Slide the video power connector
toward the leE for a proper connecon. [Warning: Not inserng the latch into the
groove may result in damage to connector. Please check the video power connector
is properly connected and not protruding out. If protrusion occurs, the connecon
might not be properly connected and monitor will not be able to operate.]
Step3 Install On-Lap Monitor to the laptop
’
s monitor
1.
As illustrated, align the shaE’s Hinge Plate of the On-Lap Monitor with the Holder
Plate, and slide the shaE’s Hinge Plate into the Holder Plate.
Fig.: Mounng the Holder Plate
Fig.: Make the posioning clip wedge to the first posioning hole
Fig.: Slide the shaE’s Hinge
Plate into the Holder Plate
The posioning clip protrudes at the first
posioning hole
8
2. Rotate the On-Lap Monitor clockwise so that it is parallel to the laptop, open the
laptop monitor and the On-Lap Monitor at the same me, as illustrated.
3. Adjust the angle of the On-Lap Monitor. A recommended angle is between 180°
and 225°.
4. Connect the video and power cable
As illustrated, connect the USB power con-
nector to the laptop's USB port, and then the
digital video connector to the laptop's
HDMI
video output port (If analog video and USB
power cable is used, connect the analog video
connector to the laptop's D-sub port). Tidy
the redundant cables with cable clips.
Fig.: Dual monitor display mode
5. As illustrated, move the On-Lap Monitor upward from the laptop’s back cover,
press down on the posioning clip at the first posioning hole, and move the On-
Lap Monitor unl the posioning clip pops up from the second posioning hole.
Fig.: Moving the posioning clip from the first posioning hole to the second
posioning hole. AEer On-Lap Monitor moves up, it is no longer fixed to the boDom of
the laptop, and the laptop’s monitor can be lted backward.
[Note: If your laptop is smaller than On-Lap Monitor, the cable may get stuck when
flipping the Monitor (see upper right figure). Follow the steps above to adjust the
monitor height.]
Step4.Make the laptop and monitor extension setting
(Refer to Secon 2 of Chapter 3 for monitor dis-
play se,ng.)
AEer switching on the laptop, go to Windows’
"Control Panel" to make the monitor extension
se,ng. If you are using Windows 7:
Select "2.DVI LCD" (digital video) or “2. display
device: VGA” (analog video) for
Display
Select "1366x768" for
Resoluon
Select "Landscape" for
Orientaon
Select "Extend these displays" for
Mulple
displays
, and drag Display 2 to the right side of
Display 1.
Fig.: Rotate the On-Lap Monitor to the
right side, then open the laptop
monitor and the On-Lap Monitor at
the same me.
Fig. A recommended angle is
between 180
°
and 225
°
.
9


