


Chapter 2 Installation Instructions
Section 1 Set up and Put away On
-
Lap 2101H
(1)Please follow the steps below to set up the On
-
Lap2101H
monitor.
◆
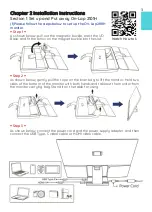
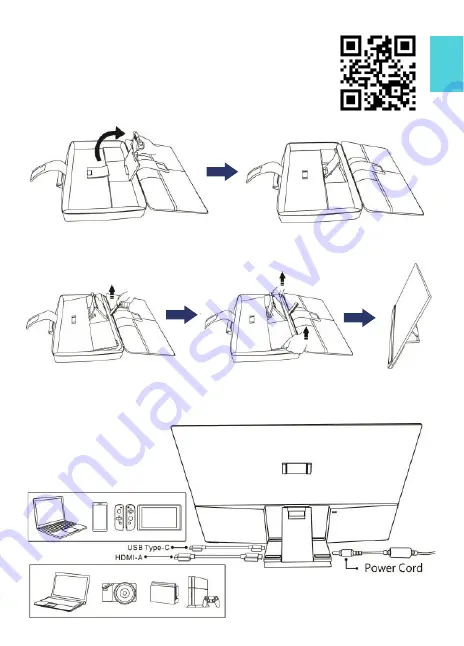
Step 1
◆
As shown below, pull out the magnetic buckle, erect the I/O
Base, and fit the tenon on the magnet buckle into the slot.
◆
Step 2
◆
As shown below, gently pull the rope on the inner bag to lift the monitor. Hold two
sides of the bottom of the monitor with both hands and take out the monitor from
the monitor carrying bag. Stand it on the table for using.
◆
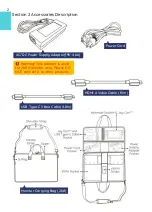
Step 3
◆
As shown below, connect the power cord and the power supply adapter, and then
connect the USB Type
-
C video cable or HDMI video cable.
Watch How to
’
s
3
Содержание On-Lap 2101H
Страница 1: ...Rev 2021 9 1...
Страница 3: ...IV V V 13 13 14 17 17 19 19 20 21 22 22 23 23 1 LED OSD 23 2 OSD 23 25 1 25 2 26 3 27 27...
Страница 21: ...1 IO IO 2 21A1 3 USB A USB Type C PC Nintendo Switch IO PC 1 30 4 5 35 45 85 Gechic 5 6 7 IV...
Страница 22: ...8 9 10 30 10 2 2 1 11 99 99 0 01 WEEE Rear Dock EU EU B VCCI B V...
Страница 23: ...15...
Страница 24: ...16...
Страница 25: ...17 On Lap2101H 1 On Lap2101H 1 IO 2 3 USB Type C HDMI...
Страница 26: ...18 2 On Lap2101H 21A1 1 2 IO 3...
Страница 29: ...21 2101H USB Type C Switch Joy con Nintendo Switch Nintendo Switch HDMI A 2101H PC DVD HDMI...
Страница 31: ...23 3 5mm Headphone Out 2 0W 1 DVD 5 1ch 2 On Lap Language Select...
Страница 32: ...24...
Страница 33: ...On Lap 2101H HDMI A USB Type C 3 5mm mini jack 2W Max x2 25...
Страница 36: ......


