


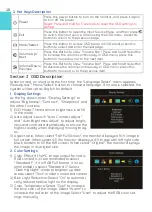


Section 2 OSD Description
When turning on monitor at the first time, the "Language Select" menu appears.
Please press " Menu/Select" button to choose a language. If no one is selected, the
system will be set as English for default.
1.
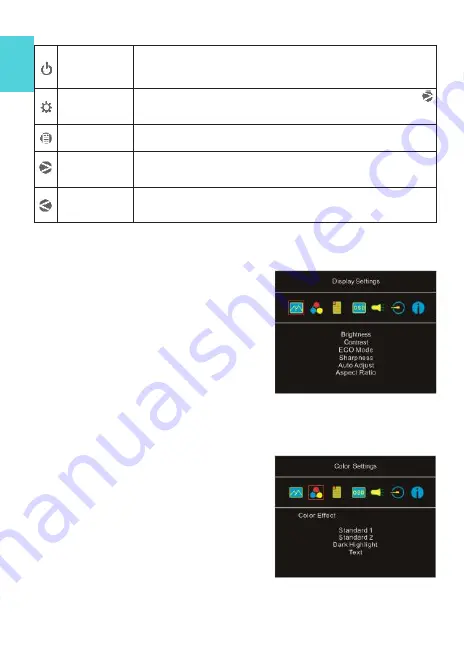
Display Settings
As the fig. shown, enter "Display Settings" to
adjust "Brightness", "Contrast", "Sharpness", and
the other functions.
1)
ECO Mode: The maximum brightness is at 50
in the mode.
2)
Auto Adjust: Launch "Auto Contrast Adjust"
and "Auto Brightness Adjust" to adjust bright-
ness and contrast automatically to ensure the
highest quality when displaying moving imag-
es.
3)
Aspect ratio: When select "16:9 Full Screen", the monitor displays a 16:9 image in
full screen. When select 4:3, the monitor displays a 4:3 image with left right side
black borders to fill the 16:9 screen. When select "Original", the monitor displays
the image in its original size.
2.
Color Settings
1)
Color Effect: If the PC image output format is
RGB Limited, it is recommended to select
"Standard 1"; if it is RGB Full format, it is rec-
ommended to select "Standard 2". Select
"Dark Highlight" mode to brighten up dark
areas; select "Text" mode to make text clearer.
2)
Blue Light Reduction: Select
“
On
”
to automati-
cally reduce the blue light on the display.
3)
Color Temperature: Select "Cool" to increase
the blue color of the image; Select "Warm" to
increase the red color of the image. Select "User" to adjust the RGB color set-
tings manually.
10
Power
Press this power button to turn on the monitor, and press it again
to turn off the power.
Reset: Press and hold for 5 seconds to reset the OSD settings to
default
Exit
Press this button to open the Input Source Menu, and then press
to switch the input source. When using the OSD menu, press this
button to return to the previous page.
Menu/Select
Press this button to access OSD panel. In OSD panel, press this
button to select and enter the next page.
Volume Up/
Next
Press this Button to show "Volume Bar." Press and hold this button
to increase the volume continuously. In OSD menu, press this
button to move down or to the next item.
Volume Down/
Previous
Press this Button to show "Volume Bar". Press and hold this button
to decrease the volume continuously. In OSD menu, press this
button to move up or to the previous item.
2.
Hot Keys Description
Содержание On-Lap 2101H
Страница 1: ...Rev 2021 9 1...
Страница 3: ...IV V V 13 13 14 17 17 19 19 20 21 22 22 23 23 1 LED OSD 23 2 OSD 23 25 1 25 2 26 3 27 27...
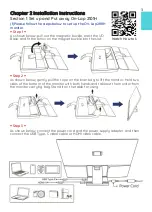
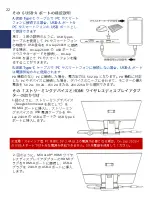
Страница 21: ...1 IO IO 2 21A1 3 USB A USB Type C PC Nintendo Switch IO PC 1 30 4 5 35 45 85 Gechic 5 6 7 IV...
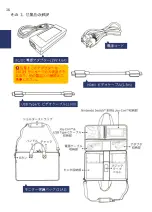
Страница 22: ...8 9 10 30 10 2 2 1 11 99 99 0 01 WEEE Rear Dock EU EU B VCCI B V...
Страница 23: ...15...
Страница 24: ...16...
Страница 25: ...17 On Lap2101H 1 On Lap2101H 1 IO 2 3 USB Type C HDMI...
Страница 26: ...18 2 On Lap2101H 21A1 1 2 IO 3...
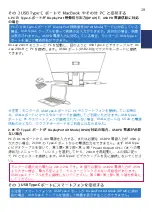
Страница 29: ...21 2101H USB Type C Switch Joy con Nintendo Switch Nintendo Switch HDMI A 2101H PC DVD HDMI...
Страница 31: ...23 3 5mm Headphone Out 2 0W 1 DVD 5 1ch 2 On Lap Language Select...
Страница 32: ...24...
Страница 33: ...On Lap 2101H HDMI A USB Type C 3 5mm mini jack 2W Max x2 25...
Страница 36: ......


