background image

IGRIDDLE COOKING 

 not 

 the 

 unattended during “preheat”

(knobs 

 to “HI”) or anytime 

 knobs are

turned to “HI” 

 food on the Grill or Griddle.

1. Suggested cooking times should be used only

   guide since variables in food may 

cooking times.

2. Avoid using metal utensils with 

 points or

rough or sharp edges which might 

 the

 coated griddle surface. 

Do not cut 

 the griddle. Use only heat-resistant dishes when

 in containers are to be warmed on the griddle,

 Preheat the 

 5 


 otherwise

indicated in guide below. 

 oil or butter 

end   

 preheat 

 Additional oil or 

   needed during cooking time.

4. Rearrange or turn 

 over as 

 to assure

even cooking.

5. Griddle 

 may need to   adjusted it’ the

 is 


 an extended   i me.

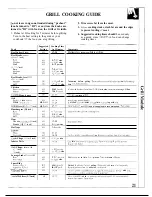
Suggested

Setting

Food

 ( 1 lb. )

 Strips and 


 inch)

Cook Time

Comments

11-14

Do 


   setting   

 half’ 

 total cooking 

HI

HI

6-10


 I inch

Chops, Pork/Lamb


 inch)

HI

I

Cube Steak

HI

I

4–5 

per side

Eggs

Scrambled

English Muffins

Fish Fillets and Steaks


 inch)

MED

HI

 up     

 Avoid 


HI

HI

Franks ( I lb.)

HI

French Toast

HI


 side

 If’ 

 is 


 with fork several 

 to absorb 

 mixture.

Fruit Slices ( 


 inch)

HI

Ham and Canadian
Bacon Slices


 inch)

For   inch ham steak, double cooking time.

8-10

HI

Hamburgers

 inch,   per lb. )

Medium

well

MED HI
MED HI

I

 over 

 once. Avoid 


 with 


 ( I 

inch)

HI

Pancakes

Sandwiches, 

thin

MED HI

2–3 

per side


 I 

Sausage Links, 

precooked

(   to 


 oz. 

Small Seafood

Shrimp, scallops, oysters

Sweet Rolls, 

reheating

17–19

 and 

 as 

 For raw sausage, 

 time

19-24

4 to I () minutes.

HI

HI

HI

MED HI

8-I()

 in   tablespoons 

 it’ desired. 


 rearrange frequently.

Do not 

 Cover lightly with foil. 

 room 

griddle 5 to 7 minutes.

Breaded Vegetables

HI

10-16


Delicate foods:

To retain moisture, cover with 

 or 

 lid, or place 

 in

 minutes

heat–resistant containers on griddle.

Warming and Hot Tray

LO

Entrees, casseroles
and hors d’oeuvres:
up to   hour

24

I

Содержание JSP68

Страница 1: ... Module 19 21 Modules and Accessories 3 ModuleCover 3 Coil Surface Unit Module 11 13 Radiant Module 16 19 Solid Disk Module 13 16 Problem SOh er 48 5O Thermostat Adjustment Do It Yourself 31 More questions call GE Answer Center 800 626 2000 Care and Cleaning 4O 47 DoorRemoval 45 Grease Jars 44 GriddleAccessory 43 Grill Module 43 Coil Surface Unit Module 40 RadiantModule 42 SolidDiskModule 4 1 Vent...

Страница 2: ...please write these numbers here Model Number Serial Number Use these numbers in any correspondence or service calls concerning your range If you received a damaged range or modular components Immediately contact the dealer or builder that sold you the range Save time and money Before you request service Check the Problem Solver in the back of this guide It lists causes of minor operating problems ...

Страница 3: ...urface unit is turned off Modules and Accessories Coil Surface Module Part Number JXGC51 This module has one 6 and one 8 coil surface unit The surface units and drip pans are removable for cleaning Part Number JXGS54 This module has one 6 and one 8 solid disk surface unit The surface units are made of cast iron and are sealed to the cooktop Each surface unit has a built in protector that keeps it ...

Страница 4: ...BOVE A RANGE OR ON THE BACKSPLASH OF A RANGE CHILDREN CLIMBING ON THE RANGE TO REACH ITEMS COULD BE SERIOUSLY INJURED 4 w AllNING A1lranEes I can tip and injury could res lt To prevent accidental tipping of the range from abnormal usage attach it to the wall or floor by installing the Anti Tip device supplied To check if the device is installed and engaged properly open the lower compartment and i...

Страница 5: ...he grill grates griddle cooktop and areas facing the cooktop oven vent opening surfaces near the opening crevices around the oven door the edges of the door window and metal trim parts above the door Remember The inside surface of the oven may be hot when d w door is opened When cooking pork follow the directions exactly and always cook the meat to an internal temperature of at least 170 F This as...

Страница 6: ...ring cooking could damage range parts and wiring Do not use aluminum foil to line the drip pans on some modules or anywhere in the oven except as described in this guide Misuse could result in a shock fire hazard or damage to the range 6 Only certain types of glass glass ceramic earthenware or other glazed containers are suitable for cooktop service others may break because of the sudden change in...

Страница 7: ...ng utensils on glass cooktop surface when it is in use They may become hot and could cause burns Do not stand on the radiant glass cooktop The weight may cause the top to bend SAVE THESE INSTRUCTIONS Flooring under the Range Your range like many other household items is heavy and can settle into soft floor coverings such as cushioned vinyl or carpeting When moving the range on this type of floorin...

Страница 8: ...FEATURES OF YOUR MODULAR GRILL GRIDDLE RANGE See the Modules and Accessories section for a listing of modules available e 8 ...

Страница 9: ...the Baking Roasting and Broiling sections 19 41 20 Oven Shelves with Stop Locks 2 5 27 28 36 44 10 Griddle Accessory Remove when not in use Use for meats pancakes or other foods usually prepared in frying pan or electric skillet 3 22 24 43 21 Broil Element 5 36 43 I 22 Bake Element May be lifted 5 36 43 gently for cleaning oven floor 23 Interior Oven Light 27 36 45 Cooktop 24 Oven Light Downdraft ...

Страница 10: ...ooking stops right away Heats by direct contact with the pan and by heating the air under the pan For best cooking resuits use good quality pans Electric coils are more forgiving of warped pans than radiant or solid disks Heats up quickly but does not change heat settings as quickly as gas or induction Electric coils stay hot enough to continue cooking for a short time after they are turned off He...

Страница 11: ... module cooking Cooking vapors blower speed The adjacent switch will turn on the and smoke are vented through a wall duct to the blower or the oven light A LO setting is outside of your home The blower is floor installed recommended for broiling or self cleaning in the lower compartment The blower will come on automatically while using the bake broil and self clean cycles The blower will come on a...

Страница 12: ...ow to medium heat settings Steel pans may cook unevenly if not combined with other metals For best cooking results pans should be flat on the bottom Match the size of the saucepan to the size of the surface unit The pan should not extend over the edge of the surface unit more than one inch Always read and follow the cookware manufacturer s instructions on cookware use Not over 1 inch Over 1 inch D...

Страница 13: ...urface Q Why is the porcelain finish on my cookware coming off A If you set the surface unit coil higher than required for the cookware material and leave it the finish may smoke crack pop or burn depending on the pot or pan Also if you set the surface unit coil higher than required for a long period of time with small amounts of dry food you can damage the finish SOLID DISK MODULE How to Insert t...

Страница 14: ...ils dry if the unit is turned on without a pan or if the pan is not making enough contact with the surface of the unit The red dots will wear off with use without affecting the performance of the surface units There is retained heat in the surface unit On boilovers wait for the unit to cool before cleaning the surface unit area You must use proper flat bottomed cookware Pans with rounded curved ri...

Страница 15: ...o boil Good flat cookware will have an even distribution of bubbles over the bottom surface area of the pan Bubbles localized in only a portion of the bottom indicate uneven contact of the pan to the surface unit uneven heat transfer or an unsuitable pan Place only dry pans on the solid disk surface units Do not place fii g 1 et ids hds on the units particularly x7 We recommend that you use only a...

Страница 16: ...ff We recommend that you begin cooking at lower settings than you have in the past and gradually increase or decrease heat as desired The energy savings are significant Q Why does it take a long time to cook my food A It doesn t The extra time it takes compared to the electric coil unit is measured in seconds not minutes These few seconds are due to the greater mass of the unit If the food is cook...

Страница 17: ...metal marks These metal marks will appear as small scratches They can be removed with Cook Top Cleaning Creme and a razor scraper When a surface unit is turned on the unit can be seen glowing red within a few seconds The red glow will turn on and off cycling to maintain the selected heat setting With poor cookware you will see frequent cycling of the unit off and on Good flat cookware will minimiz...

Страница 18: ... contact of the pan to the surface unit uneven heat transfer or an unsuitable pan Use pans that match the diameter of the surface unit Cooking performance will not be as good if the cookware is either smaller or larger than the surface unit We recommend that you use Do not use woks that have only a flat bottomed wok They are available at your local retail store The bottom surfaceunits support ring...

Страница 19: ...ont and rear sections are controlled separately You can heat both sections to the same temperature for cooking klrge amounts of the same food 01 yOLI can vary the temperatures on front and rear for cooking two different foods Also you cm save energy when cooking small amounts of food by turning only one section on and leaving the other off entirely s NEVER LEAVE THE KITCHEN while grilling meats or...

Страница 20: ...ase juices Grill Questions and Answers Q When cooking many individual foods what can I do to insure that foods will cook evenly A When cooking foods of various sizes and thicknesses start larger or thicker pieces first and add quicker cooking smaller pieces later Press the meat lightly to lie M on the grill Slash the fat on the edges of steaks and chops to prevent curling Break the joints of split...

Страница 21: ...ish SteAs I inch 01 less Whole 6 to 8 oz 40 50 5 20 17 20 f3rLIsh wi h nwltcd bu el 11 stuffed Idd 6 minutes o total time o cI top with t oi h ruit Slices I to 1 2 inch MED HI I 7 2 Firm truit SLICh as appks and pineapples are recommended TLItJl ot ten Hamburgers 3 4 inch Rwc Mcdiunl well 7 per sick X 9 per side I I I Del side TLItn OWY at ter halt ot axkin tinw HI HI HI Ham Chunks prwonki I inch ...

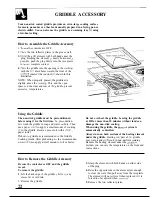
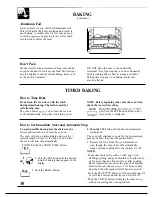
Страница 22: ...n use a paper towel to apply a small amount of cooking oil to the griddle Remove excess oil with a clean paper towel Preheat he griddle as recommended in the Griddle Cooking Guide After preheating fur the recommended mount of time apply a small amount of oil or butter Do not overheat the griddle Leaving the griddle at HI for more than 10 minutes without food can damage the non stick coating When u...

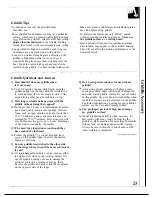
Страница 23: ...an 2 hours is recommended to assure good food quality and prevent spoilage Delicate foods such as eggs should not be kept more than 15 to 30 minutes entrees and casseroles may be warmed for 30 to 60 minutes Hors d oeuvres will stay hot for serving LIp to 1 or 17Z hours Rearrange or stir foods occasionally if possible Q Why aren t my foods done even though they have cooked the full time A Preheat t...

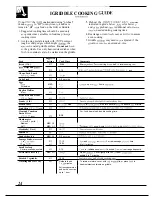
Страница 24: ... HI I 5 30 Cube Steak HI I 4 5 per side Eggs Fried Scrambled English Muffins Wwvn Fish Fillets and Steaks 1 4 to 1 inch MED HI 4 5 G iddlc up to 6 eggs Avoid cirain hole HI HI Franks I lb HI French Toast HI 3 3X per side I If bread is trozen pierce with fork several times to absorb egg mixture Fruit Slices 1 2 to 3 4inch HI Ham and Canadian Bacon Slices 1 4 to 1 2 inch For I inch ham steak double ...

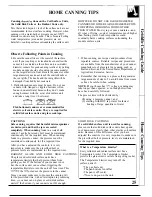
Страница 25: ... a process that generates large amounts of steam To avoid burns from steam or heat be careful when canning NOTE If your house has low voltage canning may take longer than expected even though directions have been carefully followed The process time will be shortened by 1 using a pressure canner and 2 starting with HOT tap water for fastest heating of large quantities of water CAUTIONS Safe canning...

Страница 26: ...has reached the Stop Time or that the timer has counted down Attention Tone series of short beeps l 4 second on l 4 second off until the proper response is given will sound if the oven has only been partially programmed For example if you have selected a cook time but no temperature you will hear the attention tone until yoLl select a temperature or push the CANCEL button Notification Tone single ...

Страница 27: ...cle for a minimum of 3 hours See the Operating the Self Cleaning Oven section Oven Shelves The shelves are designed with stop locks so that To replace place the when placed correctly on the shelf supports they shelf on the shelf support will stop before coming completely out from the with the stop locks oven and will not tilt when you are removing food curved extension of the j from them or placin...

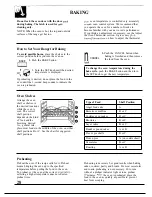
Страница 28: ...e push the BAKE button and then turn the SET knob to get the new temperature Oven Shelves Arrange the oven shelf or shelves in the desired locations while the oven is cool The correct shelf position depends on the kind of food and the browning desired As a general rule place most foods in the middle of the oven on either shelf positions B or C See the chart for suggested shelf positions Type of Fo...

Страница 29: ...g Guides When using prepared baking nlixes follow package recipe or instructions for the best baking results Cookies When baking cookies tlat cookie sheets without sides produce better looking cookies Cookies baked in a jelly roll pan short sides all around may have arker edges and pale or light browning may occur Do not use a cookie sheet so large that it touches the walls or the door of the oven...

Страница 30: ... day is displayed How to Set Immediate Start and Automatic Stop To avoid possible burns place the shelves in the 4 Turn the SET knob until the desired temperature correct position before you turn the oven on is displayed The oven will turn on immediately and cook for a The oven will continue to cook for the programmed selected length of time At the end of Cook Time amount of time then shut off aut...

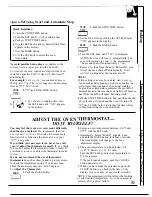
Страница 31: ...the oven light is off because heat from the bulb will speed bacteria growth Push the STOP TIME button to find out when the end of cycle tone will sound and the oven w ill turn off push the CLOCK button to display the time of day without canceling the oven operation ADJUST THE OVEN THERMOSTAT DO IT YOURSELF You may feel that your new oven cooks differently 2 Select an oven temperature between 5000F...

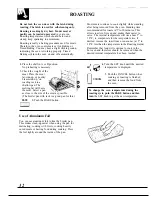
Страница 32: ...ure in the Roasting Guide Remember that food will continue to cook in the hot oven and therefore should be removed when the desired internal temperature has been reached 1 Place the shelf in A or B position No preheating is necessary 2 Check the weight of the meat Place the meat l jlll fat side up or poultry breast side up on roasting rack in a shallow pan The melting fat will baste b the meat Sel...

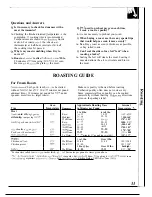
Страница 33: ... pounds more time for larger roasts Oven Type Temperature Meat Tender cuts rib high quality 325 sirloin tip rump or top I ound l Lamb leg or hone in sh mlder 325 Veal shoulder Icg or loin 325 Pork loin rib or shouldct 325 H uI1 prccoo wd 3 5 Poultrj Chicken or Duck 325 Chicken pieces 350 Turkey 325 l For boneless rolled roasts vcr 6 inches thick fid Doneness Rare Medium Well Done Rare Medium Well ...

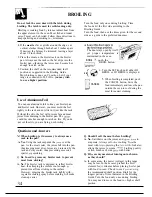
Страница 34: ...ll prevent fat and meat juices from draining to the broiler pan The Juices could become hot enough to catch on fire H you do not cut the slits you are frying not broiling Questions and Answers Q When broiling is it necessary to always use a rack in the pan A Yes Using the rack suspends the metit over the pan As the meat cooks the juices fall into the pan thus keeping meat drier Juices are protecte...

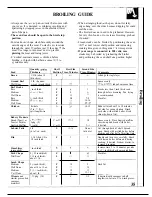
Страница 35: ... 4 Space evenly U to 8 atties take about same time Well Done Beef Steaks 7 1 inch thick 1 tO X Ibs c 6 c 8 c 12 c 10 c 15 c 25 5 6 11 7 8 14 16 20 25 Steaks less than 1 inch thick cook through before browning Pan frying is recommended Slash fat Rare Medium Well Done Rare Medium Well Done 1 inch thick 2 tO fi Ibs Chicken I whole 2 to 2X lbs split lengthwise A 35 I 0 15 Reduce time about 5 to 10 min...

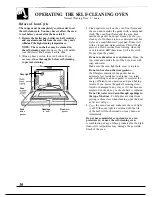
Страница 36: ...er solution This will help prevent a brown residue from forming when the oven is heated Buff these areas with a dry cloth Do not clean the gasket Do not use abrasives or oven cleaners Clean the top sides and outside front of the oven door with soap and water Make sure the oven light bulb cover is in place Do not rub or clean the door gasket the fiberglass material of the gasket has an extremely lo...

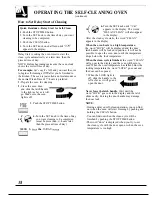
Страница 37: ...r or if the oven temperature is too high To Stop a Clean Cycle 1 Push the CANCEL button 2 When the LOCK light goes off and the oven has cooled below the locking temperature open the door After a Clean Cycle When the clean cycle is finished the word CLEAN will go out in the display and the oven will begin to cool When the oven temperature has fallen below the locking temperature the word LOCK goes ...

Страница 38: ...5 push the CLEAN button I SET 1 63 6 Turn the SET knob until 3 30 appears in the display The words DELAY CLEAN will also appear in the display After the clean cycle starts the word CLEAN appears in the display When the oven heats to a high temperature the word LOCK will be displayed and the door latch handle will be locked in position It will not be possible to open the oven door until the tempera...

Страница 39: ...ng the door Wipe up the excess soil and reset the clean cycle Q Is the crackling or popping sound I hear during cleaning normal A Yes This is the metal heating and cooling during both the cooking and cleaning functions Q Should there be an odor during the cleaning A Yes there will be an odor during the first few cleanings Failure to wipe out excessive soil might also cause an odor when cleaning Q ...

Страница 40: ...ve a surface unit To remove the drip pans for cleaning the surface units must be removed first Surface Unit Drip Pan Lift the surface unit about 1 inch above the drip pan and pull it out Do not lift the surface unit more than 1 inch If you do it may not lie flat on the drip pan when you plug it back in Repeated lifting of the surface unit more than 1 inch above the drip pan can permanently damage ...

Страница 41: ...ade of cast iron construction Do not use covers over the solid disk surface units A surface unit turned on while the cover is in place can permanently damage the cooktop Covers can also trap moisture which may cause the surface units to rust Porcelain Enameled Grease Wells Porcelain enamel can crack or chip with misuse When cleaning porcelain grease wells be careful not can stain if spill overs of...

Страница 42: ...ts affected by the spillover Remove hot pans 2 Wearing an oven mitt hold the razor ji j scraper at a 30 angle to the module I and scrape the hot spill to a cool areae outside the surface unit 3 With the spill in a cool area use a dry paper towel to remove any excess Any spillover remaining should be left until the surface of the module has cooled Do not continue to use the soiled surface unit unti...

Страница 43: ...s or other cookware maybe to burn your fingers When cool wash the griddle at the sink in soap and water Use a non metal scouring put on top and scratch the non stick coating pad if necessary Module Cover Do not place the cover on a hot module or leave it over a grill while preheating To clean the module cover wash it at the sink with soap and water and dry For stubborn soil let it soak 5 or 10 min...

Страница 44: ...ter with a soap filled or plastic scouring pad e T 5 If food has burned on sprinkle the rack with detergent while hot and cover with wet paper towels Both the broiler pan and rack can also be cleaned in the dishwasher or a dishcloth Soaking the pan will remove burned on foods Do not clean the broiler pan or rack in the self The broiler pan may be cleaned with a commercial cleaning oven oven cleane...

Страница 45: ...owel rolls to prevent pinched fingers and chipping the porcelain enamel on the frame To replace the door make sure the hinges are in the special stop position Position the slots in the bottom of the door squarely over the hinges Then lower the door slowly and evenly over both hinges at the same time If hinges snap back against the oven frame pull them back out TO CLEAN THE DOOR Inside of the door ...

Страница 46: ...emoving the knobs for cleaning please note that the knobs on the left side and the knobs on the right side are in the proper OFF position When replacing the knobs check the OFF position to insure proper alignment To remove the knob pull it straight off the control shaft Kick Panel Cleaning Under the Range To clean the front of the kick panel wash with soap The area under the range can be reached e...

Страница 47: ...nd anchors at hardware stores Use a masonry rill to drill the required holes Move the range directly in front of the cutout Standing in front of the range tilt it toward you Maneuver the range into the cutout Keep the back raised in order to clear the blower The stability bracket attached to the range should be positioned over the stability mounting device I Stability mounting il 1 Fig 1 I i IJ Se...

Страница 48: ...properly set or wrong control is set for the module or surface unit you are using Entire module is not plugged in properly If any module fails to heat switch the module to the other side of cooktop If it operates on that side then switch maybe at fault If it does not heat indications are that there is a malfunctioning component in the module Surface units are not plugged in solidly Reflector plate...

Страница 49: ... razor scraper and recommended cleaning procedures Use a razor scraper and recommended cleaning procedure Marks from aluminum and copper pans as well as mineral deposits from water or food can be removed with Cook Top Cleaning Creme See the Radiant Module Glass Ceramic Cooktop Cleaning section Incorrect cookware used Use only flat cookware to minimize cycling Plug on range is not completely insert...

Страница 50: ...as fallen below the locking temperature the door can be opened The oven thermostat needs adjustment See the Adjust the Oven Thermostat Do It Yourse section This is normal in a new oven and will disappear in time To speed the process set a self clean cycle for a minimum of 3 hours See the Operating the Self Cleaning Oven section An odor from the insulation around the inside of the oven is normal fo...

Страница 51: ...paired hearing or speech who have Braille controls for a variety of access to a TDD or a conventional teletypewriter rna GE appliances and a brochure to call 800 TDD CEAC 800 833 4322 to request inf orma assist in planning a barrier free tion or service kitchen for persons with limited mobility To obtain these items free of charge call 800 626 2000 Service Contracts 8011626 2224 YOL1 can ha e the ...

Страница 52: ... and Care material You are responsible for providing If you then have any questions adequate electrical gas exhausting about operating the product please and other connecting facilities as contact your dealer or our described in the Installation Instructions Consumer Affairs office at the provided with the product address below or call toll free Replacement of house fuses or GE Answer Cente resett...

Отзывы: