background image

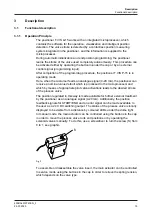
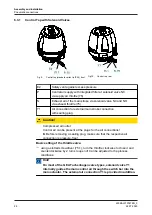
To operate the control top, take off the cap and press the plus/minus buttons
directly on the circuit board (A).
Observe the general instructions regarding ESD protection.
Operation see Section 8.2, Page 42.

3.1.4

Function of the Buttons

Automatic end position programming and manual mode are generally activated
using the buttons in or under the cap. For safety reasons, the buttons are only
enabled within a specific time window after activation of the operating voltage.
During this time window, functions can be started. The buttons are automatically
locked again after the allowed time has expired.
In manual mode the stroke of the actuator can be changed locally in 5 % steps in
the direction of the START or END position using the buttons in or under the cap.
The buttons in the cap can also be used to make customer-specific parameter
settings for the positioner.

3.1.5

Safety Air Exhaust/Installation Position

To provide protection against excess pressure which can build up in the inside of
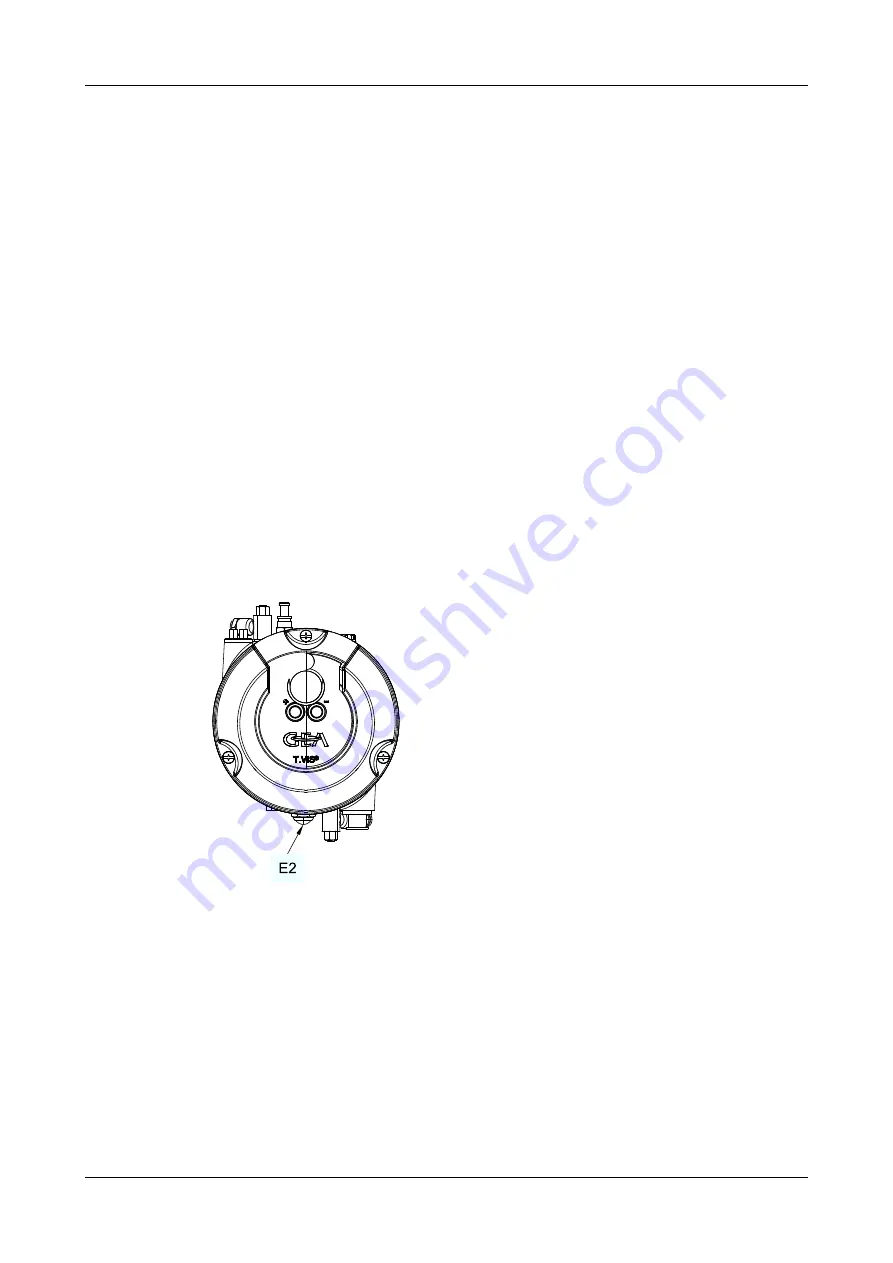
the control top, a vent plug E2 is fitted in the base. In operating mode, the
exhaust air from the lifting actuators is discharged via this vent plug. In the
unlikely event of a damaged solenoid valve or in case of sealing problems,
pressure relief is ensured.

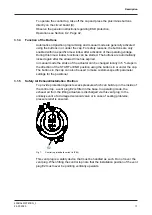
Fig.7:

Control top (standard variant in IP66)

This vent plug is a safety device that must be handled as such. Do not cover the
vent plug. When fitting the control top note that the installation position of the vent
plug E2 must never be pointing vertically upwards.

Description


430BAL010747EN_3


24.07.2020

17

Содержание T.VIS P-15

Страница 1: ...Control and feedback systems GEA T VIS P 15 Operating instruction Translation from the original language 430BAL010747EN_3 ...

Страница 2: ... or reduced to an electronic medium of machine readable form without the express permission of GEA Tuchenhagen GmbH LEGAL NOTICE Word marks The designations T VIS VARIVENT ECOVENT STERICOM VESTA und LEFF are protected trademarks of GEA Tuchenhagen GmbH We kindly request that you answer a few short questions about these instruction manual Use the following QR code or link to access the questionnair...

Страница 3: ...ation Principle 15 3 1 2 Control Top with Cap Including Buttons 16 3 1 3 Control Top with Cap without Buttons 16 3 1 4 Function of the Buttons 17 3 1 5 Safety Air Exhaust Installation Position 17 4 Transport and storage 18 4 1 Storage conditions 18 4 2 Transport 18 4 2 1 Scope of supply 18 5 Technical data 19 5 1 Type plate 19 5 2 Technical data 20 5 3 Specifications for 24V DC Version 22 5 4 Acce...

Страница 4: ...op into its Components 47 10 4 1 Removing the Cap 47 10 4 2 Remove the circuit board 48 10 4 3 Install the circuit board 48 10 4 4 Removing the sensor module 9 48 10 4 5 Removing the Solenoid Valves and the Control Plate 49 10 4 6 Removing the pneumatic block 50 10 4 7 Fitting the Pneumatic Block 50 10 4 8 Install valve plates 51 10 5 Maintenance 52 10 5 1 Replacing the Seals on the Base 52 10 5 2...

Страница 5: ... the entire life cycle of the product When the location is changed or the product is sold make sure you also provide the Operating Instructions 1 1 2 Notes on the Illustrations The illustrations in these Operating Instructions show the product in a simplified form The actual design of the product can differ from the illustration For detailed views and dimensions of the product please refer to the ...

Страница 6: ...in serious damage to the component or in the vicinity of the component The arrow identifies a precautionary measure you have to take to avoid the hazard Carry out the following steps Start of a set of instructions 1 First step in a sequence of operations 2 Second step in a sequence of operations Result of the previous operation The operation is complete the goal has been achieved Hint Further usef...

Страница 7: ...k is borne solely by the operating company 2 1 1 Requirements for operation The prerequisite for reliable and safe operation of the component is proper transportation and storage as well as professional installation and assembly Operating the unit within the limits of its designated use also involves adhering to the operating inspection and maintenance instructions 2 1 2 Improper operating conditi...

Страница 8: ...be able to initiate any necessary first aid measures in case of an emergency Clearly define procedures competences and responsibilities for those working in the area of the component Everybody must know what to do in case of an emergency Instruct the staff in this respect at regular intervals The signs on the component must always be complete and easy to read Check clean and replace the signs as n...

Страница 9: ...cleaning agents are used that significantly reduce the surface tension and or if high pressure cleaners are used we recommend using IP69k rated equipment as an option Hint The specified IP classes only apply if the connectors are connected correctly if the cable gland is properly sealed and if the control top is fitted on the valve see Chapter 6 Page 25 2 5 General safety instructions and dangers ...

Страница 10: ...m Always observe the pertinent regulations relating to waste avoidance disposal and utilization Substances harmful to the environment must be collected and stored in suitable containers Clearly mark the containers Dispose of lubricants as hazardous waste 2 5 3 Electrical Equipment For all work on electrical equipment the following principles apply Access to electrical equipment should only be allo...

Страница 11: ...wing minimum qualifications are required Training as a specialist for working independently on the component Adequate instruction to work on the component under the supervision and guidance of a trained specialist Each employee must meet the following requirements to work on the component Personal suitability for the respective task Sufficient professional qualification for the respective task Rec...

Страница 12: ...chanical equipment Electrical equipment Pneumatic system Authorization with regard to safety engineering standards to carry out the following tasks Setting devices into operation Earthing of devices Marking of devices The relevant certificates of qualification must be submitted before work can be carried out on ATEX certified machines 2 8 Safety equipment 2 8 1 Signs Dangerous points on the contro...

Страница 13: ... electronics or result in data loss Do not carry out any welding work in the vicinity of the control top or make sure electronics are properly protected 2 9 1 Electrostatically Endangered Components and Modules The control top contains electronic components that are sensitive to electrostatic discharge ESD Contact with electrostatically charged persons or objects can endanger these components In t...

Страница 14: ...m the power supply and secure it against inadvertently being switched back on again Only allow a qualified electrician to carry out any work on the electrical power supply Check the electrical equipment of the control top at regular intervals Immediately remedy loose connections and molten cables If work on live parts cannot be avoided call in a second person who can operate the main switch in cas...

Страница 15: ...is processed in the microprocessor and which by means of appropriate pilot valve activations leads to the desired stroke of the process valve The position regulated in this way is made available for further external treatment by the positioner as an analogue signal 4 20 mA Additionally the position feedback signals for START END and an error signal can be made available to the user as a 24 V DC sw...

Страница 16: ... correctly The control top is operated with the cap closed using the plus minus buttons Operation see Section 8 2 Page 42 3 1 3 Control Top with Cap without Buttons Fig 5 Control Top with Cap without Buttons Fig 6 Circuit board A According to protection class IP67 and or 69k EN 60529 the control top T VIS P 15 is suitable for use in this design and if the electrical and pneumatic connections are i...

Страница 17: ...the direction of the START or END position using the buttons in or under the cap The buttons in the cap can also be used to make customer specific parameter settings for the positioner 3 1 5 Safety Air Exhaust Installation Position To provide protection against excess pressure which can build up in the inside of the control top a vent plug E2 is fitted in the base In operating mode the exhaust air...

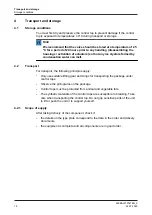
Страница 18: ...Only use suitable lifting gear and slings for transporting the package units control tops Observe the pictograms on the package Control tops must be protected from animal and vegetable fats The synthetic materials of the control tops are susceptible to breaking Take care when transporting the control top Do not grip sensitive parts of the unit to lift or push the unit or to support yourself 4 2 1 ...

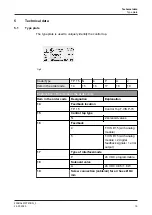
Страница 19: ...e Designation Explanation 14 Feedback location T P 1 5 Control Top T VIS P 15 15 Control top type N 2 solenoid valves 16 Feedback 4 T VIS P 15 with analog module 5 T VIS P 15 with analog module 2 digital feedback signals 1 error output 17 Type of interface mode P 24 V DC programmable 18 Solenoid valve A 24 V DC 0 85 1 6 W 19 Screw connection cable air for air hose Ø 6 4 mm Technical data Type plat...

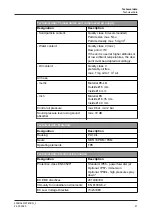
Страница 20: ...connection J P Material No 508 963 8 pin M12 junction box for screw connection H I Material No 508 061 67 Protection class IP 67 immersion 69k Protection class IP 69K high pressure spray down cleaning A For ASEPTOMAG valves Example TP15I4PAJ A UC Certification UL CSA For indoor use 5 2 Technical data Refer to the following tables for the key technical data of the control top Technical data Tempera...

Страница 21: ... LD Outside Ø 6 mm Inside Ø 4 mm Inch Material PA Outside Ø 6 35 mm Inside Ø 4 3 mm Control air pressure max 8 bar min 2 bar Sound pressure level using sound absorber max 72 dB Technical data Materials Designation Description Housing PA 12 L Seals NBR EPDM FKM Operating elements TPE Technical data Electrical information Designation Description Protection class EN 60529 Standard IP66 powerful water...

Страница 22: ...fications for 24V DC Version Technical data power supply Designation Description Supply voltage UV 24 V DC 20 12 5 Current consumption No load current 20 mA one solenoid valve 35 45 mA Max load of the feedback 50 mA Total approx 260 mA Technical data Inputs Designation Description Control voltage max 28 8 V DC High 13 V DC Low 6 V DC Control current 10mA Technical data Outputs Designation Descript...

Страница 23: ...rial no Hose cutter 407 065 Hex key size 3 408 121 Pin type face spanner pin dia 4 9065837 Open ended wrench a f 23 408 046 Open end spanner a f 16x18 408 138 Open end spanner a f 13x17 408 036 Open ended wrench a f 14 5 6 Lubricants Lubricants Lubricant designation Material no Rivolta F L G MD 2 413 071 PARALIQ GTE 703 413 064 Technical data Accessories 430BAL010747EN_3 24 07 2020 23 ...

Страница 24: ...d absorber G 1 8 Filter material stainless steel wool Ambient temperature 20 70 C max pressure 10 bar 933 175 Supply exhaust air throttle G 8 Filter material sintered stainless steel Pressure range 0 2 10 bar Infinitely adjustable flow at Δp 6 bar 310 dm3 min n Ambient temperature 10 70 C Flow rate setting at 0 70 C 603 042 Technical data Equipment 430BAL010747EN_3 24 24 07 2020 ...

Страница 25: ...ter opening the crate Under no circumstances should anyone stand under a suspended load Safety devices of the component may not work effectively during installation Reliably secure sections of the plant which have already been connected against inadvertently being switched on 6 2 Establishing Hose Connections To ensure reliable operation the compressed air hoses must be cut exactly at a right angl...

Страница 26: ...ontrol air can be present at the plugs for the air connections Before removing a sealing plug make sure that the respective air connection is pressure free Basic setting of the throttle valve using a slotted screwdriver 75 1 turn the throttle clockwise to close it and counterclockwise by 2 turns to open it Can be adjusted to the process conditions Hint On most of the GEA Tuchenhagen valve types so...

Страница 27: ... with an air hose 6 4 Electrical connections Danger To satisfy the UL requirements use a protective insulation power limited power supply according to UL IEC 60950 or power limited according to UL IEC 61010 1 3cd cl 9 4 or a Class II power supply according to NEC 6 4 1 Overview 50 24 Fig 12 Assembly and installation Electrical connections 430BAL010747EN_3 24 07 2020 27 ...

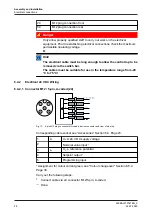
Страница 28: ...e from 20 C to 75 C 6 4 2 Electrical 24 V DC Wiring 6 4 2 1 Connector M12 5 pin A coded 24 Fig 13 5 pin M12 plug in connector A coded device connector and view of pin strip Corresponding cable socket see Accessories Section 5 4 Page 23 1 L UV L 24 V DC supply voltage 2 Nominal value input 3 L UV L reference potential 4 Setpoint output 5 Programming input Assignment for colour variant green see Col...

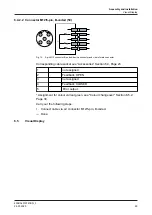
Страница 29: ...es Section 5 4 Page 23 1 not assigned 2 Feedback OPEN 3 not assigned 4 Feedback CLOSED 5 Error output Assignment for colour variant green see Colour changeover Section 6 5 2 Page 30 Carry out the following steps 1 Connect cable via air connector M12 5 pin B coded Done 6 5 Visual Display Assembly and installation Visual Display 430BAL010747EN_3 24 07 2020 29 ...

Страница 30: ...e is a power failure if no signal is displayed for more than 5 seconds 6 5 2 Colour Changeover The colour changeover function allows you to swap the colour from green to yellow or yellow to green for the following visualizations valve in non actuated position valve in actuated position moving Carry out the following steps 1 Disconnect the control top from the power supply 2 Press both buttons at t...

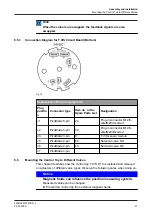
Страница 31: ...pin 9 T VIS sensor module J5 PicoBlade 2 pin 64 Solenoid valve NO J6 PicoBlade 2 pin 63 Solenoid valve NC J7 PicoBlade 4 pin 6 6 Mounting the Control Top to Different Valves This chapter describes how the control top T VIS P 15 is installed and removed on actuators of different valve types Observe the following notes when doing so Notice Magnetic fields can influence the position measuring system ...

Страница 32: ...spanner torque 2 Nm 1 4 lbft 2 Fit the control top B over the switch bar 1 and on the actuator A 1 3 Tighten the clamps 15 and screws 39 to a torque of 1 Nm 0 7 lbft 4 Align the pneumatic and electrical connections in accordance with the valve block configuration 5 Close the air connection Y1 with a sealing plug since the control top T VIS P 15 has an inner air duct 6 Perform commissioning see Cha...

Страница 33: ...ions in accordance with the valve block configuration 8 Perform commissioning see Chapter 6 Page 25 and Chapter 7 Page 38 Done 6 6 3 Mounting to a Butterfly Valve T smart 7 and a Mixproof Butterfly Valve T smart 9 Requirement Pay attention not to kink the air hoses when mounting the control top Carry out the following steps 1 Screw the switch bar 11 into the actuator torque 22 Nm 16 2 lbft Fig 19 ...

Страница 34: ...bar 1 with ring 99 into the piston rod A4 1 and tighten by applying an a f 13 open end spanner at 1 1 torque 2 Nm 1 4 lbft 4 Fit the control top B over the switch bar 1 and on the actuator 5 Tighten the clamps 15 and screws 39 to a torque of 1 Nm 0 7 lbft 6 Align the pneumatic and electrical connections in accordance with the valve block configuration 7 Due to the internal air guiding of the contr...

Страница 35: ... Align the pneumatic and electrical connections in accordance with the valve block configuration 7 As internal air guiding is not possible on VESTA valves connect the air connection Y1 on the control top to connection A 4 2 on the actuator with an air hose L 8 Perform commissioning see Chapter 6 Page 25 and Chapter 7 Page 38 Done 6 6 6 Mounting to VESTA Valve H_A Requirement Pay attention not to k...

Страница 36: ... of 1 Nm 0 7 lbft 8 Align the pneumatic and electrical connections in accordance with the valve block configuration 9 As internal air guiding is not possible on VESTA valves connect the air connection Y1 on the control top to connection A4 2 on the actuator with an air hose L 10 Carry out commissioning see Section 7 2 Page 38 Done 6 6 7 Fitting to an ASEPTOMAG Valve Requirement Pay attention not t...

Страница 37: ...valves connect the air connection Y1 on the control top to connection A 4 2 on the actuator with an air hose L 6 Carry out commissioning see Section 7 2 Page 38 Done 6 6 8 Replacing Control Tops When replacing the control top observe the following warning note Caution Collision of the switch bar with the pneumatic block If a valve with the wrong type of switch bar is used there is a risk of injury...

Страница 38: ... functional and in perfect condition Check the function before starting any work When the control top is switched on the danger zones must be free Remove any liquids that have escaped without leaving residues 7 2 Commissioning Control Top with Solenoid Valves Activating the Control Top Once the positioner has been properly mounted on the valve and the electrical and pneumatic connections have been...

Страница 39: ...ng the button Colour changes cyclically between yellow and red user can choose a dead band of either 1 2 or 3 for the control loops by pressing the button If no selection was made with the push button or confirmed or cancelled with the push button within 30 seconds then the setting most recently activated is adopted A steady red light in the illuminated dome indicates that the set values are being...

Страница 40: ...the valve and the electrical connections have been established correctly commissioning can be carried out Carry out the following steps 1 Activate th solenoid valves via PLC in order to check the proper function of the feedback on the control top T VIS P 15 This completes commissioning Hint The solenoid valve can also be activated and deactivated in manual mode via the control buttons see Operatin...

Страница 41: ...ervals All guards and hoods must be fitted as intended The installation location of the component must always be properly ventilated Structural changes to the component are not permitted Report any changes to the component immediately to the person in charge Always keep danger zones clear Do not leave any objects in the danger zone Only allow persons to enter the danger zone when the machine is de...

Страница 42: ...ress and hold Attention If power will be switched off the valve disk will return to the start position because of spring force Activation of main stroke to eliminate spring force To Fault Mode exit by power off Initial situation T VIS P 15 de energised Mounting of valve insert Programming mode red permanent SETUP active 4x green 1x red 3x green 1x red 2x green 1x red 1x green 1x red 2x blue 1x red...

Страница 43: ...r off Power up Error mode Decision about further steps new SETUP confirm error Power off Memory data loss press button back to operation mode back to first commissioning back to operation mode 5 towards CLOSED green then quick blue Valve closes green quick flashing release button within 7 s Current position indicated yellow quick flashing or press green quick flashing or blue quick flashing or blu...

Страница 44: ...safety data sheets supplied by the detergent manufacturers Only use detergents which are not aggressive towards synthetic materials and the sealing materials used and which are non abrasive Cleaning Cleaning 430BAL010747EN_3 44 24 07 2020 ...

Страница 45: ...n to the maintenance or repair work going on Do not climb on the component Use suitable access aids and working platforms Wear suitable protective clothing Only use suitable and undamaged tools to carry out maintenance work When replacing parts only use approved fully functional load suspension devices and lifting accessories which are suitable for the intended purpose Before setting the unit back...

Страница 46: ... dirt Pack sensitive parts separately For longer periods of standstill observe the storage conditions see Section 4 1 Page 18 10 2 Inspections Checking parts are firmly secured Fig 28 1 Air hose connections 2 Screw connection B between hood B and base 5 3 Clamp 15 4 Plug Further checking 1 Check that the electrical connectors are properly secured 2 Check the sound absorber and the exhaust air thro...

Страница 47: ...ry out the following steps 1 Release the screw connection 39 and remove the clamp ring 15 2 Pull the control top vertically off the valve Light emitting diode A green will go out and light emitting diode B will flash yellow Done 10 4 Dismantling the Control Top into its Components 10 4 1 Removing the Cap Fig 30 Maintenance Removing the Control Top from the Valve 430BAL010747EN_3 24 07 2020 47 ...

Страница 48: ...rinted circuit board 43 Done Hint In order to avoid or minimize the possibility of damage from electrostatic discharge Observe the requirements of DIN EN 61340 5 1 and 5 2 Be careful not to touch the electronic components 10 4 3 Install the circuit board To install the printed circuit board pay attention to the wiring diagram for the printed circuit board underside for T VIS P 15 see Section 6 5 3...

Страница 49: ...d the circuit board solenoid valve 63 must be connected to terminal NC solenoid valve 64 to terminal NO Use only solenoid valves as listed in the chapter Technical data see Chapter 5 Page 19 Warning Long switch on time and high ambient temperature Risk of burns from the solenoid valve Allow to cool before dismantling Carry out the following steps Maintenance Dismantling the Control Top into its Co...

Страница 50: ...lve plates 65 can remain on the pneumatic block 8 Carry out the following steps 1 Undo screws 57 1 57 2 Fig 34 2 Pull off the pneumatic block 8 3 Change the 6 O rings 42 on the base 5 4 Replace the O ring 55 Done 10 4 7 Fitting the Pneumatic Block Requirement When fitting the pneumatic block make sure that it is compatible Insert the pin 8 1 on the pneumatic block into the groove of the base 5 Use...

Страница 51: ...w 57 2 torque 1 5 Nm 1 0 lbft 3 For the other parts to be fitted sensor printed circuit board solenoid valves valve plate refer to the preceding pages Done 10 4 8 Install valve plates 8 65 22 65 22 65 66 66 Fig 36 Maintenance Dismantling the Control Top into its Components 430BAL010747EN_3 24 07 2020 51 ...

Страница 52: ...ocated in the lower mounting holes On ASEPTOMAG valves a special type of pneumatic block must be used Tighten the screws 66 to a max torque of 1 Nm 10 5 Maintenance 10 5 1 Replacing the Seals on the Base On VARIVENT actuators with a vent hole in the actuator cover the control top must be fitted without O ring 54 Fig 37 Carry out the following steps 1 Remove the O rings 31 54 and replace Done 10 5 ...

Страница 53: ...58 Carry out the following steps 1 Check that the control air can exit freely from the sound absorber 26 reflux valve 26 1 filter 5 1 and exhaust air throttle 75 and replace the parts if necessary The non return valve 26 1 cannot be replaced 2 Do not grease the spare parts before fitting them Done Maintenance 430BAL010747EN_3 24 07 2020 53 ...

Страница 54: ...ect wiring Connect PIN 1 and PIN 3 correctly Disconnect the plug After connecting the supply voltage green yellow is indicated immediately Green or yellow Device already programmed at least 1 x Reprogram in order to adjust to the process conditions Press the and buttons at the same time for 3 Actuate 7 s see restarting Section 8 2 Page 42 Programming cannot be completed Steady red light End positi...

Страница 55: ... not sufficient to actuate the process valve Check the control air pressure observe the minimum pressure for the process valve indicated on the type plate Control air pressure was sufficient during programming but drops in the system during the operation Check the control air pressure observe the minimum pressure for the process valve indicated on the type plate Throttle settings are incorrect Sup...

Страница 56: ...olerance setting Check the bellows and possibly reprogram see operating overview Section 8 2 Page 42 11 2 Carrying out a Reset Back to Default Standard Carry out the following steps 1 Start the SETUP procedure 2 Switch off the operating voltage while running the SETUP LED goes out loss of data in the memory module 3 Put the control top into operation see Commissioning control top with solenoid val...

Страница 57: ...e the storage conditions see Chapter 4 Page 18 12 2 Disposal 12 2 1 General notes Dispose of the component in an environmentally safe manner Observe the statutory waste disposal regulations applicable at the place of installation The component consists of the following materials Metals Synthetic materials Electronic parts Lubricants containing oil and grease Separate the different materials and di...

Страница 58: ...13 Spare parts list control top type T VIS P 15 Fig 40 Spare parts list control top type T VIS P 15 430BAL010747EN_3 58 24 07 2020 ...

Страница 59: ...ctor M12 5 pin A coded M20 cpl 221 005101 221 005101 26 Sound absorber G1 4 MS CV 933 174 933 174 31 O ring NBR 930 041 930 041 41 O ring NBR 930 436 930 436 42 O ring NBR 930 169 930 169 43 Circuit board T VIS P 15 221 005024A 221 005024A 48 Locking screw not for T VIS P 15 RM PA 922 370 508 370 50 Connector M12 5 pin B coded M16 cpl only for T VIS P 15 RM PA 221 005822 221 005822 53 O ring NBR 9...

Страница 60: ...14 Spare parts list switch bar T VIS P 15 Fig 41 Spare parts list switch bar T VIS P 15 430BAL010747EN_3 60 24 07 2020 ...

Страница 61: ...00 butterfly valves 1 3 Switch bar incl O ring 1 4305 221 589 57 In addition to item 1 adapter only for valves type VESTA H_A 1 4 TME T VIS adapter 1 4305 221 573 06 In addition to item 1 only for butterfly valves ECOVENT S 2 Switch bar BFV 7 1 4301 PA6 224 001696 for butterfly valves T smart 7 3 Switch bar A P 15 ASG 1 4305 PA6 221 589 88 For all GEA ASEPTOMAG valves 4 Switch bar A P 15 N_V 1 430...

Страница 62: ...15 Dimension sheet control top type T VIS P 15 Fig 42 N is exhaust air Dimension sheet control top type T VIS P 15 430BAL010747EN_3 62 24 07 2020 ...

Страница 63: ...rdization EN European Standard EPDM Material designation Short designation according to DIN ISO 1629 Ethylene Propylene Diene Rubber F Unit of measurement of temperature degree Fahrenheit FKM Material designation short designation according to DIN ISO 1629 Fluorine rubber h Unit of measurement of time hour HNBR Material designation Short designation according to DIN ISO 1629 Hydrogenated Acrylonit...

Страница 64: ...FE Polytetrafluoroethylene SET UP Self learning installation During commissioning and maintenance the SET UP procedure carries out all the necessary settings for the generation of messages SW Indicates the size of spanners width across flats T VIS Tuchenhagen Valve Information System V AC Volt alternating current V DC Volt direct current W Unit of measurement of power Watt TIG Welding method Tungs...

Страница 65: ...Appendix 430BAL010747EN_3 24 07 2020 65 ...

Страница 66: ......

Отзывы: