background image

– 14 –

Dispensers

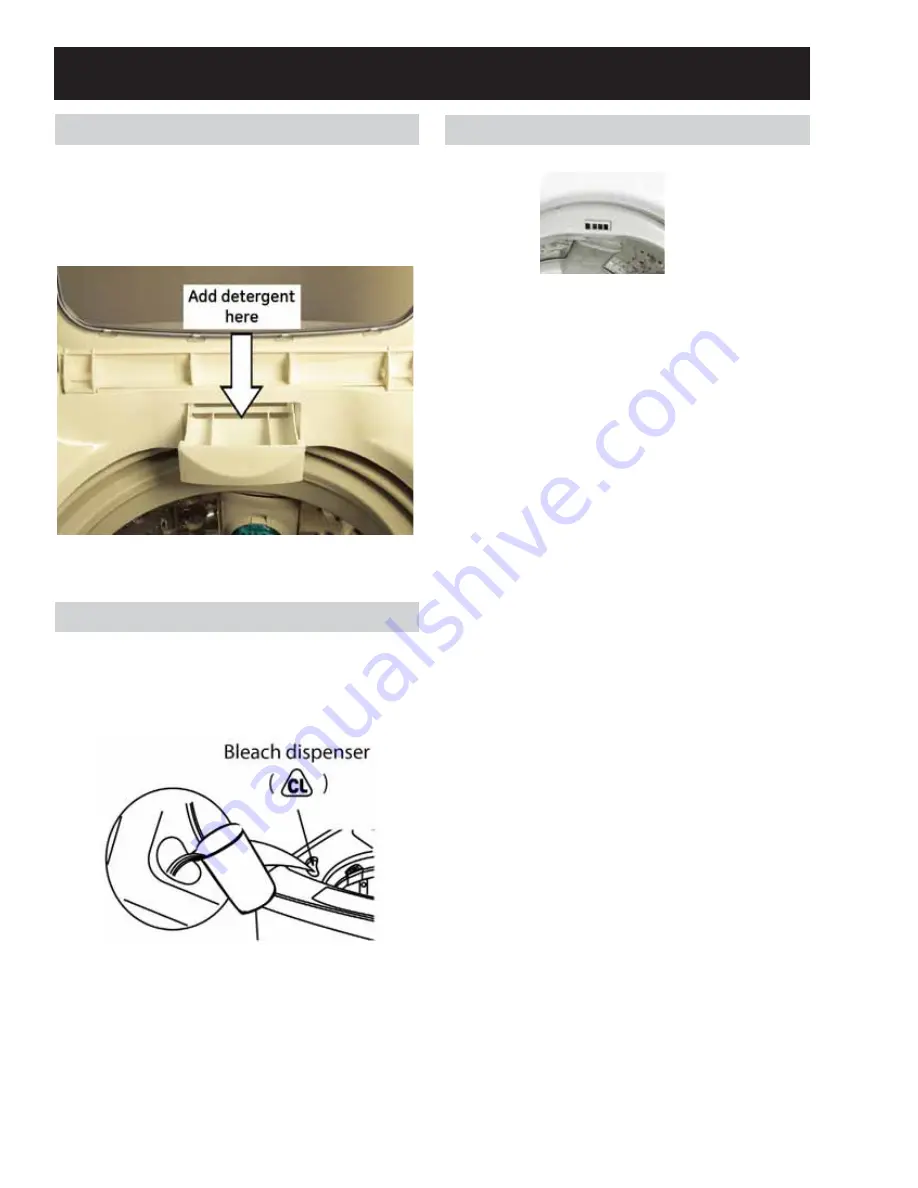
Detergent Dispenser

Open the Detergent Dispenser and deposit the 
appropriate amount of detergent. Some detergents 
MUST be fully dissolved before adding to the  
machine to get the best wash results. Check the 
instructions on the detergent package. 

Bleach Dispenser

Before starting the washer, pour measured amount 
of bleach directly into bleach dispenser. Avoid 

VSODVKLQJRURYHU¿OOLQJ3RZGHUHGEOHDFKPXVWEH

mixed with water before pouring. 

Fabric Softener Dispenser

The fabric softener dispenser is built into the top 

of the basket.  Dilute fabric softener with water. 
Undiluted fabric softener may result in spots that 
look like oil stains. Fabric softener automatically 
dispenses for the rinse cycle. If extra rinse is 
selected, the softener must be added manually.

Содержание WSLP1500H0WW

Страница 1: ...ances General Electric Company Louisville Kentucky 40225 31 9240 GE Compact Washer Technical Service Guide March 2015 GE Appliances WSLP1500H0WW WSLS1500H0WW WSLP1500H1WW WSLS1500H1WW WSLP1500H2WW WSLS1500H2WW ...

Страница 2: ...NG To avoid personal injury disconnect power before servicing this product If electrical power is required for diagnosis or test purposes disconnect the power immediately after performing the necessary checks RECONNECT ALL GROUNDING DEVICES If grounding wires screws straps clips nuts or washers used to complete a path to ground are removed for service they must be returned to their original positi...

Страница 3: ...ation 11 Redistribution Attempt 12 Drain and Spin Operation 12 Program Time Chart 13 Dispensers 14 Detergent Dispenser 14 Bleach Dispenser 14 Fabric Softener Dispenser 14 Special Features 15 Easy to Clean Lint Filter 15 Non Powered Water Recirculation 15 Component Locator Views 16 Control Board and Wire Connection Locator 18 UI Board 18 Diagnostics 19 Service Mode 19 Fault Codes 20 Cabinet and Str...

Страница 4: ...ror Codes 26 Water Levels Hz to Inches 27 Top Cover 28 Lid Switch 29 Cabinet and Structure 30 Pulsator 30 Wash Basket 31 Drain Pump Cleanout 32 Belt Protector 33 Drive Pulleys 33 Drive Motor and Belt 34 Shaft Assembly Brake Overview 35 Drain Mode Shifter Operation 35 Brake Adjustment 36 Shaft Assembly 37 Capacitor 37 Outer Tub Suspension Assembly 38 Wire Harness 39 Cabinet Handle 41 Base Assembly ...

Страница 5: ...oes for all repairs Steel Toed Work Boot Electrically Rated Glove and Dyneema Cut Resistant Glove Keeper Dyneema Cut Resistant Glove Plano Type Safety Glasses Prescription Safety Glasses Safety Glasses must be ANSI Z87 1 2003 compliant Brazing Glasses Cut Resistant Sleeve s Step 1 Plan and Prepare Step 4 Apply LOTO device and lock Step 2 Shut down the appliance Step 5 Control discharge stored ener...

Страница 6: ... light to heavy soil regular whites and colors casual and delicate fabrics Three wash rinse temperatures Water levels can be adjusted manually to reduce water use per cycle My Cycle saves a favorite cycle for future use Dispensers adds diluted detergent and fabric softener at the correct time during the wash or rinse cycles Built in status indicators display fault codes The wash tub is constructed...

Страница 7: ... S SEP T OCT V NOV Z DEC 2024 Z 2023 V 2022 T 2021 S 2020 R 2019 M 2018 L 2017 H 2016 G 2015 F 2014 D 2013 A Mini Manual Location Model Serial ID Tag Brand W GE Washer W S L P 1 5 0 0 H 0 W W Capacity Configuration L Large Feature Package S Unitized Compact Control Platform S Stationary P Portable Speed Engineering Digit Engineering Revision US Voltage Series Color WW White The Model Serial ID Tag...

Страница 8: ...ohms Water Valve Coils 120 VAC Approximately 1178 ohms DC VOLTAGE Pressure sensor 5 VDC Approximately 22 ohms FOR ELECTORSTATICS Be sure to make an earth ground connection before replacing any electronic components to prevent electrostatic damage to them This is done by touching a good earth ground on the appliance being repaired Tools Needed Adjustable Pliers Pliers 3 Phillips screwdriver 2 Phill...

Страница 9: ... area equally distributed Plumbing Water pressure must be 10 psi minimum to 150 psi maximum dynamic pressure measured at faucet Water temperature on household water heater should be set to deliver water at 120 F to 150 F 50 C to 66 C in the washer when HOT wash is selected 6KXW RȺ YDOYHV VKRXOG EH VXSSOLHG IRU ERWK KRW and cold water lines Drain water into a standpipe or laundry tub The discharge ...

Страница 10: ... be grounded for safe operation If the spin basket is not in the center or unleveled level the washer by turning the adjustable legs to set the washer horizontal Limited to only the stationary model Portable model is not applicable Leveling the Washer Excessive vibration will occur if the washer is not leveled This will also trip the unbalance switch and stop the washer Check to ensure the washer ...

Страница 11: ...ad sizes as listed above It will only have a DEEP FILL RSWLRQ I VHOHFWHG WXE ZLOO OO WR 5 ZDWHU level for all cycles 4 Delay Wash The delay wash time increases 1 hour per button press 5 Process Use to select Soak Wash Rinse and Spin functions as desired Pressing the Process button with the Load Size button will mute the end of cycle signal 6 Cycles 8VH IRU VHOHFWLQJ ZDVK SURJUDP 7KLV EXWWRQ DOORZV...

Страница 12: ...uds lock Redistribution Attempt The washer will attempt to redistribute an out of EDODQFH ORDG RQFH SHU F FOH LQ WKH QDO VSLQ XS The redistribution attempt consists of the following sequence The washer will try to reach the target spin speed one time If the washer cannot get to the target spin speed it will stop reset the cycle time to 21 PLQXWHV WKHQ OO ZLWK ZDWHU DSSURSULDWH IRU WKH selected cyc...

Страница 13: ...Time Chart WASH OPTION Swimwear Use this program to reduce moisture in the machine and on the laundry Extra Rinse A second deep rinse will be added Except for speed wash Gentle Spin High speed spin is not operated ...

Страница 14: ...arting the washer pour measured amount of bleach directly into bleach dispenser Avoid VSODVKLQJ RU RYHU OOLQJ 3RZGHUHG EOHDFK PXVW EH mixed with water before pouring Fabric Softener Dispenser The fabric softener dispenser is built into the top of the basket Dilute fabric softener with water Undiluted fabric softener may result in spots that look like oil stains Fabric softener automatically dispen...

Страница 15: ... 15 Special Features Easy to Clean Lint Filter Non Powered Water Recirculation ...

Страница 16: ... 16 Component Locator Views Under Rear Component Cover ...

Страница 17: ... 17 Rear Bottom Component Locator Views continued ...

Страница 18: ...iew see the Operating Controls section for button operation description On H1 models the 6 LED s for load sizes are removed Component Locator Views continued Control Board and Wire Connection Locator UI Board H1 Model ...

Страница 19: ... right conditions exist Use the code only as a reference and always check the component before replacing Test Item Checked Displayed Initial state upon entering Service mode All LED s on Water level frequency checked with no water in the tub 88 will be displayed quickly Then the version number 07 for HO 10 for H1 11 for H2 Then 63 68 for the water level Press Start 1 time Laundry amount detection ...

Страница 20: ...und Pressure sensor bad Level washer per installation instructions XVWRPHU GXFDWLRQ 6HSDUDWH GLȺHUHQW materials Manually redistribute materials KHFN EDODQFH ULQJ IRU ÀXLG LI QRQH replace Replace pressure sensor Water level too high Leaking water valve Pressure sensor frequency out of range Hole in pressure sensor hose or disconnected Harness connecter not connected or damaged Replace water valve R...

Страница 21: ...cessary to remove the two screw covers to access the screws 1 Open the lid 2 Q WKH QRWFK SURYLGHG LQVHUW D VPDOO ÀDW EODGH screwdriver then pry and lift the two screw covers one on each side from the top of the control panel Cabinet and Structure 3 Remove the two screws that secure the control panel to the top cover 4 Slide the control panel left to disengage the ten tabs located inside the contro...

Страница 22: ...engage it from the three rear mounting tabs 4 Place the control panel and towel aside Rear Component Cover Removal Removal of the rear component cover provides access to the power cord connections water valve pressure sensor dispenser box and lid springs The rear component cover is held to the rear of the top cover with two Phillips head screws on the rear of the washer and seven snap tabs located...

Страница 23: ... Component Cover Removal for instructions NOTE The water valve is attached to the dispenser box and will need to be removed together 2 Remove the detergent dispenser drawer from the box Slide the drawer all the way out and lift it slightly to remove 3 Disconnect the harness connecters from the water valve 4 Remove the Philips head screw that secures the water valve and dispenser box to the top cov...

Страница 24: ...er valve screens to make sure they are not clogged If water is still not coming out of the valve put the control into Service mode and apply voltage to the water valve coil that is not working Check for 120 VAC at the board or the valves Check from the common Neutral blue wire to the orange wire for the HOT water coil And from the blue Neutral wire to the gray wire for the COLD water coil The resi...

Страница 25: ...ranslated into an electrical signal frequency by the pressure sensor The frequency will vary from approximately 27 kHz empty tub to 22 kHz full tub This frequency can be measured with a Hz meter at the sensor between the orange and violet wires The frequency is monitored by the PCB which turns RȺ WKH ZDWHU YDOYHV ZKHQ WKH GHVLUHG ZDWHU OHYHO LV achieved NOTE The water level in the NORMAL CYCLE wil...

Страница 26: ... the frequency is at 15 kHz at the beginning of a cycle It will cancel the cycle The pressure sensor is out of range or disconnected OE error will be displayed when the control does not sense water level drop in 60 minutes FE Error will be displayed when the water level is sensed by the control to be too high from the pressure sensor frequency after 3 consecutive times that the pump runs This will...

Страница 27: ... 27 Water Levels Hz to Inches Water Level Frequency Hz Approx Depth in basket Empty 26 3 and up 0 Small 25 2 4 in Medium 24 9 4 75 in Large 23 4 9 in Ex Large 22 1 13 in ...

Страница 28: ...anel machine control and UI boards rear component cover water valve dispenser assembly and pressure sensor NOTE The screws that secure the front control panel and the rear component cover are the only screws that secure the top cover to the cabinet 2 Disconnect and remove the power cord from the underside of the top cover This is accomplished by disconnecting the black and white connecters under t...

Страница 29: ...re up through the top cover 6 Raise the top cover up to disengage the main harness from the harness clip on the underside of the top cover 7 The main harness and the pressure tube need to be pushed down through the top cover 8 LIW WKH WRS FRYHU RȺ WKH FDELQHW Lid Switch The lid switch is located on the machine control If the switch malfunctions the machine control will need to be replaced The magn...

Страница 30: ...W EODGH VFUHZGULYHU 2 Remove the 3 Philips head screw that secures the pulsator to the shaft of the transmission NOTE Always replace the pulsator screw once it has been removed The torque yields of the threads are compromised and will not meet torque VSHFL FDWLRQV 3 LIW WKH SXOVDWRU DQG FRXSOHU RȺ WKH VSOLQHV RI the shaft assembly The coupler is not a separate part It comes with the Pulsator Pulsa...

Страница 31: ...or 2 Remove the hub nut 1 7 16 standard thread NOTE When removing the hub nut there is a VTXDUH ÀDW ZDVKHU WKDW JRHV RYHU WKH VSOLQHV RQ WKH transmission shaft under the pulsator This is what the pulsator coupler rides on 3 2QFH WKH KXE QXW LV WDNHQ RȺ WKH FRQFDYH KXE nut washer can be removed 4 Remove the four 2 Philips head screws that VHFXUH WKH WXE FRYHU WR WKH WXE DQG OLIW LW RȺ RI the tub 5 ...

Страница 32: ...the cabinet 3 Disconnect the wire connectors and the drain inlet hose from the pump NOTE 7KH GUDLQ KRVHV PD EH GLȻFXOW WR UHPRYH due to sealing compound used during assembly Squeeze and slide the clamp back Carefully use a VPDOO ÀDW EODGH VFUHZGULYHU WR EUHDN WKH VHDO 4 The hose is held on the pump by a squeeze clamp NOTE Be sure to have something to catch excess water left in the tub when disconn...

Страница 33: ...RRU SODFH D WRZHO RU EODQNHW RQ WKH ÀRRU 1 Remove the four 10 mm bolts two on each side of the protector that attaches it to the platform 2 Remove the protector Drive Pulleys The belt is driven by the motor pulley which turns the shaft assembly pulley to agitate the pulsator or spin the basket assembly Shaft Assembly Pulley Removal 1 Remove the belt protector 2 Remove the 14 mm nut securing the pu...

Страница 34: ...depending if the cycle is in spin or agitate mode Its power is supplied from the control board goes to the start capacitor then to the motor This turns the belt attached to the motor and transmission pulleys Drive Motor Removal 1 Remove the belt protector 2 Loosen the two 13 mm bolts that attach the motor to the platform and then slide the motor toward the shaft assembly 3 5RWDWH WKH EHOW RȺ WKH P...

Страница 35: ...asket to move freely and independently from the pulsator During spin the linkage and brake lever are pulled toward the motor approximately the complete length of the linkage This will release the brake allowing the basket and pulsator to move freely together When in spin the basket will rotate clockwise If the lid is lifted or if the washer is powered down power to the drain mode shift motor will ...

Страница 36: ... the tub drain tube Brake Adjustment Brake Lever Adjustment If the basket does not stop spinning when the lid is opened or if the brake and or clutch lever or adjustment screw have been replaced follow the brake adjustment instructions below 1 Loosen the adjustment screw lock nut Turn the adjustment screw to a space between the tip of the screw and the brake lever of 5 64th of an inch 2 Keep the c...

Страница 37: ...sket belt protector and belt NOTE If the outer tub is not removed as an assembly to access the shaft assembly the washer can be carefully placed on its front or side To prevent scratches to the surface of the washer SODFH D WRZHO RU EODQNHW RQ WKH ÀRRU 2 5HPRYH WKH IRXU PP EROWV ÀDW ZDVKHUV DQG lock washers 3 LIW WKH VKDIW DVVHPEO RȺ WKH SODWIRUP NOTE The tub seal comes with and is pressed onto th...

Страница 38: ...d remove the two Phillip s head screws that secure it to the cabinet 3 Lower the rod inside the cabinet to disengage it from the bottom of the tub NOTE There is a tacky grease on the ball socket and lower suspension spring cover The rods with the blue tops are to be installed on the right side when looking at the washer from the front Tub Removal 1 Remove the top cover and components attached to i...

Страница 39: ...ol board and rear component cover 2 Raise the top and pull the harness through the front opening removing it from the harness support clips on the underside of the top cover 3 After disconnecting the components at the rear of the washer pull the harness through both openings at the rear of the top cover 4 Remove the back panel Unclip the harness from the cabinet ...

Страница 40: ... be sure to check the component or cabinet that the ground wire is connected to to the power cord ground plug 3 Release the two red harness wire ties from the cabinet 4 Disconnect the harness connector from the pump drive motor mode shifter and capacitor NOTE The harness routes under the mode shift motor and it will need to be removed to replace the harness 5 Remove the harness from the bottom of ...

Страница 41: ...e cabinet Shown from inside Base Assembly The base assembly is designed to carry the weight of not only the washer but the weight of the water and the load in it Depending on if the washer is a stationary or portable is whether or not it will have leveling feet or wheels Wheel Replacement 1 Carefully lay the washer on its side 2 8VLQJ D ÀDW EODGH VFUHZGULYHU VOLGH LW XQGHU WKH wheel and pry up pop...

Страница 42: ...d before the base assembly Removing the base access panel will give better access to the pump assembly 2 Remove the ten Philips head screws three on the front three on the back two on the right and two on the left and lift the base away from the cabinet ...

Страница 43: ... 43 Wiring Diagram ...

Страница 44: ...6RPH VWDWHV GR QRW DOORZ WKH H FOXVLRQ RU OLPLWDWLRQ RI LQFLGHQWDO RU FRQVHTXHQWLDO GDPDJHV 7KLV ZDUUDQW JLYHV RX VSHFLILF OHJDO ULJKWV DQG RX PD DOVR KDYH RWKHU ULJKWV ZKLFK YDU IURP VWDWH WR VWDWH 7R NQRZ ZKDW RXU OHJDO ULJKWV DUH FRQVXOW RXU ORFDO RU VWDWH FRQVXPHU DIIDLUV RIILFH RU RXU VWDWH V WWRUQH HQHUDO DUUDQWRU HQHUDO OHFWULF RPSDQ RXLVYLOOH 6WDSOH RXU UHFHLSW KHUH 3URRI RI WKH RULJLQDO S...

Отзывы: