background image


17 


JB83797AU


Flexi-Slice tools 


Lock Slices 

Allows you to rotate the slices whilst maintain a 90 degree angle between them 


Rotate 4d 

Rotates the 4D image and the active slice while other slices remain unchanged 


Rotate All 

Rotates the 4D image, the active slice and the lines. 

 
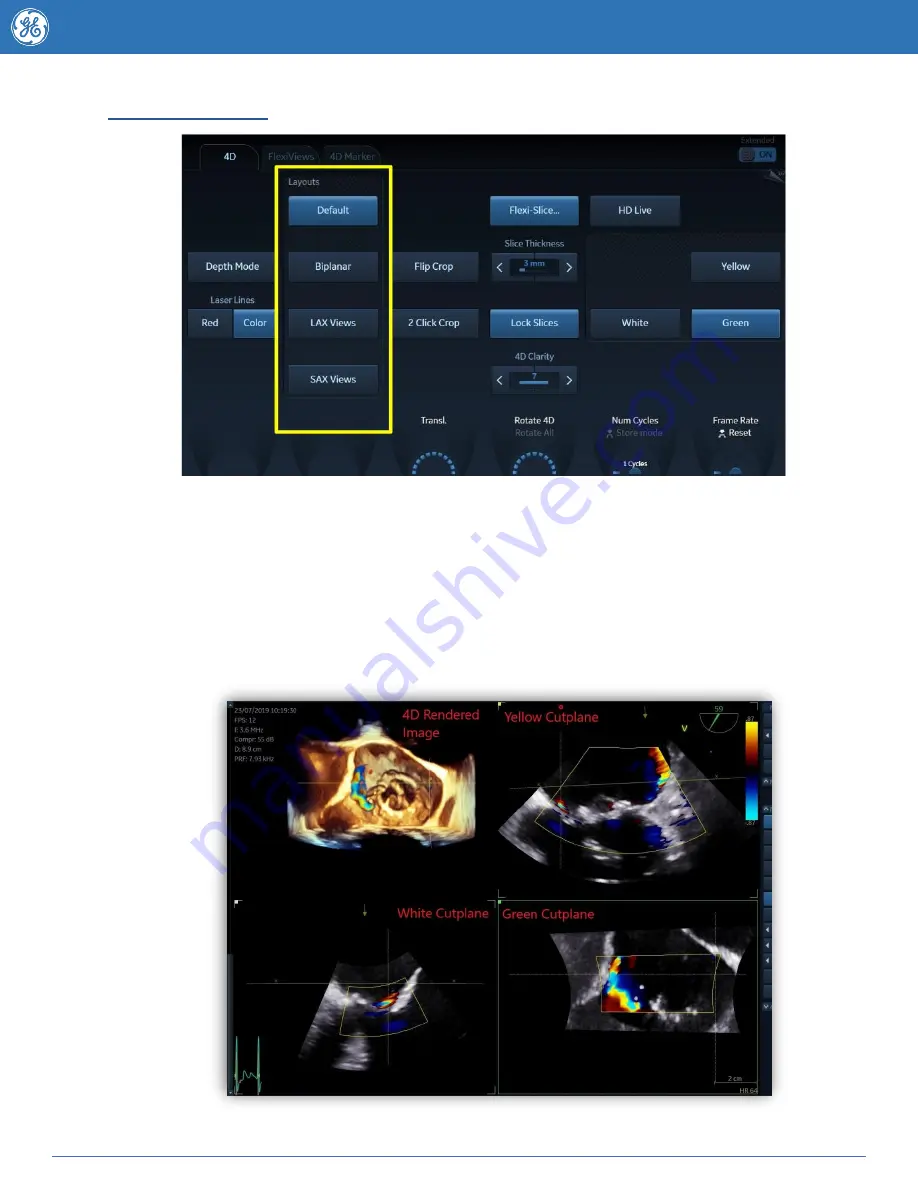
In Flexi-Slice mode each cut-plane may be rotated or translated using the Trackball.  
Press Yellow, White or Green on the Touch panel to select which 2d slice will be the Reference 
plane for the 4D image. The volume rendering is updated accordingly. The example below shows 
the Green Cutplane highlighted as the reference plane. 


Содержание Vivid E95

Страница 1: ...4D TOE Tips Tricks Kylie Hollitt CVUS Applications Specialist GE healthcare Australia ...

Страница 2: ...Acquiring 4D Workflows Acquiring Larger 4D volumes 11 13 Acquiring 4D Workflows 4D Flexi Zoom 14 Acquiring 4D Workflows FlexiViews 15 4D Tools Live and Post Processing 2 Click Crop 16 18 4D Tools Live and Post Processing Flexi Slice 19 4D Colour Obtaining 4D Colour images Optimisation Tips 20 4D Optimisation Controls Knobology Appendix Quantification Tools For more tips webinars and resources visi...

Страница 3: ...has been activated If your system is setup to provide a preview loop prior to store your cardiologist may wish for this feature to be turned off for the Transosephageal Echocardiogram To access this you will want to go to the Utility button on your touchscreen if it s not a shortcut press on MORE and into the Configuration menu The Global Imaging screen should come up automatically if not go to th...

Страница 4: ...g the TOE probe The TOE probe should be processed immediately do not allow body fluids to dry on the probe Products that are approved for use on GE TOE probes are listed on the following website link Using non approved products may void your probe warranty http www3 gehealthcare com en Products Categories Ultrasound Ultrasound_Probes Approved products should be used according to manufacturers guid...

Страница 5: ...ion of the TOE probe this image is highlighted by a yellow box The current angle of Scan Plane 1 is represented by a yellow line on the on screen navigator 3 Adjustments to the Rotate knob will adjust the angle of this view Scan Plane 2 defaults at an angle that is 90 degrees to Scan Plane 1 This image can be independently tilted and rotated If selected this image is bordered by a white box Scan P...

Страница 6: ... to a non tilted position Note Tilt and rotate can only occur in biplane mode Note example below Scan Plane 1 is at 56 degrees yellow and Scan Plane 2 has defaulted to 146 degrees white the operator has tilted the second scan plane to 12 degrees to better view a catheter as it is placed through a perivalvular leak To rotate Scan Plane 2 further use the Angle 1 toggle Moving Scan Plane 1 is achieve...

Страница 7: ...Bi Plane Select V Planes and the scan plane 2 will automatically rotate so that it is the same angle as scan plane 1 Ensure that Pos is highlighted as the current trackball function Scan plane 2 can now be tilted using the trackball up and down To reset the V Planes press the Clear button on the console Note the navigator angle on this image both scan plane angles have defaulted to zero however sc...

Страница 8: ...l three views In Tri Plane the third scan plane A2 or Angle 2 is represented by a green line to change the angle of the third image press the Angle 1 rotary knob so that Angle 2 is highlighted turning this knob will rotate the third image individually Want to learn more go to www vividechoclub net for online tutorials webinars and product information ...

Страница 9: ...proving the Penetration for your larger volume To acquire a 4D dataset of the valves left atrial appendage or IAS consider using Flexi Views or 4D Flexi Zoom see relevant sections below for more information Once you are in your 4d screen you can make further adjustments to the size using the Volume size shape toggle Frame Rate and Multi Beat options are also available on this touch screen Note adj...

Страница 10: ... use the trackball Set button to switch between position and size adjustment When you are ready to view your 4D image press the 4D Button on the console note pressing 4D Zoom turns off the 4D zoom feature to be taken to the 4D rendered image The default 4D rendered image displayed will be dependant on the saved default position of your Translate line Move the Translate line position by adjusting t...

Страница 11: ...n the 4D zoom section When you are happy with your ROI instead of pressing 4D press any of the quick access buttons as highlighted by the red box above Examples for each button follow below Acquiring 4D Surgeons View of the Mitral Valve Using 4D Flexi Zoom When you have optimized your ROI boxes press the Mitral Valve button on the touchscreen and you will be taken through to the surgeons view of t...

Страница 12: ... be moved using the translate knob at the bottom of the touchscreen to optimize the image move it closer to the region of interest you can also use 2 Click Crop to crop the image down in a parallel fashion Remember a darker 2d image may produce a nicer 4D image if it s difficult to see the structures due to blurring try turning down the large 2D gain knob Adjust Zoom region of interest The trackba...

Страница 13: ...quire a long axis you can change to a short axis live or post acquisition by using the Angle button Adding more definition to that AV 4D dataset The first thing to consider with your aortic valve dataset is your gains A darker 2D Gain will produce a clearer 4D dataset When in 4D your Active Gain knob becomes 4D gain To add more 4D definition to your structure turn the Active Gain knob down a notch...

Страница 14: ...subtab on the touchscreen Available views are specific for each probe preset press Configure on your Flexi Views touchscreen to be taken directly to the configuration screen seen below Want to learn more go to www vividechoclub net for online tutorials webinars and product information Clinical Suggestion Create save new Flexi Views mid procedure to enable fast one touch return to optimized views ...

Страница 15: ... second point is finalized the angle of the cropping direction can be moved by moving the trackball Your selected crop will appear as the rendered 4D image to the right To crop further simply begin again on the desired image To exit select 2 Click Crop again on the touch screen If you wish to change the viewing direction simply press flip crop on the touch screen The translate line may also be mov...

Страница 16: ...D image In the view above the Green Cut Plane is highlighted displaying a short axis of the Yellow Azimuth and White Elevation cut planes as the 4D rendered view Biplanar Displays the Yellow Azimuth plane and White Elevation plane as well as the rendered 4D image LAX Displays the White and Yellow cutplanes in large view with short axis orientation lines for adjustment The two selected correspondin...

Страница 17: ...in unchanged Rotate All Rotates the 4D image the active slice and the lines In Flexi Slice mode each cut plane may be rotated or translated using the Trackball Press Yellow White or Green on the Touch panel to select which 2d slice will be the Reference plane for the 4D image The volume rendering is updated accordingly The example below shows the Green Cutplane highlighted as the reference plane ...

Страница 18: ... the intersection of the two other cut planes to that location If Depth Mode is turned on the reference plane is also moved inside the volume rendering to the corresponding selected depth In Depth Mode is turned off the reference plane is kept at the current depth 5 Place the cursor at the outer area of one of the cut planes The cursor is changed to Drag to rotate the cut plane image The cut plane...

Страница 19: ...he view direction onto the volume relative to the azimuth plane 3 2D Colour Flow image in the elevation plane the yellow arrow indicates the viewing direction relative to the elevation plane 4 Orientation window displays 3D scene with acquisition sector and 2D image positions 5 Translate line To optimize your viewing of regurgitant jets use the Translate knob to move the viewing plane line down to...

Страница 20: ...e system adjusting means a trade of between spatial and temporal resolution Use to avoid multibeat to get FR 13 for LVQ trade off with image resolution AN with caution Gamma Adjusts the brightness of midtone values A higher gamma value produces an overall darker image a lower gamma value a brighter image AN HD live Simulates light propagation and scattering through tissue Use for rendered images w...

Отзывы: