background image

27

Recording a Program 

Recording While You’re Away (Timer Recording)

The timer program feature lets you program the VCR to record up to eight different
programs within a one year period.  Before setting the timer, make sure that:

¥ The clock is set correctly.
¥ A tape with safety tab has been inserted with enough tape to record the programs.
¥ The remote is set to control the VCR Ñ using 

VCR1 (VCR2•LD)

.

¥ If you receive all channels through a cable box (or satellite receiver), select a cable box

or satellite receiver channel 

on the next page

.

Setting a Timer Recording

1.

Press 

MENU•PROG

on remote to display 

VCR MAIN MENU

.

2.

Press 

1

to display 

TIMER RECORDINGS

menu.

3.

Press 

1

to display 

Create a New Program

menu.

4.

Press

1

,

2

,

3

, or

to select type of program.

1 One Time 

Ñ single program recorded once.

2 Daily 

Ñ program recorded at same time every day.

3 Weekdays 

Ñ program recorded at same 

time Monday through Friday.

4 Weekly

Ñ program recorded at same time 

once a week.

5.

Press number buttons on the remote to enter the channel
number (or 

INPUT

to select line input), start time including

AM

or 

PM

, end time, and start date of the recording.  Just

follow the on-screen prompts.

Press 

CLEAR 

to correct an entry.

If you receive all channels from a cable box (or satellite
receiver) and have completed 

CABLE BOX SETUP

, the

output channel of your cable box (or satellite receiver) will
automatically appear on the display.

6.

Select recording speed using 

SPEED 

on the remote.  

7.

Press

MENU•PROG

to enter your program.  A reminder

appears which will time out or you can press 

MENU•PROG

to return to the 

VCR MAIN MENU

.

PROGRAMS OVERLAP

may appear on the screen if you

have entered two programs where the times overlap

.

8.

The 

TIMER RECORDINGS

menu appears.  Press 

1

to enter

an additional timer program, or press 

0

to exit.

9.

Turn off the VCR

before recording begins.

TIMER

appears in the VCRÕs display panel when the timer

has been programmed.

10.

If using a cable box or satellite receiver, leave it turned on
and tuned to the channel you want to record.

Stopping a Recording in Progress

With the VCR:

Press 

POWER 

and then 

STOP 

within a few

seconds.  

With the Remote:

Press 

VCR1 (VCR2•LD)

and then 

STOP

within a few seconds.  

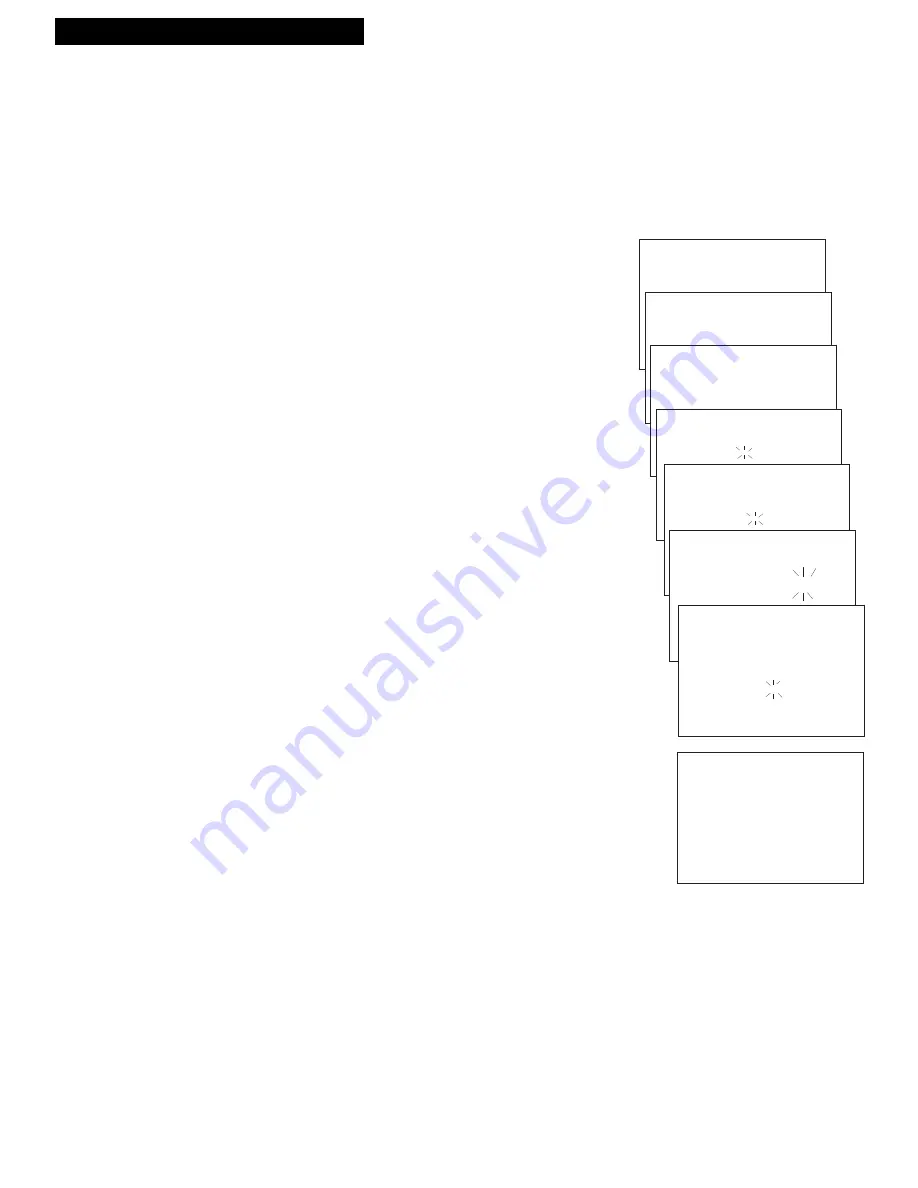
VCR MAIN MENU

1 Timer Recordings

TIMER RECORDINGS

1 Create a New Program

Program 1 
has been saved.

How often should this
program record?

1 One Time

Program 1 (One Time)

Channel    --  

Program 1 (One Time)

Channel    08  
Start Time --:-- 

Program 1 (One Time)

Channel    08  
Start Time 02:10 AM 1=AM
End Time   --:--    2=PM

Program 1 (One Time)

Channel    08  
Start Time 02:10 PM
End Time   03:35 PM
Start Date 11/18/95 Sat
Tape Speed SLP

Press CLEAR to correct
Press MENU to save

Содержание VGM500

Страница 1: ...VGM500 VCR User s Guide We bring good things to life ...

Страница 2: ... your house complies with that indicated on the identification sticker located at the back of your appliance Install the VCR horizontally away from a source of heat fireplace or appliances creating strong magnetic or electric fields engines Follow the drawing below for leaving space around your VCR to insure proper ventilation If your VCR or a cassette has been stored in a very cold atmosphere for...

Страница 3: ...ons_________________________ 38 Cleaning the VCR _____________________ 38 Index _____________________________ 39 41 1 Introduction Table of Contents Important Information Warnings______________________________ i Cautions ______________________________ i Hooking Up the VCR Choosing a Hookup ____________________ 2 Antenna or Cable System Without a Cable Box _________________________ 3 Cable System W...

Страница 4: ...he hookup for your VCR 1 How do you receive your TV signals Choose one answer from below A Outside antenna Ð Turn to page 3 B Rabbit ears set top and or bow tie antenna Ð Turn to page 3 C Cable System Ð Go to question 2 2 What type of Cable TV system do you have Choose one answer from below A Cable without a box Ð Turn to page 3 B Cable box to unscramble all the channels Ð Turn to page 4 C Cable b...

Страница 5: ...dvanced hookup Use this hookup for slightly improved picture quality hi fi stereo playback and more convenient operation Ñ use of TV VCR button not required 1 Connect as shown This connection requires additional accessories not provided If your TV is not stereo connect its audio jack to the VCRÕs AUDIO L MONO jack to hear sound from both channels 2 Plug in power cords of VCR and TV 3 Tune the TV t...

Страница 6: ...which requires fewer accessories 1 Connect as shown This connection may require additional accessories not provided 2 Plug in power cords of VCR TV and cable box 3 Tune the TV to channel 3 to view the VCR B Advanced hookup Use this hookup for slightly improved picture quality hi fi stereo playback and more convenient operation Ñ use of TV VCR button not required 1 Connect as shown This connection ...

Страница 7: ...es additional accessories not provided If your TV is not stereo connect its audio jack to the VCRÕs AUDIO L MONO jack to hear sound from both channels 2 Plug in power cords of VCR TV and cable box 3 Tune the TV to its video input to watch the VCR All pay channels are viewed through the VCR Continue to page 7 Continue to page 7 VIDEO IN OUT ANTENNA AUDIO IN OUT RIGHT RIGHT L MONO L MONO OUT IN Cabl...

Страница 8: ...on 2 Set the VCR output channel to either channel 3 or 4 See page 8 for details You will tune the recording VCR to this channel to receive the signal from the playback VCR 3 Connect as shown This connection may require additional accessories not provided 4 Plug in power cords of VCRs and TV 5 Option B hookup Use this hookup for slightly improved copy quality and hi fi stereo recording 1 Select a h...

Страница 9: ... 3 Insert batteries in remote Remote Stock No 221405 SEARCH VOL VOL MUTE PREV CH DISPLAY INPUT 1 4 7 TV VCR 3 6 9 2 5 8 0 CLEAR SPEED REW PLAY FF STOP PAUSE REC M E N U P R O G POWER VCR1 SAT CABLE TV VCR2 LD AUX CHAN CHAN TRACKING 3 4 SLOW J O G SHUT T L E EDIT RF Coaxial Cable Stock No 221407 2 AAA Batteries Startup Power Cord Stock No 221408 2nd 1st ...

Страница 10: ...3 to select either 3 or 4 as the output channel for your VCR This is the channel to which you tune your TV to see the picture from the VCR If you select Output Channel 3 you will view the VCRÕs output on channel 3 of your TV If you select Output Channel 4 you will view the VCRÕs output on channel 4 of your TV If you change the output channel remember to tune your TV to the channel you selected 3 o...

Страница 11: ...s 2 Set Clock 3 Channels 4 Preferences PREFERENCES 1 Remote Control VCR1 2 Front Panel AUTO 3 Output Channel 3 4 Video System AUTO 5 Play NTSC as NTSC 0 Exit VCR MAIN MENU 1 Timer Recordings 2 Set Clock 3 Channels 4 Preferences 5 Language LANGUAGE Select a language 1 English 2 Spanish 3 Portuguese Press MENU to continue 8 Select the language Escoge una lengua Selecione o idioma This feature lets y...

Страница 12: ...al Check the connections C Press 3 to select CHANNELS D Press 1 to begin Auto Channel Search Wait until the channel numbers stop changing The TV will then tune to the lowest channel found Press CHANNEL up or down to select the active channels The VCR automatically selects ANTENNA or CABLE for the Signal Type feature in the CHANNELS menu If you need to change the setting manually press 3 10 Add or ...

Страница 13: ...e TV VCR button Skip this step if you used one of the advanced hookups When using one of the basic hookups the TV VCR button lets you switch between the picture coming from the VCR or the picture from the TV channel This button lets you record a program on the VCR while watching another channel on the TV Details are on page 26 The VCR will automatically switch the TV VCR setting to VCR every time ...

Страница 14: ...elects next higher or lower channel in the VCRÕs channel memory CLEAR Resets time counter to 0 00 00 Allows you to change entries when setting the clock or VCR for a timer recording DISPLAY Shows VCR operating displays on the TV screen Displays the time counter EDIT Signals two properly connected compatible VCRs to begin copying a tape See page 32 FF Fast Forward Fast forwards the tape when the VC...

Страница 15: ...hannels Select one channel and then use the number buttons to select another Press PREV CH to switch between the two channels REC Starts VCR recording Used for one touch recording See page 29 REW Rewind Rewinds the tape when the VCR is stopped Searches the picture in reverse motion during playback SEARCH Displays INDEX and ZERO SEARCH menus on TV Press to advance the tape 60 or 120 seconds during ...

Страница 16: ...whichever position you select in the menu 1 Press MENU PROG to display the VCR MAIN MENU 2 Press 4 to display PREFERENCES 3 Press 1 to activate the Remote Control feature 4 Press VCR1 or VCR2 LD to change the setting and program this VCR to respond to the VCR1 or VCR2 LD button Ñ whichever you select Important Reminder Remember you must press VCR1 or VCR2 LD on the remote Ñ whichever you selected ...

Страница 17: ...hich ones operate your TV 1 Point the remote at the TV and press TV 2 If TV does not turn on in step 1 press TV and then POWER 3 Use the ÒTV Function ButtonsÓ as described on page 13 Remote Brand Button Akai 03 AOC 06 Candle 06 Citizen 06 Colortyme 06 Concerto 06 Curtis Mathes 01 06 Daewoo 06 Daytron 06 Electrohome 06 Emerson 06 Envision 05 06 Fisher 05 08 GE 00 01 06 11 Goldstar 06 Hallmark 06 Hi...

Страница 18: ...eiver 1 Point the remote at the cable box or satellite receiver and press SAT CABLE 2 If the cable box does not turn on in step 1 press SAT CABLE and then POWER If the GE or RCA digital satellite system receiver does not turn on in step 1 reprogram the remote using 00 3 Use the ÒCable Box or Digital Satellite System Receiver Function ButtonsÓ for the cable box and test the ÒTV Function ButtonsÓ to...

Страница 19: ... the component 2 Point the VCRÕs remote at the component 3 Hold the AUX button and press two number buttons to enter the code for your component 4 Release the buttons 5 Press POWER on the remote If the component turns off setup is complete Operate the Auxiliary Component After you have set up your remote to control your component test the buttons to see which ones operate the component 1 Point the...

Страница 20: ...e in indicator lights and the VCR indicator lights The tape automatically begins playback if the safety tab on the cassette has been removed 3 Press PLAY if necessary PLAY appears in the VCRÕs display panel 4 Press TRACKING up or down to remove any streaks from the picture if necessary Details are on page 20 5 Press STOP 6 Press REW The VCR will automatically rewind the tape if it reaches the end ...

Страница 21: ...AR or MIX sound Select HI FI to play back sound recorded on the Hi Fi track and for normal use The HIFI indicator is lit in the VCRÕs display panel during Hi Fi playback Select LINEAR to play back the sound recorded on the linear monaural track such as a second audio program SAP Select MIX to play back the sound recorded on both the linear track and the Hi Fi track sound on sound Auto Head Cleaner...

Страница 22: ...e any streaks from the picture 4 Press PLAY to return to playback The VCR will automatically switch from slow motion playback to stop after a few minutes Digital Auto Tracking The VCR has digital auto tracking which adjusts the picture when playing back a tape recorded on another VCR Automatic tracking is turned on whenever a tape is inserted or the VCRÕs power is turned on Manual Tracking Occasio...

Страница 23: ... in the display panel Press and release to search forward slowly The speed is increased with each press of the button As the speed increases the display changes from SLOW to SRCH Pressing the button decreases the speed Press PLAY to return to normal playback and turn off JOG SHUTTLE Press and release to search in reverse slowly The speed is increased with each press of the button As the speed incr...

Страница 24: ...d tape It helps locate the beginning or end of programs you taped The time counter resets to 0 00 00 whenever the tape is ejected from the VCR For example if a 30 minute program was recorded at the beginning of the tape you would 1 Insert the prerecorded tape Press STOP Make sure the tape is rewound 2 Press DISPLAY on the remote twice to display only the time counter on the TV screen 3 Press CLEAR...

Страница 25: ...BLE TV VCR2 LD AUX CHAN CHAN TRACKING 3 4 SLOW J O GSHUT T L E EDIT INDEX SEARCH Enter Index Number 01 Press FWD or REW Press SEARCH to exit 0 30 00 1 Insert the prerecorded tape and press STOP 2 Press SEARCH on the remote to display the INDEX SEARCH menu on the TV screen 3 Press two number buttons to enter the number of index marks you want the VCR to search Press CLEAR on the remote to correct a...

Страница 26: ...REW to return to 0 00 00 The time counter is displayed in the upper right corner of the TV screen during search If the time counter reading has a minus Ð in front of it press FF on the remote or FWD on the VCR to return to a reading of 0 00 00 ZERO SEARCH Current tape counter is 2 17 25 Press REW to go to 0 00 Press SEARCH to exit ZERO SEARCH Current tape counter is 2 17 25 Press FWD to go to 0 00...

Страница 27: ...erecorded rental tapes are recorded in SP Fewer programs can be recorded on the tape Special effects such as pause slow motion picture search and frame advance work well in SP LP Long Play gives twice the recording time of tapes recorded in SP Special effects in playback are not recommended in LP SLP Super Long Play gives three times the recording time of tapes recorded in SP Special effects such ...

Страница 28: ...display panel and on the TV screen 5 Select the channel to be recorded The channel number appears in the VCRÕs display panel and on the TV screen 6 Press REC on the remote or RECORD on the VCR to begin recording REC appears in the VCRÕs display panel while the VCR is recording Watch a TV Channel While VCR is Recording a Different Channel 1 Follow steps 1 through 6 above 2 If using one of the basic...

Страница 29: ... all channels from a cable box or satellite receiver and have completed CABLE BOX SETUP the output channel of your cable box or satellite receiver will automatically appear on the display 6 Select recording speed using SPEED on the remote 7 Press MENU PROG to enter your program A reminder appears which will time out or you can press MENU PROG to return to the VCR MAIN MENU PROGRAMS OVERLAP may app...

Страница 30: ...DINGS menu 3 Press 2 for Review Existing Progs feature The first program in the timer is displayed Check the Programs Press MENU PROG to display information for the next program Clear the Program Press CLEAR when the program appears that you want to delete Timer Recording From the VCR s Line Input The line input refers to the signal coming from the AUDIO and VIDEO IN jacks of the VCR Recording fro...

Страница 31: ...ess increases the time Ñ 30 minutes up to four hours The amount of time the VCR will record and X REC will appear in the VCRÕs display panel You can increase the amount of recording time by pressing REC on the remote or RECORD on the VCR RECORD LENGTH 0 00 CH 04 Press REC to set length One Touch Display on TV Screen Press Recording RECORD Time 0 30 30 Min 1 00 1 Hr 1 30 1 Hr 30 Min 2 00 2 Hrs 3 00...

Страница 32: ...d to record broadcast stereo TV The STEREO indicator lights in the VCRÕs display panel when the station you are tuned to is broadcasting stereo Set to MONO if the stereo signal is weak and the sound is too ÒnoisyÓ Set to SAP to record SAP second audio program instead of the normal audio on both the hi fi and linear tracks The SAP indicator lights in the VCRÕs display panel Set the Tape Playback HI...

Страница 33: ...tape speed indicator appears in the VCRÕs display panel and on the TV screen 3 Make sure the Reception STEREO MONO SAP feature is set to STEREO A Press MENU PROG to display the VCR MAIN MENU on the TV screen B Press 6 to display the AUDIO menu C Press 1 to select Reception STEREO 4 Start audio source playing and press REC on the remote or RECORD on the VCR to begin recording REC appears in the VCR...

Страница 34: ...ording VCR 7 Press PAUSE buttons on both VCRs at the same time to begin copying the tape 8 Edit out segments that you do not want to copy by pressing PAUSE on recording VCR to stop copying the tape Then locate the next segment you want to copy on the playback VCR by using FWD REW and PLAY Press PAUSE on the playback VCR Press PAUSE at the same time on both VCRs to resume copying 9 Press STOP on bo...

Страница 35: ...wing during playback Pauses recording to prevent recording of unwanted scenes PLAY Plays a tape POWER Turns the VCR on or off RECORD Starts VCR recording Used for one touch recording Remote Sensor Receives signals from the remote control Aim the remote at this sensor with no objects between them REW Rewinds the tape when the VCR is stopped Searches the picture in reverse during playback STOP Stops...

Страница 36: ...when it is connected to these jacks VIDEO IN OUT ANTENNA AUDIO IN OUT RIGHT RIGHT L MONO L MONO Display Panel This VCR has a feature that allows you to change the brightness level of the fluorescent display panel 1 Press MENU PROG on the remote to see the VCR MAIN MENU on the TV screen 2 Press 4 to display the PREFERENCES menu 3 Press 2 to select Front Panel AUTO BRIGHT or DIM Select AUTO to keep ...

Страница 37: ...REW Rewind SRCH Forward search SRCH Reverse search SLOW Slow motion STILL Frame advance STILL Play pause STOP VCR stopped TAPE flashes Set for timer Ð no tape TIMER Timer recording set X REC One touch recording in progress STEREO Indicator Lights when the station you are tuned to is broadcasting stereo Tape Speed Indicators SP LP or SLP Press SPEED on the remote to change Time or Time Counter Pres...

Страница 38: ...ies Press TV to set remote to control the corresponding compatible TV See page 15 Reprogram remote for GE TV See page 15 Aim remote at TV with no objects between them Change batteries Press TV to set remote to control a compatible TV See page 15 Aim remote at component with no objects between them Reprogram remote after batteries have been changed Change batteries Check setting of Remote Control V...

Страница 39: ...ty tab broken off Cable box not turned on at time recording was to begin VCR is removing tape from heads This is normal The head cylinder inside the VCR will continue to rotate for a few minutes after you put the VCR in the stop mode Check antenna connections Check Signal Type CABLE ANTENNA feature See page 10 Cable channels over 69 can only be selected if Signal Type CABLE ANTENNA feature is set ...

Страница 40: ...ture Range 22ûF to 149ûF Operating Temperature Range 41ûF to 104ûF Check your cable companyÔs compatibility requirements Cleaning the VCR Use a soft dry and clean cloth or dusting attachment of your vacuum cleaner to dust your VCR Remove dust from the ventilation holes on the top back sides and bottom of the cabinet Plastic surfaces are easily scratched and can be marred by alcohol and various sol...

Страница 41: ... Select 9 Line Input Recording From 28 LINEAR MIX HI FI Tape Playback Feature 19 Accessories Included 7 Add or Remove Channels from Memory 10 ADD REMOVE CHANNEL Menu 10 Antenna Connections 2 3 ANTENNA IN Connector 3 6 34 ANTENNA OUT Connector 3 6 34 Arrow Buttons 12 13 21 Attaching Power Cord 7 AUDIO and VIDEO IN Jacks 6 28 31 33 34 AUDIO and VIDEO OUT Jacks 3 6 34 AUDIO Menu 19 30 31 Audio Only R...

Страница 42: ...nu 11 Set the Time and Date 11 Setting a Timer Recording 27 Location of Controls Remote Control 12 13 VCR Back Panel 34 VCR Display Panel 34 35 VCR Front Panel 33 LP Speed 25 Manual Tracking 20 MENU PROG Button 8 9 10 11 12 14 18 19 27 28 30 31 34 MIX HI FI LINEAR Tape Playback Feature 19 MUTE Button 13 NTSC Video Playback Feature 18 NTSC Video System 9 18 Number Buttons 8 11 12 13 14 17 27 28 On ...

Страница 43: ...dicator 27 35 Timer Recording 27 TIMER RECORDINGS Menu 27 28 TRACKING Buttons 13 18 20 33 Tracking Digital Auto and Manual 20 Trouble Checks 36 37 Turn On TV 8 Turn on VCR 8 TV Button 12 15 TV Control with Remote 15 TV Function Buttons 13 TV Controlling with Remote 12 13 15 TV Turn On 8 TVs Compatible Chart 15 TV VCR Button 11 13 26 33 Types of Recordings 25 VCR Controls 33 35 VCR Function Buttons...

Страница 44: ...n this manual or on the carton This will only add delays in service for your product 10330 North Meridian Street Indianapolis IN 46290 1024 USA 1995 Thomson Consumer Electronics Inc Trademark s Registered Marca s Registrada s Printed in Singapore Part Number 95 VGM500 1 ...

Отзывы: