background image

 
D

IRECTION

 5813707-100, R

EVISION

 2

V

ENUE

™ S

ERVICE

 M

ANUAL

Chapter 7 - Diagnostics/Troubleshooting

 7-9

P R E L I M I N A R Y

Section 7-5

Using a Loaner System during Faulty System Repair

7-5-1

Purpose of this Section

If your system cannot be repaired via the troubleshooting procedures and a GE Repair Depot is 
available in your area, contact your local GE service team for requesting a loaner system. When the 
loaner system arrives, transfer the data between the systems according to the flow described below.

NOTE:

In case of failure to run the below procedure, contact your local GE service representative for further 
support.

7-5-2

Transferring data to the Loaner System

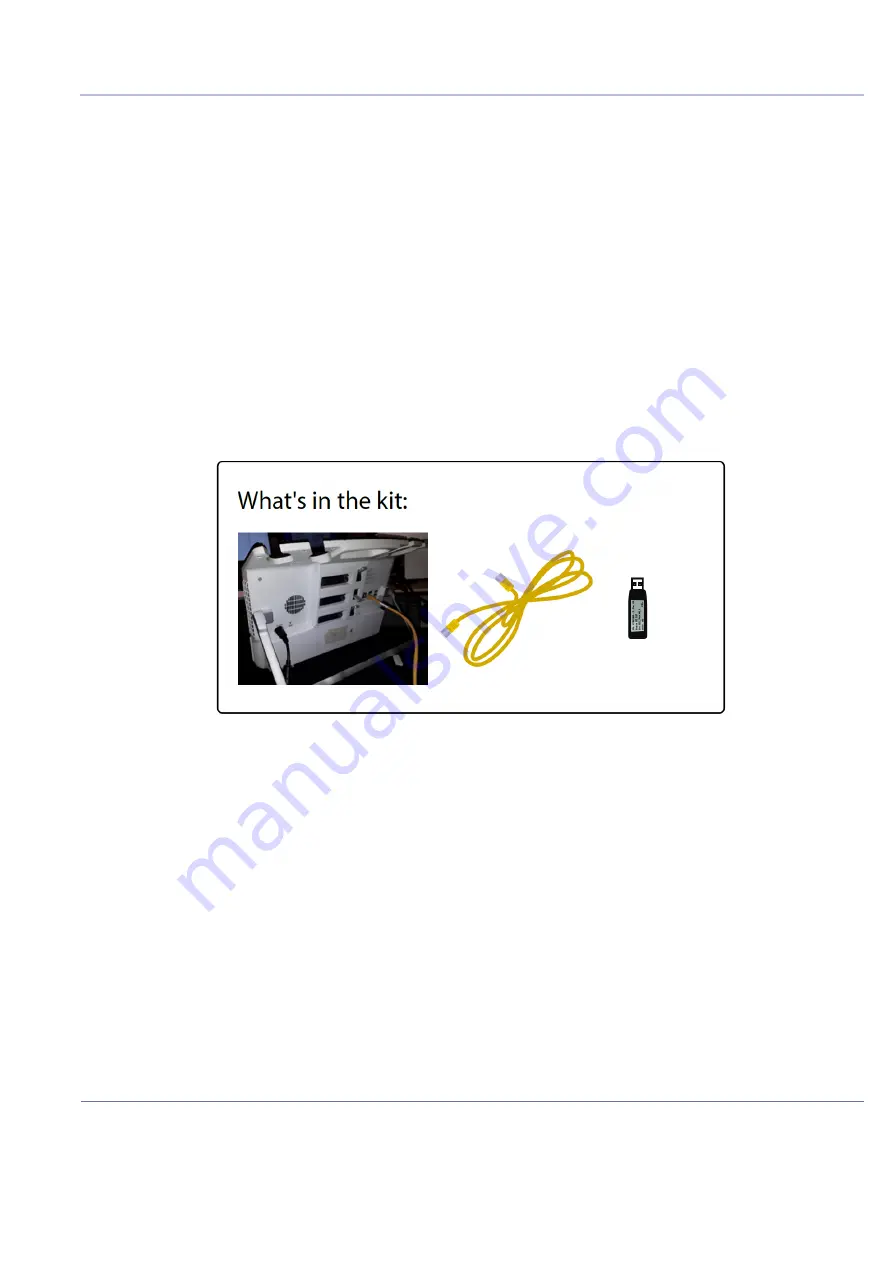
1.) Open the package and verify the contents: 

Software disk-on-key

Network cable

Loaner system

Figure 7-19   Loaner system kit

2.)

On the 

faulty

 system

, perform the following steps:

1.) Shut down the system
2.) Connect the software Disk-On-Key to any of the system’s USB ports.
3.) Turn on the system. 
4.) Select 

Run Loaner Wizard

Содержание Venue Go

Страница 1: ...Operating Documentation 2018 General Electric Company 14 MAR 2019 GEHC_FRNT_CVR FM P R E L I M I N A R Y Venue Go Service Manual Direction Number 5813707 100 Revision 2 Technical Publication...

Страница 2: ...2018 General Electric Company Manufacturer GE Medical Systems Ultrasound Primary Care Diagnostic LLC 9900 Innovation Drive Wauwatosa WI 53226 USA 14 MAR 2019 GEHC_FRNT_CVR FM P R E L I M I N A R Y...

Страница 3: ...1 9 Introduction 1 9 Human Safety 1 9 Mechanical Safety 1 12 Electrical Safety 1 14 Venue Go Battery Safety 1 17 Patient Data Safety 1 17 Dangerous Procedure Warnings 1 18 Lockout Tagout LOTO Require...

Страница 4: ...anpower Requirements 2 6 Facility Needs 2 7 Purchaser Responsibilities 2 7 Required Facility Needs 2 8 Networking Pre Installation Requirements 2 12 Connectivity Installation Worksheet 2 13 Overview 3...

Страница 5: ...verview 3 40 Physical Connection 3 40 Stand alone Venue Go 3 40 Wired Ethernet from Venue Go to a Workstation 3 40 Wireless Connection from Venue Go to a Workstation DICOM Server 3 40 Connectivity Set...

Страница 6: ...4 2 Overview 4 2 Power ON Boot up 4 3 Power Shutdown 4 5 Logging On to the Venue Go as ADM 4 5 Service Key Dongle HASP 4 7 Exit to Windows Desktop from the Venue Go Application Software 4 8 Data Manag...

Страница 7: ...B 5 13 Venue Go Display 5 14 General 5 14 Display Panel and Multi Touch MT 5 14 Speaker 5 17 External Input Output 5 18 System Power Distribution 5 19 Introduction 5 19 System Monitoring 5 20 Power Ma...

Страница 8: ...uction 5 35 iLinq Interactive Platform Features 5 35 Common Service Desktop CSD 5 36 Overview 6 1 Purpose of Chapter 6 6 1 Power Supply Adjustments 6 1 Overview 7 1 Purpose of Chapter 7 1 Service Safe...

Страница 9: ...placement Procedure 8 33 Cart Bin Replacement Procedure 8 36 Mounting Dismounting System on Cart 8 37 Cradle Assembly Replacement Procedure 8 40 Cradle Tilt Replacement Procedure 8 42 Casters Replacem...

Страница 10: ...9 5 System Parts 9 5 Cart Parts 9 8 Probes 9 10 Probes 9 12 Software Media 9 12 System Power Cables 9 13 Peripherals 9 15 Overview 10 1 Periodic Maintenance Inspections 10 1 Purpose of Chapter 10 10...

Страница 11: ...are 10 12 Probe Cleaning 10 13 Returning and Shipping of Defective Probes 10 14 Using a Test Phantom 10 15 Electrical Safety Tests 10 16 Overview 10 16 Safety Test Overview 10 16 Outlet Test Wiring Ar...

Страница 12: ...DIRECTION 5813707 100 REVISION 2 VENUE SERVICE MANUAL 12 Table of Contents P R E L I M I N A R Y This page was intentionally left blank...

Страница 13: ...DIRECTION 5813707 100 REVISION 2 VENUE SERVICE MANUAL Table of Contents 13 P R E L I M I N A R Y...

Страница 14: ...DIRECTION 5813707 100 REVISION 2 VENUE SERVICE MANUAL 14 Table of Contents P R E L I M I N A R Y...

Страница 15: ...UEL DANS UNE AUTRE LANGUE QUE L ANGLAIS C EST AU CLIENT QU IL INCOMBE DE LE FAIRE TRADUIRE NE PAS TENTER D INTERVEN TION SUR LES QUIPEMENTS TANT QUE LE MANUEL SERVICE N A PAS T CONSULT ET COMPRIS LE N...

Страница 16: ...N A DO T CNICO OPERADOR OU PACIENTE DEVIDO A CHOQUES EL TRICOS MEC NICOS OU OUTROS ESTE MANUAL DE ASSIST NCIA EST DISPON VEL APENAS EM INGL S SE QUALQUER OUTRO SERVI O DE ASSIST NCIA T CNICA QUE N O A...

Страница 17: ...VAATII MUUTA KUIN ENGLANNINKIELIST MATERIAALIA TARVITTAVAN K NN KSEN HANKKIMINEN ON ASIAKKAAN VASTUULLA L YRIT KORJATA LAITTEISTOA ENNEN KUIN OLET VARMASTI LUKENUT JA YMM RT NYT T M N HUOLTO OHJEEN MI...

Страница 18: ...KA POSKYTOVATELE SLU EB OBSLU N HO PERSON LU NEBO PACIENT VLIVEM ELEKTRICK HOP PROUDU RESPEKTIVE VLIVEM K RIZIKU MECHANICK HO PO KOZEN NEBO JIN MU RIZIKU DENNE SERVICEMANUAL FINDES KUN P ENGELSK HVIS...

Страница 19: ...LAUG TEIK JAS OPERATORIUS AR PACIENTAS GALI B TI SU EISTAS D L ELEKTROS SM GIO MECHANINI AR KIT PAVOJ DENNE SERVICEH NDBOKEN FINNES BARE P ENGELSK HVIS KUNDENS SERVICELEVERAND R TRENGER ET ANNET SPR K...

Страница 20: ...GNORAREA ACESTUI AVERTISMENT AR PUTEA DUCE LA R NIREA DEPANATORULUI OPERATORULUI SAU PACIENTULUI N URMA PERICOLELOR DE ELECTROCUTARE MECANICE SAU DE ALT NATUR OVAJ PRIRU NIK ZA SERVISIRANJE DOSTUPAN J...

Страница 21: ...RA OPERATERA ILI PACIJENTA PROUZRO ENE STRUJNIM UDAROM MEHANI KIM I DRUGIM OPASNOSTIMA T TO SERVISN PR RU KA JE K DISPOZ CII LEN V ANGLI TINE AK Z KAZN KOV POSKYTOVATE SLU IEB VY ADUJE IN JAZYK AKO AN...

Страница 22: ...R M TER TEKN SYEN KILAVUZUN NG L ZCE DI INDAK B R D LDE OLMASINI STERSE KILAVUZU TERC ME ETT RMEK M TER N N SORUMLULU UNDADIR SERV S KILAVUZUNU OKUYUP ANLAMADAN EK PMANLARA M DAHALE ETMEY N Z BU UYARI...

Страница 23: ...P R E L I M I N A R Y DIRECTION 5813707 100 REVISION 2 VENUE GO PROPRIETARY SERVICE MANUAL ix 3 14 19 POC_PRECAUTIONS_LEGAL ZH CN KO...

Страница 24: ...ctrical work on these products will comply with the requirements of the applicable electrical codes The purchaser of GE equipment shall only utilize qualified personnel i e GE s field engineers person...

Страница 25: ...ject to change without notice Every precaution has been taken in the preparation of this document Nevertheless GE assumes no responsibility for errors omissions or any damages including special or con...

Страница 26: ...018 Initial Release DOC2073428 1 1 5 November 2018 Revised functional checks table in chp 8 Revised section 4 3 functional tests procedures DOC2073428 2 2 5 December 2018 Revised Table 10 2 added safe...

Страница 27: ...N A R Y Chapter 1 Introduction Section 1 1 Overview 1 1 1 Purpose of Chapter 1 This chapter describes important issues related to safely servicing the Venue Go ultrasound scanner The service provider...

Страница 28: ...allation planners some parts of Chapter 2 Site Preparations Table 1 1 Contents in this Service Manual CHP NUMBER TITLE DESCRIPTION Chapter 1 Introduction Contains a content summary and warnings Chapte...

Страница 29: ...I M I N A R Y 1 2 3 Venue Go Models Covered in this Manual The Venue Go models documented in this manual are shown in Table 1 2 below Table 1 2 Venue Go Models PSI Group Cat No Description PSI Code G...

Страница 30: ...Color Doppler M Mode Color M Mode PW and Tissue Velocity imaging The fully digital architecture of the Venue Go system allows optimal usage of all scanning modes and probe types throughout the full sp...

Страница 31: ...R Y 1 2 4 3 How to Check for Hardware Software Version and Installed Options To verify the hardware versions on the boards Refer to HW Version tab To check the software versions on local software on t...

Страница 32: ...ary message Known or potential hazards to personal are labeled in one of three ways DANGER WARNING CAUTION When a hazard is present that can cause property damage but has absolutely no personal injury...

Страница 33: ...ser infection due to contaminated equipment Cleaning and care instructions Sheath and glove guidelines ISO 7000 No 0659 Electrical Hazard Describes precautions necessary to prevent the risk of injury...

Страница 34: ...N 5813707 100 REVISION 2 VENUE GO SERVICE MANUAL 1 8 Chapter 1 Introduction P R E L I M I N A R Y Table 1 4 Standard Icons Indicating a Special Procedure Be Used AVOID STATIC ELECTRICITY TAG AND LOCK...

Страница 35: ...TING AND ADJUSTING WARNING WARNING IF THE COVERS ARE REMOVED FROM AN OPERATING VENUE GO SYSTEM SOME METAL SURFACES MAY BE WARM ENOUGH TO POSE A POTENTIAL HEAT HAZARD IF TOUCHED EVEN WHILE IN SHUT DOWN...

Страница 36: ...IS RELEASED TAKE CARE WHEN YOU REPAIR THE ELEVATION ASSEMBLY WARNING WARNING RISK OF ELECTRICAL SHOCK ULTRASOUND SYSTEM MUST BE TURNED OFF AND DISCONNECTED FROM POWER SOURCE CORD MUST BE CONTROLLED AT...

Страница 37: ...COUNTERED THE APPROPRIATE PPE SHOULD BE USED TO REDUCE THE RISK OF INJURY WARNING WARNING WEAR ALL PPE INCLUDING GLOVES AS INDICATED IN THE CHEMICAL MSDS CAUTION USE PROTECTIVE GLASSES DURING DRILLING...

Страница 38: ...WHEN READY FOR USE CARE MUST BE USED WHEN MOVING IT OR REPLACING ITS PARTS FAILURE TO FOLLOW THE PRECAUTIONS LISTED BELOW COULD RESULT IN INJURY UNCONTROLLED MOTION AND COSTLY DAMAGE USE THE HANDLE T...

Страница 39: ...VENTING HOLES ON THE MONITOR UNOBSTRUCTED TO AVOID OVERHEATING OF THE MONITOR WARNING WARNING THE SYSTEM SHOULD NOT BE MOVED WITH THE OPERATING PANEL EXTENDED POSITION THE OPERATING PANEL IN ITS CENT...

Страница 40: ...rical safety of the probe To avoid the risk of a probe accidentally falling do not allow the probe cables to become entangled or to be caught in the system s wheels Follow these guidelines before conn...

Страница 41: ...lt to attach unique dimensions to the PATIENT ENVIRONMENT In practice a distance of 2 5 m 8 2 ft above the floor on which the medical personnel stand and a horizontal distance of 1 5 m 4 9 ft have jus...

Страница 42: ...Environment EN 60601 1 Sub clause 3 79 Patient Environment It is difficult for this standard to define dimensions for the volume in which diagnosis monitoring or treatment occurs The dimensions for th...

Страница 43: ...d other heat sources Do not leave the battery in direct sunlight Do not pierce the battery with a sharp object hit it or step on it Do not use a damaged battery Do not apply solder to a battery Do not...

Страница 44: ...S ARE REMOVED FROM AN OPERATING VENUE GO SYSTEM SOME METAL SURFACES MAY BE WARM ENOUGH TO POSE A POTENTIAL HEAT HAZARD IF TOUCHED EVEN WHILE IN SHUT DOWN MODE WARNING WARNING EXPLOSION WARNING DO NOT...

Страница 45: ...lly hazardous stored or residual energy is relieved WARNING WARNING ENERGY CONTROL AND POWER LOCKOUT FOR VENUE GO WHEN SERVICING PARTS OF THE SYSTEM WHERE THERE IS EXPOSURE TO VOLTAGE GREATER THAN 30...

Страница 46: ...Universal Product Labels NOTE The following diagrams illustrate the labels found on the Venue Go ultrasound unit For an explanation of label icons and symbols refer to Table 1 5 on page 1 21 A system...

Страница 47: ...ective earthing or reliance upon installation conditions Probe connectors and rating plate EN IEC 60601 1 Medical electrical equipment Part 1 General requirements for basic safety and essential perfor...

Страница 48: ...y Nationally Recognized Testing Laboratory NRTL Rating Plate TUV Rheinland Requirement Catalog number Indicates the manufacturer s catalog number so that the medical device can be identified Rating Pl...

Страница 49: ...DC supply Rear panel Indicates that power is supplied to the system trough AC adapter or batteries ISO 7000 Ref 1938 Type CF Defib Proof Applied Part heart in the box with paddle symbol is in accorda...

Страница 50: ...dard GB T 26572 Requirements of concentration limits for certain restricted substances in electrical and electronic products The number in the symbol is the Environment friendly Use Period EFUP which...

Страница 51: ...Label The UDI label consists of a series of alpha numeric characters and barcode which uniquely identify the Venue Go system as a medical device manufactured by General Electric Scan or enter the UDI...

Страница 52: ...Introduction P R E L I M I N A R Y 1 7 3 Venue Go Cart Labels Location In addition to the labels described in the previous section an additional label may be found on the Venue Go cart as described i...

Страница 53: ...n patient care are regulated medical waste for transportation purposes and must be transported as a hazardous material NOTE The USER SERVICE staff should dispose of all the waste properly per federal...

Страница 54: ...affect the Venue Go ultrasound scanner NOTE This equipment generates uses and can radiate radio frequency energy The equipment may cause radio frequency interference to other medical and non medical...

Страница 55: ...added device s must have appropriate safety standard conformance and CE Marking 2 There must be adequate heat dissipation and ventilation to prevent overheating of the device 3 The added device s must...

Страница 56: ...ARNING RISK OF ELECTRICAL SHOCK SYSTEM MUST BE TURNED OFF AVOID ALL CONTACT WITH ELECTRICAL CONTACTS CONDUCTORS AND COMPONENTS ALWAYS USE NON CONDUCTIVE HANDLES DESIGNED FOR THE REMOVAL AND REPLACEMEN...

Страница 57: ...volume loop Restart the application before resuming clinical scanning Table 1 6 Phone Numbers for Customer Assistance 1 of 2 LOCATION PHONE NUMBER USA GE Ultrasound Service Engineering 9900 Innovation...

Страница 58: ...ea Bangalore 560 067 India Phone 91 1 800 425 8025 91 1 800 425 7255 91 1 800 102 7750 Table 1 7 Phone and Fax Numbers for Manufacturer MANUFACTURER PHONE NUMBER FAX NUMBER GE Ultrasound Service Engin...

Страница 59: ...r 2 This chapter provides the information required to plan and prepare for the setup of a Venue Go ultrasound unit Included are descriptions of the electrical and facility requirements that must be me...

Страница 60: ...on the environmental cooling 2 2 3 Lighting Requirements For system setup updates and repairs bright lighting is required However operator and patient comfort may be optimized if the room lighting is...

Страница 61: ...conduit 2 2 5 1 Venue Go Power Requirements Electrical specifications for the Venue Go system are as follows 2 2 5 2 Inrush Current Inrush current is not a factor for consideration due to the inrush c...

Страница 62: ...no guarantee that interference will not occur in a particular setup NOTE Possible EMI sources should be identified before the unit is installed and should not be on the same line as the ultrasound sys...

Страница 63: ...xternal connection requires a magnet wrap at each end Install the shield over the front of the card cage Loose or missing covers or RF gaskets allow radio frequencies to interfere with the ultrasound...

Страница 64: ...as possible if possible six weeks before delivery to allow enough time to make any changes WARNING WARNING FOR CONSOLE ULTRASOUND SYSTEMS AND FOR ULTRASOUND SYSTEMS MOUNTED ON A DOCKING ISOLATION CAR...

Страница 65: ...chaser of GE equipment must only utilize qualified personnel to perform electrical servicing on the equipment The desire to use a non listed or customer provided product or to place an approved produc...

Страница 66: ...pening of at least 0 54 m 1 77 ft in width Power outlets for test equipment within 1 m 3 3 ft of the ultrasound unit Material to safely clean probes performed using a plastic container never metal In...

Страница 67: ...full size ground wire from the distribution panel to the Ultrasound outlet Sites with a mains power system without a defined Neutral The dedicated line shall consist of one phase two lines not shared...

Страница 68: ...abinet 11 Network Interface 3 Film Viewer 12 457 mm 18 inches distance of Ultrasound system from wall or objects 4 Counter Top 13 Stool 5 Counter Top and Sink with hot and cold water 14 Footswitch 6 O...

Страница 69: ...wide Circuit breaker for dedicated power outlet is easily accessible Sink with hot and cold water Receptacle for bio hazardous waste like used probe sheaths Emergency oxygen supply Storage for linens...

Страница 70: ...rvers for storage and to workstations for viewing images As an added benefit transferring images in this manner enables viewing to be done on reviewing station while scanning continues 2 3 3 4 DICOM O...

Страница 71: ...2 3 Connectivity Installation Worksheet Site System Information Services Destination Devices TCP IP Settings Device Type Manufacturer Name IP Address Port AE Title 1 2 3 4 5 6 7 8 9 10 11 12 Dept Venu...

Страница 72: ...DICOM Network Information Venue Go Host Name AE Title Local Port IP Address Net Mask ROUTING INFORMATION ROUTER2 ROUTER3 ROUTER1 Destination IP Addresses GATEWAY IP Addresses Default DICOM APPLICATION...

Страница 73: ...ariances from the basic setup Make sure system and probes have been subject to acclimation period Environmental cooling is sufficient Lighting is adjustable to adapt to varying operational conditions...

Страница 74: ...DIRECTION 5813707 100 REVISION 2 VENUE GO SERVICE MANUAL 2 16 Chapter 2 Site Preparations P R E L I M I N A R Y This page was intentionally left blank...

Страница 75: ...repared setup can proceed as described in this chapter Included in this chapter are guidelines for transporting the unit to a new site as well as procedures that describe how to receive and unpack the...

Страница 76: ...rvicing and troubleshooting NOTE For information on shipping carton labels refer to Figure 3 3 on page 3 5 and Figure 3 4 on page 3 6 3 2 2 1 System Acclimation Time Following transport the Venue Go s...

Страница 77: ...URN ON POWER TO THE UNIT UNTIL IT HAS HAD SUFFICIENT TIME TO ACCLIMATE TO ITS OPERATING ENVIRONMENT CAUTION TO PREVENT ELECTRICAL SHOCK CONNECT THE UNIT TO A PROPERLY GROUNDED POWER OUTLET DO NOT USE...

Страница 78: ...to unpack the Venue Go cart because of its weight Two people are required whenever a part weighing 16 KG 35 LBS or more must be lifted CAUTION Remember to use relevant personal protecting equipment PP...

Страница 79: ...stem 1 Open the system package and remove the top foam 2 Take out the system from the zipper bag and remove the upper cover foam Table 3 11 Venue Go Box Contents Description 1 Venue Go system 2 AC DC...

Страница 80: ...N 2 VENUE GO SERVICE MANUAL 3 6 Chapter 3 System Setup P R E L I M I N A R Y 3 Remove the back system foam 4 Remove the middle foam 5 Take out all accessories Figure 3 3 Remove system from zipper bag...

Страница 81: ...pen the box and identify the base protective foam 2 Remove the base protective foams and expose the wheels CAUTION Two people are needed to unpack the Venue Go cart because of its weight Two people ar...

Страница 82: ...3 8 Chapter 3 System Setup P R E L I M I N A R Y 3 Position the cart on its wheels 4 Unlock the cart wheels 5 Use the tray handle to roll out the cart from the box Figure 3 7 Position the Cart on its...

Страница 83: ...VENUE GO SERVICE MANUAL Chapter 3 System Setup 3 9 P R E L I M I N A R Y 6 Remove the rest of the foam covers 7 Take the rest of the parts out of the box remove the protective foam covers Figure 3 9 R...

Страница 84: ...agnetic Interference EMI Many of the covers shields and screws are provided primarily to protect the system from image artifacts caused by this interference For this reason it is imperative that all c...

Страница 85: ...t an authorized GE Service Representative A Damage Inspection Checklist for the Venue Go portable ultrasound scanner is provided in Table 3 13 below Table 3 12 Damage Inspection Checklist Venue Go Sys...

Страница 86: ...stem Setup P R E L I M I N A R Y 3 4 3 2 General View of the Venue Go Ultrasound Unit Figure 3 1 General View of the Venue Go Ultrasound Scanner Item 1 Front Panel Display 2 Kick stand 3 Probe holder...

Страница 87: ...nue Go Rear View Item Item 1 Venue Go System 8 Accessories basket 2 Cart Cradle 9 AC cable connector to cart 3 Vertical horizontal tilt adjustment 10 Cradle system latch 4 Up down adjustment column 11...

Страница 88: ...t insulated 3 HDMI connector not insulated 3 4 3 5 EMI Protection The Venue Go has been designed to minimize the effects of Electro Magnetic Interference EMI Many of the covers shields and screws are...

Страница 89: ...ions 3 5 2 2 Physical Dimensions 3 5 2 3 Mass with Monitor and Peripherals 3 5 2 4 Acoustic Noise Level Less than 55 dB A at 20 degrees Celsius measured in the operators head position 20 cm in front o...

Страница 90: ...and IEC60601 1 for medical equipment Furthermore all complete configurations shall comply with the valid version of the system standard IEC60601 1 1 Everybody who connects additional equipment to the...

Страница 91: ...E L I M I N A R Y The Venue Go has three RS connectors Figure 3 4 Probe Connectors on Venue Go CAUTION HANDLE THE PROBE GENTLY WHILE CONNECTING AND DISCONNECTING DO NOT TOUCH THE PATIENT AND ANY OF TH...

Страница 92: ...be a Do a visual check of the probe pins and system sockets b Remove any dust or foam rests from the probe pins c Verify the probe and the probe cable for any visual damage CAUTION Do not allow the pr...

Страница 93: ...he probe connector 5 Carefully position the probe cord so it is free to move and is not resting on the floor 3 5 5 3 Disconnect Probes Follow these steps to disconnect the RS probes as applicable 1 Mo...

Страница 94: ...es how to configure the Venue Go 3 6 2 Venue Go Configuration 3 6 2 1 EZ Configuration Wizard The Venue Go Configuration Wizard enables the user to easily configure the system after SW installation 1...

Страница 95: ...A R Y 3 Tap Run wizard to continue the installation The settings screen appears The Local tab opens by default 4 On the Local tab enter the required details and tap Save Then proceed to the next tab...

Страница 96: ...uired settings and tap Save Then proceed to the next tab 6 On the Thermal Printer tab configure the printer and tap Save Then proceed to the next tab If the printer is already configured skip this ste...

Страница 97: ...pter 3 System Setup 3 23 P R E L I M I N A R Y 7 On the InSite tab define the required settings and tap Submit Changes Make sure you fill all mandatory fields highlighted in bold Then proceed to the n...

Страница 98: ...s list by moving the On Off sliders to On Then select each Connectivity item to define its properties Tap Apply and then Save Then proceed to the next tab 9 On the OptionKey tab enter the key string t...

Страница 99: ...d tap Save As to save the report Save the report on USB flash memory Then proceed to the next tab 11 On the About tab view all settings defined on each tab and click Save to save the entire set of def...

Страница 100: ...Setup P R E L I M I N A R Y 3 6 2 2 Select System Settings Screen 1 On the Home screen tap Settings Config Figure 3 16 Home Screen Settings Menu 2 Log on as adm Figure 3 17 Operator Login 3 From the C...

Страница 101: ...DIRECTION 5813707 100 REVISION 2 VENUE GO SERVICE MANUAL Chapter 3 System Setup 3 27 P R E L I M I N A R Y Figure 3 18 System Settings 3 6 2 3 Enter Location Figure 3 19 Enter Location...

Страница 102: ...start The 24 first characters of this name are displayed on the scanning screen s title bar All 64 are displayed on the image properties on saved images 2 Select the Department field and type the name...

Страница 103: ...Format see 3 in the figure 24 the 24 hour format is used 12 the 12 AM PM hour format is used 4 Adjust the date see 1 in the figure New date is displayed 5 Adjust the time see 2 in the figure New time...

Страница 104: ...100 REVISION 2 VENUE GO SERVICE MANUAL 3 30 Chapter 3 System Setup P R E L I M I N A R Y 3 6 2 5 Select Language for User Interface and Online Manuals Figure 3 21 Select Language Units and Controls S...

Страница 105: ...referred language for the online manual The selected language will be used as soon as the unit has been restarted 4 Select the Secondary check box to enable the multi language keyboard characters supp...

Страница 106: ...E GO SERVICE MANUAL 3 32 Chapter 3 System Setup P R E L I M I N A R Y 3 6 3 Service Screen Setup 3 6 3 1 Open Service Screen 1 Log on as adm 2 From the Config side menu select Service to view the Serv...

Страница 107: ...Go SONY UP D898DC printer 3 6 4 2 Approved External Peripherals One of the external units listed below may be connected to the USB port on the rear of the Venue Go 3 6 4 3 External Peripherals for Con...

Страница 108: ...N 2 VENUE GO SERVICE MANUAL 3 34 Chapter 3 System Setup P R E L I M I N A R Y 2 Tap the Windows Start button then tap the Search button and type View Network Connections 3 In the Network Connections s...

Страница 109: ...AL Chapter 3 System Setup 3 35 P R E L I M I N A R Y 4 Select the Internet Protocol Version4 check box and tap Properties The Internet Protocol Version 4 TCP IPv4 Properties screen opens Figure 3 23 I...

Страница 110: ...re Option Key in use depending on the installed options 3 6 5 2 To Install a Software Option Follow these steps to install the Software Option Key 1 Log on as adm 2 Select Admin lower part of window 3...

Страница 111: ...le Connection from Venue Go to a workstation via a Crossover Cable You will only need a Crossover Cable for network TCP IP use to connect the two units this way a Connect one end of the crossed networ...

Страница 112: ...k printer you should use default delivery settings 3 8 1 Introduction To be able to use the network functions when connected to a hospital network the Venue Go must have a proper network address Befor...

Страница 113: ...r NNNN is the scanner s serial number AE Title Venue Go Port No Default port number 104 2 Server Config Servers List of servers Buttons Use the buttons to Add Modify or Remove servers 3 Remote Path Us...

Страница 114: ...er 3 8 4 1 Overview In this case the Venue Go is configured to work with DICOM servers in a network environment Images are first saved on the local image buffer on the Venue Go At the end of the exami...

Страница 115: ...Chapter 3 System Setup 3 41 P R E L I M I N A R Y 3 8 4 2 DICOM Server IP Address on the Venue Go Table 3 21 DICOM Server IP Address on the Venue Go Step Instruction Illustration 1 Log on as adm Sele...

Страница 116: ...rs If the On Off slider is set to Off the configured settings will not be applicable to the current dataflow On Off Slider is On On Off Slider is Off 3 In the Dataflow menu tap to select the required...

Страница 117: ...Port No Port Number For some DICOM Servers the default Time out setting 30 is too low Select OK to close the Worklist properties dialog and save changes 5 To add the new IP address click the Plus butt...

Страница 118: ...ng is sent to the remote server to see if it is accessible via the network It is not a DICOM Echo DICOM ping so it does not check AE title or port number 4 If the network connection to the server is O...

Страница 119: ...ails after a long time corresponding to the timeout the IP address or Port Number is probably wrong 3 8 4 5 DICOM Storage Setup The application supports connectivity of up to two DICOM servers 1 In th...

Страница 120: ...gory Vascular or Abdominal If the exam contains M A from both Cardiac Pediatric Heart and Vascular Abdominal categories two SR documents are sent TID 5200 Echocardiography Procedure Report and TID 510...

Страница 121: ...ault unchecked and should only be used with DICOM storage devices that can handle private data format No images no images are sent only M A Signed Doppler velocities send signed Doppler velocities Use...

Страница 122: ...er if required by the remote share For instructions see Configurable Remote Path User on page 3 48 NOTE The default User Password is always used as primary log in credential No attempt is made to use...

Страница 123: ...r 3 System Setup 3 49 P R E L I M I N A R Y Figure 3 30 Configurable Remote Path User 3 Enter the User and Password in the respective fields NOTE The field User can either be on the form username or d...

Страница 124: ...eve DICOM data from a DICOM server for further analysis on the Venue Go NOTE You may have to set up Venue Go as a destination on the server 3 8 6 2 Query Retrieve Setup on the Venue Go 1 Log on as adm...

Страница 125: ...s used for DICOM Storage 6 Enter the correct AE Title and Port Number for the DICOM Query Retrieve server in the respective fields in the DICOM QR Properties screen 3 8 6 2 1 Change Search Criterias I...

Страница 126: ...already selected select DICOM QR to display the Dicom QR properties 2 Select the Check button to ping the server NOTE The Check button checks if the remote server is accessible ping This isn t a DICO...

Страница 127: ...Ping Ping is used to verify the TCP IP connection to the server DICOM Ping is used to verify that the DICOM application is answering 1 Select DicomQR from the Selected devices list 2 Select Check 3 8...

Страница 128: ...nfiguration The following procedure is used to configure the Venue Go for a wireless network environment This procedure is required for every new wireless network 1 From the Connectivity menu select T...

Страница 129: ...cedure for use of a USB Flash Card WARNING WARNING WHEN CONNECTING PERIPHERALS TO THE Venue Go SYSTEM UNLESS THE PERIPHERAL IS MEDICAL GRADE EQUIPMENT IT SHOULD BE CONNECTED TO THE ISOLATED USB CONNEC...

Страница 130: ...asound system 3 10 1 Installation Acceptance Test Criteria A Venue Go is ready for use after the system has been configured successfully in accordance with the information provided in Chapter 3 System...

Страница 131: ...DIRECTION 5813707 100 REVISION 2 VENUE GO SERVICE MANUAL Chapter 3 System Setup 3 57 P R E L I M I N A R Y...

Страница 132: ...DIRECTION 5813707 100 REVISION 2 VENUE GO SERVICE MANUAL 3 58 Chapter 3 System Setup P R E L I M I N A R Y...

Страница 133: ...DIRECTION 5813707 100 REVISION 2 VENUE GO SERVICE MANUAL Chapter 3 System Setup 3 59 P R E L I M I N A R Y...

Страница 134: ...DIRECTION 5813707 100 REVISION 2 VENUE GO SERVICE MANUAL 3 60 Chapter 3 System Setup P R E L I M I N A R Y...

Страница 135: ...DIRECTION 5813707 100 REVISION 2 VENUE GO SERVICE MANUAL Chapter 3 System Setup 3 61 P R E L I M I N A R Y...

Страница 136: ...DIRECTION 5813707 100 REVISION 2 VENUE GO SERVICE MANUAL 3 62 Chapter 3 System Setup P R E L I M I N A R Y...

Страница 137: ...DIRECTION 5813707 100 REVISION 2 VENUE GO SERVICE MANUAL Chapter 3 System Setup 3 63 P R E L I M I N A R Y...

Страница 138: ...DIRECTION 5813707 100 REVISION 2 VENUE GO SERVICE MANUAL 3 64 Chapter 3 System Setup P R E L I M I N A R Y...

Страница 139: ...es the General Procedures and the Functional Checks General Procedures is a collection of commonly used procedures that are available by cross references from other parts of this manual Functional Che...

Страница 140: ...are securely in place The covers are required for safe operation good Ultrasound system performance and cooling purposes WARNING WARNING Energy Control and Power Lockout for Venue Go When servicing pa...

Страница 141: ...stem ON for the First Time 1 Open the battery switch silicon cover and switch ON the battery power 2 Remove the nylon sheet screen protector from the touch screen DANGER ALWAYS CONNECT THE ULTRASOUND...

Страница 142: ...the proper rated voltage The unit is ready for Power ON Boot Up 4 2 2 4 Switch ON the Venue Go 1 Tap the On Off button Figure 4 45 on the touch display to boot up the unit During normal boot up you m...

Страница 143: ...to the Windows Desktop NOTE If you need to restart Venue Go when logged on to the Windows Desktop ensure that you do a complete power down Shut Down This is required to power up the Front End Process...

Страница 144: ...for USR Just type the name USR and select Login If you log on as ADM you will have access to all setup menus and service adjustments on the Venue Go system Example Adjust network and connectivity sett...

Страница 145: ...load the system software from the software media 2 Select Format SSD and Install WARNING WARNING Before you dispose of the hard drive make sure you remove ALL PATIENT DATA from the hard drive given th...

Страница 146: ...ters 4 2 7 3 To Ensure Safety while Moving the Venue Go on Cart 1 It is advisable to lower the system to its lowest position before moving the system 2 Proceed cautiously when crossing door or elevato...

Страница 147: ...onal Checks 4 9 P R E L I M I N A R Y Section 4 3 Functional and Safety Checks 4 3 1 Overview The functional checks for Venue Go are described in this section Functional checks are used to verify that...

Страница 148: ...3 2 1 Ground Continuity Check 1 Use an Ohmmeter multimeter to measure the ground resistance between the Split cable GND pin and the cart GND pin 2 Verify the measured value is less than 0 1 Ohm 4 3 3...

Страница 149: ...Mode is the system s default mode 4 3 4 1 2 Preparations 3SC RS Probe 1 Turn ON the Venue Go 2 Connect 3SC RS probe 4 3 4 1 3 Flashlight Noise Test 3SC RS Probe 3 Select Cardiac preset and run scannin...

Страница 150: ...lace ROI at the bottom of the screen full width 6 35cm 12 Increase gain till color random noise is visible in the ROI 13 Verify no Flashlight noise appears in center of ROI color random is homogeneous...

Страница 151: ...L I M I N A R Y 4 3 4 1 5 12L RS Linear Probe Test 16 Connect 12L RS probe 17 Select Artery preset 18 Run scanning on air scan in B mode 19 Increase depth to max 20 Increase gain till image is visible...

Страница 152: ...t bring up a 2D picture for navigation purpose and then add PW CW Doppler 4 3 4 2 2 Preparations 1 Connect 3SC RS probe 2 Turn ON the Venue Go 3 Press PW or CW 4 3 4 2 3 CW Mode Test 4 Scan in CW mode...

Страница 153: ...ult frequency 15 Increase gain till spectrum is visible 16 Decrease wall filter to minimum 17 Change the cursor position along the 2D ROI center sides bottom part 18 Verify no tonal noise appears 19 S...

Страница 154: ...DIRECTION 5813707 100 REVISION 2 VENUE GO SERVICE MANUAL 4 16 Chapter 4 General Procedures and Functional Checks P R E L I M I N A R Y 23 Verify no tonal noise appears Figure 4 56 PW Mode Image Test...

Страница 155: ...e Operator Panel A list of the connected probes will pop up on the screen 2 Select the desired probe An application menu for the desired probe is listed on the screen 3 Browse to the desired applicati...

Страница 156: ...est Page This checks that the printer is correctly installed and hooked up at the Windows level 1 On the Venue Go application main screen tap Settings Config Connectivity Additional Outputs Table 4 24...

Страница 157: ...s and Functional Checks 4 19 P R E L I M I N A R Y 2 In the Printer Setup section verify that the selected printer is Sony UP D898DC Figure 4 57 Verifying Selected Printer and Queue 3 Tap on Queue 4 I...

Страница 158: ...igure 4 60 Sony Printer Notification 7 Observe the printed page If the page prints out the problem you are looking for is probably a configuration issue in Windows or configuration issue in Utilities...

Страница 159: ...Y 4 3 6 2 ECG Functionality Checks The system automatically detects the ECG module once connected The indication for the user is displayed in the Peripherals status area Figure 4 61 Peripheral Status...

Страница 160: ...ons Checks 4 3 7 1 System Back Cover Support Checks 1 On the system s back cover pull and open the systems supporting frame ensuring that the support frame doesn t move freely 2 Carefully position the...

Страница 161: ...M I N A R Y 4 3 7 2 Cart Mechanical Checks 4 3 7 2 1 Cradle Locking Test 1 Verify that when inserting the system into the cradle the locking lever locks the hinges to stabilize system inside the cradl...

Страница 162: ...apter 4 General Procedures and Functional Checks P R E L I M I N A R Y 4 3 7 2 2 Cart Movement Up Down Movement Test Tilt Swivel Rotate Up Down 1 Push the UP DOWN lever upwards and verify the system m...

Страница 163: ...m the scanner sides or upper handle is min 2 5Kg and max 4 5Kg initiate small movement while the scanner is mounted on a fully assembled cart 2 Swivel movement Bring the cart to the most upper positio...

Страница 164: ...pected Result s 1 Push down on the locking lever on each caster wheel to lock the brake on the casters Push and pull the unit right left backwards and forwards Ensure that the wheels are locked and th...

Страница 165: ...4 General Procedures and Functional Checks 4 27 P R E L I M I N A R Y 4 3 8 Functionality Tests 4 3 8 1 Battery Charging Test 1 Inspect the scan time indicator 2 Verify that after 10 minutes the scan...

Страница 166: ...arrangement and sub system functions It also describes the power distribution system the cabling system and probes Table 5 1 Contents in Chapter 5 Section Description Page Number 5 Venue Go Components...

Страница 167: ...Mode Doppler Different combinations of the above modes 5 2 2 Venue Go Mechanical Design Venue Go Portable scanner has an adjustable stand The rear stand allows the system to be placed on a flat horiz...

Страница 168: ...Board C FEB Electronics and to the Back End Board C BEB are finally displayed on the touch display 5 2 2 1 System Configuration and Software System configuration is stored on the internal SSD attached...

Страница 169: ...A R Y Section 5 3 Venue Go System Design The design of the Venue Go ultrasound scanner comprises three main sections illustrated in Figure 5 3 Main Scanner System Portable Dedicated Cart with Swivel T...

Страница 170: ...h Button with Green and orange led indicator Internal Battery Status with Green and Orange Indicator System Failure Indicator Optional External Battery Status with Green and Orange Indicator for futur...

Страница 171: ...y P R E L I M I N A R Y 5 3 2 2 Battery Status Indication The battery status indication is either red orange or green and includes 6 light bars inside the battery frame The below figure shows all poss...

Страница 172: ...the required Back End and Display supply voltages Support of the external and internal interfaces Storage of Operating System and application on internal SSD Network connectivity Wi Fi LAN Connection...

Страница 173: ...nt Signal sent to the Cart Scanner Disconnect early warning Signal Interface to External Batteries Module that contain SMBUS Interface External Battery Present Signal 3 x RS Probe Connectors located o...

Страница 174: ...Y Probe Low voltage and High Voltage Supply Internal and External HV Mux Control Interface The C FEB Interface to the C IFB Inlet FANs Board consists of the following Interfaces Inlet FANs DC voltage...

Страница 175: ...probes connected to the C FEB and implements the required probe selection The PSB provides a mechanical and electrical interface for 3 RS probes with up to 192 elements The T PSB supports the followin...

Страница 176: ...supports the following functionalities Activate on touch Activate on release Drag and drop Double click Long touch that activates mouse right click User interaction with the Touch Display is by way of...

Страница 177: ...MT activation is sensitive to A bare finger A Latex gloved hand A Latex gloved hand with ultrasound gel Display covered with transparent foil Table 5 5 Display Position Characteristics Item Value in D...

Страница 178: ...equested color for your system s light bar Note The light bar also indicates when the battery power is low by blinking in red This page was intentionally left blank 5 6 3 Speaker The Venue Go system i...

Страница 179: ...Venue Go ultrasound unit interface panel showing external peripheral accessory connectors 1 Ethernet LAN connector 1000 Base TX Ethernet IEEE 802 3 3kV insulation 2 USB 3 0 connector x3 not insulated...

Страница 180: ...em Power Distribution 5 8 1 Introduction The AC DC adapter is the main Power Supply for the Venue Go System It provides the DC voltage required to power the system in all its operational modes while p...

Страница 181: ...d locally and transferred to the scanner application in the following channels Front End Monitoring Data from the FPGAs gathered by the DSP Front End Critical Voltages monitored by the FE Monitor Devi...

Страница 182: ...tus Control via I2C Interface Front Panel Light Sensors Reading via I2C Interface Monitoring of all LVPS input and output voltages Monitoring of system power consumption Monitoring of local Temperatur...

Страница 183: ...battery in direct sunlight Do not pierce the battery with a sharp object hit it or step on it Do not use a damaged battery Do not solder a battery Do not connect the battery to an electrical outlet Do...

Страница 184: ...resumes normal charging when the battery temperature is at least below 43 C 5 9 3 3 Battery Power Specifications Scanning time in continuous 2D mode with new and fully charged pair of batteries using1...

Страница 185: ...e to transfer the heat installed on the C BEB Outlet Blower at the edge of the Heat Pipe Fan to push cold air into scanner installed on the C FEB Heat Sink All fans are controlled and have two variabl...

Страница 186: ...needle type barcode The barcode reader is connected to the Venue Go system via a USB port located on the rear 5 11 2 2 Black White Digital Graphic Printer The B W Printer is available as an option and...

Страница 187: ...anner and other devices in the Hospital Information System 5 13 2 Venue Go and a DICOM Server in a Network In this case the Venue Go is configured to work with a DICOM server in a network environment...

Страница 188: ...your direct link with a GE Online Service Engineer or Applications Support Engineer or a Request for Service via the InSite ExC link at the bottom of the display screen 5 14 2 InSite ExC Icon The InS...

Страница 189: ...mer to generate a Service or Apps request Connect to GE Increase polling rate Click this icon to increase the contact Poll Rate from 15 minutes to 15 seconds The increased polling rate continues for 1...

Страница 190: ...opens of the RFS screen which sends a service dispatch directly to GE Service after you fill in the following information Items with a red asterisk Problem type Problem area Problem description Send 3...

Страница 191: ...2 Request for Service Queue You can monitor your RFS as well as RFS s automatically sent by the system The Venue Go can automatically submit a Request for Service These are displayed on the Machine Qu...

Страница 192: ...system but cannot perform any service related functions depending on whether InSite has connected or not connected There are two Non Disruptive states If you see a black and white icon InSite ExC is a...

Страница 193: ...e are no service adjustments required on a Venue Section 6 2 Power Supply Adjustments There are no adjustments on the AC DC power supply The AC DC Power is self regulated If a voltage is outside the s...

Страница 194: ...gnostics Troubleshooting Section 7 1 Overview 7 1 1 Purpose of Chapter This chapter describes how to setup and run the tools and software that help maintain image quality and system operation Very bas...

Страница 195: ...USING DEATH ARE PRESENT IN THIS EQUIPMENT USE EXTREME CAUTION WHEN HANDLING TESTING AND ADJUSTING If the covers are removed from an operating Venue Go some metal surfaces may be warm enough to pose a...

Страница 196: ...ervice at the device or can be sent back to the manufacturer for analysis 7 3 2 Running System Diagnostics 1 Boot the system into the application screen 2 On the Home screen tap Settings Service Diag...

Страница 197: ...me stamped zip file The log capture window includes a menu box that contains a place to enter a description of the issue a check box to indicate a System lockup a choice to Export to a pre formatted r...

Страница 198: ...selected functionality Options enables creation of a log file based on a selected bookmark or for a user configurable time frame Different type of information can be selected to be part of the log fi...

Страница 199: ...ise Use the information next to classify the noise and possible cause 7 4 3 1 Noise Picked Up from the Air Electromagnetic Interference EMI from radio frequencies magnetic fields and transients in the...

Страница 200: ...he probe Self generated noise may be due to either heat problems hardware problems software problems 7 4 3 5 Heat Problems Heat problems are usually starting when the Venue Go has been ON for some tim...

Страница 201: ...s with a mains power system with defined Neutral and Live The dedicated line shall consist of one phase a neutral not shared with any other circuit and a full size ground wire from the distribution pa...

Страница 202: ...system When the loaner system arrives transfer the data between the systems according to the flow described below NOTE In case of failure to run the below procedure contact your local GE service repre...

Страница 203: ...shooting P R E L I M I N A R Y Figure 7 20 Select Run Loaner Wizard 5 Disconnect the Disk On Key 3 On the Loaner system 1 Shut down the system 2 Connect the software Disk On Key to any of the system s...

Страница 204: ...ubleshooting 7 11 P R E L I M I N A R Y 4 Transfer the data between the systems 1 Connect the two systems using the supplied network cable Figure 7 21 Connect Systems via the Network Cable 2 On Both s...

Страница 205: ...n the faulty system was encrypted Connect an external USB Keyboard to the system and type in the decryption password and tap OK Figure 7 23 Volume decryption password window 4 Verify that the faulty s...

Страница 206: ...e Loaner destination system Press next to start the duplication process Figure 7 25 Press Next in the Loaner Destination system 5 The copy process begins 6 Once the process is done shut down both syst...

Страница 207: ...M I N A R Y Chapter 8 Replacement Procedures Section 8 1 Overview 8 1 1 Purpose of Chapter 8 This chapter provides replacement procedures for Venue Go system parts as outlined below NOTE The pictures...

Страница 208: ...e back side of the Venue Go ultrasound unit DANGER ELECTRICAL HAZARDS EXIST AT SEVERAL POINTS IN THE SYSTEM FAMILIARIZE YOURSELF WITH ALL HAZARDOUS VOLTAGES AND HIGH CURRENT LEVELS BEFORE REMOVING ANY...

Страница 209: ...o ultrasound unit as described in Power Shutdown 2 Prepare stable flat surface covered with a soft material such as foam or thick cloth to prevent scratches to the display 3 Dismount Venue Go system f...

Страница 210: ...rame Kick Stand to vertical position 3 Open the battery compartment cover by moving the latch to the right 4 Remove the battery 8 2 2 5 Batteries Installation Procedure 1 Slide in the battery towards...

Страница 211: ...epare stable flat surface covered with a soft material such as foam or thick cloth to prevent scratches to the display 3 Dismount Venue Go system from cart as described in Mounting Dismounting System...

Страница 212: ...w heli coils 4 Gently separate the back cover from the touch display panel starting at the top left corner proceeding clockwise 8 2 3 5 Back Cover Installation Procedure 1 Attach the back cover to the...

Страница 213: ...ke sure the eDP cable connector is not pinched when closing the back cover 2 Install Probe Holder Rubber on the top of the system 3 Install the batteries Note IMPORTANT Remove all labels from the old...

Страница 214: ...e stable flat surface covered with a soft material such as foam or thick cloth to prevent scratches to the display 3 Dismount Venue Go system from cart as described in Mounting Dismounting System on C...

Страница 215: ...EB 8 2 4 5 C PSB Installation Procedure 1 Fold the C PSB magnetic absorber MAGRAM cover to allow easy insertion behind the black rubber bumpers 2 Align the C PSB module and screws over the screw holes...

Страница 216: ...oam or thick cloth to prevent scratches to the display 3 Dismount Venue Go system from cart as described in Mounting Dismounting System on Cart and place it on a previously prepared surface with the d...

Страница 217: ...NUAL Chapter 8 Replacement Procedures 8 11 P R E L I M I N A R Y 4 Remove the 2 screws holding the requested probe lever cap Then turn over the C PSB and gently slip the black plastic cap off the axle...

Страница 218: ...rked in Blue and shorter arc Ensure the lever is inserted with its long arc as shown in the picture below 7 Slip the black plastic cap to secure the lever on the axle 8 Attach 2 screws holding the pro...

Страница 219: ...or thick cloth to prevent scratches to the display 3 Dismount Venue Go system from cart as described in Mounting Dismounting System on Cart and place it on a previously prepared surface with the disp...

Страница 220: ...1 Gently connect the 2 WiFi antennas to the WiFi module Note The WiFi antenna cable that is connected to the right Antenna should be connected to the top connector of the WiFi module marked in blue ci...

Страница 221: ...813707 100 REVISION 2 VENUE SERVICE MANUAL Chapter 8 Replacement Procedures 8 15 P R E L I M I N A R Y C FEB and C BEB boards 5 Install back cover Figure 8 88 Magram folded end Back Cover Installation...

Страница 222: ...prevent scratches to the display 3 Dismount Venue Go system from cart as described in Mounting Dismounting System on Cart and place it on a previously prepared surface with the display facing down 8 2...

Страница 223: ...placement Procedures 8 17 P R E L I M I N A R Y 4 Release the speakers cable and the Wi Fi antenna cables from the fan cable holders 5 Remove five holding screws the 2 screws marked by blue circles ar...

Страница 224: ...ON 5813707 100 REVISION 2 VENUE SERVICE MANUAL 8 18 Chapter 8 Replacement Procedures P R E L I M I N A R Y 6 Disconnect the fan connector from C FEB and remove the fan Figure 8 92 Fan Connector Fan co...

Страница 225: ...nd connect the fan cable to the C FEB 4 Route the two Wi Fi antennas cables through the two cable holders on the left side of the fan 5 Route the speakers cables through the two cable holders on the r...

Страница 226: ...foam or thick cloth to prevent scratches to the display 3 Dismount Venue Go system from cart as described in Mounting Dismounting System on Cart and place it on a previously prepared surface with the...

Страница 227: ...the speakers cable 6 Gently lift the WiFi module upwards and pull it out 7 Pull upwards the languet to release the securing lever of the eDP connector Figure 8 95 Speakers Cable Figure 8 96 Wi Fi Ant...

Страница 228: ...nt Procedures P R E L I M I N A R Y 8 Disconnect eDP cable connector 9 Remove the 5 C BEB holding screws The 2 longer screws are marked with blue circles Figure 8 98 Disconnecting eDP Cable Connector...

Страница 229: ...placement Procedures 8 23 P R E L I M I N A R Y 10 Slightly lift the right side of the C BEB and slide it to the right to remove from the connectors 11 Release the small screw connecting the SSD to th...

Страница 230: ...oove to avoid cable pinching while closing the back cover 5 Reconnect the Wifi module 6 Install the Wi Fi antenna securing bracket and tighten the bracket holding screw 7 Secure the 5 screws long scre...

Страница 231: ...in Power Shutdown 2 Prepare stable flat surface covered with a soft material such as foam or thick cloth to prevent scratches to the display 3 Dismount Venue Go system from cart as described in Mounti...

Страница 232: ...nect the fan cable connector 5 Remove the plastic clip holder screw and release the fan cable from the clip 6 Release 5 screws connecting the unit 3 flat head screws 2 round head screws marked with bl...

Страница 233: ...unit 2 Insert the C_FEB Note the rail on the left side 3 Secure the 5 screws 4 Connect the Fan cable and the Display Indicator green cable connectors 5 Rout the fan cable and the front display indicat...

Страница 234: ...ith a soft material such as foam or thick cloth to prevent scratches to the display 3 Dismount Venue Go system from cart as described in Mounting Dismounting System on Cart and place it on a previousl...

Страница 235: ...100 REVISION 2 VENUE SERVICE MANUAL Chapter 8 Replacement Procedures 8 29 P R E L I M I N A R Y 6 Remove 10 holding screws there are 3 types of screws marked in different colors Figure 8 106 Removing...

Страница 236: ...l the C FEB so that the docking connector goes inside the docking bracket on the Front Display assembly 3 Secure the 10 holding screws 4 Route the Front Display Indicator Cable 5 Install the C BEB 6 I...

Страница 237: ...thick cloth to prevent scratches to the display 3 Dismount Venue Go system from cart as described in Mounting Dismounting System on Cart and place it on a previously prepared surface with the display...

Страница 238: ...8 2 11 5 Front Display Assembly Installation Procedure 1 Install the C FEB 2 Connect the Front Display Indicator Cable to the C FEB 3 Install the fan 4 Install speakers 5 Install back cover C FEB Ins...

Страница 239: ...2 Prepare stable flat surface covered with a soft material such as foam or thick cloth to prevent scratches to the display 3 Dismount Venue Go system from cart as described in Mounting Dismounting Sys...

Страница 240: ...s see picture 8 2 12 5 Speakers Installation Procedure 1 Insert the speaker s pins into the dedicated holes on the Front Panel assembly and slightly push in to fix the speaker in place Perform the sam...

Страница 241: ...the cable clamp to the dedicated Assy as shown in the picture Make sure the ring lugs are physically touching the chassis 4 Secure the two cable clamps using two screws Fasten the screws by 0 62 torq...

Страница 242: ...utdown 2 Prepare stable flat surface covered with a soft material such as foam to prevent scratches to the display 3 Dismount Venue Go system from cart and place it on a previously prepared surface wi...

Страница 243: ...size 8 2 14 2 Time Required 5 min 8 2 14 3 Preparations 1 Shut down the Venue Go ultrasound unit as described in Power Shutdown 2 Prepare stable flat surface covered with a soft material such as foam...

Страница 244: ...CE MANUAL 8 38 Chapter 8 Replacement Procedures P R E L I M I N A R Y 4 Lower the cart to its lowest position 5 Tilt the system to its vertical position 6 Pull the lever upwards to dismount the system...

Страница 245: ...I M I N A R Y 7 Carefully lift the Venue Go system from the cart cradle and place it on a previously prepared surface with the display facing down 8 2 14 5 Mounting System on Cart 1 Install system in...

Страница 246: ...nd unit as described in Power Shutdown 2 Prepare stable flat surface covered with a soft material such as foam to prevent scratches to the display 3 Dismount Venue Go system from cart and place it on...

Страница 247: ...2 15 5 Cradle Assembly Installation Procedure 1 Attach the Cradle assembly to the cart and tighten the four cradle holding screws 2 Route all cables through the cable holder USB cables should be route...

Страница 248: ...wer Shutdown 2 Prepare stable flat surface covered with a soft material such as foam to prevent scratches to the display 3 Dismount Venue Go system from cart and place it on a previously prepared surf...

Страница 249: ...I N A R Y 7 Remove the spring cable cover 8 Remove the two Allen screws holding the tilt assembly using 4mm Allen key NOTE When removing the Allen screws pay attention not to drop the screws into the...

Страница 250: ...L I M I N A R Y 9 Remove the Cart Tilt 8 2 16 5 Cart Tilt Installation Procedure 1 Attach the Cart Tilt to the cart and tighten the two holding screws 2 Install the spring cable cover 3 Install the co...

Страница 251: ...foam to prevent scratches to the display 3 Dismount Venue Go system from cart and place it on a previously prepared surface with the display facing down 4 Lower the cart tray to its lowest position 8...

Страница 252: ...in Power Shutdown 2 Prepare stable flat surface covered with a soft material such as foam to prevent scratches to the display 3 Dismount Venue Go system from cart and place it on a previously prepare...

Страница 253: ...I N A R Y 5 Open the printer assembly screw and slide the printer assembly towards you 8 2 18 5 Printer Assembly Installation Procedure 1 Install the printer assembly on the cart and tighten the screw...

Страница 254: ...as described in Power Shutdown 2 Prepare stable flat surface covered with a soft material such as foam to prevent scratches to the display 3 Dismount Venue Go system from cart and place it on a previo...

Страница 255: ...ter Bracket Installation Procedure 1 Install the printer in the printer assembly 2 Install the power supply in the printer assembly make sure that the power supply label is facing the bottom of the pr...

Страница 256: ...vered with a soft material such as foam to prevent scratches to the display 3 Dismount Venue Go system from cart and place it on a previously prepared surface with the display facing down 8 2 20 4 Car...

Страница 257: ...ips screws from underneath the tray 10 Slide the tray upwards and remove the tray from the cart 8 2 20 5 Cart Tray Installation Procedure 1 Install the tray on the cart 2 Reconnect 4 Phillips screws 3...

Страница 258: ...ent Procedures P R E L I M I N A R Y 4 Install the cart bin 5 Install the tilt assembly 6 Install the cradle assembly 7 Mount the system on the cart Cart Bin Installation Procedure Cart Tilt Installat...

Страница 259: ...such as foam to prevent scratches to the display 3 Dismount Venue Go system from cart and place it on a previously prepared surface with the display facing down 8 2 21 4 Up Down Handle Removal Procedu...

Страница 260: ...ons 1 Shut down the Venue Go ultrasound unit as described in Power Shutdown 2 Prepare stable flat surface covered with a soft material such as foam to prevent scratches to the display 3 Dismount Venue...

Страница 261: ...move the ECG assembly from the cart Then pull the ECG out of its bracket 8 2 22 5 ECG Installation Procedure 1 Install the ECG in its bracket 2 Install the ECG assembly on the cart and re connect two...

Страница 262: ...as described in Power Shutdown 2 Prepare stable flat surface covered with a soft material such as foam to prevent scratches to the display 3 Dismount Venue Go system from cart and place it on a previo...

Страница 263: ...and gently pull the cable upwards through the pole routing 8 2 23 5 Printer USB Cable Installation Procedure 1 Route the printer USB cable through the cart pole 2 Reconnect the USB to the printer 3 C...

Страница 264: ...trasound unit as described in Power Shutdown 2 Prepare stable flat surface covered with a soft material such as foam to prevent scratches to the display 3 Dismount Venue Go system from cart and place...

Страница 265: ...SB cable and gently pull the cable upwards through the pole routing 8 2 24 5 ECG USB Cable Installation Procedure 1 Route the ECG USB cable through the pole 2 Reconnect the USB to the ECG 3 Close the...

Страница 266: ...e Go ultrasound unit as described in Power Shutdown 2 Prepare stable flat surface covered with a soft material such as foam to prevent scratches to the display 3 Dismount Venue Go system from cart and...

Страница 267: ...Chapter 8 Replacement Procedures 8 61 P R E L I M I N A R Y 5 Disconnect the cable underneath the power supply 6 Release the power cable from the P clip Figure 8 144 Disconnect Cable underneath Power...

Страница 268: ...DIRECTION 5813707 100 REVISION 2 VENUE SERVICE MANUAL 8 62 Chapter 8 Replacement Procedures P R E L I M I N A R Y 7 Open scotch straps and remove power supply Figure 8 146 Remove Power Supply...

Страница 269: ...plit Cable Installation Procedure 1 Route the power cable through the pole 2 Connect the split cable to its position using 2 screws and connect the ground cable 3 Position the PSU and secure by scotch...

Страница 270: ...before you start the upgrade procedure 1 Perform Disk Management for all database records and select the Copy option for instructions refer to the Venue Go User Manual on your Document Media NOTE It...

Страница 271: ...At the site perform the following steps before you start the upgrade procedure 1 Perform Disk Management for all database records and select the Copy option for instructions refer to the Venue Go User...

Страница 272: ...he Interface Panel of the Venue Go 2 Turn on the system The opening screen is displayed 3 For new installation after SSD replacement tap Format SSD and Install If patient information is stored on the...

Страница 273: ...og box appears 8 Disconnect the SW installation media and tap OK in the message box 9 In the Confirmation dialog box that appears tap Yes to continue the reboot 10 Tap Yes to continue the reboot Figur...

Страница 274: ...acement Procedures P R E L I M I N A R Y 8 3 3 1 Run Venue Go EZ Config Setup Wizard 11 After the system reboots the Venue Go setup wizard welcome screen appears 12 Select the interface language and t...

Страница 275: ...es 8 69 P R E L I M I N A R Y 13 Tap Run wizard to continue the installation 14 Enter the system serial number as appears on the rating plate label and tap OK to confirm Figure 8 154 Venue Go Installa...

Страница 276: ...serial number 16 The settings screen appears The Local tab opens by default 17 Continue with the EZ Config installation as specified in Section 3 6 3 1 on page 3 20 Figure 8 156 Venue Go Installation...

Страница 277: ...s in accordance with different software versions 8 3 4 1 Backup System Configuration Perform backup of all system configuration parameters as follows 1 Log in to the system as ADM administrator 2 Tap...

Страница 278: ...ement Procedures P R E L I M I N A R Y 5 From the side menu select Admin and then Backup 6 Select the System Configuration checkbox 7 Select USB HD Memstick media as a Destination Device 8 Tap Start B...

Страница 279: ...the backup is complete the following message appears Eject the USB memstick when prompted 8 3 4 2 Backup Patient Exams 1 Connect an external USB 3 0 hard drive with at least 100GB of free space 2 Tap...

Страница 280: ...lect the Select All checkbox to select all patients for backup 4 Tap Send Selected 5 In the Copy window select USB Storage and click OK Figure 8 163 Select All Patients for Backup Figure 8 164 Send Se...

Страница 281: ...omplete proceed to Software Update Procedure 8 3 4 3 Software Update Procedure 1 Turn OFF the system 2 Plug the Software Update Media into the USB port located on the Interface Panel of the Venue Go 3...

Страница 282: ...process runs At the end of the process the following message appears 7 Click OK The following message appears 8 Select Reboot Venue Go Scanner The following message appears Figure 8 168 Venue Go SW Up...

Страница 283: ...ap OK in the message box 10 In the Confirmation dialog box that appears 11 Tap Yes to continue the reboot 12 Continue with Venue GO EZ Config Setup Wizard Figure 8 172 Venue Go Update Process Confirma...

Страница 284: ...in accordance with different software versions The software recovery procedure allows the user to reload the operating system and the application Drive C partition without affecting any user informat...

Страница 285: ...Replacement Procedures 8 79 P R E L I M I N A R Y 4 A pop up window will be displayed notifying the user about the next steps 5 Select OK Windows recovery options will be displayed 6 Select Troublesho...

Страница 286: ...will reboot automatically and the Venue Go SW reload window will be displayed 9 Select Reload Venue Go SW The software reload process will start 10 Once the process is complete The Venue Go SW reload...

Страница 287: ...Chapter 8 Replacement Procedures 8 81 P R E L I M I N A R Y 13 Continue with Venue GO EZ Config Setup Wizard Run Venue Go EZ Config Setup Wizard Perform the checks listed in Operating System and Appl...

Страница 288: ...dy for use 8 4 3 Functional Checks Required per Replacement Part Category Table 8 2 lists the Functional Checks to be performed after each type of Replacement Procedure NOTICE IMPORTANT AFTER PERFORMI...

Страница 289: ...system is easily inserted removed from cradle S5810359 Tilt Assy 4 3 8 2 3 Cart Tilt Swivel Movement Test S5811127 Shelf Visual inspection S5791187 Up down handle 4 3 8 2 2 Cart Movement Up Down Move...

Страница 290: ...tware installation 4 2 3 Power ON Boot up 4 2 4 Power Shutdown 4 3 6 Probe Connectors Check 4 3 5 Image Quality Tests 4 3 7 Peripheral Checks 7 5 3 Running System Diagnostics Part Number Replacement E...

Страница 291: ...overview of replacement parts for the Venue ultrasound scanner NOTE In the detailed Parts lists illustrations are accompanied by FRU names corresponding Part Numbers and a compatibility matrix This R...

Страница 292: ...MANUAL 9 2 Section 9 3 List of Abbreviations P R E L I M I N A R Y Section 9 3 List of Abbreviations Assy Assembly C BEB Compact Back End Board C FEB Compact Front End Board CRU Customer replaceable U...

Страница 293: ...VISION 2 VENUE GO SERVICE MANUAL Chapter 9 Renewal Parts 9 3 P R E L I M I N A R Y Section 9 4 Venue Go System on Cart Overview ECG Printer PS System Cradle and Tilt Cart Bin Base and Casters Printer...

Страница 294: ...s P R E L I M I N A R Y Section 9 5 Renewal Parts Lists and Diagrams 9 5 1 Mechanical Hardware Parts Table 9 3 Mechanical Hardware Parts Part Name Part Number Picture Can Replace Part Can Be Replaced...

Страница 295: ...rt Number Picture Can Replace Part Can Be Replaced by Part Not Compatible With Repl Proc Back cover FRU Venue Go S5775296 Table 9 4 System Parts Part Name Part Number Picture Can Replace Part Can Be R...

Страница 296: ...M I N A R Y Probe Locking Levers FRU Venue_VenueGo S5809900 C FEB FRU Venue Go S5810292 CFEB HEAT SINK ASSY FRU Venue Go fan included S5798986 Touch Display FRU Venue Go S5797182 C BEB FRU Venue Go S...

Страница 297: ...I N A R Y C BEB Magram FRU Venue Go S5795090 SSD FRU Venue Go S5791182 WiFi PCB FRU Venue Go S5797835 Speakers FRU Venue Go S5775292 Venue Go Package CRU S5793263 Table 9 4 System Parts Part Name Par...

Страница 298: ...A R Y 9 5 4 Cart Parts Table 9 5 Cart Parts Part Name Part Number Picture Can Replace Part Can Be Replaced by Part Not Compatible With Repl Proc CRU Cart Assembly Basic FRU Venue Go S5793897 Gel Cup C...

Страница 299: ...rt S5791599 Tilt Assy CRU Venue Go Cart S5810359 Shelf FRU Venue Go Cart S5811127 Split Power Cable FRU Venue Go Cart S5811099 PROBE INSERTS CRU Venue Go Cart S5797627 Printer shelf CRU Venue Go Cart...

Страница 300: ...nd Diagrams P R E L I M I N A R Y 9 5 5 Probes Table 9 6 Probes Part Name Part Number Picture Can Replace Part Can Be Replaced by Part Not Compatible With Probe 6S RS 47236956 Probe L8 18i RS 5499609...

Страница 301: ...ftware Media Probe 6Tc RS KN100104 Probe C1 5 RS 5499608 Table 9 7 Software Part Name Part Number Picture Can Replace Part Can Be Replaced by Part Not Compatible With Repl Proc SW media CRU Venue Go S...

Страница 302: ...I M I N A R Y 9 5 7 System Power Cables Table 9 8 System Power Cables Part Name Part Number Picture Can Replace Part Can Be Replaced by Part Not Compatible With Power Cable Australia S2414985 5 Power...

Страница 303: ...er 9 Renewal Parts 9 13 P R E L I M I N A R Y Power Cable Japan S2414985 8 Power Cable Switzerland S2414985 3 Power Cable USA Canada S2414985 Table 9 8 System Power Cables Part Name Part Number Pictur...

Страница 304: ...ble 9 9 Optional Peripherals Part Name Part Number Picture Can Replace Part Can Be Replaced by Part Not Compatible With Repl Proc SONY UP D898DC printer 5778615 Printer USB cable FRU Venue Go S5809718...

Страница 305: ...I M I N A R Y Table 9 10 ECG Module Part Name Part Number Picture Can Replace Part Can Be Replaced by Part Not Compatible With Repl Proc ECG Module CRU 5129487 Norav German Version ECG Module 5800116...

Страница 306: ...or inspections to be performed at periods of frequency different from those listed in this manual 10 1 2 Purpose of Chapter 10 This chapter describes the Care and Maintenance PM procedures for the Ven...

Страница 307: ...RN OFF THE POWER ON OFF SWITCH BEFORE YOU REMOVE ANY PARTS PROCEED WITH CAUTION WHENEVER POWER IS ON AND COVERS ARE REMOVED DANGER DO NOT PULL OUT OR INSERT CIRCUIT BOARDS WHILE MAINS POWER TO THE SYS...

Страница 308: ...ts corrective action and the effects of corrective action must be documented and maintained on site Your GE Service Representative can help you with establishing performing and maintaining records for...

Страница 309: ...cated Time Daily Weekly Monthly Per Facility s QA Program Notes Clean Probes or before each use Clean Probe Holders Inspect AC Mains Cable Mobile Ultrasound system Check Weekly Inspect Cables and Conn...

Страница 310: ...nches are recommended 2 Bit TX 15 M3 3 Bit TX 20 M4 4 Bit TX 25 M5 5 Bit TX 30 M6 6 Bit TX 45 M10 7 Socket Set must include 7mm socket 8 Side cutter diagonal 5 or 6 inch 9 Flat Blade Driver 3 2 mm 10...

Страница 311: ...m Record all probes and Ultrasound system options 3 Power up Turn the Ultrasound system power ON and verify that all fans and peripherals turn On Watch the displays during power up to verify that no w...

Страница 312: ...on 2 CF Mode Verify basic CF Mode Color Flow Mode operation Check the basic Ultrasound system controls that affect this mode of operation 3 Doppler Modes Verify basic Doppler operation PW and CW if av...

Страница 313: ...drive s read write properly 2 B W Printer Verify hardcopy output of the B W video page printer Clean heads and covers if necessary 3 DICOM Verify that DICOM is functioning properly Send an image to a...

Страница 314: ...stop the Ultrasound system from moving and release mechanism Where applicable check all wheel locks and wheel swiveling for proper operation 11 Cables and Connectors Check all internal cable harnesse...

Страница 315: ...ethanol or methanol alcohol abrasive cleaners or other strong solvents Only use isopropyl alcohol when instructed to do so Do not spray any liquid directly onto the Venue Go covers Do not allow any l...

Страница 316: ...he touch panel display without affecting the system operation tap Settings and then tap Clean The screen turns black allowing you to use a soft cloth with glass cleaning solution to clean the panel 2...

Страница 317: ...e probe Note For detailed information on handling Endocavity probes refer to the appropriate supplementary instructions for each probe 10 6 3 Basic Probe Care The Venue Go User Manual and the individu...

Страница 318: ...provided in the Venue Go User Manual NOTE For specific probe cleaning instructions refer to the individual probe Users Manual or care card supplied with the probe CAUTION FAILURE TO FOLLOW THE PRESCR...

Страница 319: ...e being visibly clean and properly disinfected The purpose of the regulation is to protect employees in the transportation industry as well as the persons who will receive and or open the package NOTE...

Страница 320: ...rvice or repair activities They differ somewhat from the standards that are used for design verification and manufacturing tests e g IEC 60601 1 and UL 60601 1 which require a controlled test environm...

Страница 321: ...ed insulation and adequacy of strain relief and cable clamps Locate and examine all associated transducers Inspect the cables and strain relief at each end Inspect the transducer enclosure and lens fo...

Страница 322: ...eversed If later tests indicate high leakage currents this should be suspected as a possible cause and the outlet wiring should be visually inspected 10 7 4 Grounding Continuity Measure the resistance...

Страница 323: ......

Страница 324: ...2018 by General Electric Company GE Medical Systems Ultrasound Primary Care Diagnostics LLC 9900 Innovation Drive Wauwatosa WI 53226 USA Tel 1 800 437 1171 Fax 1 414 721 3865 www gehealthcare com...

Отзывы: