– 24 –
(
Continued next page
)
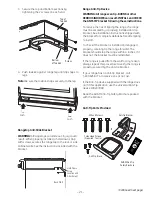
CHANGE GRILL ORIFICE
(if present)
Locate the 1–1/2" long Grill orifice.
Select for your gas type. LP
—
.047, NAT
—
.067
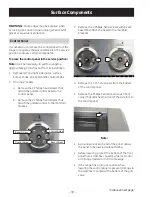
A.
Remove the grill cover,
grates and grate frame. Lift
the radiant baffle straight
up and off.
B.
Remove the 2 hex
head screws from
the top of the igniter.
• Remove one screw
from each side of
the burner surround.
• Lift out the surround.
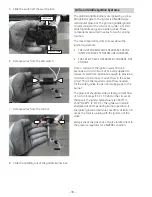
C.
Carefully push the
igniter aside and
under
the burner.
Do not pull or pinch
the wire.
Remove 4 burner
attachment screws,
2 at the front and 2
at the back. Slide the
burner assembly
toward the back and
out of the gas inlet.
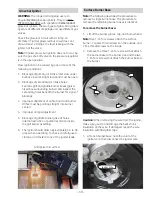
D.
Use a 1/2" deep well
socket to remove
and replace the orifice .
Reverse these
steps to re-assemble
the grill. Be sure to
place the unused
orifice in the holder
for possible future use.
4
Re
m
ove 2
hex he
a
d
screws
B
urner
Surround
Igniter
B
urner
Asse
m
bly
Surround
Screws
Front of R
a
nge
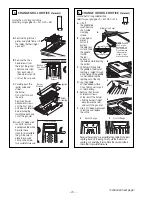
CHANGE GRIDDLE ORIFICE
(if present)
Locate the 3/4" long Griddle orifice.
Select for your gas type. LP
—
.047, NAT
—
.076
A.
Lift off
the griddle flue
cover. Remove
the 2 inside
clamping
screws.
B.
Use a pad or
piece of
carton to
protect
the adjacent
surface. Slide
the griddle
toward
the rear
and out of
the hold-down tabs along
the bottom.
C.
CAREFULLY lift and hold
the griddle. A thermostat
capillary is routed through
a clip. Gently lift the griddle
to one side and slip the
capillary out of the clip.
D.
Lay the griddle
on the padded surface.
Do not disconnect or pull
on the capillary.
E.
Remove the 2 burner
hold-down screws
at the rear of the burner.
• Pull the burner straight
back toward the rear
and out of the gas inlet.
F.
Use a 1/2" deep well socket
to remove and replace
the orifice.
Reverse these steps to re-assemble the griddle. Push excess
capillary back into the entry hole. Route the thermostat
capillary so it is held by the clip. Place the unused orifice in
the holder for possible future use.
5
C
a
pill
a
ry
Front of R
a
nge
B
C
D
E
F
Ba
ck of R
a
nge
Griddle Flue Cover
Cl
am
ping Screws
Leveling Screws
A
NOTE:
Re
m
ove
the 2 screws
positioned on
the inside only.
Do not re
m
ove
the outer
m
ost
screws—they
a
re for leveling.
Содержание Monogram ZDP486ND
Страница 53: ...53 Oven Doors exploded view Main Oven Door Companion Oven Door...
Страница 78: ...78 Rangetop Wiring Diagram...


