background image

Introduction 

The IS-ZW-TSTAT-300 programmable communicating thermostat operates via a 
high-quality, easy-to-use touch screen.  

Figure 1: IS-ZW-TSTAT-300 

LINK

RADIO

TA

RGET

TEMP

Top cover

Bottom cover

Wire terminals

MODE button

FAN button

Menu button

Prog button

Reset button

HVAC switches

Save Energy
           button

Power grid
       status
   indicator

Touch screen


WARNING: 

To avoid electrical shock and to prevent damage to the furnace, air 

conditioner, and the thermostat, disconnect the power supply before beginning 
work. This can be done at the circuit breaker. 

Caution: 

Your thermostat is a precise instrument, handle it with care: 

•  Turn off electricity to the HVAC system before installing or servicing the 

thermostat or any part of the system. 

•  Do not turn electricity back on until work is completed. 
•  Do not short (jumper) across electrical terminals at the control on the furnace 

or air conditioner to test the system. This may damage the thermostat. 

•  All wiring must conform to local codes and ordinances. 

This thermostat is designed for use with three AA alkaline batteries and/or 24 
VAC C wire (or a 12 to 24 AC or DC source) and millivolt gas systems. Each 
thermostat relay load should be limited to 1.0 A; higher amperage may cause 
damage to the thermostat. 

IS-ZW-TSTAT-300 Advanced Thermostat Installation Guide 

Содержание IS-ZW-TSTAT-300

Страница 1: ... installation 9 Testing the installation 10 Wiring diagrams 11 Wire reference chart 16 Specifications 17 Contact information For contact information see www interlogix com Copyright 2010 UTC Fire Security All rights reserved GE and the GE monogram are trademarks of the General Electric Company and are under license to Interlogix a UTC Fire Security Company 9 Farm Springs Road Farmington CT 06034 4...

Страница 2: ...aution Your thermostat is a precise instrument handle it with care Turn off electricity to the HVAC system before installing or servicing the thermostat or any part of the system Do not turn electricity back on until work is completed Do not short jumper across electrical terminals at the control on the furnace or air conditioner to test the system This may damage the thermostat All wiring must co...

Страница 3: ...will shorten thermostat life Do not locate where air circulation is poor such as in a corner in an alcove or behind a door Do not install the thermostat until all construction and painting has been completed This thermostat does not require leveling Remove the old unit Caution Read the instructions carefully before removing any wiring from the existing thermostat Wires must be labeled before they ...

Страница 4: ...ilable If you do not have a C wire you can run a new wire from the HVAC or use a standard 12 to 24 VAC or VDC wall transformer An external power source is required when using a radio module Note If you have both RH and RC you need to remove the jumper wire between these two terminals see Figure 3 on page 5 Prepare the wires Follow these guidelines for safe and secure wire connections You will need...

Страница 5: ...Y2 RH G on page 15 Three wire zoned hot water W RH A on page 15 The C wire is optional but preferred for all installation shown as a dotted line in the wiring diagrams listed above Some radio modules will require the 24 VAC C wire power If your combination of wires is not listed you can use the Wire reference chart on page 16 to determine your connections contact customer support for help Fan out ...

Страница 6: ... V to 24 V AC or DC at 300 ma or greater If used connect to the C and RH terminals no polarity Mount the thermostat to the wall 1 Hold the thermostat against the wall with the wires coming over the top above the terminal block The thermostat will cover the hole in the wall Position the thermostat for best appearance 2 Mark first and drill a 3 16 in 4 8 mm hole for the insert at each screw location...

Страница 7: ...eat pump system set the HVAC Type switch to HP heat pump If you have normal gas or oil heat or if you have a heat pump with gas or oil AUX heat set the Heat Type switch to GAS If you have normal electric heat or if you have a heat pump with electric AUX heat set the Heat Type switch to ELEC Figure 6 HVAC selection HVAC type Heat type P N 1069510 REV A ISS 09NOV10 7 ...

Страница 8: ...an corrode and damage the thermostat if you are leaving your home for a month or more you should replace the batteries as a precaution against battery failure in your absence Failing to replace the batteries when necessary could cause the thermostat to lose power or malfunction If the thermostat loses power then the thermostat will not control the temperature which could result in your HVAC system...

Страница 9: ...on switches should already be set see HVAC selection on page 7 2 With mode in OFF press the Menu button 3 Press HVAC SETUP on the Menu screen 4 On the HVAC setup screen use the icons to select the HVAC number The LCD display will show your selection and indicate the number of stages you have selected During setup 2nd stage will blink when both heat and cool have 2nd stages Figure 8 HVAC setup scre...

Страница 10: ...verify you have correctly installed the thermostat To check the fan if you have the G wire 1 Press the FAN button to turn the fan ON 2 Verify that air is blowing from the system 3 Press the FAN button again to return to AUTO To check heat 1 Set the mode to HEAT by pressing the MODE button until HEAT is displayed 2 Touch the temperature display to bring up the Manual screen 3 Touch the icon and rai...

Страница 11: ...ired heat or cool temperatures can be set on the large touch screen with the buttons A minimum 4 minute off time protects the compressor from damage This thermostat runs on three AA batteries The thermostat can be externally powered with a power source from 12 to 24 VAC or VDC at 300 mA or greater If used connect to the C and RH terminals no polarity The 24 VAC C wire is on the other side of the 2...

Страница 12: ...witch to ELEC Your HVAC system is now connected to the thermostat Figure 10 Three wire heat C B O W W2 Y Y2 RH RC G A Thermostat HVAC system W R G C Power Four wire heat cool C W Y RH G 1 Connect the RH or R wire to the RH terminal This connects the power 2 Connect the W wire to the W terminal This connects the heat 3 Connect the Y wire to the Y terminal This connects the compressor 4 Connect the ...

Страница 13: ...rminal This connects the power 5 Connect the G wire to the G terminal This connects the fan 6 Set the HVAC Type switch to NORM and If you have gas or oil heat set the Heat Type switch to GAS If you have electrical heat set the Heat Type switch to ELEC Your HVAC system is now connected to the thermostat Figure 12 Five wire heat cool C B O W W2 Y Y2 RH RC G A Thermostat HVAC system W RC G C Y RH Pow...

Страница 14: ... RH G 1 Connect the O wire to the O terminal or the B wire to the B terminal This connects the change over valve If you have both O and B connect only the O wire to the O terminal and do not connect the B wire to the B terminal see Wire reference chart on page 16 under Trane for B wire terminal 2 Connect the W2 wire to the W2 terminal This connects the AUX heat 3 Connect the Y wire to the Y termin...

Страница 15: ...nect the RH or R wire to the RH terminal This connects the power 6 Connect the G wire to the G terminal This connects the fan 7 Set the HVAC Type switch to NORM and If you have gas or oil heat set the Heat Type switch to GAS If you have electric heat set the Heat Type switch to ELEC Your HVAC system is now connected to the thermostat Figure 15 Two stage heat and two stage cool C B O W W2 Y Y2 RH R...

Страница 16: ...age auxiliary heat Y Y cool control or 1st stage of compression for heat pump Y2 Y2 2nd stage cool control or 2nd stage compression for heat pump G or F G fan control C or X C 24 VAC power to power thermostat Note Trane uses B for this connection H H external humidifier DH DH external dehumidifier EX EX external fresh air baffle B B heat pump changeover cool to heat powered in heat O O heat pump c...

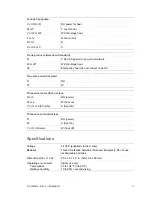
Страница 17: ...Three wire motor driven valves R or 5 RH power W or 4 W heat on Y or G or 6 3rd wire A heat off Three wire solenoid valves R RH power W A heat on Y or G 3rd wire W heat off Specifications Voltage 24 VAC supplied via the C wire Batteries Three AA alkaline batteries Duracell Energizer Do not use rechargeable batteries Dimensions W x H x D 5 5 x 3 5 x 1 5 in 140 x 89 x 38 mm Operating environment Tem...

Страница 18: ...e that interference will not occur in a particular installation If this equipment does cause harmful interference to radio or television reception which can be determined by turning the equipment off and on the user is encouraged to try and correct the interference by one or more of the following measures Reorient or relocate the receiving antenna Increase the separation between the equipment and ...

Отзывы: