GE G500 Скачать руководство пользователя страница 9

GE Grid Solutions


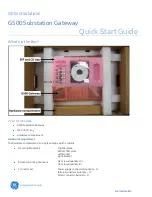
G500 Substation Gateway,


Quick Start Guide


GE Information


SWM0106-1.00-0 

9


3.


Login with the new nominated administrator user and password. 
See 

Task 2


4.


Select the desired G500 configuration and select the “Synch to” button.   
Follow the steps as prompted on the screen. 

Converting D400 configuration to G500 

DS Agile MCP Studio can restore D400 archives created in SGConfig. 
D400 devices with v530 configuration can be directly converted to G500. Previous D400 versions need to be first upgraded to 

v530 using the D400 Upgrade Manager. Launch DS Agile MCP Studio 

1.


If you need to obtain the D400 configuration from an existing operational unit - connect to D400 device and use Sync 
From to upload the configuration.  
Alternatively, select the existing D400 offline configuration to be converted. 

2.


With the D400 device selected, select the 

Create G500

 button in the menu. Follow the prompts. 

3.


When the conversion is complete, the new configuration can be saved and downloaded to the G500 using the Sync To 
option.  

Setup G500 - With a Snapshot 

Task 1: Connect to the G500  

1.


Connect a LAN cable between your computer and the G500 front maintenance LAN port. 

2.


Launch command prompt, use the command ‘ping 192.168.168.81’ to ensure the G500 is connected. 


The PC’s network settings will have to be configured to the same subnet as the G500 to establish 
communications 

Task 2: Restore the G500 Snapshot 

1.


Launch the DS Agile MCP Studio on the local configuration PC. 
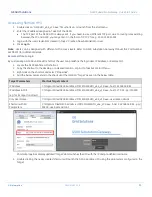
2.


Restore your G500 snapshot to a device in a project in DS Agile MCP Studio (

Archive > Restore Snapshot to Device

).  

3.


Edit the IP address in the projects device properties to match the default G500: 192.168.168.81 

4.


Select this device, initiate Synch To Device > Restore Snapshot to Device  

5.


Select all Restore options 


Restore Configuration Data 


Restore Network Settings 


Restore information required to clone a device 

6.


If used, enter the Optional Password – This is the password selected when saving the snapshot, not the password on the 
G500. This feature will verify the Snapshots authenticity, but not prevent the Snapshot sync if lost 

7.


Login with the default admin user:  


User: defadmin 


Password: defadmin. 

Refer to DS Agile Studio User Manual for more details. 

8.


Follow the steps as prompted on the screen. 

Result:

  After successfully restoring the snapshot, the G500 will restart and finish applying the changes. The G500 runs with the 

same settings and configuration as when the snapshot was previously created. 
You can now change the Projects device properties IP address set in 

step 3

 as desired. 

Содержание G500

Страница 1: ...are Compartment Hardware Compartment The hardware compartment is a single package which contains Mounting Bracket Kit Top filler plate Bottom filler plate Left bracket Right bracket Bracket mounting h...

Страница 2: ...includes 4 metal pieces left bracket right bracket top filler plate and the bottom filler plate along with M4 quantity 10 and M3 quantity 8 screws The M4 screws are used to attach the left and right...

Страница 3: ...s Note The IRIG B input and output connectors are keyed and can only be installed in the corresponding position Missing Something Contact GE Customer Service right away and we ll figure it out Be sure...

Страница 4: ...user s password before executing the command Failing to use sudo prevents the command from executing no error feedback is displayed To launch mcpcfg from the G500 command line the user must type sudo...

Страница 5: ...All secure connections using certificates must be re associated with the new imported certificates e g Secure Connection Relay VPN Server etc License file key is not restored with the snapshot G500 e...

Страница 6: ...add a nominated administrator level user s To restore G500 Snapshots Warning The default administrator defadmin user will be deleted automatically once a nominated administrator user is created succes...

Страница 7: ...le to your computer USB port and to the G500 front maintenance port Note First time users will have to install all the required Windows drivers obtained from GE 2 Launch the Secure Terminal Emulator f...

Страница 8: ...Single or 2 Redundant or 3 PRP 6 Respond to the on screen prompts as required 7 Enter 2 Static IP Address 8 Type the IP address of the G500 and press Enter The default Subnet Mask as desired 9 Naviga...

Страница 9: ...prompt use the command ping 192 168 168 81 to ensure the G500 is connected The PC s network settings will have to be configured to the same subnet as the G500 to establish communications Task 2 Resto...

Страница 10: ...r additional details G500 Runtime HMI The G500 Runtime Human Machine Interface HMI is available to view real time information on G500 With the HMI a user has the option to monitor the status of a subs...

Страница 11: ...dress or Remote Port 1 Locate the G500 Runtime HMI shortcut 2 Copy the shortcut to the desktop or a desired location or pin it to Taskbar or Start Menu 3 Right click on the shortcut and select Propert...

Страница 12: ...o of its display ports Display Port 1 DP1 and Display Port 2 DP2 When single monitor is connected the connected monitor becomes the Primary Display Port DP1 is primary by default when two monitors are...

Страница 13: ...rom the G500 Runtime HMI or G500 Command Line to check the updated Secret Signature Note The default secret signature should be replaced with a secure signature chosen by your security administrator T...

Страница 14: ...t without the prior written permission of General Electric Company The information contained in this online publication is proprietary and subject to change without notice The software described in th...

Отзывы: