
GE Grid Solutions
G500 Substation Gateway,
Quick Start Guide
GE Information
SWM0106-1.00-0
7
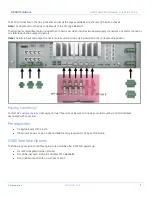
Connect to G500 via Local KVM GUI
1.
Connect the Display Port on the rear panel of the G500 to a monitor with a Display cable.
2.
Connect a keyboard to any of the USB ports.
3.
The Local HMI is started automatically when the G500 is powered on and a monitor is connected to display port.
4.
On the startup menu, select G500 -> Terminal.
5.
At the shell login prompt (login as: ), enter the default admin credentials:
•
Username:
defadmin
•
Password as
defadmin
Connect to G500 via Front maintenance LAN port
1.
Connect a LAN cable between your computer and the G500 front maintenance LAN port.
2.
Launch command prompt on the PC, use the command ‘
ping 192.168.168.81
’ to ensure the G500 is connected.
•
The PC’s network settings will have to be configured to the same subnet as the G500 to establish
communications
3.
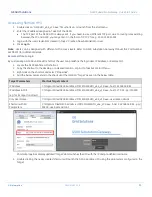
Launch the Secure Terminal Emulator from the DS Agile Studio folder in the start menu
4.
Select File > Connect and ensure the Protocol is set to SSH
5.
Enter the G500 credentials to connect:
•
Host Name: 192.168.168.81
•
Port: 22
•
Login name:
defadmin
•
Password:
defadmin
Connect to G500 via Front Serial USB Maintenance Port
1.
Connect a USB 2.0 type B cable to your computer USB port and to the G500 front maintenance port.
Note:
First time users will have to install all the required Windows drivers, obtained from GE.
2.
Launch the Secure Terminal Emulator from the DS Agile Studio folder in the start menu
3.
Select File > Connect and ensure the Protocol is set to Serial Port
4.
confirm the settings before selecting Connect:
•
Serial Port: Select the simulated G500 serial port
•
Baud rate:
115200
5.
At the G500 command shell login prompt, enter the default admin credentials:
•
Username:
defadmin
•
Password:
defadmin
Task 2: Create a New Administrator User
The default administrator (defadmin) is restricted to prevent setting or gateway configuration changes. This is to force the creation
of a new nominated administrator-level user account to continue the G500 Setup. New administrator-level user account(s) are
created using G500 Local Configuration Utility (
mcpcfg
). After completing this task, the defadmin user is removed automatically.
To create a new administrator-level user account:
1.
At the G500 #>> prompt, type ‘
sudo
mcpcfg’
and press
Enter
.
2.
Enter the defadmin user password and press
Enter
.
•
Password:
defadmin
3.
Choose option 1. Configure Authentication > 3. Administrator Group Users.
4.
Follow the on-screen prompts as required to create a new administrator-level user. You can now use this user account
to access the G500 remotely through SSH, to connect to G500 Runtime HMI or to connect MCP Studio.