background image

34

,PDJH6WDELOL]DWLRQPRGH

6HWWLQJWKH,PDJH6WDELOL]DWLRQIXQFWLRQ

under (        ) mode.
1.Switch the mode dial to (       ) mode.
2.Press 

Menu

, and use 

Up/Down

 to select 

WKH,PDJH6WDELOL]DWLRQVHWWLQJV

3.Press       to confirm the setting, and then 

start shooting the movie.

6WDELOL]DWLRQGXULQJ0RYLHPRGHLVRQO\

available when the Frame Rate is set to 15 
fps"

7KH,PDJH6WDELOL]DWLRQPRGHFRPEDWVWKH
HIIHFWRIKDQGVKDNHDQGDOORZV\RXWRWDNH

pictures that would otherwise be blurred.

1.Switch the mode dial to (           ) mode.
2.Press 

Shutter

 halfway to focus on the  

  subject.

3.Press 

Shutter

 fully to capture the image.

Содержание G1

Страница 1: ......

Страница 2: ...ii ...

Страница 3: ...1 2001 A2 2003 EN 61000 3 2 2000 A1 2001 EN 61000 3 3 1995 A1 2001 following the provision of the EMC Directive 89 336 EEC 2004 108 EEC WARNING 7R SUHYHQW UH RU VKRFN KD DUG GR QRW H SRVH WKH unit to rain or moisture For customers in the U S A Tested To Comply With FCC Standards FOR HOME OR OFFICE USE FCC Statement This device complies with part 15 of the FCC Rules Operation is subject to the foll...

Страница 4: ...dings Loss of recordings cannot be compensated for if a mal function of your camera or recording media etc PDNHV WKH SOD EDFN RI UHFRUGLQJV QRW SRVVLEOH Battery notes Incorrect use of the batteries may cause them to OHDN EHFRPH KRW LJQLWH RU EXUVW OZD V REVHUYH the precautions given below R QRW H SRVH WKH EDWWHULHV WR ZDWHU DQG WDNH SDUWLFXODU FDUH WR NHHS WKH WHUPLQDOV GU R QRW KHDW WKH EDWWHULHV...

Страница 5: ...DWLRQ SXUSRVHV RQO DQG PD EH SURS erties of their respective owners Safety information Please read the following important information carefully before using the product R QRW WDNH DSDUW RU DWWHPSW WR VHUYLFH WKH camera yourself R QRW GURS RU NQRFN WKH FDPHUD PSURSHU handling may damage the product 7XUQ RȖ WKH FDPHUD EHIRUH LQVHUWLQJ RU UHPRYLQJ the battery and memory card Use only the type of bat...

Страница 6: ... Do not use abrasive cleansers alcohol based or solvent based cleaners to clean the camera Wipe the camera with a slightly damp soft cloth About this manual This manual provides you with instructions on KRZ WR XVH RXU GLJLWDO FDPHUD YHU HȖRUW has been made to ensure that the contents of this manual are accurate but General Imaging RPSDQ UHVHUYHV WKH ULJKW WR PDNH FKDQJHV without notice Symbols use...

Страница 7: ...he battery 10 Inserting the battery 10 Inserting an SD SDHC card 12 7XUQLQJ RQ DQG RȖ 13 Using the Mode Dial 14 Setting display language date and time Setting the Date and Time 15 Setting the Language 16 About the LCD screen 17 BASIC OPERATION 18 Shooting in Auto mode 18 8VLQJ WKH RRP IXQFWLRQ 18 8VLQJ WKH DVK 19 Using the self timer 19 Using Macro mode 20 Exposure compensation 20 Advanced functio...

Страница 8: ...HZRUNV 31 Glass 31 Museum 31 Landscape 31 Night landscape 31 Night portrait 31 Return to the scene mode palette 32 Panorama mode 32 PDJH VWDELOL DWLRQ 34 Face detection 35 PLAYBACK 36 Viewing photos and videos 36 Editing video 38 Thumbnail view 39 8VLQJ RRP SOD EDFN for still pictures only 40 Using the erase button 41 USING THE MENUS 42 Still menu 42 AF mode Auto Focus mode 43 Cont AF Continuous A...

Страница 9: ... DPOF Digital Print Order Format 52 Text display 53 Trim 53 5HVL H 54 Rotate 54 Slide show 55 Red eye removal 56 Setup menu 57 Format 57 Beep 58 LCD brightness 59 Power save 59 Date Time 60 World time 60 File Numbering 61 Language 61 Video system 62 Copy internal memory to memory card 62 Reset 63 CONNECTIONS 64 Connecting to a TV 64 Connecting to a PC 65 Setting the USB mode 66 ...

Страница 10: ...ting to a PictBridge compatible printer 67 Setting the USB mode 68 Using the PictBridge menu 70 Print with date 70 Print without date 71 Print index 72 Print DPOF 72 Exit 73 Appendices 74 6SHFL FDWLRQV 74 Error messages 78 Troubleshooting 80 ...

Страница 11: ...V WKH IROORZLQJ LWHPV I DQ LWHP LV PLVVLQJ RU DSSHDUV WR be damaged please contact your vendor 8QSDFNLQJ Camera Rechargeable Lithium ion battery Battery charger USB cable AV cable CD ROM User Manual User Manual 4XLFN VWDUW JXLGH Warranty card Wrist strap ...

Страница 12: ...8 8 Front View Camera views Back View 1 2 3 ķ ĺ IJIJ IJĴ IJĵ IJij IJı ĸ Ĺ Navigation Pad Ķ ĵ ...

Страница 13: ...HU 5 Status LED 16 Power button 6 Mode dial 17 Shutter button 7 Face detection AF button 18 Zoom scroll wheel 8 Menu button 19 USB AV port 9 Erase button 20 Tripod mount point 10 Exposure compensation Up button 21 Memory card Battery compartment 11 Macro mode Right button 22 Wrist strap mount Bottom View power IJĶ IJķ IJĸ IJĹ A V OUT memory card battery IJĺ ijIJ ijı 22 ...

Страница 14: ...lug the other end of the connecting cable into a wall outlet Charging the battery Inserting the battery 1 2 A V O U T m e m o ry c a rd b a tt e ry A V O U T 1 Open the battery compartment Leave the battery to charge until the charger light goes green 7R PD LPL H EDWWHU OLIH WKH UVW FKDUJH should be at least 4 hours ...

Страница 15: ...the correct polarity Use the side of battery to press down the stopper as shown allowing the battery to be inserted properly A V O U T m e m o ry c a rd b a tt e ry 3 Close the battery compartment A V O U T A V O U T Battery capacity decreases with usage ...

Страница 16: ... the battery compartment 2 Insert an optional SD SDHC card into the memory card slot as shown A V O U T A V O U T Optional SD SDHC cards are not included The use of 64MB to 4GB memory cards from UHFRJQL HG PDQXIDFWXUHUV VXFK DV 6DQ LVN Panasonic and Toshiba is recommended for reliable data storage ...

Страница 17: ...ntly push the card to release it Pull the card carefully 7XUQLQJ RQ DQG RȖ Press the Power button to turn the camera RQ 7R WXUQ RȖ WKH FDPHUD SUHVV WKH Power button again power Power Button When turned on the camera will enter the mode according to the mode dial setting You can also turn the mode dial to change the modes after the camera is turned on ...

Страница 18: ...d on the memory card and internal memory Movie Switch to record videos Image Stabili DWLRQ 6ZLWFK WR XVH PDJH 6WDELOL DWLRQ ZKHQ WDNLQJ VWLOO SLFWXUHV Scene 6ZLWFK WR XVH D SUHVHW VFHQH PRGH IRU WDNLQJ VWLOO SLFWXUHV There are 12 scenes in total Portrait 6ZLWFK WR SRUWUDLW PRGH ZKHQ WDNLQJ FORVH XS SRUWUDLW SKRWRV Panorama Switch to capture a sequence of shots and stitch them together into a panor...

Страница 19: ... Display language To access the Setup menu do the following 1 Press Power to turn the camera on 2 Press the button and use Up Down Left Right to select the Setup menu KHQ XVLQJ WKH FDPHUD IRU WKH UVW WLPH WKH language menu will appear automatically Setting the Date and Time 1 Use the Up Down to select Date Time Then press the Right to enter the setting ...

Страница 20: ... Down to adjust the value 3 Press the EXWWRQ WR FRQ UP WKH VHWWLQJ Setting the Language 1 Use the Up Down to select Language Then press the Right to enter the setting 2 Use the navigation buttons to select the desired language 3 Press the EXWWRQ WR FRQ UP WKH VHWWLQJ ...

Страница 21: ...XJKO ZLWK ZDWHU ULQN ODUJH quantities of water and induce vomiting 7KHQ VHHN PHGLFDO DVVLVWDQFH About the LCD screen When you turn the camera on various icons are shown on the 2 5 LCD screen to indicate the current camera settings and status To learn more about the displayed icons see LCD Screen display on page 26 LCD Screen notes Extremely high precision technology had been used to manufacture th...

Страница 22: ...your picture on the LCD screen and press the shutter button halfway to focus on the subject 4 When the subject is in focus the green colored Focus frame appears on the center of the LCD screen 5 Press Shutter fully to capture the image 8VLQJ WKH RRP IXQFWLRQ BASIC OPERATION 7KH FDPHUD LV HTXLSSHG ZLWK RSWLFDO RRP DQG GLJLWDO RRP 8VH WKH Zoom scroll wheel RQ WKH WRS RI WKH FDPHUD WR RRP LQ RU RXW R...

Страница 23: ...Ȗ Using the self timer To enable the self timer function press the Down Self timer to select 2 second timer delay 10 second timer delay or a continuous shot 2 second timer delay A single picture is shot 2 seconds after the shutter button is pressed 10 second timer delay A single picture is shot 10 seconds after the shutter button is pressed Continuous shot Pictures are shot continuously when the s...

Страница 24: ...n subjects 5cm from the lens Exposure compensation The exposure compensation allows you to DGMXVW WKH EDFNJURXQG EULJKWQHVV WR SURGXFH the best result of photos To change the expo sure values do the following 1 Press the Up Exposure to display the exposure setting 2 Use the Left Right to adjust the exposure value for the picture The range is from EV 2 0 to EV 2 0 steps of 0 3 ...

Страница 25: ...the white balance do the following 1 Press the button to enter the Function PHQX 0DNH VXUH WKH WB function is selected 2 Use Up Down navigation buttons to select an option The following options are available Auto Day light Cloudy Incandescent Fluorescent Fluorescent H Manual 3 Press the EXWWRQ WR FRQ UP RXU setting The WB setting is only available when the camera is in the Manual mode ...

Страница 26: ... the button to enter the Function menu 2 Use the Left Right navigation buttons to highlight the ISO function Higher ISO pictures will naturally have more noise than lower ISO pictures 3 Use the Up Down navigation buttons to select the desired ISO value from Auto 80 100 200 400 800 or 1600 4 Press the EXWWRQ WR FRQ UP RXU setting Quality The quality setting adjusts the compression ratio of the imag...

Страница 27: ...Best quality Standard compression Fine quality High compression Normal quality Maximum compression 4 Press the EXWWRQ WR FRQ UP RXU VHWWLQJ Size 7KH VL H VHWWLQJ UHIHUV WR WKH LPDJH UHVROXWLRQ LQ pixels A higher image resolution allows you to SULQW WKDW LPDJH LQ ODUJHU VL HV ZLWKRXW GHJUDG ing the image 7R VHW WKH LPDJH VL H GR WKH IROORZLQJ 1 Press the button to enter the Function menu 2 Use the ...

Страница 28: ... 9 6M 3 2 3088x2058 3 2 7M 3088x2320 4 Press the EXWWRQ WR FRQ UP RXU setting Color The color setting allows you to add artistic HȖHFWV GLUHFWO ZKHQ WDNLQJ VKRWV RX FDQ WU GLȖHUHQW FRORU WRQHV WR DOWHU WKH PRRG RI your pictures To set the image color do the following 1 Press the button to enter the Function menu 2 Use the Left Right navigation buttons to highlight the Color function ...

Страница 29: ...25 2 Use Up Down to select an option The following options are available 2Ȗ ODFN KLWH Sepia Vivid 4 Press the EXWWRQ WR FRQ UP RXU setting ...

Страница 30: ... Auto Manual Panorama Portrait Scene PDJH 6WDELOL DWLRQ 2 Scene icon only available for Scene mode Sport LUHZRUNV Children Glass Indoor Museum Leaf Landscape Snow Night landscape Sunset Night portrait 3 Light metering method Spot AE Center Weight Ai AE 4 EV indicator 5 Self timer indicator 2 second self timer 10 second self timer Continuous shot ...

Страница 31: ...RQGV ZKHQ WKH PRGH LV UVW switched to 10 Remaining number of photos that can be WDNHQ 11 Warning icon Appears when the camera is held un steadily 12 Focus frame 13 Zoom indicator 14 White balance only available for Manual mode 15 ISO only available for Manual mode 16 Image quality PDJH VL H 18 Image color only available for Manual mode 19 EV adjustment bar 20 Memory card internal memory indicator ...

Страница 32: ...elf timer indicator 2 second self timer 10 second self timer Continuous shot 5 Macro mode indicator Macro mode 6 Battery status 7 Mode name SSHDUV IRU VHFRQGV ZKHQ WKH PRGH LV UVW switched to 5HPDLQLQJ WLPH IRU YLGHRV WKDW FDQ EH WDNHQ 9 Warning icon Appears when the camera is held un steadily 10 Focus frame 11 Zoom indicator 12 Video resolution 13 Video quality ...

Страница 33: ...le Playback mode display Mode 1 19 18 17 9 11 13 14 15 16 2 3 4 5 6 7 8 12 10 3OD EDFN PRGH LFRQ 32 OH LFRQ 3 File protection icon XGLR OH LFRQ 9LGHR OH LFRQ 6 Memory card internal memory indicator 7 Picture ID 8 Battery status 9 Mode name 10 Photo audio status No audio recording Audio recording present 11 Recording date and time 12 Histogram 13 Aperture value 14 Shutter speed 15 Exposure value 16...

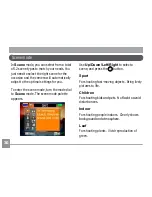
Страница 34: ... enter the scene mode turn the mode dial to Scene mode The scene mode palette appears Use Up Down Left Right to select a scene and press the button Sport For shooting fast moving objects Bring lively pictures to life Children RU VKRRWLQJ NLGV DQG SHWV 1R DVK WR DYRLG disturbances Indoor For shooting people indoors Clearly shows EDFNJURXQG DQG DWPRVSKHUH Leaf For shooting plants Vivid reproduction ...

Страница 35: ...UNV 6KXWWHU speed is slower than normal Glass For shooting objects behind transparent glass Museum For shooting in museums or places where DVK LV QRW DOORZHG Landscape For shooting landscapes Vivid reproduction of green and blue Night landscape For shooting night scenes Use of tripod is recommended Night portrait For shooting portraits with night scenes as EDFNJURXQG ...

Страница 36: ...ene mode palette You can also set the Image Quality and Image 6L H IURP WKH XQFWLRQ PHQX RU PRUH VHWWLQJ details on the options refer to Advanced function menu on page 21 Panorama mode allows you to shoot ultra wide panoramic shots It allows you to create beautiful wide view photos by stitching three images into a single panoramic picture To stitch a panoramic picture follow the steps below 1 Set ...

Страница 37: ... and press the shutter button 4 The frame record icon will display under the focus frame to indicate the number of SKRWRV RX KDYH WDNHQ 5 Capture the second and third views as WDNLQJ WKH UVW YLHZ PDNLQJ VXUH WKDW WKH edges of pictures overlap 6 The camera will then stitch the pictures into a panorama automatically 6HW WKH PRGH GLDO WR SOD EDFN PRGH WR YLHZ the result ...

Страница 38: ... to confirm the setting and then start shooting the movie 6WDELOL DWLRQ GXULQJ 0RYLH PRGH LV RQO available when the Frame Rate is set to 15 fps 7KH PDJH 6WDELOL DWLRQ PRGH FRPEDWV WKH HIIHFW RI KDQG VKDNH DQG DOORZV RX WR WDNH pictures that would otherwise be blurred 1 Switch the mode dial to mode 2 Press Shutter halfway to focus on the subject 3 Press Shutter fully to capture the image ...

Страница 39: ... face detection process When the camera detects a face a white rectangular frame will be drawn around the face If no faces can be detected a circular frame will appear on the LCD screen Note For best results the face of the subject should be relatively large on the LCD screen and the subject should be facing the camera as front on as possible 3 Press Shutter halfway to focus on the subject Face De...

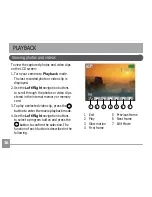
Страница 40: ...croll through the photos or video clips stored in the internal memory or memory card 3 To play a selected video clip press the EXWWRQ WR HQWHU WKH PRYLH SOD EDFN PRGH 4 Use the Left Right navigation buttons to select a program button and press the EXWWRQ WR FRQ UP WKH VHOHFWLRQ 7KH function of each button is described in the following 1 2 3 4 5 6 7 1 Exit 5 Previous frame 2 Play 6 Next frame 3 Slo...

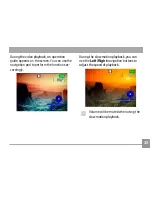
Страница 41: ...pears on the screen You can use the navigation pad to perform the functions ac cordingly XULQJ WKH VORZ PRWLRQ SOD EDFN RX FDQ use the Left Right navigation buttons to DGMXVW WKH VSHHG RI SOD EDFN Volume will be muted when using the VORZ PRWLRQ SOD EDFN ...

Страница 42: ...ton and use the Left Right navigation buttons to specify the QHZ EHJLQQLQJ RI WKH SOD EDFN 2 Select the button and use the Left Right navigation buttons to specify the QHZ HQG RI WKH SOD EDFN 2 Select the button to play the editing section 7R VDYH WKH OH VHOHFW WKH button and press the button 4 Use the Up Down navigation buttons to select an option New OH 6DYH DV D QHZ OH Overwrite 2YHUZULWH WKH R...

Страница 43: ...e saved LWK VXȗFLHQW EDWWHU DQG DW OHDVW of available memory up to 30 minutes of footage can be recorded per movie Thumbnail view When in Playback PRGH PRYH WKH RRP scroll wheel to the Wide position once to display the thumbnail of photos and video clips on the screen 8VH WKH RRP VFUROO ZKHHO WR VZLWFK between the 2x2 3x3 and 4x4 thumbnail display 2 Use Up Down Left Right to select a photo or vide...

Страница 44: ... your camera to Playback mode 2 Use the Left Right navigation buttons to select a photo to magnify 0RYH WKH RRP VFUROO ZKHHO WR WKH 7HOH position once 8VH WKH RRP VFUROO ZKHHO WR RRP LQ DQG RXW 7KH RRP LQGLFDWRU DQG SDQ ER appear on the screen 5 Use the navigation buttons to pan across the image 6 Press the button to return the image to its original scale ...

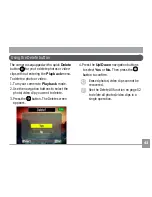
Страница 45: ...n your camera to Playback mode 2 Use the navigation buttons to select the photo video clip you want to delete 3 Press the button The Delete screen appears 4 Press the Up Down navigation buttons to select Yes or No Then press the EXWWRQ WR FRQ UP Erased photos video clips cannot be recovered See the Delete All function on page 52 to delete all photos video clips in a single operation ...

Страница 46: ...QJV 1 Use the Up Down navigation buttons to scroll through the menu items 2 Press the Right navigation button to enter the submenu 3 Use the Up Down navigation buttons to select an option 4 Press the EXWWRQ WR FRQ UP WKH VHWWLQJ and exit the menu Refer to the following sections for more de tailed information on each setting ...

Страница 47: ...ailable Single AF The focus frame appears on the center of the LCD screen to focus on the subject Multi AF The camera automatically IRFXVHV WKH VXEMHFW LQ D ZLGH DUHD WR QG the focus point AF assist beam 8VH WKLV VHWWLQJ WR DLG IRFXV LQ GDUN FRQGL tions Select On to turn on the AF assist beam or Off the disable the function ...

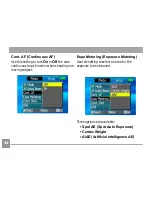
Страница 48: ...e auto continuous focus function when shooting on a moving subject Expo Metering Exposure Metering Use this setting to select an area for the exposure to be obtained Three options are available Spot AE Spot Auto Exposure Center Weight AiAE UWL FLDO Intelligence AE ...

Страница 49: ...le shot only 5 shot Capture up to 5 consecutive pictures Last 5 shots Capture pictures continu ously until the shutter button is released but only the last 5 shots are recorded Time Lapse Automatically capture SLFWXUHV LQ DW SUHGH QHG LQWHUYDOV Grid 8VH WKLV VHWWLQJ WR WXUQ RQ RU RȖ WKH IUDPLQJ JULGV ZKHQ WDNLQJ SKRWRV 7KLV PD KHOS RX position the subject in your composition ...

Страница 50: ...HGLDWHO DIWHU WDNLQJ D SLFWXUH 7KH SLF ture stays on the LCD screen for an adjustable period of time Three options are available 1 Sec 2 Sec 3 Sec Digital zoom Use this setting to enable or disable the digi WDO RRP IXQFWLRQ KHQ GLVDEOHG RQO WKH RSWLFDO RRP LV HQDEOHG ...

Страница 51: ...UHV 8VH WKLV VHWWLQJ WR enable or disable the histogram display on the LCD screen Slow Shutter 6ORZ 6KXWWHU PRGH ZLOO NHHS WKH VKXWWHU RSHQ as long as you push down the shutter button So you are in complete control of the exposure Manual To set a long exposure time between 2 30 sec ...

Страница 52: ...uttons to scroll through the menu items 2 Press the Right navigation button to enter the submenu 3 Use the Up Down navigation buttons to select an option 4 Press the EXWWRQ WR FRQ UP WKH VHWWLQJ and exit the menu Refer to the following sections for more de tailed information on each setting Continuous AF See Continuous AF section on page 44 ...

Страница 53: ...49 49 Expo Metering Exposure Metering See Expo Metering section on page 44 Stabilization See Stabilization section on page 34 ...

Страница 54: ...se the Up Down navigation buttons to scroll through the menu items 2 Press the Right navigation button to enter the setting Refer to the following sections for more de tailed information on each setting Protect To prevent pictures or videos being erased DFFLGHQWDOO RX FDQ XVH WKLV VHWWLQJ WR ORFN RQH RU DOO OHV ...

Страница 55: ... Right navigation button 4 Use the button to select Yes WR ORFN the displayed picture video or Unlock WR XQORFN LW DQG XVH WKH Up Down navigation buttons to select Back to return to the Playback menu NH icon will appear at the top of the screen to indicate that the picture video is protected Delete This setting allows you to delete a single or DOO OHV VWRUHG LQ WKH LQWHUQDO PHPRU RU RXU memory car...

Страница 56: ...escribed previously 2 Use the Up Down navigation buttons to select All and press the Right navigation button 3 Use the Left Right navigation buttons to select Yes WR GHOHWH DOO WKH OHV RU No to cancel DPOF Digital Print Order Format DPOF allows you to record your selection of SLFWXUHV WKDW RX ZRXOG OLNH WR SULQW DQG ZLOO save your selection on the memory card so that you can simply hand your memor...

Страница 57: ...shutter VSHHG H SRVXUH YDOXH LPDJH VL H LPDJH quality and ISO value Trim The trim setting allows you to trim a picture to adjust the part that you desired and save it as a new picture To trim a picture 1 Select the Trim setting from the Playback menu as described previously 8VH WKH RRP VFUROO ZKHHO DQG QDYLJDWLRQ EXWWRQV WR DGMXVW WKH WULPPLQJ ER WR W WKH ORFDWLRQ DQG VL H RI WKH QHZ SLFWXUH ...

Страница 58: ...HFW D SLFWXUH WR UHVL H 3 Use the Up Down navigation buttons to select a resolution 1024X768 or 640X480 WR UHVL H WKH LPDJH RU back to cancel and return to the Playback menu 4 Press the EXWWRQ WR FRQ UP WKH VHWWLQJ 5HVL LQJ DQ LPDJH FUHDWHV D QHZ OH WKDW FRQWDLQV WKH LPDJH LQ WKH VL H RX VHOHFW 7KH OH ZLWK WKH RULJLQDO LPDJH also remains in memory If the message The image cannot be edited appears ...

Страница 59: ... WR FRQ UP WKH VHWWLQJ The rotated image will be saved as a new OH DQG WKH RULJLQDO LPDJH ZLOO UHPDLQ intact in memory Slide show This setting allows you to view all the stored pictures as a slideshow 1 Select the Slide show setting from the Playback menu as described previously 2 Use the Up Down navigation buttons to VHOHFW ȖHFW QWHUYDO WLPH RU 5HSHDW DQG use the Left Right navigation buttons to ...

Страница 60: ...previously 2 Use the Left Right navigation buttons to select the image for which red eyes will be removed 3 Use the Up Down navigation buttons to select Yes to fix the selected image or back to cancel and return to the Playback menu 4 Press the EXWWRQ WR FRQ UP WKH VHWWLQJ For best results the face of the subject should be relatively large on the LCD screen the subject should be facing the camera ...

Страница 61: ... scroll through the menu items 2 Press the Right navigation button to enter the setting Refer to the following sections for more de tailed information on each setting Format Memory The format function allows you to erase all data in the memory card and internal memory including the protected pictures and video clips To use this setting 1 Select the Format Memory setting from the Setup menu as desc...

Страница 62: ...and change the tones for shutter buttons self timer and SRZHU RQ SRZHU RȖ To change this setting 1 Select the Beep setting from the Setup menu as described previously 2 Use the Up Down navigation buttons to switch between volume shutter tone NH WRQH VHOI WLPHU WRQH DQG SRZHU WRQH HOGV 3 Use the Left Right navigation buttons to adjust the volume and change each tone style Then press the EXWWRQ WR F...

Страница 63: ...ghtness level Then press the EXWWRQ WR FRQ UP Power Saver This setting allows you to save power and get the maximum possible running time for your EDWWHU ROORZ WKH VWHSV EHORZ WR WXUQ RȖ WKH LCD screen and camera automatically after a period of inactivity 1 Select the Power Save setting from the Setup menu as described previously 2 Use the Up Down navigation buttons to switch between LCD power and...

Страница 64: ...ate and Time section on page 15 World time The world time setting is a useful function on your overseas trips This feature enables you to display the local time on the LCD screen while you are overseas 1 Select the World time setting from the Setup menu as described previously The world time screen appears 2 Use the Up Down navigation buttons to switch between the hometown and travel destination H...

Страница 65: ...V LQ D QHZ IROGHU LQ the memory card 1 Select the File numbering setting from the Setup menu as described previously 2 Use the Up Down navigation buttons to select Yes or No Then press the EXWWRQ WR FRQ UP Language See Setting the Language section on page 16 Video system Use this setting to determine your video system in the current area 1 Select the Video system setting from the Setup menu as des...

Страница 66: ...PAL Europe Asia excluding Taiwan Oceania etc Note The TV output will not display properly if an incorrect video system is selected Copy to Card Copy internal memory to memory card 8VH WKLV VHWWLQJ WR FRS WKH OHV VWRUHG LQ WKH internal memory to the memory card 1 Select the Copy to memory card setting from the Setup menu as described previously 2 Use the Up Down navigation buttons to select Yes or ...

Страница 67: ...et setting from the Setup menu as described previously 2 Use the Up Down navigation buttons to select Yes or No Then press the EXWWRQ WR FRQ UP FW Ver Firmware version Use this setting to view the current camera UPZDUH YHUVLRQ 1 Select the FW Ver setting from the Setup menu as described previously ...

Страница 68: ...the AV cable you can view the captured images on a TV Follow the steps below to connect the supplied AV cable to a TV 1 Connect one end of the AV cable to the USB AV OUT port on your camera 2 Connect the plugs on the other end of the cable to the audio and video input ports on the TV 3 Turn on the camera and the TV on Audio Video ...

Страница 69: ...photos and videos to a PC Follow the steps below to connect the camera to a PC 0DNH VXUH ERWK WKH FDPHUD DQG 3 DUH turned on 2 Connect one end of the supplied USB cable to the USB AV OUT port on your camera 3 Connect the other end of the cable to an available USB port on your PC ...

Страница 70: ...igation buttons to select USB Connect and then press the Right navigation button 2 Use the Up Down navigation buttons to select PC 3 Press the EXWWRQ WR FRQ UP WKH VHWWLQJ 7UDQVIHUULQJ OHV WR RXU 3 The computer will automatically detect the FDPHUD DV D UHPRYDEOH GULYH RXEOH FOLFN My Computer LFRQ RQ WKH GHVNWRS WR locate the removable drive and to copy the IROGHUV DQG OHV LQ WKH GULYH WR D GLUHFWR...

Страница 71: ...t one end of the supplied USB cable to the USB port on your camera 3 Connect the other end of the cable to the USB port on the printer With the PictBridge function on your camera you can print the captured photos directly with a PictBridge compatible printer using the supplied USB cable without the need for a PC ...

Страница 72: ...t WKH FDPHUD LV FRUUHFWO FRQ JXUHG WR FRQQHFW with a Printer 1 Press the button and use Up Down to select USB Connect and then press the Right navigation button 2 Use Up Down to select Printer 3 Press the EXWWRQ WR FRQ UP WKH VHWWLQJ If the camera is not connected to a PictBridge compatible printer the following error mes sage appears on the LCD screen ...

Страница 73: ...message would also appear if the USB mode were set incorrectly in which case you should disconnect the USB cable FKHFN WKH 86 PRGH VHWWLQJV HQ sure that the Printer is turned on and then try connecting the USB cable again ...

Страница 74: ...enter Refer to the following sections for more de tailed information on each setting Print with date If you have set the date and time of your camera the date record would be saved with WKH SKRWRV RX WDNH RX FDQ SULQW WKH SKRWRV with date by following the steps below 1 Select Print with date from the PictBridge menu The following screen appears Using the PictBridge menu ...

Страница 75: ...llowing screen appears 5 Select Yes WR FRQ UP SULQWLQJ RU No to cancel Then press the button Print without date Use this setting to print the photos without dates on them 1 Select Print without date from the PictBridge menu The following screen appears 2 Use the Left Right navigation buttons to scroll through the images 3 Use the Up Down navigation buttons to select the number of prints for the cu...

Страница 76: ...QWLQJ RU No to cancel Then press the button Print index You can use this setting to print all indexes to show all the photos currently in your camera 1 Select Print index from the PictBridge menu The following screen appears 2 Select Yes WR FRQ UP WKH SULQWLQJ RU No to cancel Then press the button ...

Страница 77: ...s before hand See DPOF section on page 52 1 Select Print DPOF from the PictBridge menu The following screen appears 2 Select Yes WR FRQ UP WKH SULQWLQJ RU No to cancel Then press the button Exit To exit the PictBridge menu select Exit The Remove USB cable message will be displayed Disconnect the USB cable from the camera and printer ...

Страница 78: ...s Construction 13 elements in 10 groups Optical Zoom 3X Focusing Range Normal 60cm Macro Wide 5cm Tele 25cm QWL DQGVKDNH OHFWURQLF PDJH 6WDELOL DWLRQ Digital Zoom GLJLWDO RRP RPELQHG RRP Number of Recording Pixels Still Image 7MP 3072x2304 3 2 6MP 3072x2048 16 9 5MP 3072x1728 3MP 2048x1536 2MP 1600x1200 1MP 1024x768 0 3MP 640x480 Movie 640x480pixels 30fps 15fps 320x240pixels 30fps 15fps HVLJQ DQG ...

Страница 79: ...DQXDO PDJH VWDELOL DWLRQ 0RYLH 6FHQH 6SRUW KLOGUHQ QGRRU HDI 6QRZ 6XQVHW LUHZRUNV ODVV Museum Landscape Night Landscape Night Portrait Panorama Portrait Face detection Yes Red eye Removal Yes Panorama Stitching Yes LCD Display 2 5 inch LTPS low temperature polycrystalline silicon TFT color LCD 153 600 pixels ISO Sensitivity Auto ISO 80 100 200 400 800 1600 In Auto mode the best ISO value is automa...

Страница 80: ...nds Continuous Shooting Approx 2 1 fps Large Fine mode 3OD EDFN 0RGHV Single Photo Index 4 6 9 thumbnails Slide Show Movie Slow Motion possible Zoom Approx 2X 8X Audio Histogram Display White Balance Control AWB MWB Daylight Cloudy Incandescent Fluoren scent Fluorescent H Manual Internal Flash Shooting Range Auto Red Eye Reduction Forced Flash No Flash Slow Synchro Red Eye Reduction Slow Synchro G...

Страница 81: ... Integrated Proprietary Connector DC IN Power Rechargeable Lithium ion Battery GB 20 3 7V 750mAh Battery Charger QSXW 9ROWDJH WR 9 P Output Voltage DC 4 2V 500mA Shooting Capability Battery Performance Approx 200 shots based on CIPA standards Operation Environment Temperature 0 40o C Humidity 0 90 Dimensions W x H x D 92 x 62 5 x 20 9 mm Mass Approx 115g without the battery ...

Страница 82: ...d Picture error The picture is not captured correctly The picture is damaged No picture There are no images on the memory card or in the internal memory Lens error 7KH OHQV LV SUREDEO VWXFN DQG WKH FDPHUD ZLOO SRZHU RȖ automatically System error Unexpected error encountered 1R VRXQG OH 7KHUH DUH QR DXGLR OHV RQ WKH PHPRU FDUG RU LQ WKH internal memory Image cannot be saved The write protection swi...

Страница 83: ...rotection switch on the memory card is set to the LOCK position Warning Camera recording please wait No other actions allowed to perform during video audio recording Warning Battery exhausted The battery is out of charge 7KLV OH FDQQRW EH SOD HG EDFN 7KH SLFWXUH IRUPDW FDQQRW EH UHFRJQL HG E WKH FDPHUD No connection The camera is not connected to the printer correctly Print error There is a proble...

Страница 84: ...t polarity DPHUD WXUQV RȖ VXGGHQO during operation The battery has run out Charge the battery or replace with a fully charged battery The picture is blurred The lens is dirty DSSHDUV ZKHQ WDN ing pictures Use a soft cloth to clean the lens on your camera Use the Image Stabilization mode Images video clips and DXGLR OHV FDQQRW EH saved The memory card is full Replace the memory card with a new one ...

Страница 85: ...anted images 7KH PHPRU FDUG LV ORFNHG Turn the mode dial to any still shooting mode Images cannot print from the connected printer The camera is not con nected to the printer correctly The printer is not Pict Bridge compatible The printer is out of paper RU RXW RI LQN The paper is jammed KHFN WKH FRQQHFWLRQ EHWZHHQ the camera and printer Use a PictBridge compatible printer Load some paper in the p...

Страница 86: ......

Страница 87: ......

Страница 88: ......

Отзывы: