background image

8

Installation Instructions

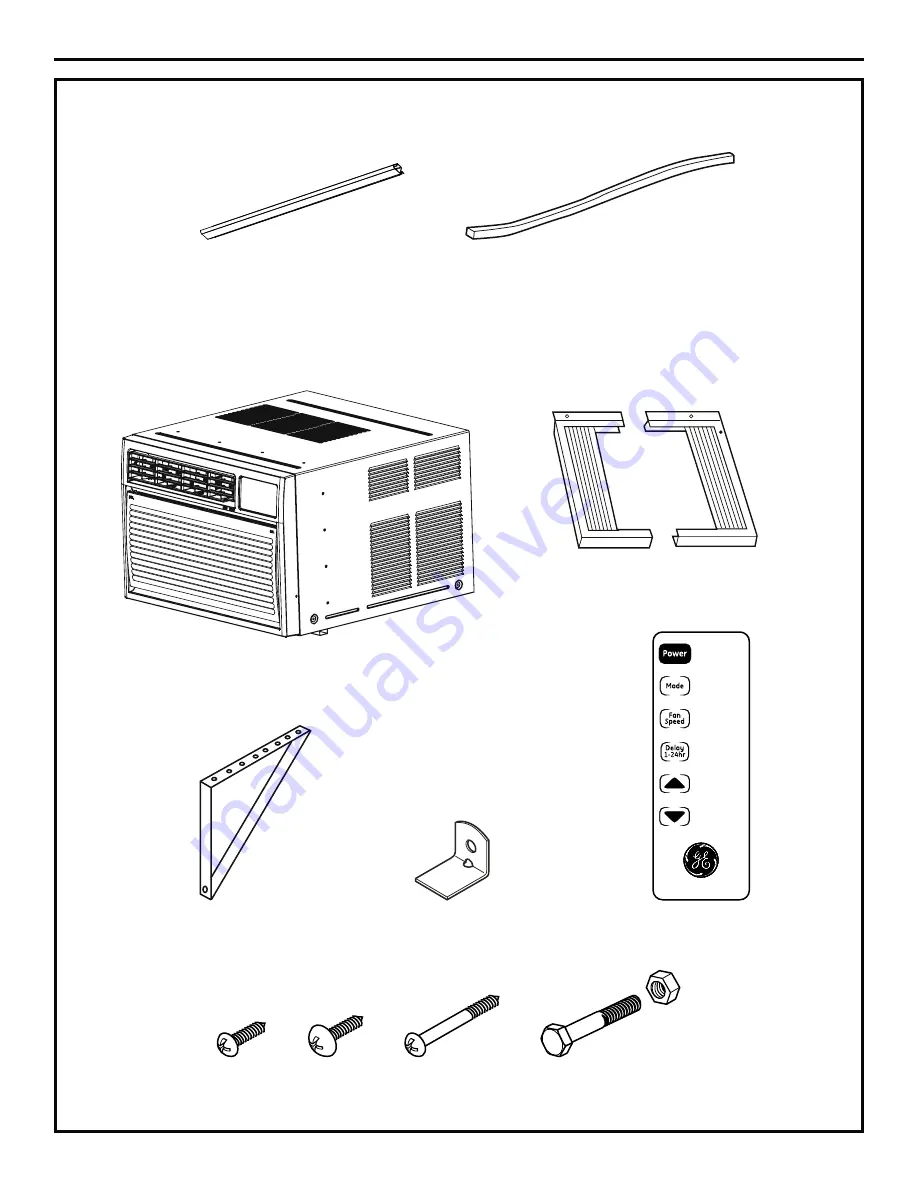
PARTS INCLUDED

(Appearance may vary)

13/32” 

Screws (12)

Installation Bracket (2)

Window Lock Bracket

Remote Control

Top Mounting Rail

Left and Right Side 

Curtains

Foam Seal

13/32” 

Screws (6)

31/32” 

Screws (8)

2-1/2” Flat Head Bolt 

and Lock Nut (2)

A

B

C

D

Temp / Delay

Содержание AHM18DP

Страница 1: ...ustomers in the U S A 15 49 7677 12 10 GE AHM18 Owner s Manual and Installation Instructions Write the model and serial numbers here Model _________________________ Serial __________________________ F...

Страница 2: ...ctrician These R410A air conditioning systems require contractors and technicians to use tools equipment and safety standards approved for use with this refrigerant DO NOT use equipment certified for...

Страница 3: ...AREFULLY SAVE THESE INSTRUCTIONS WARNING USE OF EXTENSION CORDS RISK OF FIRE Could cause serious injury or death DO NOT use an extension cord with this Window Air Conditioner DO NOT use surge protecto...

Страница 4: ...Pads Use to set temperature or delay time Temperature can be set in Cool Energy Saving and Auto mode Mode Pad Use to set the air conditioner to Fan Only Cool Energy Saver or Auto mode Fan Speed Pads...

Страница 5: ...HOHFW WKH Cool mode and High or Med fan with a middle set temperature For Maximum Cooling 6HOHFW WKH Cool mode and High fan with a lower set temperature For Quieter and Nighttime Cooling 6HOHFW WKH Co...

Страница 6: ...f necessary To remove Open the inlet grille by pulling downward on the tabs at the top upper corners of the inlet grille until the grille is in a 45 position Remove the filter Clean the filter with wa...

Страница 7: ...y to have it replaced with a properly grounded 3 prong wall outlet Some models require 230 208 volt AC protected with a time delay fuse or circuit breaker These models should be installed on their own...

Страница 8: ...DED Appearance may vary 13 32 Screws 12 Installation Bracket 2 Window Lock Bracket Remote Control Top Mounting Rail Left and Right Side Curtains Foam Seal 13 32 Screws 6 31 32 Screws 8 2 1 2 Flat Head...

Страница 9: ...to fit in a narrow window See the window opening dimensions All supporting parts must be secured to firm wood masonry or metal The electrical outlet must be within reach of the power cord Follow the...

Страница 10: ...INSTALLATION Measure the width of the window opening Mark the center line on the inside windowsill 5 B A B A A Width of window opening B Center line INSTALL OUTER CASE IN WINDOW Place outer case in wi...

Страница 11: ...f the bolt rests between studs D E 5 6 COMPLETE INSTALLATION Insert the foam seal behind the top of the lower window sash and against the glass of the upper window Place the window lock bracket as sho...

Страница 12: ...ave two people lift the air conditioner and slide it into the case Snap the front grille back onto the air conditioner Use the screws removed at the beginning of the installation to secure the grille...

Страница 13: ...ow time for the room to cool down Cold air is escaping KHFN IRU RSHQ IXUQDFH UHJLVWHUV DQG FROG DLU UHWXUQV Cooling coils have iced up 6HH LU FRQGLWLRQHU IUHH LQJ XS EHORZ Air conditioner Ice blocks t...

Страница 14: ...14 Note...

Страница 15: ...accessible for service by an individual technician Replacement of house fuses or resetting of circuit breakers Failure due to corrosion on models not corrosion protected Damage to the product caused...

Страница 16: ...Inc Suite 310 1 Factory Lane Moncton N B E1C 9M3 Parts and Accessories In the U S A GEAppliances com Individuals qualified to service their own appliances can have parts or accessories sent directly t...

Страница 17: ...Sonidos Normales de Funcionamiento 11 Soporte al Cliente Garant a para Clientes en EE UU 13 Soporte al Cliente 14 Manual del Propietario e Instrucciones de Instalaci n Escriba los n meros de modelo y...

Страница 18: ...mplazar el recept culo Estos sistemas de acondicionadores de aire R410A requieren que los contratistas y t cnicos usen herramientas equipos y est ndares de seguridad aprobados para su uso con este ref...

Страница 19: ...DOSAMENTE GUARDE ESTAS INSTRUCCIONES RIESGO DE INCENDIO Podr a ocasionar lesiones graves o la muerte NO use un prolongador con este Acondicionador de Aire de Ventana NO use protectores contra picos de...

Страница 20: ...de entre 1 y 24 horas C mo configurar Presione la tecla Delay 1 24hr Retraso entre 1 y 24 hrs en la unidad o en el control remoto Cada vez que presione las teclas Increase Incrementar Decrease Reduci...

Страница 21: ...eleccione el modo Cool Fr o y ventilador Low Bajo con una temperatura de ajuste media Modo de Fan Only Solo ventilador Use el modo Fan only Solo ventilador a velocidad Low Baja Med Media o High Alta p...

Страница 22: ...ue los polos positivos y negativos est n orientados correctamente 3 Coloque la cubierta otra vez desliz ndola en su lugar NOTAS Use 2 pilas alcalinas AAA de 1 5 voltios No use pilas recargables Retire...

Страница 23: ...acondicionador de aire Los cables caseros de aluminio podr an presentar problemas especiales Consulte a un t cnico electricista calificado ANTES DE INICIAR Lea estas instrucciones completa y cuidados...

Страница 24: ...i n 8 Temp Delay PARTES INCLUIDAS Apariencia puede variar Taladro y broca de 1 8 Llave francesa Riel de montaje superior Sellador de Gomaespuma Cortinas Izquierda y Derecha Soporte de Instalaci n 2 So...

Страница 25: ...a una ventana est ndar de dos pliegues Usted necesitar modificar el proceso para otros tipos de ventanas Todas las partes de apoyo deben quedar totalmente aseguradas a alg n metal mamposter a o a la m...

Страница 26: ...entana 5 B A B A A Width of window opening B Center line INSTALE LA CAJA EXTERIOR EN LA VENTANA Coloque la caja exterior en la ventana Baje el marco hasta que se apoye detr s de la pesta a frontal del...

Страница 27: ...D E 5 6 INSTALACI N COMPLETA Inserte el sello de gomaespuma detr s de la parte superior del marco de la ventana y contra el vidrio de la ventana superior Coloque el soporte de bloqueo de la ventana co...

Страница 28: ...ondicionador de aire Use los tornillos retirados al comenzar la instalaci n para asegurar la parrilla 7 REGRESE EL CHASIS A LA CAJA EXTERNA Enchufe en un tomacorriente de 3 patas con conexi n a tierra...

Страница 29: ...aliente necesita darle tiempo para que enfri la habitaci n O DLUH IUtR VH HVWi HVFDSDQGR HUFLyUHVH GH TXH ORV UHJLVWURV GH OD FDOHIDFFLyQ QR HVWiQ abiertos y se encuentran retornando el aire fr o DV E...

Страница 30: ...Esta garant a se extiende al comprador original y cualquier comprador posterior de productos comprados para uso residencial dentro de Estados Unidos Si el producto est situado en un rea que no dispon...

Страница 31: ...personas con dificultades auditivas favor de llamar al 800 TDD GEAC 800 833 4322 Piezas y accesorios GEAppliances com Aquellos individuos con la calificaci n necesaria para reparar sus propios electro...

Страница 32: ...ite 310 1 Factory Lane Moncton N B E1C 9M3 Parts and Accessories In the U S A GEAppliances com Individuals qualified to service their own appliances can have parts or accessories sent directly to thei...

Отзывы: