background image

Peripherals Installation

LOGIQ C9 Series – Basic Service Manual

3-27

5482298-100 English Rev. 5

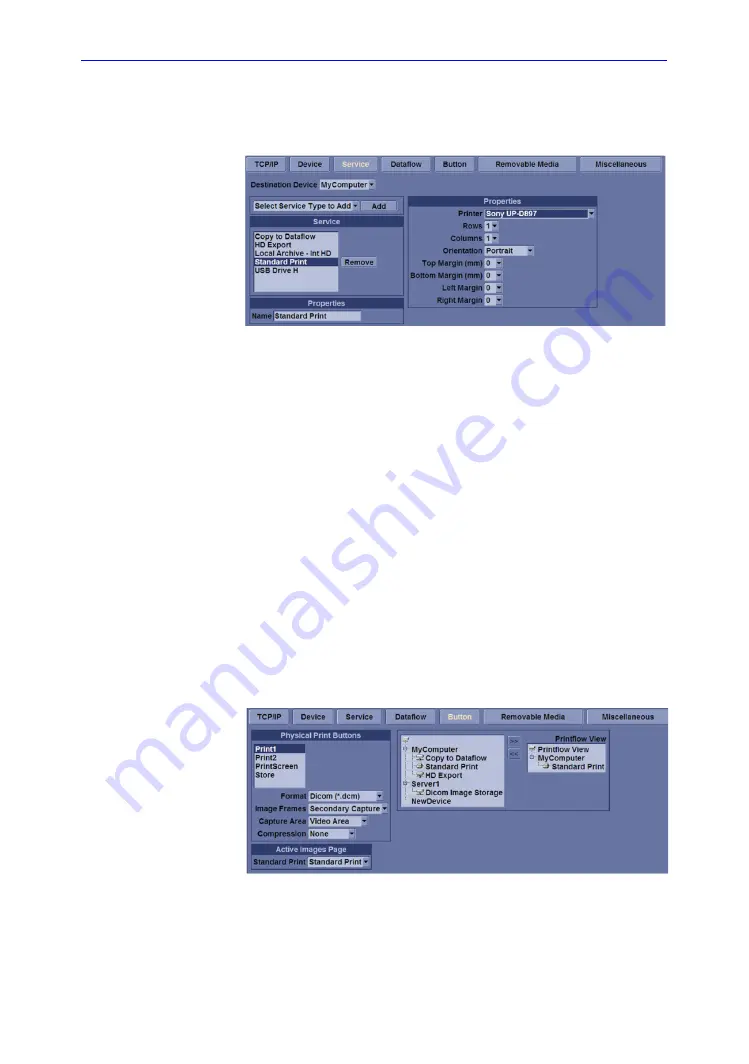
Installation Procedure (continued)

5. Select 

Utility

--> 

Connectivity

--> 

Service

. Select or add the 

Standard Print

 service. 

Figure 3-5. Connectivity -> Service Screen

6.  Select the printer from the Printer pull-down Properties 

menu. 

NOTE: 

After selecting the printer, the field turns white. 

7.  Set the following parameters in Properties: 

• 

Rows

=3

• 

Columns

=2

• 

Orientation

=Portrait

• 

Right Margin (mm)

=10

8.  Type the printer name in the 

Name

 field. 

NOTE: 

This name is used on the Button screen. 

9. Press 

Save

, then select the Button tab. 

10.  Select the appropriate print key (Print1 or Print2) from the 

Physical Print Buttons section. 

11.  Select the printer from the MyComputer column and press 

“>>” to move it to the Printflow View column. 

Figure 3-6. Connectivity -> Button Screen

Содержание 5489329

Страница 1: ...GE Technical Publication LOGIQ C9 Series Basic Service Manual Direction Number 5482298 100 English Rev 5 All Material Copyright 2014 2017 by General Electric Company Inc All Rights Reserved ...

Страница 2: ...tem Copyright 2014 2017 General Electric Company GE Medical Systems a General Electric Company going to market as GE Manufacturer GE Medical Systems China Co Ltd No 19 Changjiang Road WuXi National Hi Tech Development Zone Jiangsu P R China 214028 TEL 86 510 85225888 FAX 86 510 85226688 www gehealthcare com ...

Страница 3: ...ive or in the USA call the GE Ultrasound Clinical Answer Center at 1 800 682 5327 or 1 262 524 5698 Revision Date YYYY MM DD Reason for change Rev 1 2014 01 09 Initial Release Rev 2 2014 03 11 Update for transportation box Rev 3 2016 06 30 Update spare part list Rev 4 2016 11 18 Update spare part list Rev 5 2017 08 23 Update spare part list Pages Revision Pages Revision Front Rev 5 Chapter 6 Rev 5...

Страница 4: ...i 2 LOGIQ C9 Series Basic Service Manual 5482298 100 English Rev 5 Important precautions Translation policy ...

Страница 5: ...LOGIQ C9 Series Basic Service Manual i 3 5482298 100 English Rev 5 ...

Страница 6: ...i 4 LOGIQ C9 Series Basic Service Manual 5482298 100 English Rev 5 ...

Страница 7: ...LOGIQ C9 Series Basic Service Manual i 5 5482298 100 English Rev 5 ...

Страница 8: ...i 6 LOGIQ C9 Series Basic Service Manual 5482298 100 English Rev 5 ...

Страница 9: ...LOGIQ C9 Series Basic Service Manual i 7 5482298 100 English Rev 5 ...

Страница 10: ...i 8 LOGIQ C9 Series Basic Service Manual 5482298 100 English Rev 5 ...

Страница 11: ...LOGIQ C9 Series Basic Service Manual i 9 5482298 100 English Rev 5 ...

Страница 12: ...i 10 LOGIQ C9 Series Basic Service Manual 5482298 100 English Rev 5 ...

Страница 13: ...LOGIQ C9 Series Basic Service Manual i 11 5482298 100 English Rev 5 ...

Страница 14: ...thin this 14 day period Certified electrical contractor statement For USA Only All electrical Installations that are preliminary to positioning of the equipment at the site prepared for the equipment shall be performed by licensed electrical contractors Other connections between pieces of electrical equipment calibrations and testing shall be performed by qualified GE personnel In performing all e...

Страница 15: ...ecific information listing the system type manual title part number revision number page number and suggestion details Mail the information to GE Medical Systems China Co Ltd No 19 Changiang Road Wuxi National Hi Tech Dev Zone Jiangsu P R China 214028 GE employees should use TrackWise to report service documentation issues These issues will then be in the internal problem reporting tool and commun...

Страница 16: ...ty requirements refer to Chapter 1 in the Service Manual DANGER DANGEROUS VOLTAGES CAPABLE OF CAUSING DEATH ARE PRESENT IN THIS EQUIPMENT USE EXTREME CAUTION WHEN HANDLING TESTING AND ADJUSTING WARNING Use all Personal Protection Equipment PPE such as gloves safety shoes safety glasses and kneeling pad to reduce the risk of injury ...

Страница 17: ...uplicated in any form in whole or in part without prior written permission of GE GE may revise this publication from time to time without written notice Trademarks All products and their name brands are trademarks of their respective holders Copyrights All Material Copyright 2014 2017 by General Electric Company Inc All Rights Reserved ...

Страница 18: ...i 16 LOGIQ C9 Series Basic Service Manual 5482298 100 English Rev 5 ...

Страница 19: ... 3 LOGIQ C9 Series models covered by this manual 1 5 Important conventions Conventions used in book 1 6 Standard hazard icons 1 8 Product icons Labels locations Safety considerations Contents in this section 1 12 Introduction 1 12 Human Safety 1 12 Mechanical safety 1 15 Electrical safety 1 18 Dangerous procedure warnings Lockout Tagout LOTO requirements Returning probes and repair parts EMC EMI a...

Страница 20: ...sound system and EchoPAC PC in same room 2 18 Networking setup requirements 2 18 Environmental Dangers Patient Vicinity UL60601 1 USA 2 22 Patient Environment IEC60601 1 and ANSI AAMI ES60601 1 2 23 Chapter 3 System Setup Overview Contents in this chapter 3 2 Setup reminders Average setup time 3 3 Setup warnings 3 3 Receiving and unpacking the equipment Purpose of this section 3 6 Contents in this...

Страница 21: ...ntents in this Section 3 40 User s Manual s 3 40 Product Locator Installation Card 3 41 Chapter 4 General Procedures and Functional Checks Overview Purpose of this chapter 4 2 Contents in this chapter 4 2 Special Equipment required 4 2 General procedures Overview 4 4 Power ON Boot Up 4 5 Power off 4 8 LCD Monitor position adjustment 4 10 Logging on to LOGIQ C9 Series as ADM 4 10 Service Key Dongle...

Страница 22: ...g Chapter 5 Components and Functions Theory Overview Contents in this chapter 5 2 Block Diagram and Theory General Information 5 3 Top Console 5 3 Block Diagram 5 4 Software Diagram 5 6 Power Diagram Overview 5 7 AC Power 5 7 Common Service Platform Introduction 5 8 Chapter 6 Service Adjustments Overview Contents in this chapter 6 2 LCD Monitor adjustments Purpose of this section 6 3 Monitor Adjus...

Страница 23: ...ing shipping probes and repair parts 8 4 Disassembly Re assembly Warning and Caution 8 5 Tools needed for servicing LOGIQ C9 Series 8 6 Overview of LOGIQ C9 Series 8 7 Body Assy 8 9 Air Filter Cleaning 8 10 Trackball Roller Cleaning 8 12 Loading the software Purpose of this section 8 13 Customer provided prerequisite 8 13 Data Management moving all images 8 13 Backing up the Patient Archive and Sy...

Страница 24: ... maintenance 10 11 System maintenance Preliminary checks 10 12 Functional checks 10 13 Physical inspection 10 15 Optional Diagnostic Checks 10 16 Probe maintenance 10 17 Electrical safety tests Safety test overview 10 19 Leakage current limits 10 21 Outlet test wiring arrangement 10 23 Grounding continuity 10 24 Chassis leakage current test 10 25 Probe leakage current test 10 27 When there s too m...

Страница 25: ...00 English Rev 5 Chapter 1 Introduction This chapter describes important issues related to safely servicing the Ultrasound system The service provider must read and understand all the information presented here before installing or servicing the units ...

Страница 26: ...Overview on page 1 3 Important conventions on page 1 6 Product icons on page 1 10 Labels locations on page 1 11 Safety considerations on page 1 12 Dangerous procedure warnings on page 1 20 Lockout Tagout LOTO requirements on page 1 21 Returning probes and repair parts on page 1 22 EMC EMI and ESD on page 1 23 Customer assistance on page 1 25 ...

Страница 27: ...d Legal notes and the Table of Contents TOC An Index has been included after Chapter 10 Table 1 1 Contents in this manual Chapter number Chapter title Description 1 Introduction Contains a content summary and warnings 2 Site preparations Contains pre setup requirements for the LOGIQ C9 Series 3 System Setup Contains setup procedure with procedure checklist for the system 4 General Procedures and F...

Страница 28: ...placement procedures Provides disassembly procedures and reassembly procedures for all changeable FRU 9 Renewal Parts Contains a complete list of replacement parts for LOGIQ C9 Series 10 Care Maintenance Provides periodic maintenance procedures for LOGIQ C9 Series N A Index A quick way to the topic you re looking for Table 1 1 Contents in this manual Continued Chapter number Chapter title Descript...

Страница 29: ...ot otherwise specified the contents of this manual applies to all LOGIQ C9 Series models Table 1 2 LOGIQ C9 Series Model Designations Model Number Description System SW 5489329 LOGIQ C9 Premium for China R1 x x 5489330 LOGIQ C9 Expert for China with 4D R1 x x 5489331 LOGIQ C9 Expert for China R1 x x 5489332 LOGIQ C9 Expert for India R1 x x ...

Страница 30: ...cument are described next Model designations This manual covers the LOGIQ C9 Series Ultrasound systems listed in LOGIQ C9 Series models covered by this manual on page 1 5 Icons Pictures or icons are used wherever they will reinforce the printed message The icons labels and conventions used on the product and in the service information are described in this chapter ...

Страница 31: ...e used to provide important information about an item or a procedure NOTE Be sure to read the notes the information contained in a note can often save you time or effort DANGER Danger is used to indicate the presence of a hazard that will cause severe personal injury or death if the instructions are ignored WARNING Warning is used to indicate the presence of a hazard that can cause severe personal...

Страница 32: ...on as seen throughout this chapter In addition to text several different graphical icons symbols may be used to make you aware of specific types of hazards that could possibly cause harm Even if a symbol isn t used in this manual it may be included for your reference NOTE Even if a symbol isn t used on the product or in this manual it may be included for your reference Table 1 3 Standard hazard ic...

Страница 33: ...others icons make you aware of specific procedures that should be followed Be sure to read the notes the information contained in a note can often save you time or effort Table 1 4 Standard Icons that indicates that a special procedure is to be used Avoid Static Electricity Tag and Lock Out Wear Eye Protection Hand Protection Foot Protection Wear Eye Protection ...

Страница 34: ...Q C9 Series Basic Service Manual 5482298 100 English Rev 5 Product icons It is important to refer to the current revision of the Ultrasound system s User Manual for a full list of product labels prior to servicing the system ...

Страница 35: ...Series Basic Service Manual 1 11 5482298 100 English Rev 5 Labels locations It is important to refer to the current revision of the Ultrasound system s User Manual for a full list of product labels prior to servicing the system ...

Страница 36: ...in this manual violates safety standards of design manufacture and intended use of the equipment Human Safety Operating personnel must not remove the system covers Servicing should be performed by authorized personnel only Only personnel who have participated in a LOGIQ C9 Series Training Seminar are authorized to service the equipment DANGER DANGEROUS VOLTAGES CAPABLE OF CAUSING DEATH ARE PRESENT...

Страница 37: ... WARNING Explosion Warning DO NOT operate the equipment in an explosive atmosphere Operation of any electrical equipment in such an environment constitutes a definite safety hazard WARNING DO NOT substitute parts or modify equipment Because of the danger of introducing additional hazards ONLY install GE approved parts DO NOT perform any unauthorized modification of the equipment WARNING Ensure tha...

Страница 38: ...light on the OP panel on off button will turn off Ultrasound System components may be energized Always refer to the Ultrasound system s Proprietary Service Manual for LOTO warnings and cautions WARNING Use all Personal Protection Equipment PPE such as gloves safety shoes safety glasses and kneeling pad to reduce the risk of injury WARNING Beware of possible sharp edges on all mechanical parts If s...

Страница 39: ...NG Never use a probe that has fallen to the floor Even if it looks OK it may be damaged WARNING When the Ultrasound system is raised for a repair or moved along any incline use extreme caution since it may become unstable and tip over CAUTION Take extra care when moving the system The LOGIQ C9 Series weighs approximately 130 kg 287 lbs or more depending on installed peripherals when ready for use ...

Страница 40: ...t nobody touches the console arm when moving the operator panel CAUTION Do not move the Ultrasound system if the Operator Panel is in unlocked position CAUTION Do not transport LOGIQ C9 Series in a vehicle without locking the casters wheels and securing it as described in chapter 4 CAUTION Use protective glasses during drilling filing smooth surfaces and during all other work where eyes need prote...

Страница 41: ...ase Lock the wheels brake Ensure that the system is firmly secured while inside the vehicle Secure system with straps or as directed otherwise to prevent motion during transport Prevent vibration damage by driving cautiously Avoid unpaved roads excessive speeds and erratic stops or starts CAUTION Use protective gloves when working with sharp edges or when directed to wear PPE during a removal repl...

Страница 42: ...e connected to an electrical ground The Ultrasound system is equipped with a three conductor AC power cable This must be plugged into an approved electrical outlet with safety ground The power outlet used for this equipment should not be shared with other types of equipment Both the system power cable and the power connector must meet international electrical standards WARNING Connecting a LOGIQ C...

Страница 43: ...radation to the housing cable strain relief lens seal connector pins locking mechanism Do not use a damaged or defective probe Never immerse the probe connector or adapter into any liquid The system has more than one type of probe port Use the appropriate probe port designed for the probe you are connecting Peripherals Refer to the Patient Safety Environment section of the User s Manual for periph...

Страница 44: ...re removed from an operating LOGIQ C9 Series some metal surfaces may be warm enough to pose a potential heat hazard if touched even while in shutdown mode WARNING Explosion Warning DO NOT operate the equipment in an explosive atmosphere Operation of any electrical equipment in such an environment constitutes a definite safety hazard WARNING DO NOT substitute parts or modify equipment Because of th...

Страница 45: ...out Devices 6 Control all stored and residual energy 7 Verify isolation All potentially hazardous stored or residual energy is relieved WARNING Energy Control and Power Lockout for LOGIQ C9 Series When servicing parts of the Ultrasound system where there is exposure to voltage greater than 30 volts 1 Follow LOCK OUT TAG OUT procedures 2 Turn off the breaker 3 Unplug the Ultrasound system 4 Maintai...

Страница 46: ... regulated medical waste for transportation purposes and must be transported as a hazardous material NOTE The USER SERVICE staff should dispose of all the waste properly per federal state and local waste disposal regulations The Ultrasound system is not meant to be used for long term storage of patient data or images The user is responsible for the data on the system and a regular backup is highly...

Страница 47: ...I EMI and can be radiated through space or conducted over interconnecting power of signal cables In addition to electromagnetic energy EMC also includes possible effects from electrical fields magnetic fields electrostatic discharge and disturbances in the electrical power supply CE Compliance LOGIQ C9 Series conforms to all applicable conducted and radiated emission limits and to immunity from el...

Страница 48: ...ion point located on the rear of the Ultrasound system near the power connector Follow general guidelines for handling of electrostatic sensitive equipment WARNING Risk of electrical shock Ultrasound system must be turned off Avoid all contact with electrical contacts conductors and components Always use non conductive handles designed for the removal and replacement of ESD sensitive parts All par...

Страница 49: ... or appropriate support resource as listed below Before you call identify the following information and acquire image Alt D to send to the Customer Care team 1 System ID serial number 2 Software version 3 Date and time of occurrence 4 Sequence of events leading to issue 5 Is the issue repeatable 6 Imaging mode probe preset application 7 Media brand speed capacity type 8 Save secondary image captur...

Страница 50: ... 0732 Latin America Service Application Support 1 800 321 7937 1 262 524 5698 Europe OLC EMEA GE Ultraschall Deutschland Gmbh Co KG Beethovenstraße 239 Postfach 11 05 60 D 42655 Solingen Germany OLC EMEA Phone 49 0 212 2802 652 33 1 3083 1300 Fax 49 0 2122 8024 31 Online Services Ultrasound Asia Phone Australia China India Japan Korea Singapore 61 1 800 647 855 86 800 810 8188 91 1800 425 8025 81 ...

Страница 51: ...entative AUTHORIZED REPRESENTATIVE TELEPHONE FAX NUMBER The location of the CE marking is shown in the Safety chapter of the User manual Authorized EU Representative European registered place of business GE Medical Systems Information Technologies GmbH GEMS IT GmbH Munzinger Strasse 5 D 79111 Freiburg GERMANY 49 761 45 43 0 49 761 45 43 233 ...

Страница 52: ...Introduction 1 28 LOGIQ C9 Series Basic Service Manual 5482298 100 English Rev 5 ...

Страница 53: ...00 English Rev 5 Chapter 2 Site Preparations This chapter provides the information required to plan and prepare for the setup of an Ultrasound system Included are descriptions of the facility and electrical needs to be met by the purchaser of the units ...

Страница 54: ...Q C9 Series Basic Service Manual 5482298 100 English Rev 5 Overview Contents in this chapter Overview on page 2 2 General Ultrasound system requirements on page 2 3 Facility needs on page 2 12 Environmental Dangers on page 2 22 ...

Страница 55: ...onmental requirements If the Ultrasound system is very cold or hot When unpacking the Ultrasound system allow the temperature of the Ultrasound system to stabilize before powering up The following table describes guidelines for reaching operational temperatures from storage or transport temperatures CAUTION If the Ultrasound system is very cold or hot do not turn on its power until it has had a ch...

Страница 56: ...st be turned off Table 2 2 System Environmental Requirements Operational Storage Transport 16hrs Temperature 10 40 C 50 104 F 5 50 C 23 122 F 5 50 C 23 122 F Humidity 30 80 non condensing 10 90 non condensing 10 90 non condensing Pressure 700 1060hPa 700 1060hPa 700 1060hPa CAUTION Ensure that the probe face temperature does not exceed the normal operation temperature range CAUTION The LOGIQ C9 Se...

Страница 57: ... room NOTE Each person in the room places an additional 300 BTU h demand on the cooling system Lighting Bright light is needed for Ultrasound system installation updates and repairs However operator and patient comfort may be optimized if the room light is subdued and indirect Therefore a combination lighting system dim bright is recommended Keep in mind that lighting controls and dimmers can be a...

Страница 58: ...e Ultrasound outlet Sites with a mains power system without a defined Neutral The dedicated line shall consist of one phase two lines not shared with any other circuit and a full size ground wire from the distribution panel to the Ultrasound outlet NOTE Please note that image artifacts can occur if at any time within the facility the ground from the main facility s incoming power source to the Ult...

Страница 59: ...lation must meet all current local state and national electrical codes Unit power plug If the Ultrasound system arrives without a power plug or with the wrong plug you must contact your GE dealer or the installation engineer must supply what is locally required CAUTION Power outage may occur The LOGIQ C9 Series requires a dedicated single branch circuit To avoid circuit overload and possible loss ...

Страница 60: ...1000 4 11 Voltage dips short interruptions and voltage variations on mains supply 5 T 95 dip for 0 5 cycle 5 T 95 dip for 0 5 cycle Mains power quality should be that of a typical commercial or hospital environment 40 T 60 dip for 5 cycles 40 T 60 dip for 5 cycles 70 T 30 dip for 25 cycles 70 T 30 dip for 25 cycles 5 T 95 dip for 5 sec 5 T 95 dip for 5 sec ...

Страница 61: ...stallation Possible EMI sources should be identified before the Ultrasound system is installed Electrical and electronic equipment may produce EMI unintentionally as the result of a defect Some of these sources include medical lasers scanners cauterizing guns computers monitors fans gel warmers microwave ovens light dimmers mobile phones in house wireless phones DECT phones wireless computer keybo...

Страница 62: ...nterfere with the ultrasound signals Replace broken Radio Frequency gaskets If more than 20 or a pair of the fingers on an Radio Frequency gasket are broken replace the gasket Do not turn on the Ultrasound system until any loose metallic part is removed Do not place labels where Radio Frequency gaskets touch metal Where applicable never place a label where Radio Frequency gaskets meet the Ultrasou...

Страница 63: ...preparation checks as soon as possible if possible six weeks before delivery to allow enough time to make any changes CAUTION Ensure that the probe face temperature does not exceed the normal operation temperature range Table 2 6 Probe Environmental Requirements Operational Storage Transport Temperature 10 40 C 50 104 F 0 55 C 32 131 F 40 55 C 40 131 F Humidity 5 85 non condensing 5 85 non condens...

Страница 64: ...on Purchaser responsibilities on page 2 13 Required facility needs on page 2 14 Desirable features on page 2 15 Minimal floor plan suggestion on page 2 16 Recommended floor plan suggestion on page 2 17 Suggested floor plan Ultrasound system and EchoPAC PC in same room on page 2 18 Networking setup requirements on page 2 18 ...

Страница 65: ...ducts involved and the accompanying electrical installations are highly sophisticated and special engineering competence is required All electrical work on these products must comply with the requirements of applicable electrical codes The purchaser of GE equipment must only utilize qualified personnel to perform electrical servicing on the equipment The desire to use a non listed or customer prov...

Страница 66: ... the Ultrasound system Sites with a mains power system with defined Neutral and Live The dedicated line shall consist of one phase a neutral not shared with any other circuit and a full size ground wire from the distribution panel to the Ultrasound outlet Sites with a mains power system without a defined Neutral The dedicated line shall consist of one phase two lines not shared with any other circ...

Страница 67: ...l are within 2 m 6 5 ft of each other with peripheral within 1 m of the unit to connect cables Power outlets for other medical equipment Power outlets for test equipment within 1 m 3 2 ft of Ultrsound system Clean and protected space to store probes in their cases or on a rack Material to safely clean probes done with a plastic container never metal For the amperage requirements see Electrical req...

Страница 68: ...hes 2 Film Viewer 3 Counter Top Sink with hot and cold water and Supplies Storage 4 Linen Supply 5 Probes Supplies 6 Examination Table 1930 x 610 mm 76 x 24 inches 7 Footswitch 8 Stool 9 Ultrasound system 10 External Peripherals 11 Dedicated Power Outlet Circuit Breaker protected and easily accessible 12 Network Interface 13 457 mm 18 inches distance of Ultrasound system from wall or objects 14 GE...

Страница 69: ...Sink with hot and cold water 6 Overhead Lights Dimmer Dual Level Lighting bright and dim 7 Emergency Oxygen 8 Suction Line 9 Ultrasound system 10 Dedicated Power Outlet Circuit Breaker protected and easily accessible 11 Network Interface 12 457 mm 18 inches distance of Ultrasound system from wall or objects 13 Stool 14 Footswitch 15 Storage for Linens and Equipment 16 Examination Table 1930 x 610 ...

Страница 70: ...setup requirements Stand alone Ultrasound system without network connection None Scanner connected to hospital s network Supported networks 10 100 Mbit Ethernet DICOM network option InSite requirements InSite requires an Ethernet connection via 10 100 Mbit Interface 1 EchoPAC PC workstation parts 2 UPS 3 Ethernet network wall outlet 4 3x mains power outlets 5 Hot and Cold water 6 Dedicated mains p...

Страница 71: ...atient information over a hospital network Examples of DICOM services include the transfer of images to workstations for viewing or transferring images to remote printers As an added benefit transferring images in this manner frees up the on board monitor and peripherals enabling viewing to be done while scanning continues With DICOM images can be archived stored and retrieved faster easier and at...

Страница 72: ...here are no spaces in any field of the form See Entries must include A host name local port number AE Title IP address and Net Mask for the Ultrasound system The IP addresses for the default gateway and other routers at the site for ROUTING INFORMATION The host name IP address port and AE Title for each device the site wants connected to the Ultrasound system for DICOM APPLICATION INFORMATION A fi...

Страница 73: ...Facility needs LOGIQ C9 Series Basic Service Manual 2 21 5482298 100 English Rev 5 DICOM option setup requirements continued Figure 2 4 Worksheet for DICOM Network Information ...

Страница 74: ...tlets or providing the device with extra protective earth will be required in order to meet UL60601 1 and IEC60601 1 IEC60601 1 1 standards for electrical leakage 2 12 20DV UL60601 1 2003 In area in which patients are normally cared for the patient vicinity is the space with surfaces likely to be contacted by the patient or attendant who can touch the patient This encloses a space within the room ...

Страница 75: ...in which medical diagnosis monitoring or treatment is carried out It is very difficult to attach unique dimensions to the PATIENT ENVIROMENT In practice a distance of 2 5 m 8 2 ft above the floor on which the medical personnel stand and a horizontal distance of 1 5 m 4 9 ft have justified themselves as indicative of the dimensions of the Patient Environment The patient environment vicinity will be...

Страница 76: ...Site Preparations 2 24 LOGIQ C9 Series Basic Service Manual 5482298 100 English Rev 5 ...

Страница 77: ...nstall LOGIQ C9 Series system Included is a procedure that describes how to receive and unpack the equipment and how to file a damage or loss claim How to prepare the facility and unit of the actual installation and how to check and test the unit probes and external peripherals for electrical safety are also included in this procedure ...

Страница 78: ...verview on page 3 2 Setup reminders on page 3 3 Receiving and unpacking the equipment on page 3 6 Preparing for setup on page 3 18 Completing the setup on page 3 19 System Configuration on page 3 22 Peripherals Installation Instructions on page 3 26 Connectivity setup on page 3 34 Paperwork after setup on page 3 40 ...

Страница 79: ...with optional equipment may take slightly longer Setup warnings DANGER WHEN USING ANY TEST INSTRUMENT THAT IS CAPABLE OF OPENING THE AC GROUND LINE I E METER S GROUND SWITCH IS OPEN DON T TOUCH THE ULTRASOUND SYSTEM CAUTION To prevent electrical shock connect the unit to a properly grounded power outlet DO NOT use a three to two prong adapter This defeats safety grounding CAUTION DO NOT wear the E...

Страница 80: ...nit to acclimate before you turn it on It requires one hour for each 2 5 C increment it s temperature is below 10 C or above 40 C The following table describes guidelines for reaching operational temperatures from storage or transport temperatures DANGER Equipment damage possibility Turning the system on without acclimation after arriving at site may cause the system to be damaged CAUTION If the U...

Страница 81: ... s should be fully read and understood before operating the LOGIQ C9 Series and kept near the Ultrasound system for quick reference CAUTION Acoustic Output Hazard Although the ultrasound energy transmitted from the LOGIQ C9 Series probe is within AIUM NEMA standards avoid unnecessary exposure ultrasound energy can produce heat and mechanical damage ...

Страница 82: ...age 3 7 Unpacking the LOGIQ C9 Series on page 3 12 Warnings for receiving and unpacking GENERIC CRT VERSION CAUTION Two people are needed to unpack the Ultrasound system because of its weight Attempts to move the Ultrasound system considerable distances or on an incline by one person could result in injury or damage or both Two people are required whenever a part weighing 16 KG 35 LBS or more must...

Страница 83: ...age even if the package itself is undamaged To make it easier to detect if the handling during transportation has been improper a set of Tilt indicator has been attached to the transportation box Receiving the LOGIQ C9 Series Overview Improper handling during transportation may harm the equipment inside the package even if the package itself is undamaged Table 3 2 Tilt Watch Description Illustrati...

Страница 84: ...YES continue with the instructions in Damage in transportation on page 3 11 If NO continue with the next step 2 Is the Tilt Indicator red colored inside the middle of the indicator If YES The Tilt Indicator has been activated Continue with the instructions in Damage in transportation on page 3 11 before you continue with the next step If NO continue with the next step 1 Red Color 3 Continue with t...

Страница 85: ... Tilt indicator The Tilt indicator has been attached to the transportation box as illustrated in the figure below Figure 3 1 Tilt indicator 1 Tilt Indicator NOTE Before cutting the straps check Tilt Tags to make sure it has not been triggered If damaged report it to the carrier If not then cut the straps around the crate ...

Страница 86: ... an activated tilt indicator label there is high degree of certainty it tipped 89 degrees or more from horizontal during shipment An activated tilt indicator label does not indicate if the package was simply Tipped laid down with no impact shock or Tipped Over free fall with an impact shock Using both shock indicator labels and tilt indicator labels will help identify if a Tip Over impact shock oc...

Страница 87: ...rrier Whether noted or concealed damage MUST be reported to the carrier immediately upon discovery or in any event within 14 days after receipt and the contents and containers held for inspection by the carrier A transportation company will not pay a claim for damage if an inspection is not requested within this 14 day period LOGIQ C9 Series transportation box label The LOGIQ C9 Series transportat...

Страница 88: ...age or shortage occurs contact the address shown in Chapter 1 CAUTION Please carefully unpack the system and do not dispose the package of LOGIQ C9 Series so that it can be reused for service Table 3 5 Unpacking the LOGIQ C9 Series Step Description Corresponding Graphic 1 Tear the stop open mark 2 Cut the two packing straps around the crate Note To avoid injury with one hand holding the strap clas...

Страница 89: ... Manual 3 13 5482298 100 English Rev 5 3 Remove the top cover 4 Open the four plastic locks Note Rotate the inside plastic lock counterclockwise to remove it and then remove the outside lock Table 3 5 Unpacking the LOGIQ C9 Series Step Description Corresponding Graphic ...

Страница 90: ...ervice Manual 5482298 100 English Rev 5 5 Remove the outside shipping box 6 Remove the dust bag from the unit and remove the foam in the front of the control panel Table 3 5 Unpacking the LOGIQ C9 Series Step Description Corresponding Graphic ...

Страница 91: ...ound the LOGIQ C9 Series from the unit Note To avoid damaging the unit please use a pair of scissors instead of the knife 8 Remove the foams between the LCD and control panel 9 Loosen the tie down strap Push the brass piece to pull back handle then loosen the strap Table 3 5 Unpacking the LOGIQ C9 Series Step Description Corresponding Graphic ...

Страница 92: ...n ramp and attach it to the Pallet base on the rear side of the LOGIQ C9 Series 11 Pull the LOGIQ C9 Series down the Pallet base ramp Note Remember to pull the LOGIQ C9 Series from the back for safer transportation 12 Remove all the covers and foams from the unit 13 Place all of the filling inside the Transportation Box Close the box and store the filling for possible future use Table 3 5 Unpackin...

Страница 93: ...terials for LOGIQ C9 Series are recyclable The Transportation Box is made of spruce or similar material PHYTOSANITARY CERTIFICATE included in all shipments to The People s Republic of China Lever lockings hinges are made of zinc plated steel The inner reinforcements are made of Ethafoam Polyethylene foam The plastic foil is made of LDPE Low Density Polyethylene ...

Страница 94: ...stem has been damaged please refer to Damage in transportation on page i 12 in the beginning of this manual EMI protection The LOGIQ C9 Series has been designed to minimize the effects of Electro Magnetic Interference EMI Many of the covers shields and screws are provided primarily to protect the system from image artifacts caused by this interference For this reason it is imperative that all cove...

Страница 95: ...ctions on the I O Rear Panel on page 3 21 Connecting probes on page 3 21 Powering the system on page 3 21 System specifications System requirements verification Verify that the site meets the requirements listed in Chapter 2 See Facility needs on page 2 12 Verify that the specifications below don t conflict with any on site conditions Physical dimensions Console Weight Weight approx 130 kg 287 lbs...

Страница 96: ...cal specifications for LOGIQ C9 Series In the table below the electrical specifications for LOGIQ C9 Series includes monitor and on board peripherals WARNING Connecting a LOGIQ C9 Series to the wrong voltage level will most likely destroy it Table 3 7 Electrical specifications for LOGIQ C9 Series Part Number Description Voltage Tolerances Power consumntion Frequency 5489329 LOGIQ C9 Premium for Ch...

Страница 97: ...rements of the valid version of IEC60601 1 If in doubt consult the technical service department or your local representative for GE Healthcare Connect Ethernet Connect the network cable to the Ethernet connector on the I O Rear Panel The connector is located on the rear side of LOGIQ C9 Series Connect USB Flash Drive NOTE USB Flash Drive approved for LOGIQ C9 Series are verified for EMC performanc...

Страница 98: ...to configure the LOGIQ C9 Series Contents in this section LOGIQ C9 Series configuration For complete instructions refer to the lastest revision of the LOGIQ C9 Series Basic User Manual Chapter 16 Information includes Entering Location Adjusting Date and Time Selecting User interface Language Selecting Online Manual Language Slelecting Unites of Measure ...

Страница 99: ...als Installation Overview This section describes how to install and configure the peripherals validated for the LOGIQ C9 Series For LOGIQ C9 Series peripheral list please refer to Peripheral on page 9 5 About the operation check out of peripherals See Peripheral checks on page 4 25 for more information ...

Страница 100: ...als furnished with B W Printer Item Description Quantity Note 1 Sony UP D897 MD Printer 1 2 Paper Roll 1 3 USB cable 1 Table 3 9 Materials furnished with Color USB Printer Item Description Quantity Note 1 Sony UP D25MD Printer 1 2 Paper Roll 1 3 AC Power Cord local purchase 1 4 USB cable 1 Table 3 10 Materials furnished with B W Printer Item Description Quantity Note 1 HP Officejet 100 Printer 1 2...

Страница 101: ...dal Footswitch 3 Pedal Footswitch Table 3 12 Materials furnished with the USB 2 0 HDD Item Description Quantity Note 1 USB 2 0 HDD 1 2 USB Cable 1 Table 3 13 Materials furnished with the Footswitch Item Description Quantity Note 1 Footswitch 1 Table 3 14 Materials furnished with the Footswitch Item Description Quantity Note 1 Footswitch 1 ...

Страница 102: ...k B W Printer Installation Procedure NOTE The printer driver is customized for the LOGIQ C9 Series at the factory you do not need to change the settings 1 Place the device in a suitable place 2 Connect power cord and USB Cable on the Printer 3 Connect the power cord with the AC output on the rear panel of LOGIQ C9 Series then turn on the printer 4 Connect the printer to the USB port Figure 3 4 Con...

Страница 103: ...OTE After selecting the printer the field turns white 7 Set the following parameters in Properties Rows 3 Columns 2 Orientation Portrait Right Margin mm 10 8 Type the printer name in the Name field NOTE This name is used on the Button screen 9 Press Save then select the Button tab 10 Select the appropriate print key Print1 or Print2 from the Physical Print Buttons section 11 Select the printer fro...

Страница 104: ...c Service Manual 5482298 100 English Rev 5 Installation Procedure continued 12 If you want to assign this printer to the Standard Print Button on the Active Image Screen select this printer at the Active Image Printer section 13 Press Save ...

Страница 105: ... One person 5 min Preparations 1 Unpack the Sony UP D25MD Printer Installation Procedure 1 Place the device in a suitable place 2 Connect power cord and USB Cable on the Printer 3 Connect the power cord with the AC output on the rear panel of LOGIQ C9 Series then turn on the printer 4 Connect USB cable to LOGIQ C9 Series USB port Figure 3 7 Color Printer connection ...

Страница 106: ...Footswitch Installation Tools No special tools needed Manpower One person 5 min Preparations 1 Unpack the Footswitch 2 Ensure no physical damage Installation Procedure 1 Connect the Footswitch to the USB port on the LOGIQ C9 Series system Figure 3 8 Connect Footswitch to the system ...

Страница 107: ... supports these configurations No Function Rec Pause Freeze Next Heartcycle Prev Heartcycle Print 1 Print 2 Update Next Step Scan Assistant Previous Step Scan Assistant Scan Assistant Pause Resume or Mark Cine The default setting is No Function Enter Utility Application Settings to configure the Footswitch functions Figure 3 9 Configuring Footswitch Functions ...

Страница 108: ... 5 USB2 0 HDD Installation Tools No special tools needed Manpower One person 5 min Preparations 1 Unpack the USB2 0 HDD 2 Ensure no physical damage Installation Procedure 1 Connect the USB2 0 HDD to the USB port on the LOGIQ C9 Series system Figure 3 10 Connect HDD to the system ...

Страница 109: ...8 100 English Rev 5 ECG Installation Tools No special tools needed Manpower One person 5 min Preparations 1 Unpack the ECG 2 Ensure no physical damage Installation Procedure 1 Connect the ECG to the USB port on the LOGIQ C9 Series system Figure 3 11 Connect ECG to the system ...

Страница 110: ...ddress subnet mask default gateway and network speed For automatic assignment of IP address subnet mask and default gateway select DHCP Note If possible set the LOGIQ C9 Series netwoek Speed to match that of the Network switch if in doubt set it to AutoDetect Otherwise transfer times can be two or five times longer during which the LOGIQ C9 Series will appear to be locked up If the Hard Drive acti...

Страница 111: ... the LOGIQ C9 Series AE stands for Application Entity DICOM services use this to identify the LOGIQ C9 Series AE title is case sensitive This title may containn the Computer Name from the TCP IP page if desired Note It is NOT recommended to use the factory default This is not prohibited but more than one system with the same AE title can cause confusion 3 Edit Port Number if needed 104 is typical ...

Страница 112: ...t Add The system creates a device called NewDevice 2 Change the name to one of your choosing 3 Enter the IP address of the device 4 Save your changes and then press Ping A Smiley Face indicates successful communication between your LOGIQ C9 Series and the device A Frown indicates failed communication Check the following Is the device running Is it connected to the network Did you enter the right I...

Страница 113: ...ave already setup the device in the Device tab in How to Setup and Use a DICOM Image Storage Service on page 3 37 2 From the Slect Service Type to add drop down menu select DICOM Image Storage and press Add 3 Change the name of the service to one of your choosing 4 Enter the AE Title and port Number of the service AE Title is case sensitive 4 Save your changes and then press Verify A Smiley Face i...

Страница 114: ...with your local GE Ultrasound representative to get the latest information 1 Power on the system NOTE Keep the power cord connection during the installation 2 After the power up sequence is complete select Utility on the touch panel and then select Admin in the Utility menu 3 In System Admin tab etner the new option keys then select Add Figure 3 12 Input Option Key WARNING For software Option Inst...

Страница 115: ... the system after each installation if several option keys are installed at one time Select Cancel for the first several times and select OK after the last installation to activate all the changes 5 After the system is powered on check the option status Figure 3 14 Check Option Status The option status explanation Permanent This option is enabled in the system 6 Exit Utility and check the function...

Страница 116: ...tem documentation This ensures that all relevant safety and user information is available during the operation and service of the complete Ultrasound system Contents in this Section User s Manual s on page 3 40 Product Locator Installation Card on page 3 41 User s Manual s User Check that the correct User Manual s for the system and software revision is included with the installation Specific lang...

Страница 117: ...ic Service Manual 3 41 5482298 100 English Rev 5 Product Locator Installation Card NOTE The Product Locator Installation Card shown may not be the same as the provided Product Locator card Figure 3 15 Product Locator Installation Card Example ...

Страница 118: ...System Setup 3 42 LOGIQ C9 Series Basic Service Manual 5482298 100 English Rev 5 ...

Страница 119: ...4 1 5482298 100 English Rev 5 Chapter 4 General Procedures and Functional Checks This chapter provides procedures for quickly checking major functions of the LOGIQ C9 Series and diagnostics instructions using the built in service software ...

Страница 120: ...unctions of the scanner and diagnostics instructions using the built in service software Contents in this chapter Overview on page 4 2 General procedures on page 4 3 Functional checks on page 4 21 Power supply test adjustments on page 4 26 Special Equipment required To perform these tests you ll need any of the sector linear or convex probes Normally you should check all the probes used on the sys...

Страница 121: ... and cooling purposes WARNING Energy Control and Power Lockout for LOGIQ C9 Series When servicing parts of the Ultrasound system where there is exposure to voltage greater than 30 volts 1 Follow LOCK OUT TAG OUT procedures 2 Turn off the breaker 3 Unplug the Ultrasound system 4 Maintain control of the Ultrasound system power plug 5 Wait for at least 30 seconds for capacitors to discharge as there ...

Страница 122: ...0 Logging on to LOGIQ C9 Series as ADM on page 4 10 Service Key Dongle HASP on page 4 11 Exit to Windows Desktop from the LOGIQ C9 Series application software on page 4 13 Removable media on page 4 15 Archiving and loading presets on page 4 16 Download Upload of System Presets via InSite ExC on page 4 17 Data Management on page 4 17 Backup on page 4 17 Installation and Setup Procedure for Peripher...

Страница 123: ...HICH HAS THE PROTECTIVE GROUNDING CONNECTOR DANGER NEVER USE A THREE TO TWO PRONG ADAPTER THIS DEFEATS THE SAFETY GROUND DANGER ENSURE THAT THE POWER CORD AND PLUG ARE INTACT AND THAT THE POWER PLUG IS THE PROPER HOSPITAL GRADE TYPE WHERE REQUIRED CAUTION Ultrasound system requires all covers Operate this Ultrasound system only when all board covers and frame panels are securely in place The cover...

Страница 124: ...lack so that the unit can be moved slightly 3 Verify that the power cable is without any visible scratches or any sign of damage 4 Verify that the on site mains voltage is within the limits indicated on the rating label near the Circuit Breaker on the rear of the unit 5 Connect the Power Cable s female plug to the Power Inlet at the rear of the unit 6 Lock the plug in position with the Retaining C...

Страница 125: ... Processor c Back End Processor and rest of scanner starts with the sequence listed in the next steps d Back End Processor is turned ON and starts to load the software e The Start Screen is displayed on the monitor f A start up bar indicating the time used for software loading is displayed on the monitor g The software initiates and sets up the Front End electronics and the rest of the instrument ...

Страница 126: ... Figure 4 1 System Exit Window Logoff Use this button to log off the current user The system remains ON and ready for a new user to log on If the Logoff button is dimmed it indicates that no user is logged on to the unit at the moment Shutdown Use this button to shut down the system The entire system will shut down It is recommended to perform a full shutdown at least once a week If the Shutdown b...

Страница 127: ...Windows Desktop NOTE If you need to restart LOGIQ C9 Series when logged on to the Windows Desktop ensure that you do a complete power down Shut Down This is required to power up the Front End Processor Figure 4 2 System Exit menu when logged in using Service Dongle System shutdown Disconnect the Mains Power Cable is necessary For example Relocating the scanner CAUTION DO NOT unplug and or transpor...

Страница 128: ...rd login Cancel Cancel login As default two users are defined USR and ADM USR If you log on as USR you will have access to do set up tasks that a user may need to do during daily use As default no password has been set for USR Just type the name USR and select Login ADM If you log on as ADM you will have access to do general set up service adjustments adjust network and connectivity settings As de...

Страница 129: ...everal USB ports to choose between There are USB ports besides the touch screen and on the front and rear panel of the system 3 Power ON the unit If a Service Dongle is plugged in a Maintenance Access dialog will be displayed on the screen Figure 4 4 Maintenace Access dialog 4 Leace the Username field empty 5 Type the current GE Service Password in the password field NOTE READ THIS NOTE BEFORE YOU...

Страница 130: ...erify the password The Start Application dialog will be displayed Figure 4 5 Start Application dialog NOTE Install SW button is only enabled if there is an Application software disk in the DVD drive 7 Select MAINTENANCE to enter maintenance mode This will bring up the Maintenance dialog 8 Select Exit to Windows This will display the Windows Desktop on the screen Figure 4 6 Maintenance dialog ...

Страница 131: ...to exit to the Windows Desktop when the application software is running The Service Dongle must be plugged in if not See Service Key Dongle HASP on page 4 11 for more information 1 On the alphanumeric keyboard press Ctrl Alt Delete and then select Task Management Figure 4 7 Task Management 2 Select EchoLoader exe in the Processes list and then select End Process Figure 4 8 Processes List ...

Страница 132: ...asic Service Manual 5482298 100 English Rev 5 Exit to Windows Desktop from the LOGIQ C9 Series application software continued 3 Select Yes to continue Figure 4 9 Warning Message 4 Be ready to select Maintenance before the Time Bar is full Figure 4 10 System Halted ...

Страница 133: ...dows This will display the Windows Desktop on the screen Figure 4 11 Maintenance dialog NOTE If you need to restart ensure that you do a complete power down Shut Down This is required to power up the Front End Processor Removable media Refer to the latest revision of the User Manual to perform the following tasks Using Removable Media Labeling Removable Media Formatting Removable Media Verifying R...

Страница 134: ... and Biometry pages can be saved on an DVD R disk or USB memory device for reloading on the system NOTE Presets should NOT be saved on the same DVD R disk or USB memory device as images The Archive Menu lists the images but does NOT list the presets stored on a DVD R disk or USB memory device Archiving Presets to an DVD R Disk or USB memory device 1 Insert an empty blank DVD R disk into the DVD RW...

Страница 135: ...oading Presets from an DVD R disk or USB memory device 1 Insert the DVD R disk with the archived Presets into the DVD RW 2 Access to Utility System Backup Restore The Restore sheet will be shown on the LCD display See Figure 4 12 on page 4 16 3 Select the items needed to be restored 4 Select Restore The system performs the restore and restarts Download Upload of System Presets via InSite ExC Data ...

Страница 136: ...rint the PDF files from the Manual CD ROM 1 Insert the CD R disk CD ROM into the CD drive on a PC or Laptop with Adobe Acrobat Reader 2 Follow the instructions on the screen to display the manual of choice 3 Before printing the complete manual or pages from the manual select File Page Setup 4 Select the paper size and choose Portrait 5 Select File Print to start printing In the pop up window you m...

Страница 137: ...ll outlet Disconnect all probes and external I O cabling Remove the Operator Panel Lower and place it on a clean surface with the front down Follow these links if you need more information See Power off on page 4 8 for more information WARNING DO NOT touch any boards with integrated circuits prior to taking the necessary ESD precautions Always connect yourself via an arm wrist strap to the advised...

Страница 138: ...em 2 Rotate the dust gasket counterclockwise until it can be removed from the keyboard Figure 4 13 Remove the retainer 3 Separate the trackball and the gasket Wipe off any oil or dust from the trackball gasket and the trackball housing using a cleaner or cotton swab 4 Assemble the trackball and gasket then put it into the housing and rotate it clockwise until its notches are set in the position Te...

Страница 139: ...ction the functional checks for are described Functional checks are used to verify that the product works as intended Functional checks may also be used during troubleshooting Contents in this Section Preparation Turn on power to LOGIQ C9 Series For detailed description See Power ON Boot Up on page 4 5 for more information ...

Страница 140: ...General Procedures and Functional Checks 4 22 LOGIQ C9 Series Basic Service Manual 5482298 100 English Rev 5 Basic Controls Operator Panel Figure 4 14 Control Panel Map ...

Страница 141: ...he bottom of the Touch panel there are five combination rotary push buttons The functionality of these rotaries changes depending upon the currently displayed folder page 1 Power On Off Switch 2 Patient Key 3 Probe Preset Key 4 Report Key 5 End Exam Key 6 TGC Sliders 7 Rotary controls 8 A N Keyboard 9 Mode Gain XYZ Controls 10 Cursor Key 11 Clear Key 12 Comment Key 13 Body Pattern Ellipse key 14 M...

Страница 142: ...e but not resting on the floor CAUTION TAKE THE FOLLOWING PRECAUTIONS WITH THE PROBE CABELS KEEP AWAY FROM THE WHEELS DO NOT BEND DO NOT CROSS CABLES BETWEEN PROBES Table 4 1 Probe and Connectors Checks Step Task Expected Results 1 Select the appropriate connected probe from the probe indicators on the Touch Panel The probe activates in the currently selected operating mode The probe s default set...

Страница 143: ...ow the steps below to verify that Brakes and Direction Locks function as intended 1 Press the right pedal to engage the front wheel brakes Apply a pressure on the scanner to verify that the brakes works as intended 2 Press the center pedal to release the front wheel brakes Press the left pedal to engage the Swivel lock Ensure that the wheels lock making it impossible to turn the scanner to the sid...

Страница 144: ...Supply Refer to if you appear to have a problem that may be related to the Power Supplies Power Supply Adjustment There are no adjustments on the power supply The DC Power is self regulated If a voltage is outside the specified range it means that something is wrong either with the power supply itself or with a unit connected to that specific power outlet When an error occur the power will be turn...

Страница 145: ...ng the scanner to customer for use Software Configuration Checks Table 4 2 Software Configuration Checks Step Task to do Notes 1 Verify Date and Time is correct 2 Verify that Location Hospital Name is correct 3 Verify Language settings are correct 4 Verify assignment of Print Keys 5 Verify all of the customer s options are set up correctly Demo Option strings turn on ...

Страница 146: ...General Procedures and Functional Checks 4 28 LOGIQ C9 Series Basic Service Manual 5482298 100 English Rev 5 Site Log Table 4 3 Site Log DATE SRVICE PERSON PROBLEM COMMENTS ...

Страница 147: ...298 100 English Rev 5 Chapter 5 Components and Functions Theory This chapter explains LOGIQ C9 Series s system concepts component arrangement and subsystem functions It also describes the power distribution and the Common Service Desktop interface ...

Страница 148: ...Theory 5 2 LOGIQ C9 Series Basic Service Manual 5482298 100 English Rev 5 Overview Contents in this chapter Overview on page 5 2 Block Diagram and Theory on page 5 3 Power Diagram on page 5 7 Common Service Platform on page 5 8 ...

Страница 149: ...forming system that can handle up to 128 elements linear probes Signal flow from the Probe Connector Panel to the Front End to the Mid Processors and Back End Processor and finally to the LCD and peripherals System configuration is stored on a hard disk drive and all necessary software is loaded from the hard disk drive on power up Top Console The Top Console includes a Standby On switch a keyboar...

Страница 150: ...Components and Functions Theory 5 4 LOGIQ C9 Series Basic Service Manual 5482298 100 English Rev 5 Block Diagram Figure 5 1 LOGIQ C9 Series System Block Diagram ...

Страница 151: ...d to board connector And it provides signals to relay board and MST board respctively APSTRSF is a power supply board in LOGIQ C9 Series it accepts power from APS module and ACDC adapter Under the PWMST s control it generates all kinds of voltages to meet the power requirements of PWMST Power Control PWA is assembled in the power box It provides an interface for AC power input and provides isolate...

Страница 152: ...Components and Functions Theory 5 6 LOGIQ C9 Series Basic Service Manual 5482298 100 English Rev 5 Software Diagram Figure 5 2 Software Diagram ...

Страница 153: ...d no main power switch located on this power pack AC Power The mains cord has plugs in one side end A male plug connects to the mains outlet on site The mains voltage is routed to the AC power pack through a Circuit Breaker located on the site The Circuit Breaker is of the auto fuse type if for some reason the current grows to high the switch will automatically break the power From the Main Circui...

Страница 154: ...8 100 English Rev 5 Common Service Platform Introduction The Service Platform contains a set of software modules that are common to all PC backend ultrasound and cardiology systems The Common Service Platform will increase service productivity and reduce training and service costs ...

Страница 155: ...ries Basic Service Manual 6 1 5482298 100 English Rev 5 Chapter 6 Service Adjustments This chapter describes how to test and make adjustments to the LOGIQ C9 Series You can use these to test the system for errors ...

Страница 156: ...Service Adjustments 6 2 LOGIQ C9 Series Basic Service Manual 5482298 100 English Rev 5 Overview Contents in this chapter Overview on page 6 2 LCD Monitor adjustments on page 6 3 ...

Страница 157: ...or how to adjust the LCD Monitor Position Brightness and Contrast Factory Reset of LCD settings The LCD Brightness and Contrast adjust buttons are at the right side bottom of LCD Figure 6 1 LCD Brightness and Contrast adjust buttons 1 Left key adjustment button 2 Middle key press to display Brightness or contrast indicators 3 Right key adjustment button Keep pressing the Middle key for 3 to 5 seco...

Страница 158: ...v 5 Factory Reset of LCD settings continued To reset all the settings to factory default settings 1 Press Right key once to activate the main menu 2 Press Right key to select the System icon Then Press the Middle key 3 Select Factory Reset and press Middle key Figure 6 2 Factory reset ...

Страница 159: ...es Basic Service Manual 6 5 5482298 100 English Rev 5 Touch Panel Touch Panel Resolution NOTE After the system is powered on if the touch panel resolution is changed and the touch panel does not work properly restart the system ...

Страница 160: ...Service Adjustments 6 6 LOGIQ C9 Series Basic Service Manual 5482298 100 English Rev 5 Control Panel adjustment Please refer to User Manual for how to adjust LCD Panel ...

Страница 161: ... Diagnostics Troubleshooting This chapter describes how to setup and run the tools and software that help maintain image quality and system operation Very basic host system and board levels are run whenever power is applied Some Service Tools may be run at the application level ...

Страница 162: ...oting 7 2 LOGIQ C9 Series Basic Service Manual 5482298 100 English Rev 5 Overview Contents in this chapter Overview on page 7 2 Gathering Trouble Data on page 7 3 Screen Capture on page 7 6 Network Configuration on page 7 13 ...

Страница 163: ...cturer for analysis There are different options to acquire this data that would give different results Collect Vital System Information The following information is necessary in order to properly analyze data or images being reported as a malfunction or being returned to the manufacturer Product Name LOGIQ C9 Series From the Utility System About screen Applications Software Software Version Softwa...

Страница 164: ...resets and the following logs Keyboard Shadow Log Error Logs Crash Log Power Supply Temperature NOTE Power Supply and Temperature logs are not currently being updated by the LOGIQ C9 Series This Alt D function is available at all times Figure 7 1 Alt D Dialog Box When Alt D is pressed a menu box appears that allows for A place to enter a description of the proplem A choice to store to a pre format...

Страница 165: ...acts from compression To save log files and an image snapshot press Alt D select the save logs function and fill in the form Use a USB flash drive or CD R to store the log s When you fill out the form fill in the system behavior you saw plus any other comments Fill in the check box if the system crashed To save log files and an image snapshot press Alt D Describe the issues then select to store lo...

Страница 166: ...o factory default print key to accomplish a secondary screen capture However customer may have customize Print Keys or Store key function Therefore screen capture should involve the following steps 1 Check and record any custom settings for the Print Store button 2 Set the Print Store button to Whole Screen Secondary Capture 3 Capture the required screens to the Hard Disk Drive or DVD R 4 Restore ...

Страница 167: ...zed settings Figure 7 2 Connectivity Button screen 5 In the Destinations section record the service that is displayed 6 In the Physical Print Buttons section record the parameters related to the service Setting the P1 Key to Screen Capture If the P1 Key is not set to screen capture 1 While on the Connectivity screen with the Buttons tab displayed go to the Destinations list 2 From the list select ...

Страница 168: ...uring a Screen The following is a generic process to capture any screen from the scanner 1 Navigate to and display the image screen to be captured 2 Press P1 This will place a snapshot of the screen on the clipboard displayed at the bottom of the scan image display Figure 7 3 Select Image to Capture ...

Страница 169: ...ring a Screen continued 3 Select and highlight the snapshot to be stored 4 Select Save As Icon on the right side of the image screen Figure 7 4 Menue Save As 5 A Save dialog box will be opened Choose the archive location to save image on the USB Drive or CD DVD Figure 7 5 Save Dialog Box ...

Страница 170: ...nd Record the P1 Key Function on page 7 7 Refer to Figure 7 2 on page 7 7 1 Seclect Utility on the control panel 2 Select Connectivity Button 3 In the Physical Print Buttons field select Print1 4 In the Destinations list select the service s recorded in step 5 Section Check and Record the P1 Key Function on page 7 7 5 In the Physical Print Buttons section select the parameters related to the servi...

Страница 171: ...uptive Mode Allows you to enable or disable disruptive mode troubleshooting System Shutdown Allows for system shutdown from diagnostic menu Select to Restart System or Shutdown System Also select to retain Disruptive Mode or Not After submitting to restart or shutdown a confirmation screen gives one last chance to confirm or cancel the request ...

Страница 172: ... Diagnostics Essential Test Hard Drive Long Hard Drive Short Memory Network Adapter System Board Video PC Diagnostics Interactive Tests AVI Playback Keyboard Microphone Monitor Sound USB Ports Restart LOGIQ C9 Series After Diagnostics Always shutdown the system and reboot after a diagnostics session ...

Страница 173: ...Utility Connectivity TCP IP in IP settings window check Enable DHCP and select the proper network speed in Network Speed Figure 7 6 Enable DHCP NOTE If user wants to setup static IP address uncheck Enable DHCP option input static address in IP Address box Subnet Mask and Default Gateway box In Network Speed choose the proper speed available Figure 7 7 Input static address ...

Страница 174: ...h Rev 5 Network Configuration continued 3 Select Save and a popup window displays Select OK to restart the system and activate the changes Figure 7 8 System Restart inquiry dialog 4 After the system restarts the network icon at the left bottom of screen turns green Figure 7 9 Network icon ...

Страница 175: ... 5482298 100 English Rev 5 Chapter 8 Replacement Procedures This chapter describes how to remove and install or replace modules and subsystems in the LOGIQ C9 Series It also includes instructions for installing and re installing the software ...

Страница 176: ...IQ C9 Series Basic Service Manual 5482298 100 English Rev 5 Overview Contents in this chapter Overview on page 8 2 Warnings and important information on page 8 3 Disassembly Re assembly on page 8 5 Loading the software on page 8 13 ...

Страница 177: ...least 30 seconds for capacitors to discharge as there are no test points to verify isolation 6 Remove disconnect the battery if present Ultrasound System components may be energized WARNING Because of the limited access to cabinets and equipment in the field placing people in awkward positions GE has limited the lifting weight for one person in the field to 16 KG 35 LBS Anything over 16 KG 35 LBS ...

Страница 178: ...hipped from a clinic or site for example body coils or an ultrasound probe The purpose of the regulation is to protect employees in the transportation industry as well as the people who will receive or open this package NOTE The US Department of Transportation DOT has ruled that items that were saturated and or dripping with human blood that are now caked with dried blood or which were used or int...

Страница 179: ...ARNING ONLY QUALIFIED SERVICE PERSONNEL SHOULD REMOVE ANY COVERS OR PANELS ELECTRICAL HAZARDS EXISTS AT SEVERAL POINTS INSIDE BECOME THOROUGHLY FAMILIAR WITH ALL HAZARDOUS VOLTAGES AND HIGH CURRENT LEVELS TO AVOID ACCIDENTAL CONTACT CAUTION Do not wear the ESD wrist strap when you work on live circuits and more than 30V peak is present ...

Страница 180: ...Small Phillips Screwdriver 7 screw 5244775 2 Screw GB T820 2000 M3x8 Common Phillips Screwdriver 8 screw 5342274 4 Inch SScrew 6 32UNC Common Phillips Screwdriver 9 screw 5439265 246 Screw M4x10 Common Phillips Screwdriver 10 screw 5445720 12 GB 818 2000 M4x30 Common Phillips Screwdriver 11 screw 2337572 2 Screw FH M3x6 Common Phillips Screwdriver 12 screw 5476381 20 Bolt M8x18 with Washer 6 Inner...

Страница 181: ...8 1 System Overview 1 1 LCD Monitor 2 Audio speaker 3 Touch Panel 4 Control panel 5 Control panel up down lever 6 Control Panel swivel lever 7 B W printer storage area 8 DVD R Drive 9 Probe connector ports 10 Wheels 11 Gel holder 12 Probe holder 13 Rear Panel 14 Rear Handle 15 Probe cable hook 16 Power cable hook 17 Power Box ...

Страница 182: ...acement Procedures 8 8 LOGIQ C9 Series Basic Service Manual 5482298 100 English Rev 5 Overview continued Figure 8 2 System Overview 2 1 LCD Assy 2 Neck Assy 3 Control Panel Assy 4 Body Assy 5 Power Box Assy ...

Страница 183: ... Assy Figure 8 3 Bottom Assy Overview 1 Body Front Cover Assy 2 Body Back Cover Assy 3 Body Left Side Cover Assy 4 Body Right Side Cover Assy 5 Base Cover Assy NOTE Left Side here means the side which is NOT beside the real panel NOTE Right Side here means the side which is beside the real panel ...

Страница 184: ...mmended the filters be cleaned every two weeks but the requirements will vary with environment Tools None Preparation Shut down the system and disconnect the power cord Needed Manpower 1 person 5 minutes travel CAUTION Be sure to lock the wheels before cleaning the air filters to aviod injury by any unexpected movement of the system DO NOT operate the unit without the air filters in place Allow th...

Страница 185: ...ocedure 1 Pull out the two air filters from both sides of the power box Figure 8 4 Pull out Air Filter 2 Dust the filter with a vacumm cleaner and or wash it with a mild soapy solution If washed rinse and dry the filter before re installation 3 Put back the two air filters to both sides of the power box ...

Страница 186: ...etainer counterclockwise until it can be removed from the keyboard Figure 8 5 Remove the retainer 3 Separate the trackball and the retainer Wipe off any oil or dust from the trackball retainer and the trackball housing using a cleaner or cotton swab 4 Assemble the trackball and retainer then put into the housing and rotate it clockwise until its notches are set in the position CAUTION When cleanin...

Страница 187: ...ages to a remote server or to removable media For instructions please see Disk management in the User Manual User Guide CAUTION An error or a power loss may occur Always backup the Patient Archive and the Presets System Configurations before loading the software In order to complete a successful restore of the Patient Database as needed after a hard disk replacement or if all the content on the ha...

Страница 188: ...from the following screens CAUTION An error or a power loss may occur Always backup the Patient Archive and the Presets System Configurations before loading the software In order to complete a successful restore of the Patient Database as needed after a hard disk replacement or if all the content on the hard disk has been erased the images must be moved away from LOGIQ C9 Series before doing backu...

Страница 189: ... adapter is connected during system upgrade 1 Insert the Upgrade DVD labeled System Application Software in the DVD RW or insert the USB memory stick to the USB port of the system 2 Properly turn off the scanner by momentarily pressing the Power On Off Switch In System Exit window select Shutdown to shutdown the system NOTE If the system will not shutdown normally hold down the Power On Off Switch...

Страница 190: ...isk To select a the complete disk will be loaded This option is recommended for application software upgrade NOTE When to select a to load complete disk please ensure that any patient data on the disk has been backed up NOTE If you upgrade the software from R1 0 x to R1 1 x be sure to select 1 to load the complete disk CAUTION If you select a ALL existing software and data will be erased If backup...

Страница 191: ...t will not boot up It is not recommended for application software upgrade because during upgrade process the data on the system would possibly be impacted NOTE If you upgrade the software from R1 0 x to R1 1 x DO NOT select 2 for loading C disk only To select c to quit system upgrade process Figure 8 7 System Software load instruction WARNING While the software install procedure is designed to pre...

Страница 192: ... 6 Input Yes or No and press Enter key to continue Figure 8 8 Confirmation on loading the system 7 System USB memory stick DVD will be loading Wait for the software installation to complete Typical installation time 5 10 minutes Status bar on the screen indicates progress Figure 8 9 Loading status WARNING Do not interrupt the software loading at any time ...

Страница 193: ...m Software with USB memory stick DVD continued 8 After finish updating system remove the USB memory stick DVD and press any key to shut down the system NOTE If you don not remove the USB memory stick DVD the software system loading process repeats when the system boots up Figure 8 10 System upgrade complete ...

Страница 194: ...ion check out Functional Check out 1 Power on LOGIQ C9 Series system and wait until system booting to main screen 2 Press Utility on the Touch Panel 3 Select the About button on the right Figure 8 11 Utility System 4 Check whether Software Version is the right version for use Figure 8 12 Software version ...

Страница 195: ...eload the Correct Preset Region NOTE After the system software loading completion please reload the correct preset region 1 Reboot the system 2 Select Utility General 3 In the Location portion select the right region in the field of Preset Region Figure 8 13 Preset Region 4 Reboot the system ...

Страница 196: ... are activated and working 1 Reboot the system 2 Select Utility Admin System Admin 3 Ensure that all the installed option keys are displayed and the status of Options are valid The status Permanent means the option keys are activated and working The status disabled means the option keys are not activated and not working Check if the option is installed and if the serial number and option key are c...

Страница 197: ...on is displayed on the right top location of the screen About the probe specification for intended use on LOGIQ C9 Series Plug in at least one of each type of the probes and check if each of the probes is recognized and the probe information is displayed correctly Figure 8 14 Probe identification Peripheral Device Check Check to ensure that all the peripheral devices work properly For instruction ...

Страница 198: ...lling DICOM devices is not incorporated in this manual To access the instruction about installing DICOM devices please refer to another manual Basic User Manual Please use the latest revision of this document Touch Panel Calibration After the software upgrade check if the touch panel works properly If the touch panel does not work properly perform the touch panel calibration Please contact GE serv...

Страница 199: ...LOGIQ C9 Series Basic Service Manual 9 1 5482298 100 English Rev 5 Chapter 9 Renewal Parts This chapter lists the renewal parts available for the LOGIQ C9 Series ...

Страница 200: ...Renewal Parts 9 2 LOGIQ C9 Series Basic Service Manual 5482298 100 English Rev 5 Overview Contents in this chapter Overview on page 9 2 List of Abbreviations on page 9 3 Renewal Parts Lists on page 9 4 ...

Страница 201: ...viations Table 9 1 List of Abbreviations ABBREVIATION DESCRIPTION 3D THREE DIMENSIONAL Assy ASSEMBLY FRU 1 Replacement part available in part hub FRU 2 Replacement part available from the manufacturer lead time involved KBD Keyboard LCD Liquid Crystal Display BnV Brightness and Volume TMST Master Board ...

Страница 202: ...er Pack Operator Console Assy The following figure illustrates what is the front side 1 left side 2 back Rear side 3 right side 4 of the system Figure 9 1 Operator Console Assy Table 9 2 ACDC Power Pack ACDC Power Cable List Item Part Number Part Name Quantity FRU 001 5460229 ACDC Adapter with Clamp Filter 1 1 ...

Страница 203: ...499319 6 5 1 1 105 3Sp 5384875 3 2 1 1 106 4D3C L KTI195894 3 2 1 1 Table 9 4 Peripherals for LOGIQ C9 Series Item Part Number Description Qty FRU ECG module 200 5173040 ECG Assy with IEC cable 1 1 201 5173105 ECG Assy with Chinese label 1 1 Footswitch 202 5338419 USB foot switch FSU 1000 1 1 203 5151236 USB foot switch 1 1 USB Stick 204 5395754 Sandisk USB Stick 4G 1 1 205 5434317 3 1TB USB mobil...

Страница 204: ...398164 E8CS reusable Biopsy Kit 1 1 213 E8385MJ E8CS Starter Kit 1 1 214 E8385MY E8CS Sterile Needle Guide 1 1 215 5178413 9L Biopsy Guide Starter Kit 1 1 216 5176499 11L Multi Biopsy Guide 1 1 217 H48621Y 4D3C L Biopsy Kit 1 1 218 H46701AE 4D3C L Biopsy Starter Kit 1 1 219 5329137 3Sp Multi Angle Biopsy 1 1 220 5264178 ML6 15 Multi Biopsy Kit 1 1 Table 9 4 Peripherals for LOGIQ C9 Series Item Par...

Страница 205: ...ies Basic User Manual English 1 N 404 5453344 141 LOGIQ C9 Series Basic User Manual Simplified Chinese 1 N 405 5478150 100 LOGIQ C9 Series User Guide English 1 N 406 5478150 141 LOGIQ C9 Series User Guide Simplified Chinese 1 N 407 5482295 100 LOGIQ C9 Series Release Notes English 1 N 408 5482295 141 LOGIQ C9 Series Release Notes Simplified Chinese 1 N Table 9 7 Accessories and Kits Item Part Numb...

Страница 206: ...Renewal Parts 9 8 LOGIQ C9 Series Basic Service Manual 5482298 100 English Rev 5 ...

Страница 207: ... Maintenance This chapter describes Care and Maintenance on the Ultrasound system and peripherals These procedures are intended to maintain the quality of the Ultrasound system s performance Read this chapter completely and familiarize yourself with the procedures before performing a task ...

Страница 208: ...on page 10 2 Warnings on page 10 3 Why do maintenance on page 10 4 Maintenance task schedule on page 10 6 Tools required on page 10 8 System maintenance on page 10 12 Electrical safety tests on page 10 19 When there s too much leakage current on page 10 30 Inspection Paperwork on page 10 32 Electrical Safety Tests Log on page 10 34 ...

Страница 209: ...UTIOUS WHENEVER POWER IS STILL ON AND COVERS ARE REMOVED CAUTION Practice good ESD prevention Wear an anti static strap when handling electronic parts and even when disconnecting connecting cables CAUTION Do not pull out or insert circuit boards while power is on CAUTION Do not operate this Ultrasound system unless all board covers and frame panels are securely in place System performance and cool...

Страница 210: ... Quality Assurance Programs may require additional tasks and or inspections at a different frequency than listed in this manual Keeping records It is good business practice that ultrasound facilities maintain records of periodic and corrective maintenance The Ultrasound Periodic Maintenance Inspection Certificate provides the customer with documentation that the Ultrasound system is maintained on ...

Страница 211: ...ysicists the supervising radiologist physician or appropriate designee Routine quality control testing must occur regularly The same tests are performed during each period so that changes can be monitored over time and effective corrective action can be taken Testing results corrective action and the effects of corrective action must be documented and maintained on the site Your GE service represe...

Страница 212: ... LOGIQ C9 Series and can best provide competent efficient service Contact GE for coverage information and or price for service The service procedures and recommended intervals shown in the Care and Maintenance Task Schedule assumes that you use your LOGIQ C9 Series for an average patient load 10 12 per day and not use it as a primary mobile Ultrasound system which is transported between diagnostic...

Страница 213: ...e Annually Peripheral Leakage Current Checks See Notes Twice Annually Surface Probe Leakage Current Checks See Notes Twice Annually Endocavity Probe Leakage Current Checks See Notes Quarterly Annually Surgical Probe Leakage Current Checks See Notes Quarterly Annually Measurement Accuracy Checks See Notes Twice Annually Functional Checks See Notes also after corrective maintenance Table 10 1 Custom...

Страница 214: ... End 1 2 9 16 9 XL9974MM Xcelite hex Blade 2 5mm 9 44579 Wrench Open End 1 2 9 16 9 XL9975MM Xcelite hex Blade 3mm 9 45385 Pliers Arc Joint 7 inch 9 XL9976MM Xcelite hex Blade 4mm 9 45378 Pliers Slip Joint 9 XL9977MM Xcelite hex Blade 5mm 9 4518 Pliers Long Nose Miniature 9 XL991CM Handle 9 4518 Pliers Long Nose Miniature C2356E Screw starter Kedman Quick Wedge 9 44776 Ignition Wrench Set 10 pc BL...

Страница 215: ...ade 5 32 inch 9 43499 1 2 inch Socket 1 4 inch drive 9 XL9926 Xcelite hex Blade 3 16 inch 9 4355 Flex Spinner 9 XL99764 Xcelite hex Blade 7 64 9 43523 Breaker 9 XL99964 Xcelite hex Blade 9 64 9 43531 6 inch Ext 9 XLM60 Mini screwdriver kit 9 65283 Case 8 5 in 4 5 in 2 in Deep 9 45072 Pliers 6 inch Diagonal 9 46696 Hex Keys 9 XL100X Wire Stripper Cutter 5 inch 100X 9 39829 Torpedo Level Magnetic 9 ...

Страница 216: ...Punch Pin 1 4 inch 9 34374 3 8 inch Metric Socket Set 12 PT 9 42973 Cold Chisel 1 2 inch 9 44311 16mm Socket 12 pt 9 GH77 Center Punch Automatic 9 33485 Metal Socket Tray 9 GH890 File Handle Adj 9 33484 Metal Socket Tray 9 31276 File Round Bastard 8 inch 9 33484 Metal Socket Tray 9 31277 File Half Round Bastard 8 inch 9 52068 Tap and Drill Set 9 31263 File Flat Mill 8 inch 9 52722 6 Tap 21045C Clo...

Страница 217: ...arge adjustable wrist strap 3M 2214 Small adjustable wrist strap 3M 3051 conductive ground cord Anti Static Vacuum Cleaner 46 194427P278 46 194427P279 120V 230V Safety Analyzer The safety Analyzer tool should be calibrated and compliant with AAMI ESI 1993 or IEC 60601 or AS NZS 3551 QIQ Phantom E8370RB RMI Grayscale Target Model 403GS NOTE The use of a Phantom is not required during Preventive Mai...

Страница 218: ...rasound system power on and verify that all fans and peripherals turn on Watch the displays during power up to verify that no warning or error messages are displayed Where applicable confirm that the battery is charged If no AC Input present use the internal battery 4 Probes Verify that the Ultrasound system properly recognizes all probes 5 Displays Verify proper display on the monitor 6 InSite Wh...

Страница 219: ...obe Elements Perform an Element Test on each probe to verify that all the probe elements and system channels are functional 6 Applicable Software Options Verify the basic operation of all optional modes such as Contrast Check the basic Ultrasound system controls that affect each options operation 7 Xmit Recv Elements Use the Visual Channel Utility on the loop connect to verify that all system xmit...

Страница 220: ...sary 3 Color Printer Verify hardcopy output of the Color video page printer Clean heads and covers if necessary 4 DICOM Verify that DICOM is functioning properly Send an image to a DICOM device 5 ECG Verify basic operation with customer 6 Footswitch Verify that the footswitch is functioning as programed Clean as necessary 7 DVD Verify that the DVD is functioning properly Clean heads and covers if ...

Страница 221: ...r for dents scratches or cracks 3 Input Power Refer to Mains cable inspection on page 10 14 4 Cables Connectors Check all internal cable harnesses and connectors for wear and secure connector seating Pay special attention to footswitch assembly and probe strain or bend reliefs 5 Shielding Covers Check to ensure that all EMI shielding internal covers air flow panels and screws are in place Missing ...

Страница 222: ...perature log to see if there are any trends that could cause problems in the future 3 Check the Configuration Log update if needed 10 Power and System Status Indicators Check for proper operation of all Power and System Status Indicators 11 Battery Where applicable check that the battery is not damaged does not leak does not emit an odor and is not deformed or discolored Observe all warnings and c...

Страница 223: ...ailure to properly handle or maintain a probe may also void its warranty Any evidence of wear indicates the probe cannot be used Do a visual check of the probe pins and Ultrasound system sockets before plugging in a probe The Interoperative probes often have special considerations and individual probe user manuals For Interoperative probes also refer to their separate user manuals Table 10 11 Syst...

Страница 224: ...de of nitrile derived from vegetable starch to prevent allergic latex reactions CAUTION Failure to follow the prescribed cleaning or disinfection procedures will void the probe s warranty DO NOT soak or wipe the lens with any product not listed in the User Manual Doing so could result in irreparable damage to the probe Follow care instructions that came with the probe CAUTION Disinfect a defective...

Страница 225: ...NTHS ACCORDING TO THE HISTORICAL DATA ONLY TRAINED PERSONS ARE ALLOWED TO PERFORM THE SAFETY INSPECTIONS MENTIONED ABOVE DANGER TO MINIMIZE RISK OF ELECTRICAL SHOCK ONLY TRAINED PERSONS ARE ALLOWED TO PERFORM THE ELECTRICAL SAFETY INSPECTIONS AND TESTS DANGER TO AVOID ELECTRICAL SHOCK THE ULTRASOUND SYSTEM UNDER TEST MUST NOT BE CONNECTED TO OTHER ELECTRICAL EQUIPMENT REMOVE ALL INTERCONNECTING CA...

Страница 226: ...cables and strain relief at each end Inspect the transducer enclosure and lens for cracks holes and similar defects Test the system peripherals and probes for leakage current Excessive leakage current can cause injury or death in sensitive patients High leakage current can also indicate degradation of insulation and a potential for electrical failure Do not use probes or equipment having excessive...

Страница 227: ...for capacitors to discharge as there are no test points to verify isolation 6 Remove disconnect the battery if present Ultrasound System components may be energized CAUTION Compare all safety test results with safety test results of previously performed safety tests e g last year etc In case of unexplainable abrupt changes of safety test results consult experienced authorized service personnel or ...

Страница 228: ...le 10 14 Type CF Applied Part Leakage Current Limits ECG Connections Country Normal Condition Open Ground Reverse Polarity Open Neutral Mains Applied All 0 1 mA 0 5 mA 0 5 mA 0 5 mA 5 0 mA Table 10 15 Equipment Type and Test Definitions Applied Parts AP Parts or accessories that contact the patient to perform their function For ultrasound equipment this includes transducers and ECG leads Type BF B...

Страница 229: ... be reported to the hospital immediately and the receptacle should not be used Figure 10 1 Typical alternate outlet tester NOTE No outlet tester can detect the condition where the Neutral grounded supply conductor and the Grounding protective earth conductor are reversed If later tests indicate high leakage currents this should be suspected as a possible cause and the outlet wiring should be visua...

Страница 230: ...posed metal parts of the case The ground wire resistance should be less than 0 2 ohms Reference the procedure in the IEC60601 1 Figure 10 2 Ground continuity test DANGER ELECTRIC SHOCK HAZARD THE PATIENT MUST NOT BE CONTACTED TO THE EQUIPMENT DURING THIS TEST 1 GROUND PIN 2 OHMMETER 3 LOGIQ C9 Series 4 ACCESSIBLE METAL PART MONITOR HOUSING PEAR PANEL CONNECTOR ANY CASTER WHEEL SUPPORT ...

Страница 231: ...ilar test instrument its power plug may be inserted into the wall outlet and the equipment under test is plugged into the receptacle on the panel of the meter This places the meter in the grounding conductor and the current flowing from the case to ground will be indicated in any of the current ranges The maximum allowable limit for chassis source leakage is shown in Table 10 12 on page 10 21 DANG...

Страница 232: ...page 10 21 Record all data on the PM Inspection Certificate Table 10 16 Typical Data Sheet for enclosure Source Leakage Current Unit Power Tester Polarity Switch Tester Neutral or Ground Switch Test 1 Speaker Cover Test 2 Real Panel Metal Parts Optional Test 3 Optional Test 4 Enter Name of tested peripheral here ON NORM OPEN ON NORM CLOSED ON REV OPEN ON REV CLOSED OFF NORM OPEN OFF NORM CLOSED OF...

Страница 233: ...ge and test lead placement It is abnormal if no leakage current is measured If no leakage current is detected check the configuration of the test equipment Tools For needed tools see Tools required on page 10 8 DANGER DO NOT USE THE PROBE IF THE INSULATING MATERIAL HAS BEEN PUNCTURED OR OTHERWISE COMPROMISED INTEGRITY OF THE INSULATION MATERIAL AND PATIENT SAFETY CAN BE VERIFIED BY SAFETY TESTING ...

Страница 234: ... Procedure Using Probe Adapter Follow the Safety Analyzer tool instruction to test each transducer for leakage current The electrical Safety Analyzer tool should be calibrated and compliant with AAMI ESI 1993 or IEC 60601 or AS NZS 3551 No Meter Procedure Using Probe Adapter Follow the Safety Analyzer tool instruction to test each transducer for leakage current The electrical Safety Analyzer tool ...

Страница 235: ...ess than the values shown in Table 10 13 on page 10 21 Record all data on the PM Inspection Certificate Table 10 17 Typical Data Sheet For Transducer Source Leakage Current Transducer Tested Unit Power Tester Power Polarity Switch Tester GROUND or NUETRAL Switch Measurement ON NORM OPEN ON NORM CLOSED ON REV OPEN ON REV CLOSED OFF NORM OPEN OFF NORM CLOSED OFF REV OPEN OFF REV CLOSED ...

Страница 236: ...plicable tighten all grounds Ensure star washers are under all ground studs Inspect wiring for bad crimps poor connections or damage Test the wall outlet verify it is grounded and is free of other wiring abnormalities Notify the user or owner to correct any deviations As a work around check the other outlets to see if they could be used instead NOTE No outlet tester can detect the condition where ...

Страница 237: ...rrect probe type in the appropriate space on the check list If excessive leakage current is slot dependent inspect the system connector for bent pins poor connections and ground continuity If the problem remains with the probe replace the probe Peripheral Fails Tighten all grounds Ensure star washers are under all ground studs Inspect wiring for bad crimps poor connections or damage Still Fails If...

Страница 238: ... N r e m o t s u C Date Performed Warranty C ontract HBS System Type e t a D e r u t c a f u n a M r e b m u N l a i r e S r e b m u N l e d o M r e b m u N l a i r e S r e b m u N l e d o M t a m r o F n a c S y c n e u q e r F 1 e b o r P r e b m u N l a i r e S r e b m u N l e d o M t a m r o F n a c S y c n e u q e r F 2 e b o r P r e b m u N l a i r e S r e b m u N l e d o M t a m r o F n a c...

Страница 239: ... D O I l a n r e t x E n o i t c n u F e d o M F C s r o t c e n n o C d n a s e l b a C n o i t c n u F e d o M M Applicable Software Opti l a r e h p i r e P d e v o r p p A E G s n o s DVD RW Printer i l e b a L s n o i t p O e r a w d r a H e l b a c i l p p A ng see User Manual for Labeling Control Panel LCD Measurement Accuracy GE Approved Peripherals PHYSICAL IN ELECTRICAL SAFETY Final Chec...

Страница 240: ...measured OK Comments Outlet correct ground and wiring config System ground continuity Chassis source leakage current probe Chassis source leakage current wheel Chassis source leakage current monitor Patient lead source leakage lead to ground Patient lead source leakage lead to lead Patient lead source leakage isolation Peripheral 1 leakage current Peripheral 1 ground continuity Peripheral 2 leakag...

Страница 241: ...ral 2 ground continuity Peripheral 3 leakage current Peripheral 3 ground continuity Table 10 18 Electrical safety tests log Continued Electrical test performed Max value allowed Value measured OK Comments Table 10 19 Electrical safety tests probes log Probe Max value allowed Max value measured OK Comments ...

Страница 242: ...Care and Maintenance 10 36 LOGIQ C9 Series Basic Service Manual 5482298 100 English Rev 5 ...

Страница 243: ...tance 1 25 phone numbers 1 26 customer order verification 3 18 customer provided prerequisite 8 13 D damage in transportation 3 11 damage in transport i 12 dangerous procedure warnings 1 20 data network setup requirements 2 18 desirable features 2 15 DICOM network function 2 19 DICOM setup requirements 2 20 display PDF files from manual CD ROM print PDF files from manual CD ROM 4 18 E electrical r...

Страница 244: ...it is very cold or hot 2 3 important precautions i 2 InSite network requirements 2 18 installation see system setup 3 1 installation warnings see setup warnings 3 3 introduction chapter 1 1 1 L labels transportation box label 3 11 legal notes i 15 lighting 2 5 list of abbrevations 9 3 loading software 8 13 lockout tagout LOTO requirements 1 21 LOTO lockout tagout requirements 1 21 M mains cable in...

Страница 245: ... shipping returning probes and repair parts 1 22 shock and tilt indicators position 3 9 shock indicator 3 7 site preparations 2 1 time and manpower requirements 2 11 software loading 8 13 software hardware compatibility 9 4 software hardware compatibility 5 3 specifications 3 19 electrical specifications 3 20 physical dimensions 3 19 standard GE tool kit 10 8 standard hazard icons 1 8 statement ce...

Страница 246: ...Index 4 LOGIQ C9 Series Basic Service Manual 5482298 100 English Rev 5 chassis fails 10 30 ECG fails 10 31 new unit 10 31 peripheral fails 10 31 probe fails 10 31 still fails 10 31 ...

Страница 247: ...GE ...

Отзывы: