GE 45633 Скачать руководство пользователя страница 4

45633 Instructions rev 1-a.doc 

Page 4 of 14 

1/13/2010 


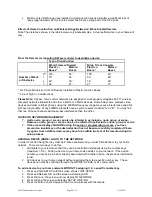
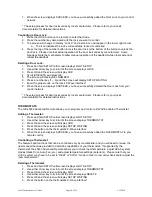
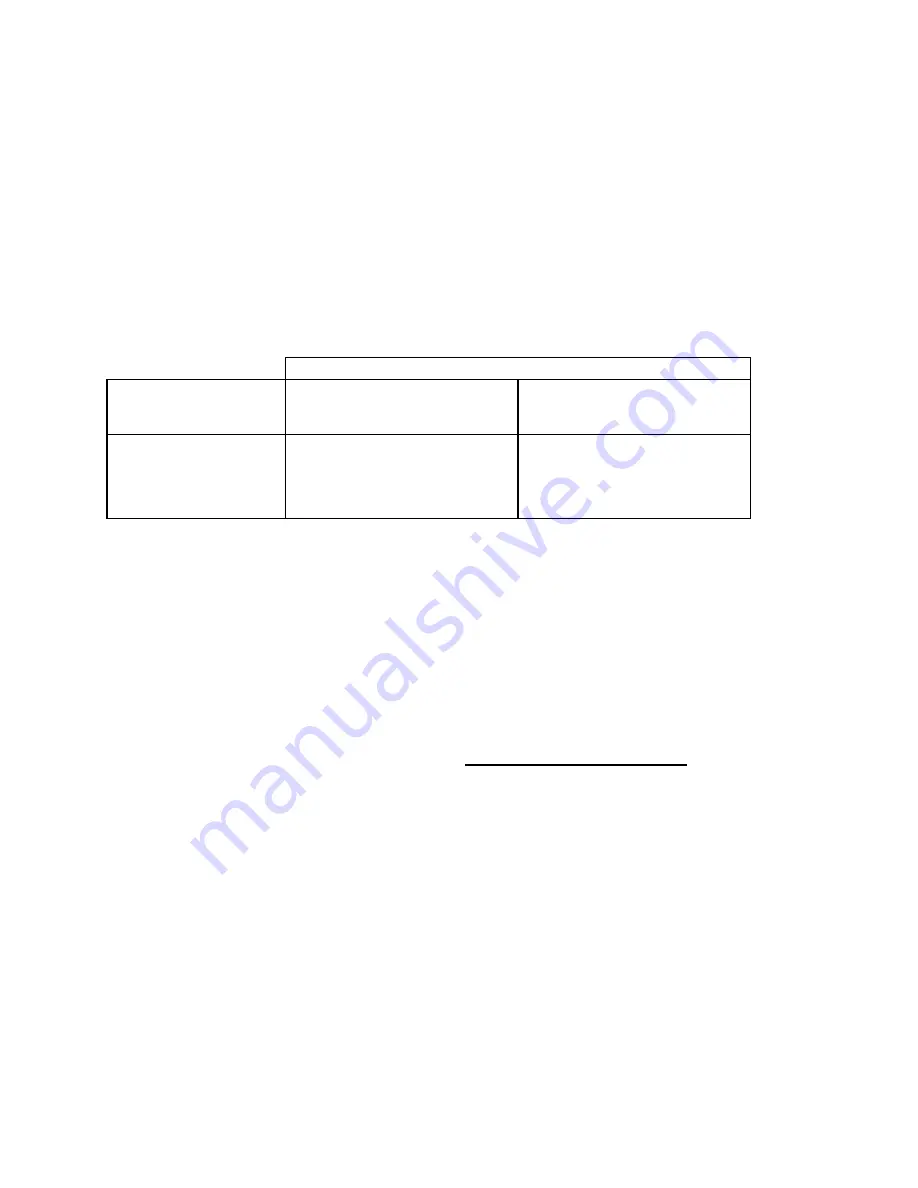
Wall mounted Z-Wave devices installed in metal junction boxes will suffer a significant loss of 
range (approximately 20%) since the metal box blocks a large part of the RF signal. 


Effects of Home Construction on Wireless Range Between Z-Wave Enabled Devices 

Note: The distances shown in the table below are typical examples.  Actual performance in your home will 
vary. 


From the Remote (or repeating Z-Wave module) to destination device: 


Type of Construction 


Wood Frame w/Drywall 

Brick, Tile or Concrete 


Plastic J-
Boxes* 

Metal J-
Boxes 

Plastic J-
Boxes* 

Metal J-
Boxes 

Number of Walls 
or Obstacles 

0**  100' 

80' 

100' 

80' 

70' 

56' 

60' 

48' 

49' 

39' 

36' 

29' 

34' 

27' 

21' 

17' 

* For Plug-in Modules or In-Wall Devices Installed in Plastic Junction Boxes 

** Line of Sight / no obstructions 

 
Please Note:  

Z-Wave home control networks are designed to work properly alongside 802.11 wireless 

computer networks, Bluetooth and other 2.4GHz or 5.8GHz devices.  Some baby cams, wireless video 
devices and older cordless phones using the 900MHz frequency range may cause interference and limit 
Z-Wave functionality.  

Many 900MHz products have a switch to select channel “A” or “B”.  You may find 

that one of these channels will cause less interference than the other. 


NOTES ON NETWORK MANAGEMENT 

1.  Add a node, group or scene can also be referred to as include a node, group or scene. 

Remove a node, group or scene can also be referred to as Exclude a node, group or scene. 

2. 

If the screen displays FAILURE during the setup or programming process, you have 
pressed an invalid key or the desired action has not been successfully completed Please 
try again.  Some Z-Wave devices may have to be within two feet of the remote during the 
setup process.


ADDING A DEVICE (NODE / LIGHT) TO THE NETWORK 

In order to control the lights, they must be Z-Wave enabled and you must first add them to your home 
network.  There are two ways to do this. 

1.  Add lights to your remote so that they can be controlled individually using the number keys 

(maximum of 18).  Adding a device to your remote also adds it to your network.  If the device 
number you are trying to add is already associated with another device, the previous information 
is lost. 

2.  Add devices to your home network without assigning them to a specific number key.  These 

devices can only be controlled through the GROUP, SCENE or ALL commands. 


To add a device to your home network WITHOUT assigning it to a specific number key: 

1.  Press and hold SETUP until the screen shows LGHT SETUP 
2.  Press and Release OK and the screen will display ADD 
3.  Press OK once; the screen will now display TO NETWORK 
4.  Press OK and the screen will display SETUP WAITING 
5.  Press the button on the device so that it communicates with the remote. 

Содержание 45633

Страница 1: ...ure settings on a Z Wave enabled thermostat LIGHT Use to program and or control individual lights GROUP Use to program and or turn multiple lights ON or OFF with one button SCENE Use to program and or...

Страница 2: ...Devices within the Z Wave network are either controllers or slaves Most AC powered slaves also function as repeaters in the network and when required relay the command signals to the destination devic...

Страница 3: ...likelihood of unintentionally turning on the appliance will be reduced significantly because the Shift button will need to be pressed before pressing device numbers 10 18 2 Z Wave devices controlling...

Страница 4: ...NETWORK MANAGEMENT 1 Add a node group or scene can also be referred to as include a node group or scene Remove a node group or scene can also be referred to as Exclude a node group or scene 2 If the s...

Страница 5: ...creen will display the selected LIGHT NODE and ON To turn a light off press and release the OFF key for less than one second The screen will display the selected LIGHT NODE and OFF Setting a Light s B...

Страница 6: ...e is still part of your home control network and the group still exists if there were more than one device in it to start 1 Press and hold SETUP until the screen displays LGHT SETUP 2 Use either Arrow...

Страница 7: ...ugh 18 6 Press the OK key and the screen will display SETUP WAITING 7 Press the button on the device that you wish to remove 8 When the screen displays SUCCESS you have successfully removed the device...

Страница 8: ...the device that you wish to remove from All Control 6 The screen will display SUCCESS TIME AND DATE SETUP Setting the Time 1 Press and hold SETUP until the screen displays LGHT SETUP 2 Use either Arr...

Страница 9: ...med the OFF time press OK and the screen will display SUCCESS Random EVENTS The GE 45633 Advanced Remote allows you to program automated events such as turning on or off your lights at a predetermined...

Страница 10: ...Lock from your control network The setup process for door locks varies by lock manufacturer Please refer to your lock s documentation for detailed instructions THERMOSTATS The GE 45633 Advanced Remot...

Страница 11: ...play read CONFIG VAL 8 Use either Arrow key to scroll until the display reads the proper value 0 255 as indicated in the Z Wave device s instructions 9 Press OK 10 Press the button on the device 11 Th...

Страница 12: ...key to scroll until the display reads TRANSFER 4 Press OK and the screen will display PRIMARY 5 Use either arrow key to scroll until the display reads RECEIVE 6 Press OK and the Screen will display R...

Страница 13: ...Wave Command Classes Basic Command Class Binary Switch Command Class Configuration Command Class Controller Replication Command Class Encryption Command Class Lock Command Class Manufacturer Specific...

Страница 14: ...cause undesired operation of the device WARRANTY JASCO Products warrants this product to be free from manufacturing defects for a period of two years from the original date of consumer purchase This w...

Отзывы: