
45633 Instructions rev 1-a.doc
Page 11 of 14
1/13/2010
7. When the screen displays SUCCESS, you have successfully deleted the thermostat.
* Refer to the thermostat’s instructions for detailed instructions.
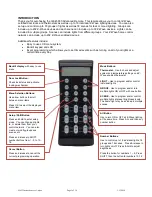
ADVANCED CONFIGURATION
Some Z-Wave devices provide advanced capabilities available only through the use of a remote control
like the GE 45633 Advanced Remote. One example is the GE 45606 in-wall dimmer which allows the
end user to create 3 different dim rates depending upon how the dimmer is activated (manually, via a
normal Z-Wave
“Dim” command or via an All-On or All-Off Z-Wave command). Each of the three can be
set anywhere between 10 milliseconds and 4.2 minutes for the time it takes to go from full intensity to
minimum intensity.
Please refer to the instructions of your Z-Wave device for available options and specific instructions on
changing its advanced configuration.
To Change Advanced Configuration Settings:
1. Press and hold SETUP the screen displays LGHT SETUP.
2. Use either Arrow key to scroll until the display reads ADV CONFIG
3. Press OK and screen will display PARAM 0
4. Use either Arrow key to scroll until the display reads the proper parameter number (1 - 255) as
indicated in the Z-
Wave device’s instructions
5. Press OK and the screen will read NUM BYTES
6. Use either Arrow key to scroll until the display reads the proper number of bytes (1, 2 or 4) as
indicated in the Z-
Wave device’s instructions
7. Press OK and the screen will display read CONFIG VAL
8. Use either Arrow key to scroll until the display reads the proper value (0 - 255) as indicated in the
Z-
Wave device’s instructions
9. Press OK
10. Press the button on the device.
11. The screen will display SUCCESS
CREATE SECONDARY CONTROLLER
SENDING DEVICE AND NETWORK INFORMATION TO A SECONDARY REMOTE
You can add a secondary remote to your network, and copy your primary remote’s device and network
information to it.
To send device and network information to a secondary remote:
1. Place the two remotes near each other.
2. Press and hold SETUP on the primary GE 45633 ADVANCED remote until the display reads
LGHT SETUP.
3. Use either Arrow key to scroll until the display reads TRANSFER
4. Press OK and the screen will display PRIMARY
5. Use either arrow key to scroll until the display reads SECONDARY
6. Press and OK and the Screen will display ALL
7. Refer to the user manual for the secondary remote for programming information. See the
following section on “Copying Network/Device Information” if the target remote is a GE 45633
remote. Put the target (secondary) remote into programming mode so that communicates with
the primary remote. The primary remote then copies the network and device information to the
new secondary remote.
8. Press the OK key and the screen will display SENDING.
9. When screen displays SUCCESS you have successfully transferred the information.
10. Add devices, groups, and scenes to the new secondary remote as needed.
SENDING INFORMATION TO A SECONDARY REMOTE
You can add a secondary remote to your network, and copy your primary remote’s network and device
information to it.
To send information to a secondary remote:


