background image

27

  Uso del control remoto

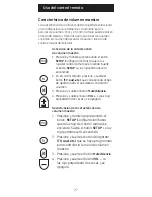
Desactivación de la característica de  

volumen maestro

1.  Presione y mantenga presionado el 

botón  

SETUP (Configuración) hasta 

que la luz roja del control remoto se 
encienda. Suelte el botón 

SETUP. La luz 

roja permanecerá encendida.

2.  Presione y suelte el botón del aparato


(TV, aud, etc.) que se haya programado 
para controlar la función de volumen 
maestro.

3.  Presione y suelte el botón 

Mute/Silencio

.

4.  Presione y suelte el botón 

VOL –. La 

luz roja parpadeará dos veces y se 
apagará.

Activación de la característica  

de volumen maestro

1.  Presione y mantenga presionado el botón  

SETUP (Configuración) hasta que la luz 
roja del control remoto se encienda. Suelte 
el botón 

SETUP. La luz roja permanecerá 

encendida. 

2.  En el control remoto, presione y suelte el 

botón

 (TV, aud, etc.) que corresponda al tipo 

de aparato para el que desea controlar el 
volumen.

3.  Presione y suelte el botón 

Mute/Silencio.

4.  Presione y suelte el botón

 VOL +. La luz roja 

parpadeará dos veces y se apagará. 

Característica de volumen maestro

La característica de volumen maestro le permite seleccionar 
un solo dispositivo que siempre es controlado por los 
botones de volumen. Por ej., el control remoto puede estar en 
el modo de televisor mientras que los botones de volumen 
controlan el volumen del receptor de audio o la barra de 
sonido en lugar del televisor.

Содержание 37123

Страница 1: ...Universal Remote Instruction Manual Control Remoto Universal Manual de Instrucciones 37123 2 17 v1 6177 37123 ...

Страница 2: ...y DVD players streaming media players sound bars cable receivers and more Introduction 2 Setup 3 Button Functions 4 Programming Your Remote 6 Direct Code Entry 6 Auto Code Search 7 Controlling Combo Devices 9 Favorites Function 9 Using Your Remote 11 Master Volume Feature 11 Code Identification 12 Reset to Factory Settings 12 Troubleshooting 13 Warranty 14 FCC Statement 15 Table of Contents SAVE T...

Страница 3: ...operating properly replace the batteries with new ones Battery Precautions Do not mix old and new batteries Do not mix alkaline standard carbon zinc or rechargeable Ni Cd Ni MH etc batteries Always remove old weak or worn out batteries promptly and recycle or dispose of them in accordance with local and national regulations Battery Saver Your remote automatically turns off if the buttons are depre...

Страница 4: ...4 Button Functions 3 1 5 6 20 21 17 15 10 11 16 13 18 19 4 8 7 9 12 23 22 24 14 2 ...

Страница 5: ...ng devices or Guide on cable satellite receivers 11 Menu Displays the on screen menu 12 Ok Selects menu items for the controlled device 13 Up Down Left Right menu navigation 14 Info Displays on screen show content information 15 Exit Exit on screen menus 16 Mute Mutes sound 17 Volume Up Down 18 Channel Up Down 19 Previous Channel Returns to the previously selected channel 20 Streaming App Hotkeys ...

Страница 6: ... dvd strm aux b ray cbl sat amp Locate the brand of your device and circle all the remote codes for the brand 2 Press and hold down the SETUP button on the remote until the red light on the remote control turns on Release the SETUP button The red light will remain on Note The red light will either be a small light at the top of the remote or the power on off button 3 Press and release the device b...

Страница 7: ... Search method in the next section to program your remote For combination devices such as a TV DVD combo or TV VCR combo you may have to enter a code for each device See Controlling Combo Devices pg 9 Write down the remote codes used to program the remote for future reference Auto Code Search The Auto Code Search is a process where you can search through all the codes stored in the remote to find ...

Страница 8: ...t 10 codes 5 Manually turn the device back on 6 With the remote pointed at the device press and release the VOL button The remote will re send the first code of the 10 codes from Step 4 The red light will blink once and remain on Did the device turn off If YES you have found a code for the device Press and release the same device button you pressed in Step 3 This will store the code in the remote ...

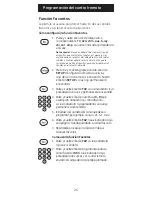
Страница 9: ... both parts of the combo device For example if you have a TV DVD combo you may need to set up one code under the TV button to control the TV and a separate code under the dvd button to control the DVD Favorites Function Allows user to program up to 10 of their favorite channels for quick access Setup Favorite Channels 1 Press and release the device button tv cbl etc The indicator light will blink ...

Страница 10: ...release the FAV button the red indicator will turn off Your favorite channel is now saved 7 Repeat this process for up to 10 of your favorite channels Using Favorite Function 1 Press and release the FAV button The red indicator light will turn on 2 Press and release the programmed button for your favorite channel 0 9 The red indicator will blink twice and the remote will send the code for your pre...

Страница 11: ...red light will remain on 2 Press and release the device button TV aud etc on the remote for the device you wish to control the volume 3 Press and release the MUTE button 4 Press and release the VOL button The red light will blink twice and turn off Disabling the Master Volume Feature 1 Press and hold down the SETUP button on the remote until the red light on the remote control turns on Release the...

Страница 12: ...es the remote light flashes This is the number corresponding to the first digit of the code Repeat the process by pressing the 2 3 and 4 buttons for the remaining digits 5 Press and release the ENTER button to exit this mode 1 Press and hold down the SETUP button on the remote until the red light on the remote control turns on Release the SETUP button The red light will remain on 2 Press and relea...

Страница 13: ...ote does not operate some features of your device Sometimes a particular code might operate a few features but not all Try programming the remote with a different code from the Code list See Direct Code Entry section Remote may not be able to operate all features of your device or button names may be different than that of your original remotes Scan this to view a helpful remote setup video http w...

Страница 14: ...long an implied warranty lasts or permit the exclusion or limitation of incidental or consequential damages so the above limitations may not apply to you This warranty gives you specific rights and you may also have other rights which vary from state to state If unit should prove defective within the warranty period return prepaid with dated proof of purchase to MADE IN CHINA GE is a trademark of ...

Страница 15: ...nst harmful interference in a residential installation This equipment generates uses and can radiate radio frequency energy and if not installed and used in accordance with the instructions may cause harmful interference to radio communications However there is no guarantee that interference will not occur in a particular installation If this equipment does cause harmful interference to radio or t...

Страница 16: ...16 ...

Страница 17: ...17 Control Remoto Universal Manual de Instrucciones 37123 37123 ...

Страница 18: ...ón 18 Configuración 19 Funciones de los botones 20 Programación del control remoto 22 Entrada directa de códigos 22 Búsqueda automática de códigos 24 Control de Aparatos Combinados 25 Funcione Favoritos 26 Uso del control remoto 27 Característica de volumen maestro 27 Identificación de códigos 28 Restablecimiento de la configuración de fábrica 28 Resolución de problemas 29 Garantía 30 Declaración ...

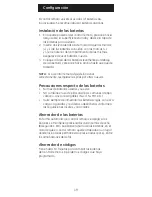
Страница 19: ...e reemplace las pilas por otras nuevas Precauciones respecto de las baterías No mezcle baterías usadas y nuevas NO combine el uso de pilas alcalinas comunes de tipo carbono cinc o recargables Ni Cd Ni MH etc Quite siempre de inmediato las baterías viejas con poca carga o agotadas y recíclelas o deséchelas conforme a las regulaciones locales y nacionales Ahorrador de las baterías En forma automátic...

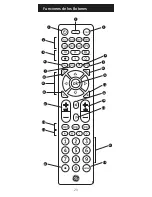
Страница 20: ...20 Funciones de los Botones 3 1 5 6 20 21 17 15 10 11 16 13 18 19 4 8 7 9 12 23 22 24 14 2 ...

Страница 21: ...ón de contenido web o Guía a receptores de cable satélite 11 Menu Muestra el menú en pantalla 12 Ok Selecciona los elementos del menú para el dispositivo que está controlando 13 Arriba abajo izquierda y derecha teclas de menú de navegación 14 Info Muestra en pantalla información del programa y contenido 15 Exit cierra los menús de pantalla 16 Mute Apaga el sonido 17 Subir Bajar volumen 18 Subir Ba...

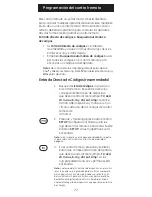
Страница 22: ...sección correspondiente al tipo de dispositivo que desea controlar por ejemplo TV dvd strm aux b ray cbl sat amp Localice la marca del dispositivo y marque con un círculo cada uno de los códigos de control remoto de la marca 2 Presione y mantenga presionado el botón SETUP Configuración hasta que la luz roja del control remoto se encienda Suelte el botón SETUP La luz rojapermanecerá encendida Nota ...

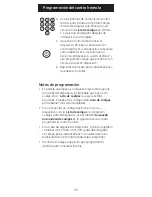
Страница 23: ...e controlar Notas de programación Es posible que algunos códigos solo ejecuten algunas funciones del dispositivo Es probable que haya otro código en la Lista de códigos que ejecute más funciones Pruebe otros códigos de la Lista de códigos para obtener más funcionalidades Si no encuentra un código que funcione con su dispositivo o en la Lista de códigos no aparecen códigos para el dispositivo use e...

Страница 24: ...ña ubicada en la parte superior del control remoto o en el botón de encendido apagado 3 En el control remoto presione y suelte el botón que corresponda al tipo de aparato que desea controlar por ejemplo TV dvd strm aux b ray cbl sat amp La luz roja parpadeará una vez y permanecerá encendida 4 Apunte el control remoto hacia el dispositivo y presione y suelte el botón POWER en el control El control ...

Страница 25: ...o 7 Notas especiales El botón VOL se puede usar para retroceder por cada conjunto de 10 códigos La luz roja parpadeará dos veces después de probar el primero o el último código de cada conjunto de 10 7 Use el control remoto para volver a encender el dispositivo Pruebe los botones en el control para ver si el dispositivo responde como debería ser Si los botones no accionan el dispositivo vuelva al ...

Страница 26: ... Configuración hasta que la luz roja del control remoto se encienda Suelte el botón SETUP La luz roja permanecerá encendida 3 Pulse y suelte el botón FAV La luz indicadora roja parpadeará una vez y permanecerá encendida 4 Pulse y suelte el botón numérico 0 9 que usará para almacenar su canal favorito La luz indicadora roja parpadeará una vez y permanecerá encendida 5 Introduzca el número del canal...

Страница 27: ...tenga presionado el botón SETUP Configuración hasta que la luz roja del control remoto se encienda Suelte el botón SETUP La luz roja permanecerá encendida 2 En el control remoto presione y suelte el botón TV aud etc que corresponda al tipo de aparato para el que desea controlar el volumen 3 Presione y suelte el botón Mute Silencio 4 Presione y suelte el botón VOL La luz roja parpadeará dos veces y...

Страница 28: ...ión hasta que la luz roja del control remoto se encienda Suelte el botón SETUP La luz roja permanecerá encendida 2 En el control remoto presione y suelte el botón correspondiente al aparato TV dvd strm aux b ray cbl sat amp para el que desee obtener el código 3 Presione y suelte el botón ENTRAR 4 Presione y suelte el botón n º 1 Cuente la cantidad de veces que la luz del control remoto parpadea Es...

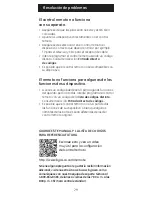
Страница 29: ...para algunas funciones del aparato pero no todas Intente programar el control remoto con un código de la lista de códigos distinto Consulte la sección Entrada directa de códigos Es posible que el control remoto no sirva para todas las funciones de su dispositivo o bien que algunos nombres de los botones sean diferentes de los del control remoto original Resolución de problemas GUARDE ESTE MANUAL Y...

Страница 30: ...tales por lo que las limitaciones antes mencionadas pueden no aplicarse en su caso Esta garantía le otorga derechos específicos Es posible que tenga otros derechos que pueden variar según el estado en el que vive Si se demuestra que la unidad presenta defectos dentro del período de la garantía envíe el producto con franqueo postal e incluya el comprobante de compra fechado a Jasco Products Company...

Страница 31: ...zonable contra interferencias perjudiciales en instalaciones residenciales Este aparato genera usa y puede irradiar energía de radiofrecuencias y si no se instala y usa según las instrucciones puede provocar interferencia perjudicial a las radiocomunicaciones No obstante no hay garantías de que no ocurrirá interferencia en una instalación en particular Si este aparato provoca interferencia perjudi...

Страница 32: ......

Отзывы: