background image

5

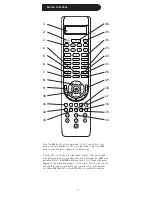
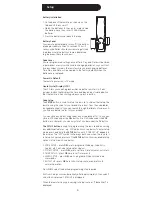
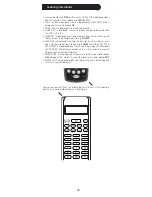
  Button Functions, cont.

1.  Liquid Crystal Display (LCD): Helps.with.setup.and.displays.the.

Mode.the.remote.is.in,.and.time,.etc.

2.  SETUP: Used.for.setting.up.your.remote.
3.  TV, DVD, DVR, etc.:.Selects.product.to.be.operated.
4.  EXIT:.Exits.On-Screen.Menus/Returns.to.previous.On-Screen.

selection.

5.  Dot:.Used.for.digital.channels,.e.g..2.3..
6.  MENU: Brings.up.the.device.Menu.screen.(if.available).-.use.with.

UP,.DOWN,.LEFT,.and.RIGHT navigation.buttons.

7.  MUTE: Turns.off.the.TV.sound.while.the.picture.remains.
8. UP,.DOWN,.LEFT &.RIGHT: Navigation.buttons.
9.  VOLUME UP/DOWN: Changes.the.volume.level.of.the.product,.

normally.the.TV.

10.  OK: Selects.menu.items.for.the.device.you.are.controlling.
11.  ABCD buttons:.Used.to.store.learned.commands.
12.REPLAY: On.some.DVRs,.this.button.replays.the.last.8.seconds.of.a.

program.

13.PAGE DOWN: Sets.your.Favorites.ratings,.and.moves.one.screen.

down.at.a.time.in.guides.and.menus.

14.  RECORD, PLAY, STOP, REW, FF, PAUSE:.Control.buttons.that.

operate.your.DVD/DVR.even.when.the.remote.is.set.to.operate.the.
TV..Also.operates.DVD.Scan.-/+.


15.  LIVE:.Returns.to.live.TV.
16.PAGE UP:.Sets.your.Favorites.ratings,.and.moves.one.screen.up.at.

a.time.in.guides.and.menus.

17.  INPUT: For.some.TVs,.press.repeatedly.to.select.available.viewing.

sources.(antenna,.cable.box,.VCR,.DVD,.etc.).

18.  DVR List:.Press.to.display.list.of.recorded.shows.on.your.DVR.
19.  CHANNEL UP/DOWN: Changes.the.channels..Also.controls.DVD/

CD.C/-.track.selection,.i.e.,.DVD/CD.Track.Skip.Up/Down..
Note.the.

DVR buttons.also.control.the.DVD.when.in.DVD.Mode.

20.  LAST:.Returns.to.the.previously.selected.channel,.or.DVD.repeat.

toggle..

21.  INFO: Displays/selects.on-screen.channel.information.
22.  GUIDE:.Displays.on-screen.program.or.channel.guides.
23.  ENTER:.Used.after.direct.channel.number.entry.to.immediately.

change.to.the.selected.channel.

24.  NUMBERS:.Enter.numbers.for.direct.channel.selection..Some.

products.require.Enter.to.be.pressed.after.channel.selection.

25.  ASPECT: Aspect.Ratio.Control.selects.viewing.format.for.the.

displayed.picture,.e.g.,.Wide,.Zoom,.etc.

26.  POWER: Turns.device.on.or.off.

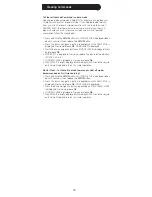
DVD/DVR Punch-Through Feature

This.remote.allows.the.6.DVD/DVR.transport.buttons.(i.e.,.PLAY,.PAUSE,.
STOP,.FF,.REWIND,.and.REC).to.operate.the.programmed.TV,.DVD,.
SAT,.DVR,.Cable.device.if.the.code.has.these.button.functions.e.g..if.
you.have.programmed.a.SAT/DVR.or.Cable/DVR,.etc..Otherwise.the.
transport.keys.will.punch-through.to.the.last.DVD.or.VCR.programmed.
mode.you.used,.i.e.,.the.transport.buttons.control.your.DVD.or.VCR.
player.even.when.you.are.in.TV,.SAT.or.Cable.mode.

Содержание 24999

Страница 1: ...Universal Remote Instruction Manual 24999 ...

Страница 2: ...e 9 Programming Combo Device Codes 9 Volume Mute Control Feature 10 Setting Volume Mute Control Punch Through 10 Setting any Mode to use its own Volume Mute 10 Resetting Mute Volume Control to defaults 11 Setting Time of Day 12 Setting the Date 12 Setting the Backlight Delay 13 Full System Reset to factory defaults 13 Timer Setup 14 Sleep Timer 14 Setting and Clearing Timers 14 15 Code Learning 16...

Страница 3: ...r brands of TV VCR DVD SAT CBL and audio equipment Note Some functions from your original remote may not be controlled by the 24999 remote Use the original remote if available to control such functions Sometimes buttons other than described in these instructions may actually perform the function For example the CHAN and VOL buttons might be used to navigate through menu choices We recommend you ex...

Страница 4: ...re referred to by different names on the device you are controlling E G LAST may be called RECALL or ENTER may be called DISPLAY These differences depend on the brand and model of your product Also this remote can only operate features that exist on your product E G your product must have LAST ability for the LAST button to operate this feature Button Functions 1 2 3 4 5 6 7 8 9 10 11 12 13 26 25 ...

Страница 5: ...nus 17 INPUT For some TVs press repeatedly to select available viewing sources antenna cable box VCR DVD etc 18 DVR List Press to display list of recorded shows on your DVR 19 CHANNEL UP DOWN Changes the channels Also controls DVD CD CHAPTER track selection i e DVD CD Track Skip Up Down Note the DVR buttons also control the DVD when in DVD Mode 20 LAST Returns to the previously selected channel or...

Страница 6: ...e for your brand of product from the code tables on separate sheet or you can search through the library of codes until you find a code that works for your product You can store any kind of code under any mode except TV I E you can store a VCR code under the CBL button or a DVD code under the VCR button etc However you can only store TV codes under the TV button The SETUP button is used for progra...

Страница 7: ...n Mode button press Display Pressing and holding a Mode button changes to that Mode and displays the active Mode and its code e g DVD and the programmed 4 digit code e g 0768 The display returns to normal when you release the button SETUP Shift Display Pressing and releasing the Setup button displays the active Mode of the remote e g DVD the Date e g 3 26 Month Day and indicates Shift operation wi...

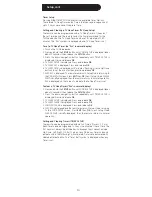
Страница 8: ...using VOLUME MUTE CHANNEL POWER INPUT PLAY STOP FF REWIND and PAUSE Once the correct code has been found press and release OK to install the Code 9 PLEASE WAIT is briefly displayed followed by SUCCESS and the remote returns to normal operation 10 With your device on press CHANNEL UP If the device responds no further programming is required Note If some buttons do not operate your equipment try one...

Страница 9: ...ordingly SEARCHING is displayed along with the Device selection during the search process If the desired Code is accidentally passed then press the CHANNEL DOWN button to backtrack through the Library Press CHANNEL UP or POWER or PLAY to change direction forward again 10 Press and release OK to install the Code PLEASE WAIT is briefly displayed followed by SUCCESS and the remote returns to normal o...

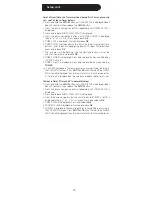
Страница 10: ...yed 5 Press and release OK ALL VOL MODE is displayed 6 Press and release desired Mode key TV VCR DVD etc for Volume Mute control PLEASE WAIT is briefly displayed followed by SUCCESS and the remote returns to normal operation All Modes will now punch through to your chosen Mode for Volume Mute control If the chosen Mode has no Volume Mute commands of its own Volume Error is shown in the display and...

Страница 11: ...s the down navigation button until SYSTEM SETUP is displayed 3 Press and release OK VOL MUTE SETUP is displayed 4 Press and release OK ALL VOL SET is displayed 5 Press the down navigation button repeatedly until VOL MUTE RESET is displayed 6 Press and release OK CONFIRM RESET is displayed 7 Press and release OK PLEASE WAIT is briefly displayed followed by SUCCESS and the remote returns to normal o...

Страница 12: ...LEASE WAIT is briefly displayed then the remote returns to normal operation Setting the Date DATE SETUP To set the Month Date and Day 1 Press and hold the SETUP button until CODE SETUP is displayed takes about 3 seconds then release the SETUP button 2 Press the down navigation button until SYSTEM SETUP is displayed 3 Press and release OK VOL MUTE SETUP is displayed 4 Press the down navigation butt...

Страница 13: ...ime to 00 zero Press and release OK 6 SUCCESS is displayed and the remote remains in Setup Mode returning to the CODE SETUP screen Press EXIT then OK to exit Setup Mode PLEASE WAIT is briefly displayed then the remote returns to normal operation Reset the LCD Remote to Factory Defaults SYSTEM RESET To reset the remote back to factory default settings All User programmed settings e g code settings ...

Страница 14: ...to the CODE SETUP screen Press EXIT then OK to exit Setup Mode PLEASE WAIT is briefly displayed then the remote returns to normal operation Zzz is displayed on the screen to indicate that a Sleep Timer is set To clear a TV Sleep Timer Zzz in normal display 1 Press and hold the SETUP button until CODE SETUP is displayed takes about 3 seconds then release the SETUP button 2 Press the down navigation...

Страница 15: ...X Key1 is displayed Press and release the key required e g POWER 10 SUCCESS is displayed The remote remains in Setup Mode returning to the CODE SETUP screen Press EXIT then OK to exit Setup Mode PLEASE WAIT is briefly displayed then the remote returns to normal operation A Timer Bell is displayed on the screen to indicate that a timer is set To clear a Timer Timer Bell in normal display 1 Press an...

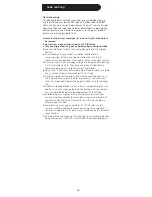
Страница 16: ...hen carry out a Master Clear before completely learning your original remote s commands g Carry out a Mode Clear before learning a Mode to make sure there are no previously learned commands for that Mode h Place the original remote end to end with the Learning Remote so the IR transmitters on both remotes are directly in line with each other You may need to adjust the height of either remote to ac...

Страница 17: ...v Try learning the original remote for that Mode again If problems reoccur with the same button check the original remote button being learned does it transmit Does it operate the target device Try learning that button under a different clear Mode If it learns okay then it is likely to be a different code type from the others and cannot be learned under the same Mode Learning Notes 1 You cannot le...

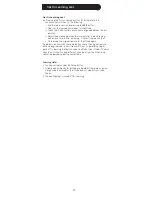
Страница 18: ...NING is displayed Pointing the remotes as shown below press and hold the original remote key e g POWER until the SUCCESS or LEARN ERROR is displayed see Tips on Learning page 19 followed by LEARN MORE this process can take up to 2 or 3 seconds to complete Release the original remote button 7 LEARN MORE is still displayed To learn more buttons press and release OK and repeat from step 5 To exit at ...

Страница 19: ...displayed Press and release OK 4 MODE KEY is displayed Press and release the desired Mode button TV VCR DVD etc 5 CONFIRM CLEAR is displayed Press and release OK 6 PLEASE WAIT is briefly displayed followed by SUCCESS and the remote exits Setup Mode and returns to normal operation Master Clear To Clear all Learned Commands under all modes recommended on first time Learning 1 Press and hold the SETU...

Страница 20: ...anufacturer is not responsible for any radio or TV interference caused by unauthorized modifications to this equipment Such modifications could void the user s authority to operate the equipment Jasco Products Company warrants this product to be free from manufacturing defects for a period of ninety days from the original date of consumer purchase This warranty is limited to the repair or replacem...

Страница 21: ...21 Universal Remote Instruction Manual 24999 12 10 24999 Jasco Products Company 10 E Memorial Road Oklahoma City OK 73114 2205 Made in China ...

Отзывы: