background image

GASMAX/TX Operation & Maintenance Manual, Revision 1.0 

Page 27


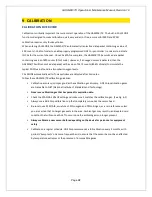
After power-up, allow the GASMAX/TX to stabilize for one to eight hours prior to any initial calibration 

(see GDS Corp Electrochemical Sensor manual for more details on specific electrochemical sensors). This 

will allow the sensor to reach stable equilibrium with respect to environmental conditions such as 

ambient temperature, humidity, and barometric pressure as well as applied “reference” and “counter” 

voltages generated by the GASMAX/TX electronics.  At this point, the GASMAX/TX can be calibrated and 

made operational.  

INITIAL SETUP – LEGACY MODE 

Additional information will be available in a future version of the GASMAX/TX manual.  


Содержание GASMAX

Страница 1: ...GDS Corp 2513 Hwy 646 Santa Fe Texas 77510 409 927 2980 409 927 4180 Fax ww gdscorp com Operation and Maintenance Manual GASMAX TX Battery Powered Dual Channel Wireless Gas Monitor...

Страница 2: ...AL COMPLETELY BEFORE OPERATING OR SERVICING ATTENTION POUR DES RAISONS DE S CURIT CET QUIPEMENT DOIT TRE UTILIS ENTRETENU ET R PAR UNIQUEMENT PAR UN PERSONNEL QUALIFI TUDIER LE MANUE D INSTRUCTIONS EN...

Страница 3: ...__ 17 Surge Protection Grounding_________________________________________________ 18 6 HARDWARE OVERVIEW______________________________________________ 19 7 INSTALLATION _______________________________...

Страница 4: ..._____________________________________________ 34 Sensor Replacement Remote Sensors _________________________________________ 35 Normal Maintenance______________________________________________________...

Страница 5: ...___________________________________________________ 47 Sensor Head Accessories _____________________________________________________ 48 Sensor Separation Kit___________________________________________...

Страница 6: ...P SETUP CHECKLIST 26 FIGURE 9 1 CALIBRATION SETUP 29 FIGURE 9 2 CALIBRATION FLOWCHART 30 FIGURE 10 1 GASMAX TX DATA DISPLAY SCREEN 31 FIGURE 10 2 DUAL DATA AND TREND DISPLAY SCREENS 32 FIGURE 10 3 GAS...

Страница 7: ...TX Operation Maintenance Manual Revision 1 0 Page 7 FIGURE 13 3 GASMAX TX REMOTE SENSOR SEPARATION KIT 48 FIGURE 14 1 GASMAX TX DIMENSIONS SINGLE LOCAL SENSOR 49 FIGURE 15 1 GDS CORP NETWORK IDENTIFI...

Страница 8: ...rtain gases in ambient air Accuracy in atmospheres containing steam or inert gases cannot be guaranteed Always mount the sensor head vertically with the sensor head facing down Do not paint transmitte...

Страница 9: ...es while using very little power Battery life can be as long as one year under common circumstances Instead of complicated setup procedures that involve channel selection and identification codes the...

Страница 10: ...C Memory On board non volatile memory retains all user settings Housing Aluminum housing with epoxy paint standard 316 stainless steel optional Dimensions Width 5 4 137 mm Height 8 203 mm Depth 5 127...

Страница 11: ...he sensor board amplify the signal PGA Gain and covert the information from analog to digital using a 12 bit A D converter If an ultra low power infrared sensor is being used hydrocarbon gases enter t...

Страница 12: ...RS OR WIRELESS SYSTEM SITE MANAGERS If the GASMAX TX determines that a data packet should be transmitted the following events take place Power is applied to the radio the radio is placed in receive mo...

Страница 13: ...ir transmissions While the GASMAX TX is optimized for use with third generation controllers such as the C2 TX Wireless Site Manager the GASMAX TX can also be integrated into existing wireless networks...

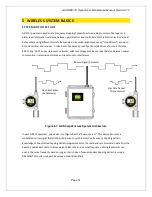
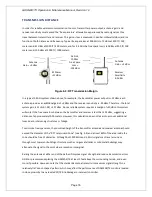
Страница 14: ...n ideal balance between power consumption transmission distance and resistance to interference Figure 5 1 GDS Corp Wireless System Architecture In each GDS Corp system one device is configured as the...

Страница 15: ...s than 102 dBm suggesting a distance of approximately 1000 meters However this calculation does not take into account additional loses due to intervening structures or foliage To minimize free space l...

Страница 16: ...ignal gain by focusing the reception pattern in a more horizontal plane Rubber duck and collinear antennas provide best performance when installed with at least 1 to 2 wavelengths away from walls or s...

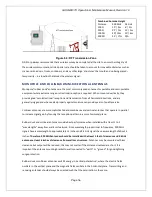
Страница 17: ...l be mounted with vertical polarity then the Yagi s must also have vertical polarity see Fig 5 3 Care needs to be taken to ensure the Yagi is aligned correctly to achieve optimum performance Two Yagi...

Страница 18: ...und Wireless devices should have a solid connection to earth via a ground stake or ground grid if the soil has poor conductivity Solid connection means a large capacity conductor not a small wire with...

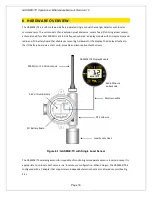
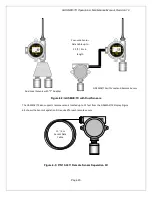
Страница 19: ...dware for the display The display attaches to the I O battery board via a short multi pin cable and two captive thumbscrews Figure 6 1 GASMAX TX with Single Local Sensor The GASMAX TX wireless gas mon...

Страница 20: ...sensors located up to 15 feet from the GASMAX TX display Figure 6 3 shows the Sensor Separation Kit required for each remote sensor Figure 6 3 P N 10 0411 Remote Sensor Separation Kit Dual Local Senso...

Страница 21: ...sensor head to allow easy access for attachment of a Calibration Cup and or removal of the sensor head cover for sensor replacement Whenever possible the GASMAX TX should be mounted in a location tha...

Страница 22: ...cables for remote sensors connect to TB 1 for channel 1 and to TB 2 for channel 2 When replacing the battery be careful to double check the polarity before installing Reversing the polarity will dama...

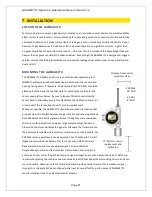
Страница 23: ...d ALWAYS be mounted vertically as shown and GDS Corp recommends side entry for all conduit runs NOTE THE SENSOR SEPARATION KIT DATA CABLE CAN BE CUT TO ANY LENGTH FROM THE 15 FT 3M CABLE PROVIDED THE...

Страница 24: ...a second layer of self vulcanizing weatherproofing tape 1000 2314 with a final layer of electrical PVC tape USE IN HAZARDOUS AREAS The GASMAX TX enclosure and sensor head with integral flame arrestor...

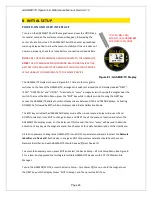
Страница 25: ...ch display screens between DATA and TREND displays Activating DOWN CAL followed by EDIT while in display mode initiates Calibration Mode The EDIT key activates the USER MENU display mode When in user...

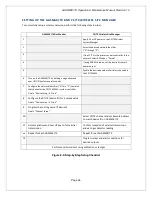
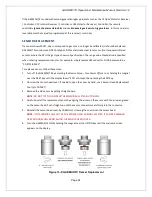
Страница 26: ...rn on the GASMAX TX by holding a magnetic wand over UP ON key for several seconds 7 Configure the network identifier A thru Z to match that chosen for the C2 TX WSM or system controller Find in Device...

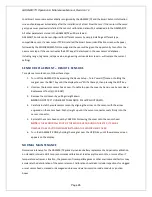
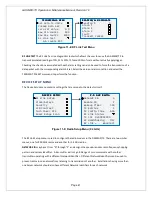
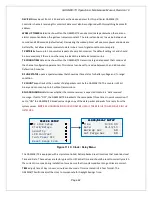
Страница 27: ...ochemical sensors This will allow the sensor to reach stable equilibrium with respect to environmental conditions such as ambient temperature humidity and barometric pressure as well as applied refere...

Страница 28: ...no keystrokes are detected after 5 minutes Follow these GASMAX TX calibration guidelines Calibration accuracy is only as good as the calibration gas accuracy GDS Corp calibration gases are traceable t...

Страница 29: ...ulator via a length of flexible tubing If necessary a cylinder of zero air may be necessary if the absence of target gas cannot be confirmed GDS Corp recommends a flow rate of 0 5 liters minute for st...

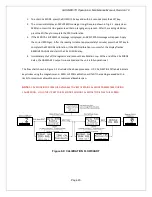
Страница 30: ...complete the SPAN GAS calibration If the SPAN calibration is successful the display flashes REMOVE CAL GAS and starts the CAL PURGE delay 4 Immediately shut off the regulator and remove the calibratio...

Страница 31: ...that the GASMAX TX microprocessor is in low power sleep mode Indicates that the GASMAX TX microprocessor is awake and reading the sensor data Indicates that the GASMAX TX is trying to synchronize with...

Страница 32: ...and fault status bits and battery voltage The GASMAX TX will initiate a data packet transmission under the following specific conditions Every time the Wakeup Timer expires irrespective of the gas le...

Страница 33: ...etween each transmission Increasing the TX Multiples value will increase battery usage but may reduce communications errors in noisy environments Setting the TX Config value The TX Config setting dete...

Страница 34: ...ld be 10 9715 R0100 To replace a sensor follow these steps 1 Turn off the GASMAX TX by accessing the Device Setup Turn Power Off menu or holding the magnet over the NEXT key until the display shows ED...

Страница 35: ...shows EDIT at Accept then pressing the EDIT key 2 Unscrew the remote sensor head cover If unable to open the cover by hand use a Sensor Head Replacement Tool p n 10 0187 3 Remove the old sensor by pul...

Страница 36: ...Born On 09 03 13 Last Cal 11 13 13 NEXT key to exit WARNING WARNING WARNING WARNING Previous calibration will be erased EDIT to Continue NEXT to Exit PGA SETUP PGA SETUP PGA SETUP PGA SETUP Gain 67 4...

Страница 37: ...edited in this menu ZERO 0 defines the reading to be displayed when the input is at 0 SPAN 100 defines the reading to be displayed when the input is at 100 The highest reading allowed is 9999 includi...

Страница 38: ...ccur in the GDS 95 Wireless Alarm Station and C2 TX Wireless Site Monitor SET POINT enters the engineering unit value where the alarm trips It may be negative and trip when monitored values fall out o...

Страница 39: ...ge of the 12 bit analog to digital converter Raw Min Counts represents 0 of scale and Raw Max Counts represents 100 of scale Under certain conditions these counts values can be adjusted to remove exce...

Страница 40: ...gain value resets the calibration Gain and Offset values to their default values of 1 000 and 0 000 The current PGA gain value is shown in percent and can be increased or decreased by pressing the UP...

Страница 41: ...seudo random radio frequency hopping pattern and system identifier A transmitter will not go In Range of or communicate with another transmitter operating with a different Network Identifier Different...

Страница 42: ...oltage and in range condition TX COUNT keeps track of the number of data packets sent by the GASMAX TX The counter is 32 bit binary and can count up to 4 2 million transmissions RF HANDSHAKING determi...

Страница 43: ...igit code appears near the bottom of the screen SECURE LEVEL sets LOW HIGH or OFF modes A LOW level allows CAL MODE sensor calibrations but requires the 4 digit Pass Code prior to altering menus HIGH...

Страница 44: ...ce Setup Turn Power Off menu or hold the magnet over the NEXT key until the display shows EDIT to Accept and then press the EDIT key WARNING WARNING WARNING WARNING TURNING OFF POWER EDIT to Accept NE...

Страница 45: ...r a mixture of oxygen and nitrogen to zero the sensor Sensor output drifted above calibration maximum limit or drifted below fault limit Sensor is defective and should be replaced GASMAX TX EXHIBITS U...

Страница 46: ...tions WSM beacon not set for SERVER if primary network manager Antenna connection compromised or antenna broken WIRELESS SITE MANAGER DISPLAYS COMM ERROR FOR ALL GASMAX TX Network Identifiers do not m...

Страница 47: ...ay no radio 1000 2188 900 MHz radio module 1000 2454 2 4 GHz radio module Yellow Enclosure 10 0160 GASMAX Enclosure Battery PCB 10 0407 Battery PCB 1000 2721 Replacement 3 6V Battery Sensor Head Assem...

Страница 48: ...Figure 13 3 GASMAX TX Remote Sensor Separation Kit Splash Guard Flow Cell Sensor Head Splash Guard 10 0198 Splash Guard Fits all sensor heads Sensor Head Flow Cell 10 0205 Flow Cell 1 8 NPT compressi...

Страница 49: ...GASMAX TX Operation Maintenance Manual Revision 1 0 Page 49 14 DRAWINGS AND DIMENSIONS Figure 14 1 GASMAX TX Dimensions Single Local Sensor 5 1 5 00 15 1 with 900 MHz antenna 19 2 with 2 4 GHz antenna...

Страница 50: ...2 478 GHz Yes H 8 8 No 902 928 MHz 2 402 2 478 GHz Yes I 9 9 No 902 928 MHz 2 402 2 478 GHz Yes J 10 10 No 902 928 MHz 2 402 2 478 GHz Yes K 11 11 No 902 928 MHz 2 402 2 478 GHz Yes L 12 12 No 902 928...

Отзывы: