background image

Page  7  


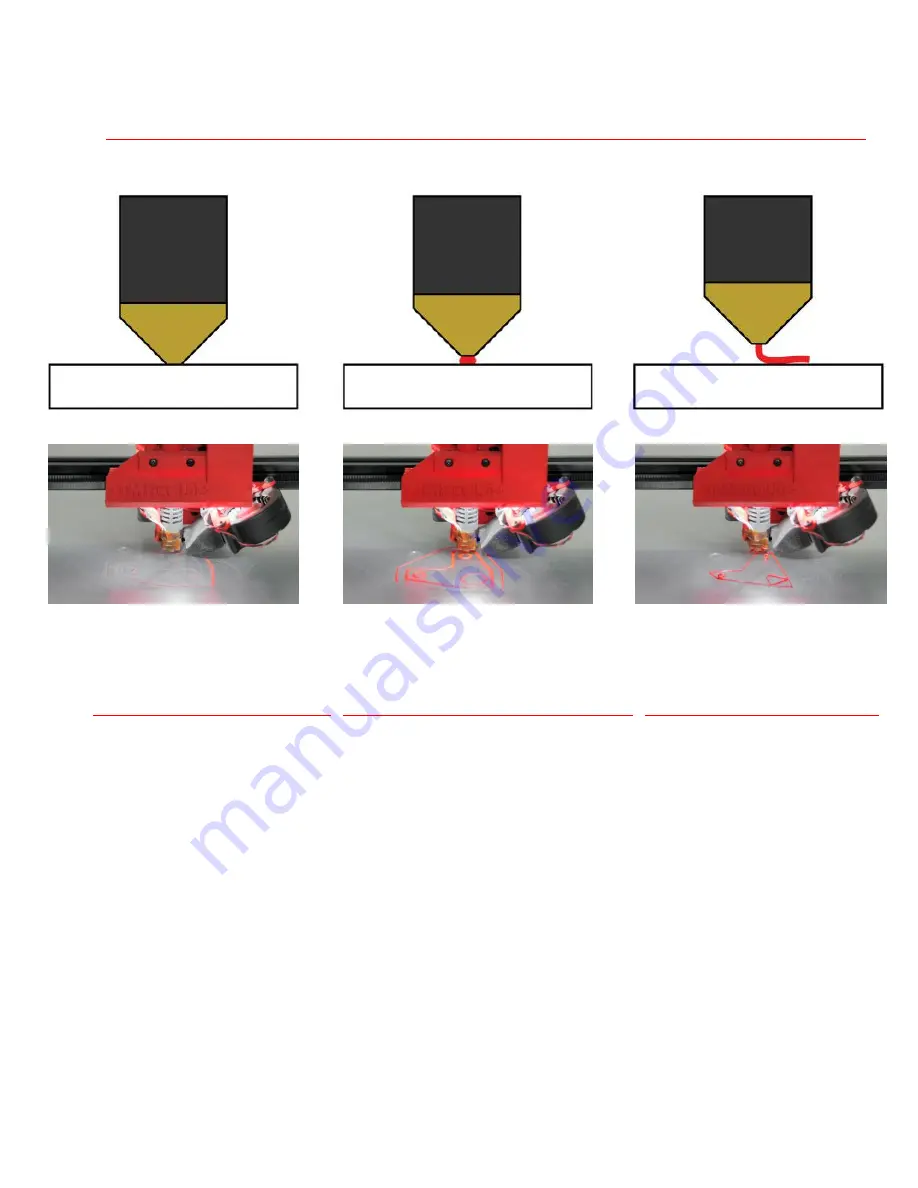
F i r s t   L a y e r   P r i n t   D i a g r a m


N o z z l e   i s   t o o   l o w  


Nozzle is dragging on print bed 

and not allowing the filament to 

be pushed out. If this print 

continues the bed may become 

damaged. 


Solution 

Raise the nozzle (outlined above) 

and make sure to turn the z-axis 

set screw (outlined below) to set 

the new z-axis zero height. 

N o z z l e   i s   j u s t   r i g h t  


Nozzle is slightly above print bed allowing 

filament to be evenly spread onto the 

surface. The filament should be a clean 

continuous line throughout the whole 

print. 


Solution 

Nothing. 

Keep an eye on the print and let if finish. 

N o z z l e   i s   t o o   h i g h  


Nozzle is too far from print bed 

causing the filament to not 

adhere and instead it will extrude 

into the air. You will either see a 

blob form at the tip or stringing in 

the air. 


Solution 

Lower the nozzle (outlined above) 

and make sure to turn the z-axis 

set screw (outlined below) to set 

the new minimum z-axis height. 


Содержание gMax Printer 1.5+

Страница 1: ...inter in the future To jump straight to bed leveling check out page 8 Machine Specifications For Reference 1 Max Hotend Temperature 243C Do not set your max temperature above 235C to prevent a MAXTEMP...

Страница 2: ...ely turn on and display text Below is a diagram of what each portion of the LCD screen represents Note This is for dual extruders and single extruder setups will not have a Hotend 2 reading Note If yo...

Страница 3: ...will result in the creation of a gcode file Note A gcode file is a text file filled with commands used to run the printer It can be opened with a simple text editor such as Microsoft Notepad and edit...

Страница 4: ...nd of the filament by gently bending it This will make it much easier to insert into the extruder Insert the filament as shown here 4 Pinch the extruder arm above the spring and insert filament into t...

Страница 5: ...b this is your accept button and scroll down to Print from SD and push in the knob again 4 Select the file you wish to print and push the knob Your first Print 1 First you will see the extruder move t...

Страница 6: ...layer Refer to the chart on the next page You can do this by using the LCD screen Quickly go to Tune Babystep Z then turn the knob This will raise or lower the extruder by very small amounts so you c...

Страница 7: ...slightly above print bed allowing filament to be evenly spread onto the surface The filament should be a clean continuous line throughout the whole print Solution Nothing Keep an eye on the print and...

Страница 8: ...he filament spool to ensure it does not bind or wrap around the brackets This is especially true for new spools of filament Leveling The Bed If you notice your bed may not be level use the guide below...

Страница 9: ...ext print Note To access the set screw you must raise the extruder by 5 6 This can be done by using the LCD screen and going to Prepare Move Axis Move 1mm Move Z Then simply turn the knob Tips During...

Страница 10: ...the filament change command at specific spots in the print Removing the print David vs Goliath After the print finishes you can immediately pop it off unless it s very small in which case you may wan...

Страница 11: ...de you can carefully use a blade to remove the plastic or in some cases it just flakes off Note A heat source such as a lighter works great to heat the plastic to fix any problem areas and to smooth v...

Отзывы: