background image

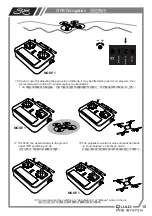
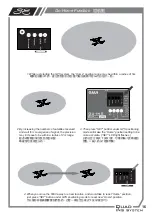
啟動回航點開關,此時機頭會轉向航點並朝航點前進(速度會隨距離縮短而

回航點

變慢),若高度超過10m,它會到達航點後下降至10m;若高度在10m以下,則

保持原高度停懸。回航期間你依然可以下達操作指令,如轉向、下降等。

回航點後若要繼續操作,請記得要解除回航點功能。

Go-Home Function

5.When switching to “Home” function, the 500X will turn its head 

toward “Home” location and start returning to “Home” position. 

If  its altitude is more than 10m, it will decend to 10m height after 

arriving at “Home” position. If its altitude is below 10m, it will 

maintain altitude and hover. You can still give orders like yaw or 

decend while the 500X is returning to “Home” position. 

6.If you would like to operate after returning to “Home” position,

remember to switch back to “Manual” or “Auto-balance” mode. 

17

10m

Содержание GU-INS

Страница 1: ...city 300 degree sec 6 Auto balance mode Max tilt angle 60 degree 7 GPS positioning mode a Hovering accuracy Horizontal 2m Vertical 0 5m b Max yaw angular velocity 250 degree sec c Max tilt angle 45 de...

Страница 2: ...izontal speed 10 m s 36 km hr e Max vertical speed 8 m s horizontal posture 8 GU INS provides pitch and rolls output signals can work with different types of camera mounts 9 Fail safe functions Automa...

Страница 3: ...erfered the 500X will become uncontrollable If so please switch back to auto balance mode 7 Do not insert the GPS system indoor the 500X will become uncontrollable due to bad signal reception You can...

Страница 4: ...Fast flash Execute HOME function Slow flash Searching for GPS signals Solid GPS signal searching procedure is completed Slow flash Manual mode Fast flash Auto balance mode Solid GPS positioning mode...

Страница 5: ...ll the GU INS to the center of the platform Front Back Please keep GU INS away from magnetic material interference 3 Entwine the power cable about 4 circles as illustrated and then insert it to the 4...

Страница 6: ...Insert ESC plugs 1 4 to the given sockets of GU INS Notice the position and spinning direction of the motors The main controller of GU INS is aeolotropic The arrow on GU INS represents the direction...

Страница 7: ...Create a model as Airplane in transmitter confirm the REV setting as illustrated 8 Assign MODE green wire to the 3 positions switch A on the transmitter as illustrated H blue wire to the 2 positions...

Страница 8: ...rottle stick to its top position 3 Connect the battery to the 500X the motors will come up with corresponding tones and the LED light of MODE lights Red flashing 4 Then move the throttle stick to its...

Страница 9: ...tead of standard receiver 6 channel connection cable is unnecessary while using satellite receiver While setting the transmitter please assign the functions Home Mode etc to the 2 or 3 positions switc...

Страница 10: ...ual mode 2 Connect the battery to the 500X after the corresponding tones of ESCs you are ready for test flight 3 Move the throttle stick gradually until the 500X slightly lift off 4 Move the ELE stick...

Страница 11: ...D movement follow your transmitter command 7 After checking all movements of the 500X are correct hover the 500X about 1m above the ground if it shakes or wags while hovering decrease the GAIN value u...

Страница 12: ...10 SET LED light flashes three times when calibration under manual mode is completed 11 Set all trims to neutral after calibration 12 Switch to Auto balance mode and calibrate the attitude of 500X wit...

Страница 13: ...on top of the canopy with double sided adhesive tape The GPS system is not aeolotropic affix with GAUI mark facing up will do insert the plug to the GPS socket on the GU INS 3 Connect the battery of t...

Страница 14: ...e buttom and count the number of LED flashes illustrated 7 flashes 7 satellites received 6 Switch to GPS positioning mode the LED light will turn solid green as illustrated 7 The definition of throttl...

Страница 15: ...he MODE LED light will turn into fast green flash 11 Climb to the altitude you want and switch back to GPS positioning mode 12 Move the throttle stick upward and the 500X will start to climb 13 Move t...

Страница 16: ...ame area But if you install new devices on the 500X you need to calibrate it again because the new devices may influence the magnetic field of the 500X 15 Check the GPS positioning function from four...

Страница 17: ...e thus we recommand to adjust it to central position as illustrated 17 The 500X can decend slowly to the ground under GPS positioning mode 18 The propellers would not stop until switched back to Auto...

Страница 18: ...wait for convergence of signal the precision may increase to be within a radius of 2m range 3 Then press SET buttom under GPS positioning mode will make the Home position setting to be more accurate S...

Страница 19: ...ude is more than 10m it will decend to 10m height after arriving at Home position If its altitude is below 10m it will maintain altitude and hover You can still give orders like yaw or decend while th...

Страница 20: ...use 2 4S insert the plug to the second cell positive pole of the balance plug 4 Due to the variation in performance among different batteries you will be able to adjust the activated voltage for low...

Страница 21: ...ld the throttle stick at the central position the 500X will still decend 8 When the low voltage protection function is activated MODE LED light will flash red Low Voltage Protection 6 You need to move...

Страница 22: ...horizontal axis servo to R CAM socket and place the 500X on a flat platform for the following calibration and setting procedures 2 Adjust the neutral position of horizontal axis servo to make the came...

Страница 23: ...al position Camera Gimbal Calibration 4 For your safety please remove the propellers before setup 5 Turn on the transmitter first and then connect the battery of GU INS the 500X press SET buttom befor...

Страница 24: ...D light flashes 10 Raise the other side of the pole vertical axis of camera gimbal adjust the camera gimbal with ELE stick to be parallel to baseline A as previous step 11 Press SET buttom to confirm...

Страница 25: ...SET GPS MODE SENSOR LED lights will all flash then turn off to indicate the calibration of camera gimbal is completed You can also only adjust the vertical axis of the camera gimbal press SET buttom...

Страница 26: ...500X remove the canopy 3 Connect the USB cable to the PC it will download the driver automatically 4 Insert the other end of USB cable to the OSD socket of GU INS 5 Download the firmware from the GAU...

Страница 27: ...ting procedures is completed as display on PC sounds of ESCs will stop MODE LED light will turn off you should then disconnect the battery of the 500X 10 Remove the USB cable the firmware updating pro...

Страница 28: ...8G transmitter module Make sure your transmitter module does not interfere with the GPS system Keep the transmitter away from the GPS system to minimize possible radio interference Option Option Batt...

Страница 29: ...oning Number of satellites received Direction of the aircraft heading Position of the aircraft Home Residual battery Altitude Speed Operating time capacity The central area of the OSD image displays a...

Страница 30: ...GAUI http www gaui com tw E mail gaui gaui com tw FAX 886 2 2610 5567 MADE IN TAIWAN...

Отзывы: