background image

Left          

5

Left

Component

Icon

Description

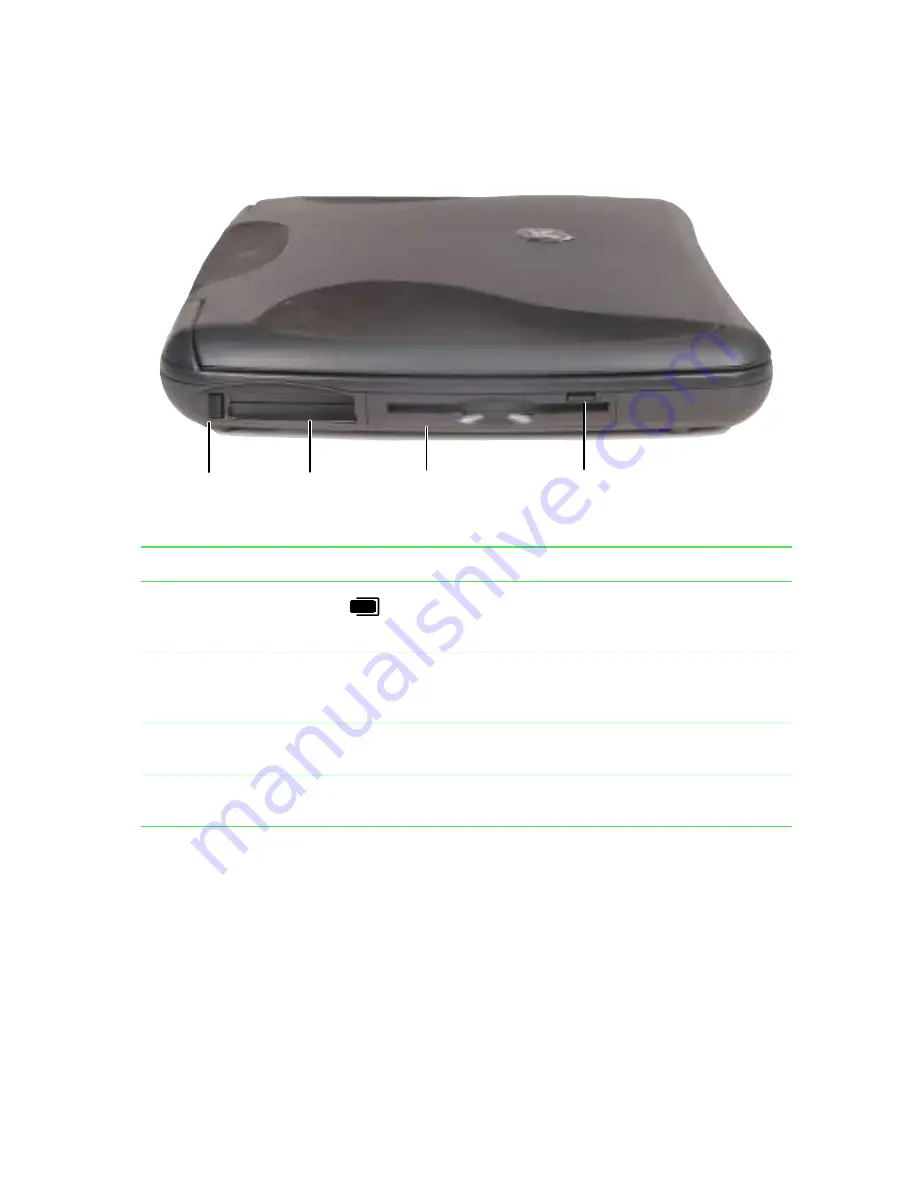
PC Card eject button

Press the eject button to remove a PC Card from the 
PC Card slot. For more information, see “Adding 
PC Cards” on page 116

PC Card  slot

Insert one Type I, II, III, or Zoom Video PC Card into this 
slot. For more information, see “Adding PC Cards” on 
page 116

Diskette drive

Insert a standard 3.5-inch diskette into this drive. 
(Available only on some models.)

Diskette drive eject button

Press the eject button to remove a diskette from the 
drive.

PC Card 
eject button

Diskette drive

Diskette drive 
eject button

PC Card 
slot

Содержание Solo 1150

Страница 1: ...yboard 19 Using function keys 21 Using multi function buttons 23 Using the EZ Pad touchpad 25 3 Windows Basics 29 About the Windows environment 30 Desktop items 31 Window items 33 Using the Start menu...

Страница 2: ...e volume 66 Playing audio and video files 68 Listening to music CDs in Media Player 69 Recording and playing audio 70 Using MusicMatch 72 Playing CDs 72 Creating music files 73 Building a music librar...

Страница 3: ...Travel Tips 111 Modem 112 Files 112 Security 112 Power 114 10 Upgrading Your Notebook 115 Adding PC Cards 116 Preventing static electricity discharge 118 Installing memory 119 Replacing the hard driv...

Страница 4: ...t steps 150 Troubleshooting 151 CD drive 151 Diskette drive 153 File management 154 Hard drive 155 Internet 155 Keyboard 157 LCD panel 157 Memory 158 Modem 158 Mouse 164 Networks 164 Passwords 165 Pow...

Страница 5: ...v A Safety Regulatory and Legal Information 181 Index 191...

Страница 6: ...vi...

Страница 7: ...1 1 Checking Out Your Gateway Solo 1150 Tips Tricks To access the contents of this manual while you are traveling download the manual from www gateway com support manlib...

Страница 8: ...f notebook is OFF or in Hibernate LED flashing notebook is in Standby Batterychargeindicator light The battery is installed The LED shows the battery activity and status Green battery is fully charged...

Страница 9: ...Front 3 Front Component Description Cover release latch Open notebook cover by pressing the release latch Cover release latch...

Страница 10: ...e computer is accessing the CD drive CD drive eject button Press the eject button to eject the disc tray from the drive Modem jack Plug a modem into this jack USB Universal Serial Bus port Plug a USB...

Страница 11: ...rd slot Insert one Type I II III or Zoom Video PC Card into this slot For more information see Adding PC Cards on page 116 Diskette drive Insert a standard 3 5 inch diskette into this drive Available...

Страница 12: ...as a USB Iomega Zip drive into this port External microphone jack Plug a microphone into this jack Speaker out or headphone jack Plug external speakers or headphones into this jack Monitor port Plug t...

Страница 13: ...ry into this bay System identification label Find the product model number and serial number on this label Certificate of Authenticity label Find the registration key for the operating system on this...

Страница 14: ...ter contains information that identifies your notebook model Technical support will need this information if you call for assistance Label information varies by model 00 0X 000XXX X 0 0 XX Revision co...

Страница 15: ...an external monitor to your notebook or USB devices such as a keyboard mouse or printer Memory Large programs such as multimedia games or graphics programs use a lot of memory If your programs are run...

Страница 16: ...10 Checking Out Your Gateway Solo 1150...

Страница 17: ...2 Getting Started This chapter explains how to Connect the AC power adapter Start your notebook Turn off your notebook Identify status indicators Use your keyboard Use your touchpad and external mous...

Страница 18: ...y is not fully charged before you use your notebook on battery power for the first time the battery life may be much shorter than you expect If the battery life seems short even after being charged fo...

Страница 19: ...om your notebook and repeat Step 2 3 When you finish using your notebook turn the notebook off and leave the notebook connected to AC power for at least 24 hours Warning Do not attempt to disassemble...

Страница 20: ...a surge protector which will absorb voltage surges and prevent them from reaching your computer Warning High voltages can enter your computer through both the power cord and the modem connection Prot...

Страница 21: ...lifting the LCD panel 2 Press the power button located above the keyboard The power button is preset to On Off mode However you can also set it to function in Standby Resume mode For more information...

Страница 22: ...ng the power button settings see Managing Power on page 87 Turning off your notebook To turn off your notebook 1 Click Start then select Shut Down The Shut Down Windows dialog box opens 2 Select Shut...

Страница 23: ...Status indicators 17 Status indicators Caps Lock Pad Lock Scroll Lock Harddrive CD drive Diskette drive...

Страница 24: ...his light turns on When Caps Lock is turned on Pad Lock is turned on Scroll Lock is turned on The notebook is accessing the diskette drive The notebook is accessing the hard drive The notebook is acce...

Страница 25: ...including shortcut keys for Windows function keys for specific system operations and the Pad Lock keys for the numeric keypad You can attach an external keyboard to the notebook using the USB ports Yo...

Страница 26: ...eys Press these keys to move the cursor to the beginning of a line to the end of a line up the page down the page to the beginning of a document or to the end of a document FN key Press the FN key in...

Страница 27: ...the monitor port on the notebook Enter Standby mode Press the power button to resume from Standby mode Turn on Pad Lock so you can use the numeric keypad Press this key combination again to turn off...

Страница 28: ...22 Getting Started Decrease the volume Mute the volume Increase the contrast of the display Decrease the contrast of the display Press and hold FN while pressing this Function key To...

Страница 29: ...Keyboard 23 Using multi function buttons s E mail Internet Help Shortcut...

Страница 30: ...amming the multi function buttons see Programming the multi function buttons on page 109 Button Icon Press to E mail Open your e mail program Internet Open your Web browser Help Open online help Short...

Страница 31: ...Using the EZ Pad touchpad 25 Using the EZ Pad touchpad The EZ Pad consists of a touchpad and two buttons Right touchpad button Left touchpad button Touchpad...

Страница 32: ...jects To Do this Move the pointer on the screen Move your finger around on the touchpad If you run out of space on your touchpad and need to move the pointer farther lift your finger move it to the mi...

Страница 33: ...or find more information about an object on the screen Position the pointer over the object Quickly press and release the right button once This action is called right clicking Move an object on the...

Страница 34: ...28 Getting Started...

Страница 35: ...is chapter to get basic information on how to Work on the Windows desktop Manage files and folders Work with documents Use shortcuts HelpSpot For more information on using Windows double click the Hel...

Страница 36: ...t screen you see is the Windows desktop The desktop is like the top of a real desk Think of the desktop as your personalized work space where you open programs and perform other tasks Your desktop may...

Страница 37: ...iles and folders The Recycle Bin is where files folders and programs that you discarded are stored You must empty the Recycle Bin to permanently delete them from your computer For instructions on how...

Страница 38: ...a file or program by clicking selecting an item on the menu that opens The taskbar is the bar at the bottom of the screen containing the Start button on the left and a clock on the right Other buttons...

Страница 39: ...k the icon for a drive folder files or program a window opens on the desktop This example shows the Local Disk C window which opens after double clicking the Local Disk C icon in the My Computer windo...

Страница 40: ...of the program Clicking the minimize button reduces the active window to a button on the taskbar Clicking the program button in the taskbar opens the window again Clicking the maximize button expands...

Страница 41: ...he Start menu To open the Start menu Click the Start button on the lower left of the Windows desktop The Start menu opens showing you the first level of menu items When you move the mouse pointer over...

Страница 42: ...n in a file cabinet About drives Drives are like file cabinets because they hold files and folders A computer almost always has more than one drive Each drive has a letter usually Local Disk C for the...

Страница 43: ...th files and folders 37 To see the files and folders on a drive Double click the drive icon If you do not see the contents of a drive after you double click its icon click View the entire contents of...

Страница 44: ...r 1 Double click the My Computer icon on the desktop The My Computer window opens 2 Double click the drive or folder for example 3 Floppy A or Local Disk C where you want to put the new folder The dri...

Страница 45: ...you decide where you want the file to go you paste it there To copy a file or folder to another folder 1 Right click the file or folder that you want to copy A menu opens on the desktop 2 Select Copy...

Страница 46: ...hat you want to move A menu opens on the desktop 2 Select Cut from the menu 3 Open the destination folder 4 With the pointer inside the destination folder press the right touchpad button 5 Select Past...

Страница 47: ...omputer or Windows Explorer select the files or folders that you want to delete For instructions on how to select multiple files and folders see Shortcuts on page 52 2 Select File then Delete Windows...

Страница 48: ...Bin window opens 2 Select File then Empty Recycle Bin Windows asks you if you are sure that you want to empty the bin 3 Click Yes Windows permanently deletes all the files in the Recycle Bin Caution E...

Страница 49: ...levels usually many more levels than a file cabinet in fact So you usually will have to search through levels of folders to find the file or folder that you need This is called browsing To browse for...

Страница 50: ...our hard drive you can use the Search utility in Windows Me to search by Name or part of a name Creation date Modification date File type Text contained in the file Time period in which it was created...

Страница 51: ...g box opens 2 If you want to search by file or folder name type in all or part of the file or folder name in the Search for files or folders named box in the left pane of the window If you type all of...

Страница 52: ...Search can find files meeting more criteria than file name You can select options to narrow your search by clicking Search Options and selecting the options that you want Date searches for files that...

Страница 53: ...ing a document apply to most of these types of files The following examples illustrate the concepts for creating saving opening and printing a document in Microsoft Word Though these examples use Micr...

Страница 54: ...e then New The New dialog box opens 3 Click a tab for the type of document you want to create select a document template style then click OK The document template opens 4 Begin composing your document...

Страница 55: ...er To save a document in Microsoft Word 1 Select File then Save The Save As dialog box opens 2 In the Save in list find the folder you plan to save the file in 3 Type the new file name 4 Click Save He...

Страница 56: ...Microsoft Word 1 Click Start then select Programs then Microsoft Word Microsoft Word starts and a blank document opens 2 Select File then Open 3 In the Look in list find the folder you want to open 4...

Страница 57: ...r printer refer to the printer documentation To print a document in Microsoft Word 1 Make sure that the printer is turned on and loaded with paper 2 Start Microsoft Word and open a document 3 Select F...

Страница 58: ...RL key then click each of the remaining icons that you want to select Select multiple items in a list or in an Explorer window Click the first item press and hold down the CTRL key then click each of...

Страница 59: ...s chapter provides information about the Internet and the World Wide Web and tells you how to set up Gateway netSM or America Online Internet services so that you can send and receive e mail and acces...

Страница 60: ...computer using a telephone DSL or cable line to other computers or servers An Internet Service Provider a company that provides access to the Internet through an ISP server When you connect to an ISP...

Страница 61: ...Online an Internet e mail address is created for you After completing the setup you are ready to access the Internet To set up an Internet account with Gateway net or America Online 1 Double click the...

Страница 62: ...about the Web and the Web browser see Using the World Wide Web on page 57 To disconnect from your Gateway net or America Online Internet account Click X in the top right corner of the Gateway net or A...

Страница 63: ...ter Web pages can contain not only text but animations music and other multimedia features A group of related Web pages is called a Web site You can access Web sites to shop track investments read the...

Страница 64: ...the browser address bar for example www gateway com then click GO on the browser address bar OR On the current Web page click a link to a Web site The Web browser locates the server computer on the In...

Страница 65: ...eb page to navigate to the Web site containing the file that you want to download 3 Create or locate the folder where you want to store the file on your computer 4 Click the link on the Web page for t...

Страница 66: ...ign up for an account with an ISP For example a person with an account with the Gateway net ISP might have an e mail address that is similar to this one Sending e mail To send e mail using Gateway net...

Страница 67: ...nect to your Gateway net or America Online account 2 Click Read Mail OR Click Read For more information about managing and organizing your e mail messages see the online help in your e mail program He...

Страница 68: ...62 Using the Internet...

Страница 69: ...ltimedia This chapter contains information on using the multimedia features on your computer including information on Using drives Adjusting the volume Using Windows Media Player Recording and playing...

Страница 70: ...ng files to another computer To use a diskette 1 Insert the diskette into the diskette drive with the label facing up 2 To access a file on the diskette double click the My Computer icon double click...

Страница 71: ...imedia such as listening to CDs To insert a CD 1 Press the eject button on the CD drive then pull the disc tray completely open 2 Place the CD in the tray with the label up then press down carefully o...

Страница 72: ...To adjust overall volume level Click the speaker icon on the taskbar then drag the slider to change the volume or click to select the Mute check box On the keyboard press the FN PAGE UP or PAGE DOWN k...

Страница 73: ...ce you want to adjust does not appear in the Volume Control dialog box select Options Properties select the audio device that you want to adjust then click OK 2 Drag the volume level and balance slide...

Страница 74: ...t Help To play a file using the Windows Media Player 1 Click Start then select Programs Accessories Entertainment then Media Player The Media Player opens 2 Select File then Open The Open dialog box o...

Страница 75: ...n your computer For more information about the using the Windows Media Player select Help To listen to a CD in the Windows Media Player Insert a CD into the CD drive The Windows Media Player opens and...

Страница 76: ...ntertainment then Sound Recorder The Sound Recorder opens 2 Click record then speak into the microphone 3 When you finish recording click stop 4 Select File then Save As The Save As dialog box opens 5...

Страница 77: ...audio recording in Sound Recorder 1 Open the Sound Recorder 2 Select File then Open The Open dialog box opens 3 Select the file you want to play back then click Open 4 Play the file by clicking play t...

Страница 78: ...nformation Listen to Internet Radio Playing CDs You can use the MusicMatch program to play music CDs To play a music CD 1 Double click the MusicMatch Jukebox icon on your desktop MusicMatch opens 2 Pl...

Страница 79: ...p in MusicMatch MP3 MPEG Layer 3 is a standard for digitally compressing high fidelity music into compact files without noticeably sacrificing quality MP3 files end in the file extension mp3 Ripping i...

Страница 80: ...add music tracks to your music library by Creating MP3 files When you create MP3 files from the tracks on your music CD MusicMatch automatically adds these files to your music library Dragging and Dr...

Страница 81: ...ttings To change the music library display settings 1 Double click the MusicMatch Jukebox icon 2 Select Options then Settings The Settings window opens 3 Click the Music Library tab 4 Select the categ...

Страница 82: ...alled CD DataBase CDDB After you add a CD track as an MP3 file to your music library you can edit track information To edit track information 1 Double click the MusicMatch Jukebox icon 2 Create an MP3...

Страница 83: ...io Use the Radio feature in MusicMatch to listen to Internet Radio stations To listen to an Internet radio station 1 Double click the MusicMatch Jukebox icon then connect to the Internet 2 Click Radio...

Страница 84: ...ons by music format city or country 4 Select a radio station then click Play MusicMatch connects to the station Using advanced features You can also use MusicMatch to create your own music CDs and to...

Страница 85: ...er After you have created a document using a spreadsheet word processor or graphics program you can send it as a fax You can also receive faxes on your notebook This chapter shows you how to Set up a...

Страница 86: ...law To set up your fax cover page 1 Click Start then select Programs PhoneTools then PhoneTools PhoneTools opens 2 Click Configure then select General Configuration from the pop up menu The General C...

Страница 87: ...e number 5 Click OK 6 If you want to change the logo that appears on the cover page click Configure then select Logo Management from the pop up menu The Logo Management dialog box opens 7 If you do no...

Страница 88: ...g a fax To send a fax 1 Click Start then select Programs PhoneTools then PhoneTools PhoneTools opens 2 Click Send Fax The Send Fax Wizard opens HelpSpot For more information on sending a fax double cl...

Страница 89: ...ver page template from the Template drop down list then click Next If you typed a message in the Message Text area you must select a cover page 6 If you want to attach a file make sure the file is not...

Страница 90: ...ument open click File then select Print The Print dialog box opens 2 Select the printer Capture fax BVRP then click OK The Send Fax Wizard opens 3 Complete the wizard as instructed in To send a fax on...

Страница 91: ...e In Box 2 To view a fax click Fax Inbox then double click the fax you want to view The fax viewer opens where you can view and print the fax HelpSpot For more information on receiving a fax double cl...

Страница 92: ...86 Sending and Receiving Faxes...

Страница 93: ...should manage power consumption to get the most use out of the battery This chapter shows you how to Check and recharge the battery Change batteries Extend the life of the battery by conserving batte...

Страница 94: ...eft corner of the screen The Status display shows the current power source the battery charge and the power management mode Looking at the battery indicator light A green light indicates that the batt...

Страница 95: ...replace the main battery 1 Turn off the computer 2 Close the cover 3 Turn your notebook over Warning Danger of explosion if battery is incorrectly replaced Replace only with the Gateway Solo 1150 Li...

Страница 96: ...90 Managing Power 4 Remove the screw from the battery release latch 5 Slide the battery release latch to release the battery...

Страница 97: ...es 91 6 Hold the latch forward and lift the battery straight out from the notebook 7 Slide the recharged battery into the bay and snap it into place 8 Replace the screw 9 Open the notebook and press t...

Страница 98: ...98 Using the CD drive only when necessary CD drives use a large amount of power Recharge the battery often take an extra battery and fully recharge the batteries before traveling For more information...

Страница 99: ...rams and documents that were open when you activated Hibernate For more information on using Hibernate mode see To use Hibernate mode on page 98 Using Standby mode Always save your work before using t...

Страница 100: ...hard drive is automatically turned off You can select one of the defined power schemes or create a custom power scheme Alarms can alert you when the battery charge is low Advanced power settings let...

Страница 101: ...roperties dialog box opens 3 Select a power scheme from the Power Schemes list OR Set the timers for System stand by Turn off monitor and Turn off hard disks then save your custom power scheme by clic...

Страница 102: ...ol Panel The Control Panel window opens If you do not see the Power Options icon click view all Control Panel options 2 Double click the Power Options icon The Power Options Properties dialog box open...

Страница 103: ...ings then Control Panel The Control Panel window opens If you do not see the Power Options icon click view all Control Panel options 2 Double click the Power Options icon The Power Options Properties...

Страница 104: ...ns Properties dialog box opens 3 Click the Hibernate tab 4 Select the Enable hibernate support check box then click Apply Hibernate mode is now an option you can select on the Advanced tab and in the...

Страница 105: ...tion about customizing your computer by changing settings in Windows and adding new hardware devices You can Change screen and display settings Change the background and screen saver Program the multi...

Страница 106: ...hotographs need millions of colors to be displayed with optimum quality Windows lets you choose from several color depth settings for your LCD We recommend that the 16 bit High Color setting be used a...

Страница 107: ...Click the Settings tab 4 Select a setting from the Colors list For most purposes the color depth should be 16 bit High Color 5 If you want to save your changes click OK Windows tells you it will apply...

Страница 108: ...lay easier The larger the screen area the smaller the individual items such as icons and menu bars appear To change the screen area 1 Click Start then select Settings then Control Panel The Control Pa...

Страница 109: ...indows environment For example you can change the appearance of such things as the desktop windows and dialog boxes You can select an existing scheme or create your own To select a color scheme 1 Clic...

Страница 110: ...mes go to Step 6 4 If you want to create a new scheme select various items from the Item list and change their settings 5 Click Save As type a name for the new scheme and then click OK 6 Select a colo...

Страница 111: ...tart then select Settings then Control Panel The Control Panel window opens 2 Click Double click the Display icon The Display Properties dialog box opens Important If Active Desktop is turned on and y...

Страница 112: ...m another location by clicking Browse 5 If you want the picture you chose to cover the entire screen select Tile from the Picture Display list 6 If the picture you chose does not cover the entire scre...

Страница 113: ...screen savers that you can choose from and many more are available from the Internet and as commercial products To select a screen saver 1 Click Start then select Settings then Control Panel The Contr...

Страница 114: ...ngs and then make your changes If the Settings button is not available you cannot customize the screen saver you selected 6 If you want to password protect your screen saver select the Password protec...

Страница 115: ...buttons on page 23 To program the multi function buttons 1 Click Start then select Settings then Control Panel If you do not see the Multi function Keyboard icon click view all Control Panel options...

Страница 116: ...eral devices such as printers scanners and digital cameras to your computer USB ports are plug and play which means that you usually can use a USB device by just plugging it into the USB connector Win...

Страница 117: ...free This chapter provides information on Using the modem Transferring files Protecting your notebook from loss and theft Managing your notebook s power efficiently Tips Tricks To access the contents...

Страница 118: ...ion Files Copy your working files from your desktop computer to your notebook before you travel If you need to access your desktop computer files from your notebook while traveling set up the desktop...

Страница 119: ...follow the instructions You must set the supervisor password in order to set the user startup password 5 Highlight Set User Password then press ENTER and follow the instructions This is the password...

Страница 120: ...charge and use the most efficient power management settings For information on conserving battery power see Conserving battery power on page 92 For information on using alternate power sources see Usi...

Страница 121: ...115 10 Upgrading Your Notebook This chapter provides information about adding hardware devices to your notebook Topics include Adding PC Cards Replacing memory Replacing the hard drive...

Страница 122: ...rds because your notebook supports hot swapping Hot swapping means that you can insert a PC Card while your notebook is running If your PC Card does not work after hot swapping refer to the PC Card ma...

Страница 123: ...Adding PC Cards 117 To remove a PC Card 1 Release the eject button by pressing the PC Card eject button once 2 Eject the PC Card by pressing the eject button again...

Страница 124: ...ve components from their antistatic bags only when you are ready to use them Do not lay components on the outside of antistatic bags because only the inside of the bags provide electrostatic protectio...

Страница 125: ...pgrading your memory To add or replace memory modules 1 Follow the instructions under Preventing static electricity discharge on page 118 2 Shut down your notebook then remove the battery and disconne...

Страница 126: ...120 Upgrading Your Notebook 4 Remove the memory bay cover 5 If you are removing a module gently press outward on both clips at either end of the memory module until the module tilts upward...

Страница 127: ...lacement module at a 30 degree angle and slide it into the empty memory slot 8 Gently push the module down until it clicks in place 9 Replace the memory bay cover insert the battery or connect the pow...

Страница 128: ...place the hard drive 1 Follow the instructions under Preventing static electricity discharge on page 118 for important precautions 2 Shut down the notebook then disconnect the power and modem cables 3...

Страница 129: ...drive 123 5 Slide the hard drive kit out and lift it up 6 Place the new hard drive kit into the notebook case 7 Replace the screw to secure the hard drive to the notebook 8 Reinstall the battery then...

Страница 130: ...124 Upgrading Your Notebook...

Страница 131: ...r computer away from magnetic fields Magnetic fields can erase data on both diskettes and hard drives Never turn off your computer when the hard drive light is on because data on the hard drive could...

Страница 132: ...task Immediately after purchase Monthly When needed See Create an emergency diskette X page 127 Check for viruses X X page 129 Manage hard drive space X page 131 Clean up hard drives X X page 132 Scan...

Страница 133: ...our computer To create an emergency startup diskette 1 Click Start then select Settings then Control Panel The Control Panel window opens 2 Click Double click Add Remove Programs The Add Remove Progra...

Страница 134: ...n Windows finishes copying files remove the diskette from the diskette drive 8 You should write protect the diskette which will prevent the diskette from being erased or infected by viruses by sliding...

Страница 135: ...at are on diskettes attached to e mail messages or downloaded from the Internet Checking all programs for viruses before installing them Disabling macros on suspicious Microsoft Word and Excel files T...

Страница 136: ...the virus You should periodically update your Norton AntiVirus program to protect against the latest viruses To update Norton AntiVirus 1 Click Start then select Programs Norton AntiVirus then LiveUp...

Страница 137: ...ve space In Windows you can see a chart of the available hard drive space To check hard drive space 1 Double click the My Computer icon The My Computer window opens 2 Right click the drive that you wa...

Страница 138: ...you want to delete files from then select Properties The System Properties dialog box opens at the General tab 3 Click Disk Cleanup The Disk Cleanup dialog box opens 4 Select the check box beside eac...

Страница 139: ...ly want to run ScanDisk once a week On the other hand if you use your computer less frequently once a month may be adequate Also use ScanDisk if you encounter hard drive problems To run ScanDisk 1 Dou...

Страница 140: ...n click Start For Help press F1 ScanDisk checks the drive for errors This process may take several minutes 6 Correct any problems that are found by following the on screen instructions After ScanDisk...

Страница 141: ...different areas of the drive Defragmenting the information stored on the drive can improve hard drive performance While the Disk Defragmenter program is running do not use your keyboard or mouse beca...

Страница 142: ...t automatically click Start or Defragment Disk Defragmenter shows its progress on the screen When finished Disk Defragmenter asks if you want to quit the program 6 If you want to defragment another dr...

Страница 143: ...table CDs to do partial backups of selected files or folders Use a backup device such as a CD R CD RW or Zip drive or other high capacity backup device to do a complete hard drive backup If you do not...

Страница 144: ...t the Maintenance Wizard 1 Click Start then select Programs Accessories System Tools then Maintenance Wizard The Maintenance Wizard dialog box opens 2 Select the Maintenance Wizard options that suit y...

Страница 145: ...et by default to disabled 5 Press ENTER A small settings window opens 6 Press the down arrow key to select Enabled 7 Press ENTER The option is set to Enabled 8 Press the left arrow key until you selec...

Страница 146: ...p lint free cloth to clean the computer and other parts of your system Do not use abrasive or solvent cleaners because they can damage the finish on your components Your computer is cooled by air draw...

Страница 147: ...e screen Use a soft cloth and water to clean the screen Squirt a little water on the cloth never directly on the screen and wipe the screen with the cloth Cleaning the mouse If you have a mouse and th...

Страница 148: ...the retaining ring and mouse ball 4 Remove any dust lint or dirt from the mouse ball with a soft cloth 5 Clean the mouse rollers with a cotton swab dipped in isopropyl alcohol 6 Replace the mouse ball...

Страница 149: ...more information see Reinstalling device drivers or programs on page 144 Troubleshooting For more information see Troubleshooting on page 149 If the options above do not correct the problem you can us...

Страница 150: ...evice manufacturer You should reinstall device drivers If directed to do so while troubleshooting If you see a message indicating that there is a problem with a device driver You can also reinstall so...

Страница 151: ...Open text box type D RUNMENU EXE where D is the drive letter of your CD drive 4 Click OK The System Restoration Kit program starts 5 If the Welcome to the System Restoration Kit window opens close it...

Страница 152: ...ere D is the drive letter of your CD drive 4 Click OK The System Restoration Kit program starts 5 If the Welcome to the System Restoration Kit window opens close it by clicking OK 6 Click the Install...

Страница 153: ...with your computer To reinstall Windows Me and the device drivers 1 Place the Solo 1150 Recovery CD Disc 1 in the CD drive 2 Restart the computer When you see the message about changing system settin...

Страница 154: ...148 Restoring Software...

Страница 155: ...apter do not correct the problem see Getting Help on page 169 for more information about how to get help Safety guidelines While troubleshooting your computer follow these safety guidelines Never remo...

Страница 156: ...ite down the exact message The message may help technical support in diagnosing and fixing the problem If you added or removed modules or peripheral devices review the installation procedures you perf...

Страница 157: ...cing some temporary memory problems Shut down and restart your computer An audio CD does not produce sound Make sure the CD label is facing up Click the speaker icon in the lower right corner of the t...

Страница 158: ...152 Troubleshooting To clean a CD Wipe from the center to the edge not around in a circle using a product made especially for the purpose...

Страница 159: ...not be read by the diskette drive You receive a Disk is full error message Delete unnecessary files on the diskette Try a different diskette Occasionally diskettes are flawed and cannot be read by the...

Страница 160: ...deleted in Windows 1 Double click the Recycle Bin icon 2 Right click the file you want to restore then select Restore The file is restored to the place where it was originally deleted from Important...

Страница 161: ...hard drive for errors on page 133 The hard drive cannot be accessed or you receive a General failure reading drive C error message If a diskette is in the diskette drive eject it and restart the compu...

Страница 162: ...ISP is having technical difficulties Double check the URL or try a different URL If the error message still appears disconnect from the ISP connection and close your browser Then reconnect and open th...

Страница 163: ...yboard character keeps repeating or you receive a Keyboard stuck or Key failure error message Make sure that nothing is resting on the keyboard Make sure a key is not stuck Press each key to loosen a...

Страница 164: ...cable is less than 6 feet 1 8 meters long Remove any line splitters or surge protectors from your telephone line then check for a dial tone by plugging a working telephone into the telephone wall jack...

Страница 165: ...line noise Wiggle the modem cable to see if that makes a difference Make sure the connectors are free from corrosion and all screws in the wall or telephone wall jack are secure You can also call your...

Страница 166: ...entral Time when the server is backed up To access the gateway your way dial up server 1 Double click the My Computer icon then click double click the Dial Up Networking icon 2 If the Welcome to Dial...

Страница 167: ...d receives faxes at 14 400 bps when you have a 56K modem Current fax technology only supports a maximum send and receive rate of 14 400 bps The modem is not recognized by the computer Make sure the li...

Страница 168: ...the modem did not pass diagnostics Contact Gateway technical support The modem is noisy when it dials and connects When your modem tries to connect to another modem it begins handshaking Handshaking...

Страница 169: ...ications 4 Click to clear the Dial Up Networking check box then click OK twice The System Settings Change dialog box opens 5 Click Yes The computer restarts 6 Click Start then select Settings then Con...

Страница 170: ...included then click Remove 6 Click IPX SPX if included then click Remove 7 Click NetBeui if included then click Remove 8 Make sure the Primary Network Logon field is set to Windows Logon 9 Click OK tw...

Страница 171: ...is plugged into a surge protector make sure the surge protector is securely connected to an electrical outlet switched on and working properly To test the outlet plug a working device such as a lamp...

Страница 172: ...he printer online Check the connector and cable for bent or broken pins Reinstall the printer driver Use the manual that came with your printer for instructions on installing the printer driver If the...

Страница 173: ...add additional memory to the printer Consult the printer documentation for instructions for adding additional memory You receive a Printer is out of paper error message After adding paper make sure th...

Страница 174: ...operly connected The LCD panel has pixels that are always dark or too bright This condition is normal and inherent in the TFT technology used in active matrix LCD screens Gateway s inspection standard...

Страница 175: ...pter tells you about additional information resources available to help you use your computer It includes the following topics HelpSpot Software support tools Gateway Web site Online help Telephone su...

Страница 176: ...and to help you quickly discover and use the many features of your Gateway computer To start HelpSpot Click Start then select Help OR Double click the Gateway Help and Support desktop icon HelpSpot o...

Страница 177: ...r browsing the index To learn about how to work with documents and programs use your mouse and other topics click the Getting Started link on the HelpSpot main page HelpSpot contains several short vid...

Страница 178: ...172 Getting Help To play a HelpSpot video To watch a video in HelpSpot click Videos on the HelpSpot navigation bar then click a video title The video plays...

Страница 179: ...your computer Visit the Gateway Web site at www gateway com for Technical documentation and product manuals Technical tips and support Hardware drivers A glossary of computer terms Frequently asked q...

Страница 180: ...site they will refer you to the area or department that can www gateway com support index shtml OR HelpSpot E mail Tech Support Get the answers to your technical inquiries by e mail from a Gateway te...

Страница 181: ...y phone and discuss the Gateway solution that best fits you needs www gateway com OR HelpSpot Order Status Get information on whether your order has been received is in production or has been shipped...

Страница 182: ...to perform a task while you are using the program Most online help information can be accessed by selecting a topic from a Help menu or by clicking a Help button You can search for information by vie...

Страница 183: ...sues billed by the minute 800 229 1103 charged to your credit card 900 555 4695 charged to your telephone bill Gateway Client Care Talk to a Gateway Client Care representative about a non tutorial tec...

Страница 184: ...r documentation and technical support resources If you have how to questions about using a program consult Online Help Printed documentation The Microsoft Windows documentation The software publisher...

Страница 185: ...rinted or online manual that came with your hardware or software In many cases additional product information and online manuals for Gateway supplied hardware can be found in our Web site s Documentat...

Страница 186: ...int www gateway com about country softwaretraining shtml Gateway CD ROM Learning Libraries A variety of courses and tutorials are available on CD ROM Select from several easy to use learning libraries...

Страница 187: ...is in the proper position for your area The voltage selector switch is set at the factory to the correct voltage Openings in the computer case are provided for ventilation Do not block or cover these...

Страница 188: ...r is turned off a small amount of electrical current still flows through the computer To avoid electrical shock always unplug all power cables and modem cables from the wall outlets before cleaning th...

Страница 189: ...o which the receiver is connected Consult the dealer or an experienced radio TV technician for help Compliance Accessories The accessories associated with this equipment are shielded video cable These...

Страница 190: ...operation of this equipment If this happens the telephone company will provide advance notice in order for you to make necessary modifications to maintain uninterrupted service This equipment cannot...

Страница 191: ...eans of a certified connector assembly The customer should be aware that compliance with the above conditions may not prevent degradation of service in some situations Repairs to certified equipment s...

Страница 192: ...R 21 1998 Attachment requirements for pan European approval for connection to the analogue Public Switched Telephone Networks PSTNs of TE excluding TE supporting voice telephony services in which netw...

Страница 193: ...ea or an adjacent area thereto and conforms to the standards set by the Voluntary Control Council for Interference by Information Technology Equipment aimed at preventing radio interference in such re...

Страница 194: ...is equipment shall not be set up to make automatic calls to the Telecom 111 Emergency Service Some parameters required for compliance with Telecom s Telepermit requirements are dependent on the equipm...

Страница 195: ...Products under a US Department of Health and Human Services DHHS Radiation Performance Standard Should the unit ever need servicing contact an authorized service location Warning Use of controls or ad...

Страница 196: ...registered trademarks and black and white spotted box logo GATEWAY Gateway Astro Gateway Work Gateway Connected touch pad Gateway Connected music player Gateway Cyber Ware Gateway Education Ware Gate...

Страница 197: ...ng 89 managing power 92 monitoring charge 88 recalibrating 139 recharging 89 release latch 7 warning messages 88 bays battery 7 89 hard drive 7 memory 7 C cable connections AC adapter 6 headphone 6 mi...

Страница 198: ...122 replacing hard drive 122 viewing contents 36 viewing files and folders 37 E electrostatic discharge ESD 118 e mail 54 60 address 60 checking for messages 61 sending 60 emergency startup diskette...

Страница 199: ...elpSpot 170 Getting Started 171 playing a video 172 starting 170 Hibernate mode 98 hyperlinks 57 I icons 31 selecting desktop 52 installing hard drive 122 memory 119 PC Cards 116 Internet 54 connectin...

Страница 200: ...bjects 27 MP3 file creating 73 editing track information 76 playing 68 MPEG file 68 multi function keyboard buttons 23 customizing 109 multimedia playing a file with Windows Media Player 68 playing au...

Страница 201: ...98 management 92 114 schemes 94 Standby Resume 15 troubleshooting 165 Power LED 2 printer installing 110 troubleshooting 165 printing documents 51 programs closing 52 opening 27 35 R radio listening...

Страница 202: ...tton 32 Start menu 35 starting notebook 15 programs 27 35 startup diskette 127 static electricity 118 surge protector 14 system identification label 7 8 T taskbar 32 technical support automated troubl...

Страница 203: ...rt 4 6 using with Plug and Play devices 110 V VGA port 6 video troubleshooting 168 virus 129 protecting against 59 129 removing with Norton AntiVirus 129 volume adjusting 66 adjusting modem 162 contro...

Страница 204: ...198...

Отзывы: