background image

63

www.gateway.com

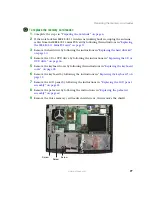
Replacing the palm rest assembly

11

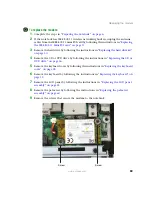
Lift the palm rest assembly up and away from the notebook.

12

Place the new palm rest assembly onto the notebook.

13

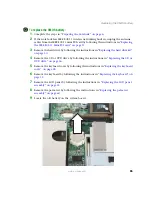
Make sure that the brown touchpad connector clip on the system board is in the raised 
position.

14

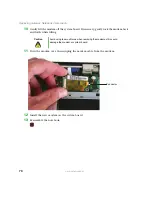
Insert the end of the touchpad cable into the connector, then slide the clip down.

15

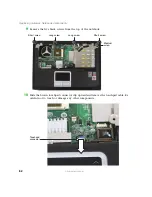
Replace the top palm rest screws removed in 

Step 9

.

16

Turn the notebook so the bottom is facing up.

17

Replace the black screws on the bottom of the notebook removed in 

Step 8

.

18

Reassemble the notebook.

Содержание MX7120

Страница 1: ......

Страница 2: ......

Страница 3: ...kit 20 Replacing the hard drive in the hard drive kit 23 Replacing the CD or DVD drive 26 Replacing the keyboard cover 28 Replacing the keyboard 32 Replacing the cooling assembly 36 Replacing the pro...

Страница 4: ...ii www gateway com...

Страница 5: ...anty Important This service guide is not intended to be provided to individual users or consumers It cannot be provided to anyone other than an authorized service provider Important For information on...

Страница 6: ...he label on the bottom of the notebook contains information that identifies the notebook model and its features Caution It is important that you use the correct service guide for the notebook Failure...

Страница 7: ...se this chart to identify the main components of the notebook For a complete list of replaceable parts see Contents on page i LCD panel assembly see page 45 Keyboard cover see page 28 Keyboard see pag...

Страница 8: ...rface behind the notebook or far enough to the side that your arms do not accidentally brush them onto the floor To help keep track of screws try the following Place each component s screws in their o...

Страница 9: ...metal part of your workbench or other grounded connection Touch a bare metal surface on your workbench or other grounded object Important Before performing maintenance on the notebook you should read...

Страница 10: ...odem cable and network cable 4 Close the LCD panel 5 Disconnect all peripheral devices and remove any PC Cards 6 Remove the battery For more information see Removing the battery on page 7 Warning To a...

Страница 11: ...otebook Removing the battery To remove the battery 1 Turn the notebook over so the bottom is facing up 2 Slide the battery lock to the unlocked position then slide and hold the battery release latch 3...

Страница 12: ...task Important Use only memory modules designed for the Gateway 7000 series M520 MX7000 or NX700 Important This notebook has two memory modules One is located in the memory bay The other is accessible...

Страница 13: ...9 www gateway com Replacing the memory module in the memory bay Memory bay...

Страница 14: ...com Replacing Gateway Notebook Components To replace the memory module 1 Complete the steps in Preparing the notebook on page 6 2 Remove the memory bay cover screw 3 Open the memory bay cover then re...

Страница 15: ...gateway com Replacing the memory module in the memory bay 4 Gently press outward on the clip at each end of the memory module until the module tilts upward 5 Pull the memory module out of the slot Cli...

Страница 16: ...keyed so it can only be inserted in one direction If the module does not fit make sure that the notch in the module lines up with the tab in the memory bay 7 Gently push the module down until it click...

Страница 17: ...By law only approved wireless modules provided by Gateway or a Gateway authorized representative explicitly for the Gateway 7000 series M520 MX7000 or NX700 may be installed in this notebook Caution L...

Страница 18: ...14 www gateway com Replacing Gateway Notebook Components Mini PCI bay...

Страница 19: ...acing the IEEE 802 11 Mini PCI card To replace the IEEE 802 11 Mini PCI card 1 Complete the steps in Preparing the notebook on page 6 2 Remove the mini PCI bay cover screw 3 Open the mini PCI bay cove...

Страница 20: ...ts 4 Note which antenna cable is attached to the connector labelled MAIN or M and which antenna cable is attached to the connector labelled AUX or A 5 Unplug the two antenna cables Tips Tricks Wrap on...

Страница 21: ...17 www gateway com Replacing the IEEE 802 11 Mini PCI card 6 Move the antenna cables out of the way then press outward on the clip at each side of the module until the module tilts upward Clip Clip...

Страница 22: ...30 degree angle and press it into the empty slot This module is keyed so it can only be inserted in one direction If the module does not fit make sure that the notch in the module lines up with the t...

Страница 23: ...19 www gateway com Replacing the IEEE 802 11 Mini PCI card 10 Reattach the antenna cable to the connectors noted in Step 4 11 Replace the wireless network bay cover then replace the cover screw...

Страница 24: ...ateway com Replacing Gateway Notebook Components Replacing the hard drive kit Tools you need to complete this task Screws removed during this task Phillips 0 screwdriver 1 black hard drive kit Hard dr...

Страница 25: ...ecovery then click Recovery Help Manual 2 Print the Using Gateway System Recovery online guide for use in Step 8 3 Back up any data you want to transfer to the new hard drive For more information see...

Страница 26: ...that secures the hard drive kit to your notebook 8 For instructions on installing Windows your drivers and your applications see the Using Gateway System Recovery online guide you printed in Step 2 I...

Страница 27: ...to complete this task Screws removed during this task To replace the hard drive in the hard drive kit 1 Complete the steps in Preparing the notebook on page 6 2 Remove the hard drive kit by following...

Страница 28: ...24 www gateway com Replacing Gateway Notebook Components 3 Remove the four screws that secure the hard drive to the hard drive kit bracket Screw Screw Screw Screw...

Страница 29: ...in the hard drive kit 4 Remove the bracket from the old drive 5 Insert the new drive into the bracket with the label side up and so the screw holes line up 6 Replace the four screws that secure the br...

Страница 30: ...need to complete this task Screws removed during this task To replace the CD or DVD drive 1 Complete the steps in Preparing the notebook on page 6 2 Turn the notebook over so the bottom is facing up 3...

Страница 31: ...manual eject hole push in the paper clip to eject the drive tray then pull the drive tray open 5 Carefully slide the drive out of the drive bay 6 Slide the new CD or DVD drive into the drive bay Make...

Страница 32: ...cing Gateway Notebook Components Replacing the keyboard cover Tools you need to complete this task Screws removed during this task Flat blade driver Scribe or non marring tool OR Phillips 0 screwdrive...

Страница 33: ...steps in Preparing the notebook on page 6 2 Remove the two keyboard cover screws 3 Turn the notebook over so the top is facing up 4 Open the LCD panel to the fully open position 5 Insert the small fl...

Страница 34: ...m of the keyboard cover and gently pry it up 7 Lift the back edge of the keyboard cover then rotate it toward you so it lies face down on top of the keyboard Be careful not to damage the LCD panel Tip...

Страница 35: ...rom the new keyboard cover into the connector then slide the clip downward to lock the connector in place 11 Place the new keyboard cover on the notebook Press down on the cover in several places unti...

Страница 36: ...eyboard 1 Complete the steps in Preparing the notebook on page 6 2 Open the keyboard cover by following the instructions in Replacing the keyboard cover on page 28 3 Remove the two keyboard screws Imp...

Страница 37: ...the keyboard 4 Lift the back edge of the keyboard slightly then carefully push it toward the LCD panel to release the keyboard retaining tabs Be careful not to damage the LCD panel 5 Lay the keyboard...

Страница 38: ...d keyboard away from the notebook The keyboard is now completely detached from the notebook 8 Lay the new keyboard face down on top of the palm rest 9 Make sure that the brown keyboard connector clip...

Страница 39: ...t edge of the keyboard to seat the retaining tabs into their corresponding slots 11 Gently press the keyboard down until it is flat all the way across The keyboard should easily fall into place Be car...

Страница 40: ...task To replace the cooling assembly 1 Complete the steps in Preparing the notebook on page 6 2 Remove the keyboard cover by following the instructions in Replacing the keyboard cover on page 28 3 Rem...

Страница 41: ...acing the cooling assembly 4 Remove the cooling assembly cover screws 5 Lift the front of the cooling assembly cover slide the cover to the front of the notebook then remove it Long screw Short screw...

Страница 42: ...umber 4 screw 7 Remove the four screws that are stamped with the numbers 1 through 4 next to them Make sure that you remove the screws in reverse numerical order Caution When removing the cooling asse...

Страница 43: ...39 www gateway com Replacing the cooling assembly 8 Unplug the old cooling fans Connector Connector...

Страница 44: ...ohol 12 Place new thermal grease on the processor Use only enough to cover the CPU die 13 Install the new cooling assembly in the notebook 14 Plug in the new cooling fans 15 Replace the four screws th...

Страница 45: ...eassemble the notebook Caution Two types of tape are used in this Gateway notebook Mylar non conductive tape is typically transparent with a red or brown tint Conductive tape is typically grey or silv...

Страница 46: ...n Preparing the notebook on page 6 2 Remove the keyboard cover by following the instructions in Replacing the keyboard cover on page 28 3 Remove the keyboard by following the instructions in Replacing...

Страница 47: ...old processor from the system board 7 Install the new processor onto the system board making sure that Pin 1 on the processor indicated by the silk screened arrow on the corner of the processor aligns...

Страница 48: ...ay Notebook Components 8 Remove any thermal grease residue from the cooling assembly using a soft cloth and isopropyl alcohol 9 Place the thermal grease on the processor Use only enough to cover the C...

Страница 49: ...mplete this task Screws removed during this task Flat blade driver Scribe or non marring tool OR Phillips 0 screwdriver 1 black LCD ground screw 1 black mini PCI bay cover 1 black LCD ground screw 2 b...

Страница 50: ...Mini PCI card on page 13 3 Remove the keyboard cover by following the instructions in Replacing the keyboard cover on page 28 4 Remove the keyboard by following the instructions in Replacing the keybo...

Страница 51: ...LCD panel assembly 7 Remove the screw connecting the LCD grounding wire to the top of the notebook 8 Grasp the black plastic sleeve carefully and pull upward to unplug the LCD video cable from the no...

Страница 52: ...om Replacing Gateway Notebook Components 9 Taking care to note the cables routing and positions as they are installed from Gateway pull the antenna cables out from under the system board Wireless ante...

Страница 53: ...49 www gateway com Replacing the LCD panel assembly 10 Carefully unplug the white LCD panel connector by lifting upward using a screw driver scribe or non marring tool Connector...

Страница 54: ...omponents 11 Carefully close the LCD panel then remove the two screws that secure the LCD panel to the bottom of the notebook 12 Open the LCD panel then remove the two hinge screws that secure the LCD...

Страница 55: ...place the two hinge screws 15 Reattach the cable removed in Step 10 to the appropriate connector on the system board 16 Slide the antenna cables through the access hole under the system board then int...

Страница 56: ...task Screws removed during this task Flat blade driver Scribe or non marring tool OR Phillips 0 screwdriver 1 black LCD ground screw 1 black mini PCI bay cover 1 black LCD ground screw 2 black LCD pa...

Страница 57: ...acing the IEEE 802 11 Mini PCI card on page 13 3 Remove the keyboard cover by following the instructions in Replacing the keyboard cover on page 28 4 Remove the keyboard by following the instructions...

Страница 58: ...ay com Replacing Gateway Notebook Components 7 Remove the six screws from the front of the LCD panel assembly 8 Carefully separate the front and back of the LCD panel assembly Screw Screw Screw Screw...

Страница 59: ...tape that may have been holding the inverter in place 12 Reconnect the cables Caution Two types of tape are used in this Gateway notebook Mylar non conductive tape is typically transparent with a red...

Страница 60: ...k together Press the two halves together in several places until they click in place You should find no loose spots or spots where the two halves do not meet 14 Replace the six LCD panel assembly scre...

Страница 61: ...sk Screws removed during this task Flat blade driver Scribe or non marring tool OR Phillips 0 screwdriver 1 black LCD ground screw 1 black mini PCI bay cover 1 black LCD ground screw 2 black LCD panel...

Страница 62: ...r on page 28 4 Remove the keyboard by following the instructions in Replacing the keyboard on page 32 5 Remove the LCD panel by following the instructions in Replacing the LCD panel assembly on page 4...

Страница 63: ...59 www gateway com Replacing the LCD panel or LCD panel lid 9 Reconnect the inverter 10 Replace the six LCD panel assembly screws removed in Step 7 11 Reassemble the notebook...

Страница 64: ...task Flat blade driver Scribe or non marring tool OR Phillips 0 screwdriver 2 black keyboard cover 1 black LCD ground screw 2 black LCD panel 1 black mini PCI bay cover 1 black LCD ground screw 9 blac...

Страница 65: ...ns in Replacing the hard drive kit on page 20 4 Remove the CD or DVD drive by following the instructions in Replacing the CD or DVD drive on page 26 5 Remove the keyboard cover by following the instru...

Страница 66: ...the five black screws from the top of the notebook 10 Slide the brown touchpad connector clip upward and remove the touchpad cable Be careful not to touch or damage any other components Short screw S...

Страница 67: ...re that the brown touchpad connector clip on the system board is in the raised position 14 Insert the end of the touchpad cable into the connector then slide the clip down 15 Replace the top palm rest...

Страница 68: ...k Flat blade driver Scribe or non marring tool OR Phillips 0 screwdriver 2 black LCD panel 1 black LCD ground screw 1 black mini PCI bay cover 1 black LCD ground screw 2 black keyboard 1 black hard dr...

Страница 69: ...tions in Replacing the hard drive kit on page 20 4 Remove the CD or DVD drive by following the instructions in Replacing the CD or DVD drive on page 26 5 Remove the keyboard cover by following the ins...

Страница 70: ...flat blade screwdriver or non marring tool under the old battery and gently pry it up until it pops out of the socket 11 Make sure that the positive side of the new battery is facing up then press the...

Страница 71: ...67 www gateway com Replacing the modem Replacing the modem Tools you need to complete this task Flat blade driver Scribe or non marring tool OR Phillips 0 screwdriver...

Страница 72: ...black LCD panel 1 black LCD ground screw 1 black mini PCI bay cover 1 black LCD ground screw 2 black keyboard 1 black hard drive kit 2 black CD or DVD drive 2 black modem 2 black keyboard cover 4 blac...

Страница 73: ...the hard drive kit on page 20 4 Remove the CD or DVD drive by following the instructions in Replacing the CD or DVD drive on page 26 5 Remove the keyboard cover by following the instructions in Replac...

Страница 74: ...ssary gently rock the modem back and forth while lifting 11 Turn the modem over then unplug the modem cable from the modem 12 Install the new modem on the system board 13 Reassemble the notebook Cauti...

Страница 75: ...de driver Scribe or non marring tool OR Phillips 0 screwdriver 2 black LCD panel 1 black LCD ground screw 1 black mini PCI bay cover 1 black LCD ground screw 2 black keyboard 1 black hard drive kit 2...

Страница 76: ...e by following the instructions in Replacing the hard drive kit on page 20 4 Remove the CD or DVD drive by following the instructions in Replacing the CD or DVD drive on page 26 5 Remove the keyboard...

Страница 77: ...www gateway com Replacing the speakers 9 Unplug the speakers one connector from the system board 10 Remove any tape holding the speakers in place then lift the speakers from the retaining pins Connect...

Страница 78: ...tion Two types of tape are used in this Gateway notebook Mylar non conductive tape is typically transparent with a red or brown tint Conductive tape is typically grey or silver If the existing tape ca...

Страница 79: ...75 www gateway com Replacing the memory card reader Replacing the memory card reader Tools you need to complete this task Flat blade driver Scribe or non marring tool OR Phillips 0 screwdriver...

Страница 80: ...LCD ground screw 1 black mini PCI bay cover 1 black LCD ground screw 2 black keyboard 1 black hard drive kit 2 black CD or DVD drive 3 black memory card reader shield 2 black memory card reader 2 bla...

Страница 81: ...the hard drive kit on page 20 4 Remove the CD or DVD drive by following the instructions in Replacing the CD or DVD drive on page 26 5 Remove the keyboard cover by following the instructions in Repla...

Страница 82: ...ww gateway com Replacing Gateway Notebook Components 10 Remove the two memory card reader screws 11 Carefully slide the memory card reader away from the side of the notebook then turn it over Screw Sc...

Страница 83: ...ry card reader into the notebook 15 Make sure that the brown memory card reader connector clip on the system board is in the raised position 16 Insert the end of the memory card reader cable into the...

Страница 84: ...memory modules designed for the Gateway 7000 series M520 MX7000 or NX700 Important This notebook has two memory modules One is located in the memory bay The other is accessible only after removing th...

Страница 85: ...black LCD ground screw 1 black mini PCI bay cover 1 black LCD ground screw 2 black keyboard 1 black hard drive kit 2 black CD or DVD drive 3 black memory card reader shield 2 black memory card reader...

Страница 86: ...d drive kit on page 20 4 Remove the CD or DVD drive by following the instructions in Replacing the CD or DVD drive on page 26 5 Remove the keyboard cover by following the instructions in Replacing the...

Страница 87: ...ent module at a 30 degree angle and press it into the empty memory slot This module is keyed so it can only be inserted in one direction If the module does not fit make sure that the notch in the modu...

Страница 88: ...k X 23 7762 thermal grease Screws removed during this task Flat blade driver Scribe or non marring tool OR Phillips 0 screwdriver 5 0 mm hex nutdriver 1 black LCD ground screw 1 black mini PCI bay cov...

Страница 89: ...E 802 11 wireless networking built in unplug the antenna cables from the IEEE 802 11 mini PCI card by following the instructions in Replacing the IEEE 802 11 Mini PCI card on page 13 2 black modem 4 b...

Страница 90: ...oling assembly by following the instructions in Replacing the cooling assembly on page 36 10 Remove the processor and install it on the new system board by following the instructions in Replacing the...

Страница 91: ...87 www gateway com Replacing the system board 16 Unplug the speakers one connector from the system board Connector...

Страница 92: ...acing Gateway Notebook Components 17 Remove the four screws holding the hard drive cage then remove the cage 18 Remove the two screws holding the optical drive rails then remove the rails Screw Screw...

Страница 93: ...89 www gateway com Replacing the system board 19 Remove the screw holding the battery bay bracket then remove the bracket 20 Remove the two system board screws Screw Screw Screw...

Страница 94: ...Replacing Gateway Notebook Components 21 Remove the system board hexnut 22 Carefully remove the system board 23 Place the new system board into the notebook 24 Replace the system board hexnut removed...

Страница 95: ...n Replacing the IEEE 802 11 Mini PCI card on page 13 30 Install the memory module removed in Step 2 on the new system board by following the instructions in Replacing the memory module in the memory b...

Страница 96: ...92 www gateway com Replacing Gateway Notebook Components...

Страница 97: ......

Страница 98: ...MAN M520 SHADOW SVC GDE R0 9 05...

Отзывы: