Replacing the hard drive
Technical Support
See the label on the bottom of the notebook for Customer Care Information. See
your Reference Guide for important safety, regulatory, and legal information.
© 2008 Gateway, Inc. All rights reserved. Gateway and eMachines are trademarks
or registered trademarks of Gateway, Inc. in the United States and other countries.
All other brands and product names are trademarks or registered trademarks of
their respective companies.
Replacing the hard drive
Locating Components
Preventing static electricity discharge
The components inside your notebook are extremely sensitive to static
electricity, also known as electrostatic discharge (ESD). ESD can
permanently damage electrostatic discharge-sensitive components in
your notebook.
Before working with notebook components, follow these guidelines:
•
Avoid static-causing surfaces such as carpeted floors, plastic,
and packing foam.
•
Remove components from their antistatic bags only when you
are ready to use them. Do not lay components on the outside
of antistatic bags because only the inside of the bags provide
electrostatic protection.
•
Always hold components by their edges. Avoid touching the
edge connectors. Never slide components over any surface.
•
Wear a grounding wrist strap (available at most electronics
stores) and attach it to a bare metal part of your workbench
or other grounded connection.
•
Touch a bare metal surface on your workbench or other
grounded object.
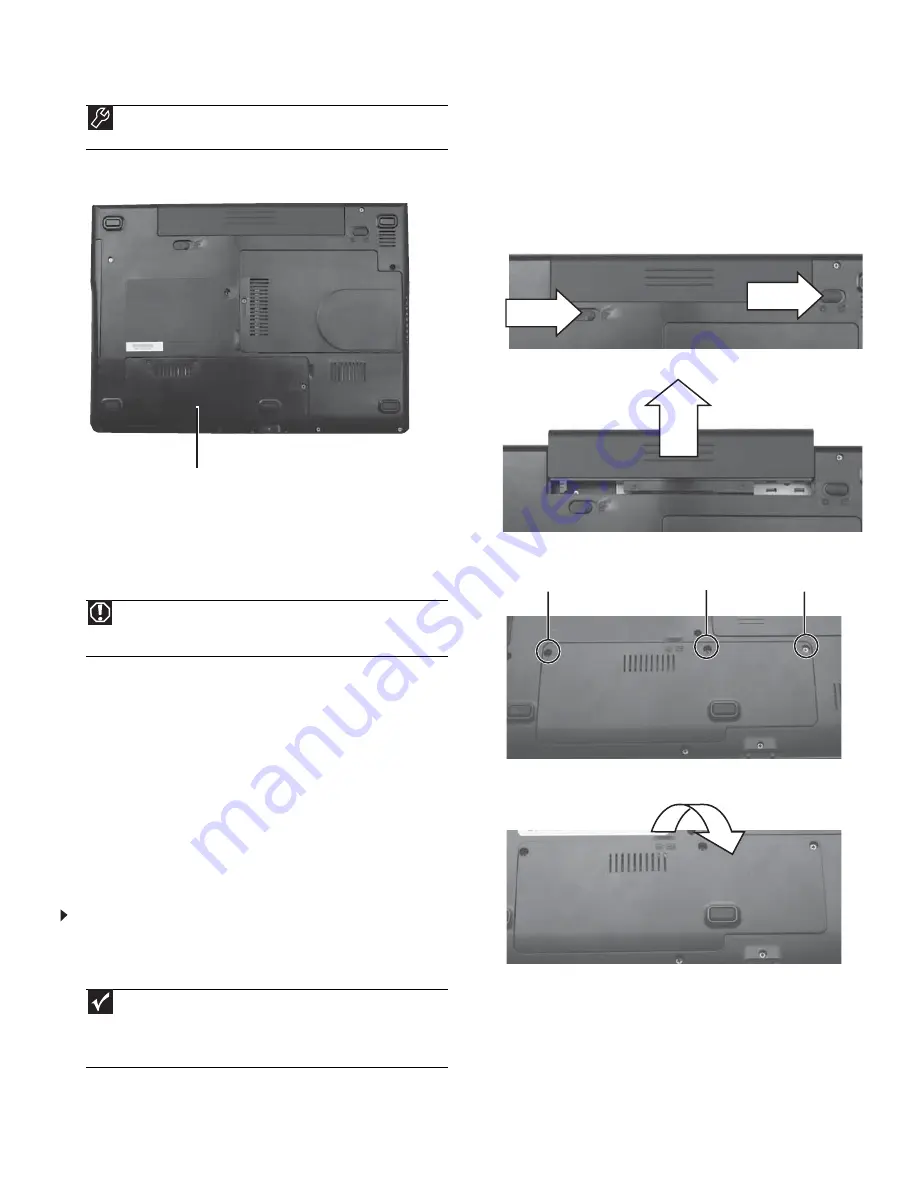
To replace the hard drive:
1 If possible, create a Drivers and Applications Recovery disc. For
more information, see “Preparing for software and device driver
recovery” in the Reference Guide.
2 Follow the guidelines under “Preventing static electricity
discharge.”
3 Turn off your notebook.
4 Close the LCD panel.
5 Disconnect the AC adapter, modem cable, and network cable.
6 Disconnect all peripheral devices connected to your notebook and
remove any Express and memory cards.
7 Turn your notebook over so the bottom is facing up.
8 Slide the battery lock to the unlocked position, then slide the
battery latch.
9 Slide the battery out of your notebook.
10 Loosen the three hard drive bay cover screws (these screws cannot
be removed).
11 Lift the hard drive bay cover using the thumb notch, then remove
it.
Tools
You need a small Phillips screwdriver to replace the hard drive. You
also need the operating system disc that came with your notebook.
Warning
To avoid exposure to dangerous electrical voltages and moving
parts, turn off your notebook and unplug the AC adapter, modem cable,
and network cable and remove the battery before replacing a component.
Important
If you cannot create a Drivers and Applications Recovery disc,
Gateway may send you a set of recovery discs or a replacement hard drive
with the drivers and applications already installed. Contact Gateway
Customer Care at the Web address or telephone number shown on the label
on the bottom of your notebook.
Hard drive bay
Screw
Screw
Screw
1


