


CHAPTER 8: Upgrading Your Notebook
110
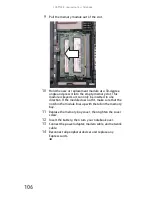
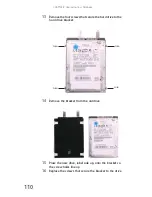
13
Remove the four screws that secure the hard drive to the
hard drive bracket.
14
Remove the bracket from the old drive.
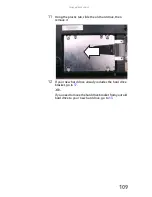
15
Place the new drive, label side up, onto the bracket so
the screw holes line up.
16
Replace the screws that secure the bracket to the drive.
Screw
Screw
Screw
Screw
Содержание M-150S
Страница 1: ... NOTEBOOK REFERENCEGUIDE ORDINATEUR PORTABLE GUIDE DU MATÉRIEL ...
Страница 2: ......
Страница 7: ...www gateway com v Appendix A Legal Information 141 Index 151 ...
Страница 8: ...Contents vi ...
Страница 12: ...CHAPTER 1 About This Reference 4 ...
Страница 13: ...CHAPTER2 5 Checking Out Your Notebook Front Left Right Back Bottom Keyboard area LCD panel ...
Страница 84: ...CHAPTER 5 Managing Power 76 ...
Страница 120: ...CHAPTER 8 Upgrading Your Notebook 112 ...
Страница 121: ...CHAPTER9 113 Troubleshooting Safety guidelines First steps Troubleshooting Telephone support ...
Страница 148: ...CHAPTER 9 Troubleshooting 140 ...
Страница 174: ...Sommaire vi ...
Страница 179: ...CHAPITRE 2 5 Vérification de votre ordinateur portable Avant Gauche Droite Arrière Bas Zone du clavier Écran ACL ...
Страница 228: ...CHAPITRE 3 Installation et initiation 54 ...
Страница 290: ...CHAPITRE 8 Mise à niveau de votre ordinateur portable 116 ...
Страница 291: ...CHAPITRE 9 117 Dépannage Directives de sécurité Premières étapes Dépannage Support par téléphone ...
Страница 334: ...ANNEXE A Informations légales 160 ...
Страница 346: ...172 Index ...
Страница 347: ......
Страница 348: ...8512932 MAN TRTNTMP HW RF CA R2 02 08 ...


