: Upgrading Your Computer
50
3
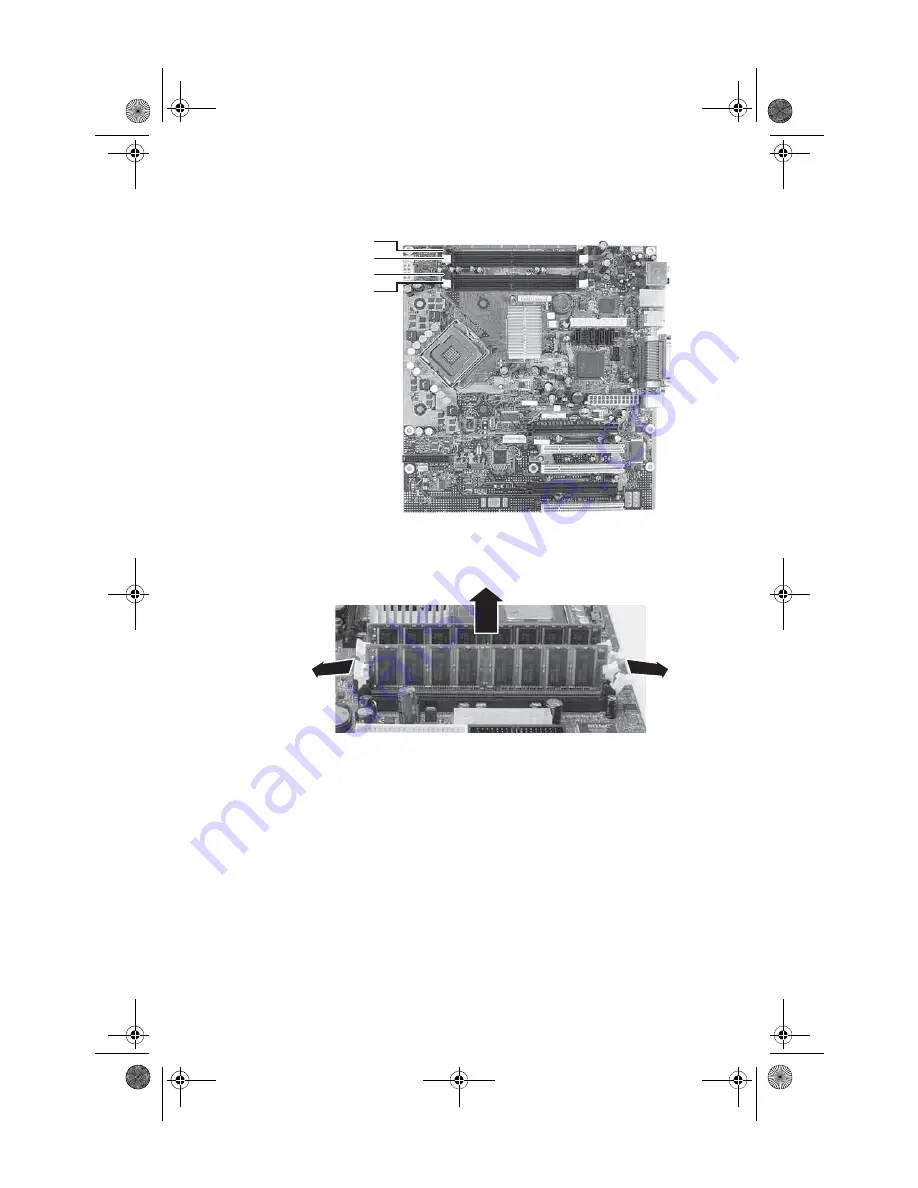
Find the memory module banks on your system board.
4
If you are removing a DIMM from the memory module
bank, gently pull the plastic tabs away from the sides
of the memory module and remove it.
- OR -
If you are adding a DIMM to an empty memory module
bank, gently pull the plastic tabs away from the sides
of the memory module bank. Make sure that you install
modules of the same type into both slots of a memory
channel (bank).
5
Align the notches on the new DIMM with the notches
on the memory module bank, then press the module
firmly into the bank. The tabs on the sides of the
memory module should secure the memory module
automatically. When the module is secure, you hear a
click.
6
Return your computer to its upright position.
Channel B slot 1
Channel B slot 0
Channel A slot 1
Channel A slot 0
8511858.book Page 50 Monday, December 18, 2006 10:51 AM
Содержание FX530QS
Страница 1: ...REFERENCE GUIDE...
Страница 2: ...8511858 book Page b Monday December 18 2006 10 51 AM...
Страница 10: ...CHAPTER 1 About This Reference 4 8511858 book Page 4 Monday December 18 2006 10 51 AM...
Страница 11: ...CHAPTER2 5 Checking Out Your Computer Front Back 8511858 book Page 5 Monday December 18 2006 10 51 AM...
Страница 34: ...CHAPTER 1 Setting Up and Getting Started 28 8511858 book Page 28 Monday December 18 2006 10 51 AM...
Страница 48: ...CHAPTER 4 Advanced Hardware Setup 42 8511858 book Page 42 Monday December 18 2006 10 51 AM...
Страница 82: ...CHAPTER 1 Upgrading Your Computer 76 8511858 book Page 76 Monday December 18 2006 10 51 AM...
Страница 98: ...CHAPTER 1 Maintaining Your Computer 92 8511858 book Page 92 Monday December 18 2006 10 51 AM...
Страница 144: ...Appendix A Legal Notices 138 8511858 book Page 138 Monday December 18 2006 10 51 AM...
Страница 152: ...146 Index 8511858 book Page 146 Monday December 18 2006 10 51 AM...
Страница 153: ...8511858 book Page 147 Monday December 18 2006 10 51 AM...
Страница 154: ...MAN BTX CONS REF GDE V R0 12 06 8511858 book Page 148 Monday December 18 2006 10 51 AM...


