background image

®

E-9722R Server

USER

GUIDE

Содержание E-9722R

Страница 1: ... E 9722R Server USERGUIDE ...

Страница 2: ......

Страница 3: ...settings 14 Chapter 3 Maintaining Your Server 15 Caring for your server 16 Cleaning your server 16 Preparing for system recovery 17 Recording the BIOS configuration 17 System administration 17 Gateway Systems Manager 17 Server security 18 Identifying your server 19 Updating the baseboard management controller firmware 19 Using your Server Companion DVD 20 Viewing documents 20 Installing drivers an...

Страница 4: ...47 Replacing the CMOS battery 49 Replacing the control panel 50 Replacing the system board 50 Chapter 5 Using the BIOS Setup Utility 53 Opening the BIOS Setup utility 54 Updating the BIOS 54 Recovering the BIOS 55 Resetting the BIOS 56 Resetting BIOS passwords 57 Updating and recovering the BMC 58 Updating the BMC firmware 58 Recovering the BMC 58 Chapter 6 Troubleshooting 61 Telephone support 62 ...

Страница 5: ...Specifications 79 System specifications 80 System board specifications 80 Environmental specifications 81 Electronic specifications 81 Memory map 81 Interrupts 82 Connector pinouts 82 Additional specifications 85 Appendix B BIOS Settings 87 Appendix C Legal Information 95 ...

Страница 6: ...Contents iv ...

Страница 7: ...CHAPTER1 1 Checking Out Your Gateway Server Front Back Back Interior System board Hot swap backplanes Getting Help ...

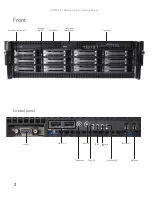
Страница 8: ...er 2 Front Control panel Hard drives as many as 12 Hard drive tray LEDs Optical drive SMIL module bay optional Control panel VGA port USB ports 2 Power button ID button Power LED ID LED NIC status LED System fault LED Reset button NMI button ...

Страница 9: ...www gateway com 3 Back USB ports 2 PS 2 Keyboard port PS 2 Mouse port Serial port VGA port Server management port NIC ports 4 ID LED Power supply AC power connector ...

Страница 10: ...Feature Feature 1 System board 6 Front panel 2 Fan duct 7 Front panel VGA connector 3 System fans 8 SMIL module optional 4 SATA II SAS backplane 9 Slimline DVD CD RW combo drive or DVD RW drive 5 Hard drive bays 10 Riser card assembly 1 2 3 4 5 6 7 8 9 10 ...

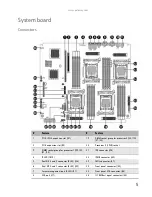
Страница 11: ...rocessor 0 CPU0 socket 3 DIMM socket group for processor 1 J33 J32 J31 J30 21 IDE connector J36 4 ID LED CR10 22 IPMB connector J43 5 Dual NIC 2 and 3 connector RJ 45 J26 23 SMIL connector J37 6 Dual NIC 0 and 1 connector RJ 45 J23 24 Front panel connector J45 7 Server management port RJ 45 J21 25 Front panel VGA connector J46 8 VGA port J17 26 I2C SMBus signal connector J44 ...

Страница 12: ...r processor 3 J14 J15 J16 J18 30 System configuration jumper J56 13 Processor 3 CPU3 socket 31 Floppy connector J40 14 Processor 1 CPU1 socket 32 Battery B1 15 Processor power connector J1 33 PCI E mezzanine board connector J38 16 Fan tach connector J2 34 PCI X mezzanine board connector J49 17 DIMM socket group for processor 2 J5 J17 J8 J9 35 Front panel USB connector J53 18 Processor 2 CPU2 socke...

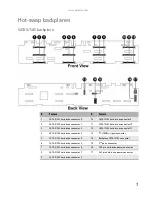
Страница 13: ...rd drive connector 2 12 SATA II SAS hard drive connector 11 4 SATA II SAS hard drive connector 3 13 I2C SMBus signal connector 5 SATA II SAS hard drive connector 4 14 Backplane SATA II SAS connector 6 SATA II SAS hard drive connector 5 15 3rd party connector 7 SATA II SAS hard drive connector 6 16 1X4 pin hard drive power connector 8 SATA II SAS hard drive connector 7 17 2x3 pin hard drive power c...

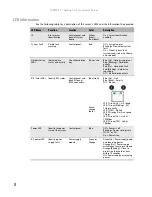
Страница 14: ... Red On Hard drive fault Red Blinking Hard drive rebuilding Off No hard drive access NIC status LEDs Identify NIC states Control panel and back I O panel RJ 45 connectors Blue front Green Orange back Blue On Link Blue Blink Activity Off No link LED 1 Green On NIC linked LED 1 Green Blinking NIC 1 Gbps activity LED 1 Off No link LED 2 Orange On Link speed 1 Gbps LED 2 Green On Link at 100 Mbps LED ...

Страница 15: ...ee Using Your Server Companion DVD Gateway Web site Gateway provides a variety of information on its Web site to help you use your server Visit the Gateway Web site at support gateway com for Technical documentation and product guides Technical tips and support Updated hardware drivers Order status Frequently asked questions FAQs Telephone support You can access a wide range of services through yo...

Страница 16: ...CHAPTER 1 Checking Out Your Gateway Server 10 ...

Страница 17: ...CHAPTER2 11 Setting Up Your Server Setting up the hardware Protecting from power source problems Starting your server Setting up the operating system Initial hardware settings ...

Страница 18: ...ge protector which absorbs voltage surges and prevents them from reaching your server When you purchase a surge protector Make sure that the surge protector meets the appropriate product safety certification for your location such as Underwriters Laboratories UL Check the maximum amount of voltage the protector allows to pass through the line The lower the voltage the better the protection for you...

Страница 19: ... power button Make sure that the power cable s is plugged in securely and that your surge protector if you are using one is plugged in and turned on Make sure that the monitor is connected to the server plugged into the power outlet or surge protector and turned on You may also need to adjust the monitor s brightness and contrast controls If you cannot find the cause of the power loss contact Gate...

Страница 20: ...ed See your operating system s documentation for instructions on completing the installation or configuring advanced settings for your specific network If you are installing an operating system because it was not already installed by Gateway see the appropriate installation guide for instructions Initial hardware settings Your server comes from the manufacturer with the correct initial hardware se...

Страница 21: ...15 Maintaining Your Server Caring for your server Preparing for system recovery System administration Identifying your server Updating the baseboard management controller firmware Using your Server Companion DVD ...

Страница 22: ... with a narrow straw like extension Isopropyl alcohol Cotton swabs A tape drive cleaning cartridge if a tape drive is installed A CD drive cleaning kit Cleaning tips Always turn off your server and other peripheral devices before cleaning any components Use a damp lint free cloth to clean your server and other parts of your server system Do not use abrasive or solvent cleaners because they can dam...

Страница 23: ...system s documentation or online help for instructions on creating and using an emergency repair discs Recording the BIOS configuration To help keep track of your custom changes to BIOS settings and to prepare for system recovery you should record your BIOS configuration after you have your server set up and working You should also record your BIOS configuration whenever you upgrade or add new har...

Страница 24: ...art your server then press F2 when the Gateway logo screen appears during startup The BIOS Setup utility opens 2 Select the Security menu 3 Select Change Supervisor Password 4 Type the password and press ENTER then type it again and press ENTER 5 Save your changes and close the BIOS Setup utility To remove a BIOS security password 1 Restart your server then press F2 when the Gateway logo screen ap...

Страница 25: ...agement functions such as Monitoring server components FRU and sensor data records SDR the information provided depends on the option selected Managing non volatile storage for the system event log and sensor data records Interfacing with the emergency management port to send alerts and interact with remote management systems Fault resilient booting the extent depends on the option selected You sh...

Страница 26: ...ns To access files manually open the Docs Manuals folder on the Server Companion DVD To install Acrobat Reader 7 Click the link for Acrobat on the Documentation page OR Run Docs Reader app21279 Setup exe from the Server Companion DVD Installing drivers and programs You can install drivers and programs directly onto the server by using the Server Companion DVD You can also extract drivers onto disk...

Страница 27: ...w any on screen instructions To access the files manually open the Drivers folder on the SCDVD then open the appropriate subfolder Booting from the Server Companion DVD By booting from the SCDVD you can repair applications and drivers or exit to the command prompt To boot from the SCDVD 1 With your server turned on insert the SCDVD into the DVD drive 2 Restart your server A message appears asking ...

Страница 28: ...CHAPTER 3 Maintaining Your Server 22 ...

Страница 29: ...erver case Installing and removing drives Installing memory Installing and removing PCI expansion cards Replacing system fans Replacing or adding a processor Replacing a power supply module Replacing the power distribution module Replacing the hot swap backplane Replacing the CMOS battery Replacing the control panel Replacing the system board ...

Страница 30: ... 9 Preventing static electricity discharge The components inside your server are extremely sensitive to static electricity also known as electrostatic discharge ESD Before working with server components follow these guidelines Turn off the server then unplug the power cords and all other cables Press the power button to drain any residual power from the server Wear a grounding wrist strap availabl...

Страница 31: ...ver 1 Follow the instructions in Preventing static electricity discharge on page 24 Make sure that you turn off the server then unplug the power cord s and all other cables connected to the server 2 If the bezel is installed unlock it then pull it off 3 If the server is mounted in a cabinet remove it from the cabinet 4 Place the server on a stable non skid surface Warning To prevent risk of electr...

Страница 32: ...d left toward the middle of the server then slide the front top cover 2 toward the back of the server and lift it off Caution For correct cooling and air flow always reinstall the top covers before you turn on the server Operating the server without the covers in place will cause the server to overheat Important The hard drive carriers shown in these illustrations may look different than the actua...

Страница 33: ...e front top cover on the server then slide it forward until it clicks into place 3 Place the back top cover on the server then slide it forward 1 until it clicks into place Replace the screw 2 to hold the top cover in place 4 Reconnect the power cords and all other cables Important The hard drive carriers shown in these illustrations may look different than the actual hard drive carriers in your s...

Страница 34: ...the instructions in Preventing static electricity discharge on page 24 Make sure that you turn off the server then unplug the power cord s and all other cables connected to the server 2 Unlock the bezel if necessary and remove it by pulling it from the chassis 3 Follow the instructions in Opening the server case on page 25 4 Disconnect the 44 pin optical drive cable from the optical drive interfac...

Страница 35: ...rd 12 Follow the instructions in Closing the server case on page 27 13 Reinstall the bezel if required by snapping it into place on the front of the chassis 14 Reconnect all power cords and peripheral device cables then turn on the server Removing and installing a hard drive Use this procedure to add or replace a hard drive in a hot swap bay Your server supports as many as twelve 1 inch high 3 5 i...

Страница 36: ...my hard drive from the drive tray 5 Using the four screws you removed install the new hard drive into the drive tray 6 Make sure that the tray s release lever is open then slide the new drive fully into the empty hot swap drive bay 7 Push the lever back into place to secure the hard drive in the bay 8 Reinstall the bezel if required by snapping it into place on the front of the chassis Caution Bef...

Страница 37: ... BIOS configures the memory controller to run in single channel dual channel or four channel mode DIMM banks must be populated using the following guidelines There are four groups of DIMMs with four DIMMs in each group on the system board to support processor 0 processor 1 processor 2 and processor 3 Each group supports one processor circled When you insert the DIMM s you must always start with DI...

Страница 38: ... 1 GB 4 GB Processor 1 1 GB 1 GB Processor 0 2 GB 2 GB 8 GB Processor 1 2 GB 2 GB Processor 0 4 GB 4 GB 16 GB Processor 1 4 GB 4 GB 8 Processor 0 512 MB 512 MB 512 MB 512 MB 4 GB Processor 1 512 MB 512 MB 512 MB 512 MB Processor 0 1 GB 1 GB 1 GB 1 GB 8 GB Processor 1 1 GB 1 GB 1 GB 1 GB Processor 0 2 GB 2 GB 2 GB 2 GB 16 GB Processor 1 2 GB 2 GB 2 GB 2 GB Processor 0 4 GB 4 GB 4 GB 4 GB 32 GB Proc...

Страница 39: ...GB 4 GB 32 GB Processor 1 4 GB 4 GB Processor 2 4 GB 4 GB Processor 3 4 GB 4 GB 16 Processor 0 512 MB 512 MB 512 MB 512 MB 8 GB Processor 1 512 MB 512 MB 512 MB 512 MB Processor 2 512 MB 512 MB 512 MB 512 MB Processor 3 512 MB 512 MB 512 MB 512 MB Processor 0 1 GB 1 GB 1 GB 1 GB 16 GB Processor 1 1 GB 1 GB 1 GB 1 GB Processor 2 1 GB 1 GB 1 GB 1 GB Processor 3 1 GB 1 GB 1 GB 1 GB Processor 0 2 GB 2...

Страница 40: ...vides one 280 pin PCI X 66MHz expansion slot and one PCI E x8 expansion slot One PCI X 66 MHz expansion slot can support two PCI E x8 expansion slots with x8 speed and one PCI X 66 MHz using the riser card One PCI E expansion slot can support two PCI E x8 expansion slots with x8 speed using the riser card The riser card comes with the system package The edge connectors of the riser card connect to...

Страница 41: ...g a card disconnect any cables that are attached to the old card 4 Push the riser card locking tabs 1 in the directions shown in the illustration 5 Lift the riser card assembly out of the chassis 2 and place it on a clean static free surface ...

Страница 42: ...ou are not replacing the card install a slot cover 7 on the back of the riser card assembly 8 If you are replacing the riser card continue with the next step OR If you are replacing the PCI card go to Step 11 Caution Do not touch the contacts on the bottom part of the expansion card Touching the contacts can cause electrostatic damage to the card ...

Страница 43: ...I card into the riser card making sure any connectors extend through the slot at the back of the assembly and that the card is fully seated in the riser card 12 Close the release lever see Step 6 and the card guide tab 13 Position the PCI riser card assembly 1 over the PCI socket on the server board then press the PCI riser card assembly into the PCI socket until it clicks into place 14 Follow the...

Страница 44: ...1 Follow the instructions in Preventing static electricity discharge on page 24 2 Follow the instructions in Opening the server case on page 25 3 Determine which fan group needs to be replaced by noting which fans are not operating 4 Pull up the locking handle 1 on the system fan then lift the fan group 2 from the fan cage in the chassis 5 Insert the replacement fan group into the fan cage and pre...

Страница 45: ...uctions in Preventing static electricity discharge on page 24 2 Follow the instructions in Opening the server case on page 25 but do not turn off the server or unplug the power cord s or other cables 3 Remove the fan duct by lifting it out of the chassis 4 Lift the retaining clip 1 ...

Страница 46: ...an power and fan tach cables to the system board then insert the retention tab 1 into the corresponding clip on the chassis and push the other side of the fan cage down 2 making sure that the retaining clip is inserted into the hole in the chassis 8 Replace the fan duct by placing it into the chassis 9 Follow the instructions in Closing the server case on page 27 Important Make sure that the arrow...

Страница 47: ... and up on the heatsink retention levers 1 and move them out of the way 5 Lift the heatsink straight up 2 then remove the heatsink from the processor Warning Processors and heat sinks may be hot if the computer has been running Before replacing a processor or heat sink let them cool for several minutes Caution A heat sink must be installed on the processor Installing a processor without a heat sin...

Страница 48: ...ld triangle on the corner is situated as shown in the following illustration 9 When the processor is oriented correctly and in place press it firmly into the socket rotate the load plate into place and push down the load lever until it clicks into place Caution The processor only fits the socket when oriented as indicated Do not force the processor into the socket You may bend or damage the proces...

Страница 49: ... power supply module has failed the LED on the power supply will be orange 2 If your server has only one power supply module installed make sure that you turn off the server then unplug the power cord before continuing OR If your server has two or more power supply modules installed you do not need to turn off the power to the server before continuing Caution The heatsink has Thermal Interface Mat...

Страница 50: ...ower distribution module 1 Follow the instructions in Preventing static electricity discharge on page 24 Make sure that you turn off the server then unplug the power cord s and all other cables connected to the server 2 Follow the instructions in Opening the server case on page 25 3 Remove the PCI riser assembly by following the instructions in Installing and removing PCI expansion cards on page 3...

Страница 51: ...assis to engage the three locking tabs 9 Tighten the thumbscrew to secure the power distribution board in the chassis 10 Reconnect the power cables See System board on page 5 for the location of the connectors on the system board 11 Replace the system fan cage and fan duct by following the instructions in Replacing system fans on page 38 12 Reinstall the PCI riser assembly by following the instruc...

Страница 52: ...rd drive on page 29 5 Remove the fan duce and the system fans and fan cage following the instructions in Replacing system fans on page 38 6 Disconnect all cables from the backplane 7 Pull the backplane bracket and backplane 1 out of the chassis 8 Press the release tab 2 on the backplane bracket and push the backplane to the left 3 9 Pull the backplane from the backplane bracket Caution The hot swa...

Страница 53: ...structions in Closing the server case on page 27 15 Reinstall the hot swap drives back into the server Make sure that you install the drives into the same bays you removed them from in Step 4 For instructions see Removing and installing a hard drive on page 29 16 Replace the bezel by snapping it into place on the front of the server Installing and removing an optional mezzanine board This server h...

Страница 54: ...ap into place 6 Replace the PCI riser card assembly by following the instructions in Installing and removing PCI expansion cards on page 34 7 Follow the instructions in Closing the server case on page 27 To remove an optional mezzanine board 1 Follow the instructions in Preventing static electricity discharge on page 24 Make sure that you turn off the server then unplug the power cord s and all ot...

Страница 55: ... need to install the new battery the same way 7 Push the battery retention clip away from the battery until the battery lifts up then remove the old battery You can use a screwdriver to help lift the battery 8 Make sure that the positive side of the new battery is facing the correct direction then press the new battery into the socket until it snaps into place 9 Follow the instructions in Closing ...

Страница 56: ... Replacing the system board To replace the system board 1 Follow the instructions in Preventing static electricity discharge on page 24 Make sure that you turn off the server then unplug the power cord s and all other cables connected to the server 2 Follow the instructions in Opening the server case on page 25 3 Remove the PCI riser assembly by following the instructions in Installing and removin...

Страница 57: ...ns in Replacing or adding a processor on page 41 15 Replace the memory by following the instructions in Installing memory on page 31 16 Replace the system fan cage and fan duct by following the instructions in Replacing system fans on page 38 17 Reinstall the PCI riser assembly by following the instructions in Installing and removing PCI expansion cards on page 34 18 Follow the instructions in Clo...

Страница 58: ...CHAPTER 4 Installing Components 52 ...

Страница 59: ...CHAPTER5 53 Using the BIOS Setup Utility Opening the BIOS Setup utility Updating the BIOS Recovering the BIOS Resetting the BIOS Updating and recovering the BMC ...

Страница 60: ...es you access to settings related to system access passwords For more information see Server security on page 18 Server gives you access to settings for system management console redirection event log configuration and fault resilient boot settings Exit gives you access to options for closing the BIOS Setup utility Updating the BIOS To update the BIOS 1 Print the appendix for BIOS Settings on page...

Страница 61: ...er cords and all other cables connected to the server 2 Follow the instructions in Opening the server case on page 25 3 Remove the jumper across pins 1 2 of header J56 E then place the jumper across pins 2 3 4 Follow the instructions in Closing the server case on page 27 5 Insert a bootable USB disk on key containing a valid BIOS image into a USB port 6 Reconnect the power cords and turn on the se...

Страница 62: ... continuing to hold down the reset button press the power button 5 Release both buttons at the same time The BIOS is reset To reset the BIOS using the system board jumper 1 Print the appendix for BIOS Settings on page 87 in this guide 2 Restart your server then press F2 when the Gateway logo screen appears during startup The BIOS Setup utility opens 3 Record any custom BIOS settings on your printo...

Страница 63: ...arge on page 24 Make sure that you turn off the server then unplug the power cord s and all other cables connected to the server 2 Follow the instructions in Opening the server case on page 25 3 Remove the jumper across pins 1 2 of header J56 A then place the jumper across pins 2 3 4 Follow the instructions in Closing the server case on page 27 5 Reconnect the power cords and turn on the server Th...

Страница 64: ...tatic electricity discharge on page 24 Make sure that you turn off the server then unplug the power cord s and all other cables connected to the server 2 Follow the instructions in Opening the server case on page 25 3 Remove the jumper across pins 1 2 of header J3 F then place the jumper across pins 2 3 4 Follow the instructions in Closing the server case on page 27 5 Update the BMC firmware by fo...

Страница 65: ...www gateway com 59 8 Follow the instructions in Closing the server case on page 27 9 Plug in the AC power cords and turn on the server for normal use ...

Страница 66: ...CHAPTER 5 Using the BIOS Setup Utility 60 ...

Страница 67: ...CHAPTER6 61 Troubleshooting Telephone support Tutoring and training Safety guidelines Error messages Troubleshooting ...

Страница 68: ...ailed description of your issue including the exact text of any error messages and the steps you have taken Make sure that your server is nearby at the time of your call The technician may have you follow appropriate troubleshooting steps Consider using Gateway s online technical support Gateway s Web site has FAQs tips and other technical help You can also use the Web site to e mail Customer Care...

Страница 69: ...edural errors such as typing an incorrect keystroke or trying to save a file to a write protected diskette Some messages however may indicate a problem that requires further troubleshooting Memory messages Gate20 Error The BIOS is unable to correctly control the system board s Gate A20 function which controls access of memory over 1 MB This may indicate a problem with the system board Boot message...

Страница 70: ...and configure ATAPI devices in POST Secondary Master Hard Disk Error The ATAPI device configured as Secondary Master could not be correctly initialized by the BIOS This message is typically displayed when the BIOS is trying to detect and configure ATAPI devices in POST Secondary Slave Hard Disk Error The ATAPI device configured as Secondary Slave could not be correctly initialized by the BIOS This...

Страница 71: ...m configuration messages DMA 2 Error Error initializing secondary DMA controller This is a fatal error often indication a problem with system hardware DMA Controller Error POST error while trying to initialize the DMA controller This is a fatal error often indication a problem with system hardware Checking NVRAM Update Failed BIOS could not write to the NVRAM block This message appears when the FL...

Страница 72: ...er This may indicate a problem with system hardware CMOS messages CMOS Date Time Not Set The CMOS Date and or Time are invalid This error can be resolved by readjusting the system time in AMIBIOS Setup CMOS Battery Low CMOS Battery is low This message usually indicates that the CMOS battery needs to be replaced It could also appear when the user intentionally discharges the CMOS battery CMOS Setti...

Страница 73: ...ssing and holding F2 while your server restarts Correct any discrepancies Remove the back top panel by following the instructions in Opening the server case on page 25 then make sure that all cables inside the case are attached securely Also make sure that the colored cable edges are aligned correctly and that the connectors do not miss any pins If you have the correct test equipment make sure tha...

Страница 74: ... returns the most recent card you installed is at fault 5 A processor on the system board generated an error Remove one of the processors if two are installed then try a known good processor in the first socket Same as for 4 beeps 6 The keyboard controller 8042 may be defective The BIOS cannot switch to Protected mode Remove the keyboard to see if the error goes away If it does try a known good ke...

Страница 75: ...o CR29 on the system board then check the tables on the following pages to determine the problem The location of Port 80 LEDs is shown in the following illustration The eight diagnostic LEDs are divided into two groups LEDs from CR22 CR25 comprise one group and LEDs from CR26 CR829 comprise the other group The two groups represent the two digits of the hex code The CR22 CR25 group stands for the f...

Страница 76: ...bad update CMOS with power on default values and clear passwords Initialize status register A Initialize data variables that are based on CMOS setup questions Initialize both the 8259 compatible PICs in the system 05 Initialize the interrupt controller in hardware generally PIC and interrupt vector table 06 Do R W test to CH 2 count reg Initialize CH 0 as system timer Install the POSTINT1Ch handle...

Страница 77: ...t registers 40 Detect different devices parallel ports serial ports and coprocessor in CPU and so on successfully installed in the system and update the BDA EBDA and so on 50 Programming the memory hole or any kind of implementation that needs an adjustment in system RAM size if needed 52 Updates CMOS memory size from memory found in memory test Allocates memory for Extended BIOS Data Area from ba...

Страница 78: ...point Description Before D1h Early chipset initialization is done Early super I O initialization is done including RTC and keyboard controller NMI is disabled D1 Perform keyboard controller BAT test Check if waking up from power management suspend state Save power on CPUID value in scratch CMOS D0 Go to flat mode with 4 GB limit and GA20 enabled Verify the bootblock checksum D2 Disable CACHE befor...

Страница 79: ...ler is initialized L1 cache is enabled E9 Set up floppy controller and data Attempt to read from floppy EA Enable ATAPI hardware Attempt to read from ARMD and ATAPI CDROM EB Disable ATAPI hardware Jump back to checkpoint E9 EF Read error occurred on media Jump back to checkpoint EB E9 or EA Determine information about root directory of recovery media F0 Search for pre defined recovery file name in...

Страница 80: ...tic Device Initialization function 1 Initializes all static devices that include manual configured onboard peripherals memory and I O decode windows in PCI PCI bridges and noncompliant PCI devices Static resources are also reserved Boot Output Device Initialization function 2 Searches for and initializes any PnP PCI or AGP video devices 38 Initialize different buses and perform the following funct...

Страница 81: ...cards on page 34 If another slot of the correct size is available install the card in a different slot Hard drive The hard drive cannot be accessed or you receive a General failure reading drive C error message If a diskette is in the diskette drive eject it and restart your server by pressing the reset button Restart your server by pressing the reset button Turn off your server then remove all ha...

Страница 82: ...s and the information they provide Memory Memory errors were detected during server start up Open your server and make sure that the memory modules are installed correctly For instructions see Installing memory on page 31 A memory module may be defective If possible try another memory module and see if the error repeats Monitor Your server is running but there is no picture Adjust the brightness a...

Страница 83: ...hat the surge protector or UPS is connected securely to an electrical outlet turned on and working correctly One way to check this is to plug the server directly into a wall outlet bypassing the surge protector or UPS Make sure that the electrical outlet is working by plugging a working device such as a lamp into the outlet then turning it on to test the outlet Open your server and make sure that ...

Страница 84: ...CHAPTER 6 Troubleshooting 78 ...

Страница 85: ...APPENDIXA 79 Server Specifications System specifications System board specifications Environmental specifications Electronic specifications Additional specifications ...

Страница 86: ...d Operating systems Supports Windows Server 2003 all and Windows Storage Server 2003 all Certifications FCC Class A UL cUL Processor Quad 1207 pin socket F Supports as many as four AMD Opteron 8000 Series processors with 1 0 GHz Hyper Transport Bus Chipset nVIDIA nFORCE 3600 MCP55 Professional nVIDIA nFORCE 3050 IO55 NEC PCI X bridge uPD 720404 Memory Sixteen DIMM slots support from 1 GB to 64 GB ...

Страница 87: ...0 to 80 Acoustic noise Sound Pressure 58 dBA Rackmount in an idle state at typical office ambient temperature 73 4 F Sound Power 6 8 BA in an idle state at typical office ambient temperature 73 4 3 6 F Shock Operating 5 0 g 11 mSec 1 2 sine Unpackaged 25 g velocity change 136 inches sec 40 lbs to 80 lbs Packaged Non palletized free fall in height 24 inches 40 lbs to 80 lbs Vibration Unpackaged 5 H...

Страница 88: ...terrupt for that controller you must physically unplug the IDE cable from the system board Simply disabling the drive by configuring the BIOS option does not make the interrupt available ISA Interrupt Description IRQ0 8254 timer IRQ1 Keyboard controller IRQ2 Cascade for IRQ9 IRQ3 Free IRQ4 Serial port IRQ5 VGA IRQ6 Diskette controller IRQ7 Free IRQ8 Real time clock IRQ9 Generic Option for SCI IRQ1...

Страница 89: ...round 8 Power good 9 Stand by 5 V 10 12 V 11 12 V 12 3 3 V 13 3 3 V 14 12 V 15 Ground 16 DC_ON soft on off 17 Ground 18 Ground 19 Ground 20 Key 21 5 V 22 5 V 23 5 V 24 Ground Pin Signal Name 1 Ground 2 Ground 3 Ground 4 Ground 5 12 V1 6 12 V1 7 12 V2 8 12 V2 Pin Signal Name ...

Страница 90: ...7 5 V 8 GND 9 5 V 10 GND 11 No connection 12 SDA 13 HSYNC horizontal sync 14 VSYNC vertical sync 15 SCL Pin Signal Name Description 1 DCD Data Carrier Detect 2 RXDATA Receive Data 3 TXDATA Transmit Data 4 DTR Data Terminal Ready 5 GND Ground 6 DSR Data Set Ready 7 RTS Request To Send 8 CTS Clear To Send 9 RI Ring Indicate Pin Signal Name 1 Keyboard or mouse data 2 NC ...

Страница 91: ...ze and processor type visit Gateway s Support page at support gateway com The Support page also has links to additional Gateway documentation and detailed specifications for your server 3 GND 4 5 V 5 Keyboard or mouse clock 6 NC Pin Signal Name 1 5 V 2 USBn Data 3 USBn Data 4 GND Pin Signal Name 1 I2 C SCL 2 I2 C SDA 3 I2 C Alert 4 Ground 5 3 3 V Pin Signal Name ...

Страница 92: ...APPENDIX A Server Specifications 86 ...

Страница 93: ...APPENDIXB 87 BIOS Settings ...

Страница 94: ...rtup The BIOS Setup utility opens 3 Select menus and submenus to display setting information Caution Setting the wrong values in the Advanced Menu may cause the server to malfunction BIOS menu BIOS submenu Setting Value Main System Overview AMIBIOS Version Build date System ID Version Processor Type Speed Count System Memory Size System Time HH MM SS System Date DAY MM DD YYYY Advanced CPU Configu...

Страница 95: ...ence Size of Dimm B1 Size or Non Presence CPU2 Size of Dimm A0 Size or Non Presence Size of Dimm B0 Size or Non Presence Size of Dimm A1 Size or Non Presence Size of Dimm B1 Size or Non Presence CPU3 Size of Dimm A0 Size or Non Presence Size of Dimm B0 Size or Non Presence Size of Dimm A1 Size or Non Presence Size of Dimm B1 Size or Non Presence IDE Configuration OnBoard IDE Controller Disabled En...

Страница 96: ...guration sub menu IO55 SATA 1 Primary auto detected Selects IDE Configuration sub menu IO55 SATA 1 Secondary auto detected Selects IDE Configuration sub menu IO55 SATA 2 Primary auto detected Selects IDE Configuration sub menu IO55 SATA 2 Secondary auto detected Selects IDE Configuration sub menu Hard Disk Write Protect Disabled Enabled IDE Detect Time Out Sec 0 5 10 15 20 25 30 35 ATA PI 80Pin Ca...

Страница 97: ...abled Enabled OnBoard NIC3 Disabled Enabled OnBoard NIC4 Disabled Enabled OnBoard NIC PXE Function Disabled Enabled PCIX Daughter Card Option ROM Disabled Enabled GW MzBoard Option ROM Disabled Enabled Full Height Riser Slot Installed PCIe Top Slot Option ROM Disabled Enabled PCIe Middle Slot Option ROM Disabled Enabled PCI X Bottom Slot Option ROM Disabled Enabled Low Profile Riser Slot Installed...

Страница 98: ...r password User Access Level No Access View Only Limited Full Access Change User Password Set or clear User password Password Check Disabled Enabled Boot Sector Virus Protection Disabled Enabled Power Reset Switches Inhibit Disabled Enabled NMI control switch inhibit Disabled Enabled Server System Management Restore on AC Power Loss Last State Install OS Windows Other Wake on Ring Function Enabled...

Страница 99: ...abled Boot Loader Always Terminal Type ANSI VT100 VT UTF8 VT UTF8 Combo Key Support Disabled Enabled IPMI Configuration Status of BMC BMC Firmware Revision View BMC Event Log Provides data on event log Clear BMC System Event Log Disable PEF No Yes Restore on AC Power Loss Power Off Power On Last State Wake on RING function Disabled Enabled Exit Save Changes and Exit F10 Discard Changes and Exit Di...

Страница 100: ...Size Device size LBA Mode Device LBA mode Block Mode Device block mode PIO Mode Device PIO mode Async DMA Device Async DMA mode Ultra DMA Device Ultra DMA mode S M A R T Device S M A R T support Type Not Installed Auto CD DVD ARMD LBA Large Mode Disabled Auto Block Multi Sector Transfer Mode Disabled Auto PIO Mode Auto 0 1 2 3 4 DMA Mode Auto SWDMA 0 2 MWDMA 0 2 UWDMA 0 6 S M A R T Auto Disabled E...

Страница 101: ...APPENDIXC 95 Legal Information ...

Страница 102: ...ordampererating IfyoursystemisfittedwithaTVTuner cable orsatellitereceivercard makesurethattheantennaorcablesystemiselectricallygroundedtoprovidesomeprotectionagainstvoltage surgesandbuildupofstaticcharges Care during use Donotwalkonthepowercordorallowanythingtorestonit Donotspillanythingonthesystem SomeproductshaveareplaceableCMOSbatteryonthesystemboard ThereisadangerofexplosioniftheCMOSbatteryis...

Страница 103: ...etwork thetelephonecompanywillnotifyyouinadvancethattemporarydiscontinuanceofservicemayberequired Thetelephonecompanymay requestthatyoudisconnecttheequipmentuntiltheproblemisresolved Thetelephonecompanymaymakechangesinitsfacilities equipment operations orproceduresthatcouldaffecttheoperationofthisequipment Ifthishappens thetelephonecompanywill provideadvancenoticeinorderforyoutomakenecessarymodifi...

Страница 104: ...nctions maygivethetelecommunicationscompanycausetorequesttheusertodisconnecttheequipment Usersshouldmakesure fortheirownprotection thattheelectricalgroundconnectionsofthepowerutility telephonelines andinternalmetallicwaterpipesystem ifpresent areconnected together Thisprecautionmaybeparticularlyimportantinruralareas TheRingerEquivalenceNumber REN assignedtoeachterminaldeviceprovidesanindicationoft...

Страница 105: ...erandouterpackaging includingshippingcontainers thisproductwasdeliveredin andbydisposingoforrecyclingusedbatteriesproperly Withyourhelp wecanreducetheamountofnaturalresourcesneededtoproduceelectricalandelectronicequipment minimizetheuseoflandfillsforthedisposalof endoflife products andgenerallyimproveourqualityoflifebyensuringthatpotentiallyhazardoussubstancesarenotreleasedintotheenvironmentandare...

Страница 106: ...APPENDIX C Legal Information 100 ...

Страница 107: ...kette drive 5 IDE 5 power 5 RJ 45 5 USB 2 video 2 control panel replacing 50 standard 2 control panel connector 5 cover panels removing 25 D DDR SDRAM see memory device drivers installing 20 Device Initialization Manager see DIM diagnostic LEDs 69 ACPI runtime checkpoints 74 bootblock initialization code checkpoints 72 bootblock recovery code checkpoints 73 DIM code checkpoints 74 POST code checkp...

Страница 108: ...utility 54 maintenance cleaning 16 cleaning case 16 cleaning keyboard 16 cleaning screen 17 Gateway Systems Manager 17 general guidelines 16 recording BIOS configuration 17 master boot record 76 memory installing 31 location 5 map 81 troubleshooting 76 messages 63 monitor cleaning 17 troubleshooting 76 motherboard see system board N NMI 67 non maskable interrupt 2 67 O opening case 25 operating sy...

Страница 109: ...ctricity 24 supervisor password see administrator password support telephone 9 surge protector 12 system 80 administration 17 control 17 ID indicator 2 19 interrupts 82 management 17 security 18 specifications 80 startup 13 system board components 5 connectors 5 installing 50 replacing 50 specifications 80 system board LEDs 8 76 system configuration protecting with passwords 18 system fans install...

Страница 110: ...Contents 104 ...

Страница 111: ......

Страница 112: ...A MAN E 9722R USR R0 02 07 ...

Отзывы: