background image

14 | Gates Corporation

OPERATING INSTRUCTIONS

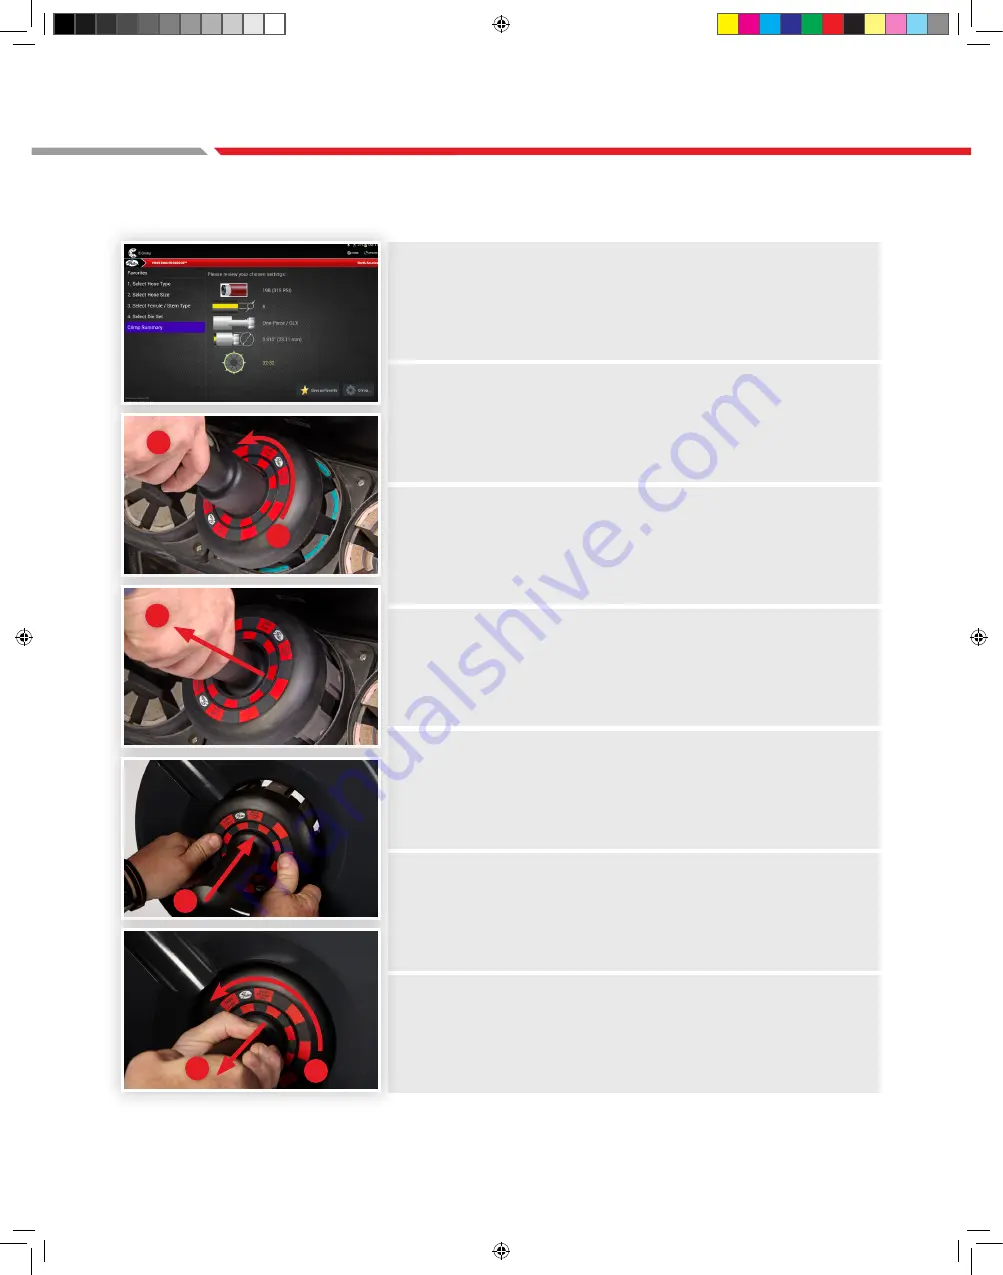
LOAD CRIMPER DIES

Review eCrimp Summary

The eCrimp application indicated the correct die set to be used for 
the specified hose/coupling combination.

Locate Correct Die Set

This may be in the optional stand, or in the die container.

Load Die Set

Load Die Set with Gates Quick Change Tool (QCT).

Align Dies

Align die finger dovetails, between the die retention plates, with die 
shoe receptacles in crimper head.

Insert QCT

Insert the QCT until it bottoms out on the die shoe surface. The die 
is then set (red aligns with black on decal).

Twist QCT

Release the QCT by pushing the handle in to disengage dies, then 
twisting to the left, or counterclockwise, until die fingers are 
disengaged. (Red aligns with red on decal)

Withdraw QCT

1

2

3

4

5

6

GC32TSi Safety and Operating Manual-A4.indd   14

1/11/17   12:37 PM

Содержание GC32TSi

Страница 1: ...1 GC32TSi SAFETY AND OPERATION MANUAL GC32TSi CRIMPER SAFETY AND OPERATION MANUAL GC32TSI Product Number 7480 7004 Part Number 78827...

Страница 2: ...16 seconds PHYSICAL Dimensions Plan inch x inch x Height inch 27 x 20 x 30 Weight Without Dies Oil lbs 660 lbs 295 kg Shipping Space 47 120 cubic inches Shipping Weight 787 lbs 358 kg Crate Size Plan...

Страница 3: ...10 Verify Crimp 12 Hose Preparation 13 Load Crimper Dies 14 Crimp Aasembly 15 Unload Die Set 17 Calibration 17 Periodic Maintenance 18 Lubrication 18 Torque Bolts 18 Foam Filler Pads 18 Check Oil Lev...

Страница 4: ...ies Hose assembly equipment crimpers Hoses and fittings from one manufacturer should not generally be assembled with the equipment of another manufacturer NOTE Gates recommends only those hose and cou...

Страница 5: ...o suit hose feed method i e bench fed or hand fed If hose is hand fed the bottom of the hose should be level with the operator s elbows when standing upright Operator should have a straight back durin...

Страница 6: ...oot Pedal Quick Change Tool Hydraulic Oil in reservoir Air Breather must be fitted at customers location Stand dies and rack are ordered separately CALIBRATION TOOL TUNGSTEN DISULPHIDE GREASE QUICK CH...

Страница 7: ...tional crimper stand if using The crimper stand MUST be secured to the floor STORE AND INSTALL DIE SETS Using the Quick Change Tool QCT load dies into the front and or back of stand in optional rack o...

Страница 8: ...pprox 15 degrees retighten the handle Remove control box power cord Position the first sling between the control box and the electric motor as per the photo so that the straps clear the control box En...

Страница 9: ...ench drill four holes aligning with holes in crimper and bolt together Remove the slings and store Oil reservoir is shipped full Remove plug and replace with breather cap store plug Always ship crimpe...

Страница 10: ...mper can also be activated by using a foot pedal The protective metal case surrounding the pedal will avoid accidental activation Install foot pedal by plugging it into the lower right side of control...

Страница 11: ...r supply Turn the power switch on The power switch can be found on the right of the control box TURN CONTROL PANEL ON The switch is located at the top left corner of the panel NOTE Power must be turne...

Страница 12: ...saved E Crimp favorite folder G2 In the G2 folder we have loaded 8G2 8G hose assembly This assembly will also be used to qualify the calibration of the machine This selection has a final COD of 1 050...

Страница 13: ...ge Position has been reached and the new die set can be inserted Load correct Die Set in the machine using the QCT then press Done Ready to Crimp will be displayed Place the G2 assembly as detailed in...

Страница 14: ...l crimp diameter not be within specified crimp tolerance the assembly MUST be discarded If the machine is not crimping product accurately it may need to be recalibrated Refer to the calibration proced...

Страница 15: ...amp stem in vise jaws on hex portion and push hose onto stem until locking collar bottoms out against hose Hose should be flush against stem shoulder 4 Hose and coupling are now ready for crimping IF...

Страница 16: ...Change Tool QCT Align Dies Align die finger dovetails between the die retention plates with die shoe receptacles in crimper head Insert QCT Insert the QCT until it bottoms out on the die shoe surface...

Страница 17: ...et and the correct dies are loaded in the crimper Select Crimper Application Insert Assembly Into Crimper Head You may need to press and hold the yellow retract button to ensure sufficient clearance f...

Страница 18: ...htly on the hose assembly That ensures the ferrule locking collar is properly located over the stem locking collar Crimper will close to the position corresponding to the settings chosen Once it reach...

Страница 19: ...CT Twist the QCT clockwise until die fingers are engaged and withdraw QCT This will pull the die fingers out of the crimper head Place Dies Place die fingers back into storage receptacle and press dow...

Страница 20: ...Tungsten Disulphide grease If cone becomes shiny use a brush to apply a tablespoon of fresh Tungsten Disulphide grease around the cone The machine comes with Tungsten Disulphide grease which is far m...

Страница 21: ...itions change oil every 300 hours of use Change the filter every time you change the oil PN 7482 7196 Remove cap using a wrench to loosen Drain clean and refill reservoir per pump operating instructio...

Страница 22: ...20 Gates Corporation TOOLING 8 12 16 11 29 18 5 6 13 14 15 7 10 9 2 3 4 17 1 19 Figure 4 Exploded View items in table below GC32TSi Safety and Operating Manual A4 indd 20 1 11 17 12 37 PM...

Страница 23: ...82 7104 78836 9 Control Box Assembly 7482 7234 78994 10 Touch Screen 7482 7235 78995 11 Head Replacement 7482 7236 78996 12 Die Retention Kit 7482 7237 78997 13 Linear Potentiometer 75MM 7482 7238 789...

Страница 24: ...below to help restore equipment to proper operating standards Refer to troubleshooting guide This is included on the panel and also available from the Gates website CONTROL INDICATOR Crimp Retract Slo...

Страница 25: ...pencil Verifies the squareness of cut Insert the hose into its proper slot indicated by dash size push it all the way in Check for square cut maximum allowable angle of cut is five degrees Mark the in...

Страница 26: ...w the exclusion of incidental or consequential damages and some states do not allow limitation on how long an implied warranty lasts so the above limitation and exclusions may not apply to you This wa...

Страница 27: ......

Страница 28: ...2 GC32TSi SAFETY AND OPERATION MANUAL GC32TSI Product Number 7480 7004 Part Number 78827 GATES COM...

Отзывы: