background image

TEST FIRING HEATER

Test fire heater, following the lighting instructions on heater post.  Leak test all gas connections with soapy water.  Soap 
bubbles indicate gas leakage. 

DO NOT use a match to test for gas leaks.

WARNING: White smoke may appear around the radiant head during the first minute of the initial firing.

TROUBLE SHOOTING

Problem

Possible Causes

Solution

Main burner 
won’t light

No gas

Replace cylinder

Low gas pressure

Replace cylinder

Blockage in orifice

Remove blockage

Manual valve not in ‘LOW’ or ‘HIGH’ position

Position to ‘HIGH’

Exposure to rain

Remove emitter and clean burner ports

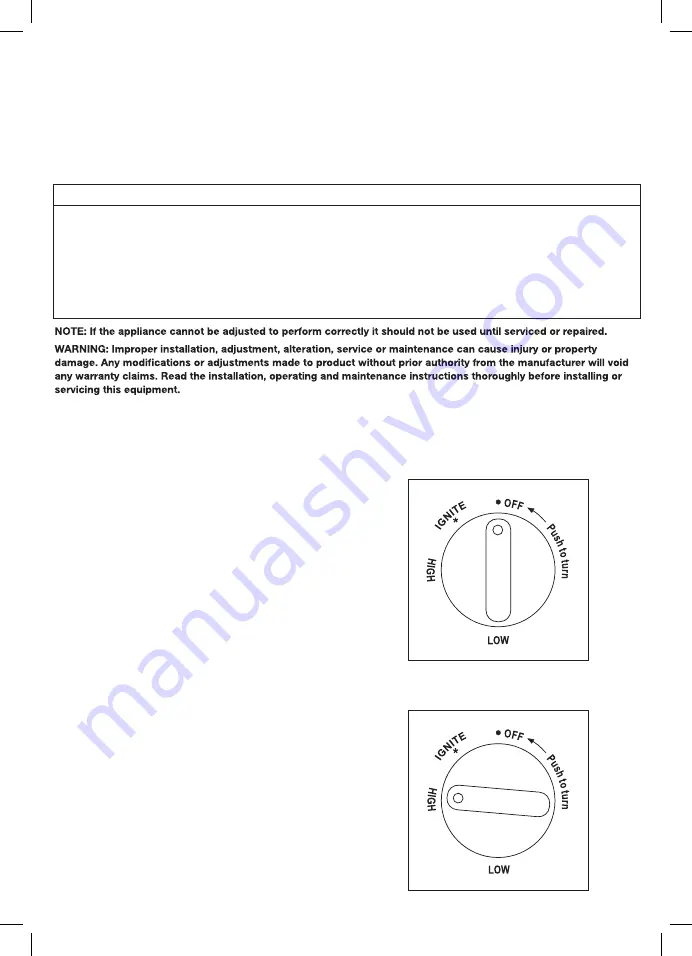
LIGHTING INSTRUCTIONS

WARNING: White smoke may appear around the radiant 
head during the first minutes of the initial firing.
1.   Ensure that the control knob is off.  Slowly open the 

gas cylinder valve.

2.   Push in control knob and turn anti-clockwise to ‘HIGH’
3.   Check for flame at the burner. If burner does not light 

immediately turn control knob to ‘OFF’ position and 
try again from the start. Allow 30 seconds between 
ignition attempts for gas to dissipate. Several attempts 
may be necessary.


Failure to follow this lighting procedure may result 
in flame roll out beyond the emitter grid.

4.   With the burner alight keep control knob depressed for 

15 seconds.

5.   For minimum heat push in and turn the control knob to 

‘LOW’.

6.   To turn heater off, turn the control knob to ‘OFF’.

7

Содержание PH7057

Страница 1: ...mage Read the instructions thoroughly before installing or servicing this equipment FOR OUTDOOR USE ONLY PROPANE GAS Model No PH7056 PH7057 The ideal solution for extending the outdoor entertaining season Direct ignition Maximum output 40MJ h Adjustable heat output Includes wheels Operates for approximately 9 hours on a properly filled 9Kg propane cylinder Includes a safety tip over switch that ha...

Страница 2: ...sed on the heater should be of a non combustible and non corrosive nature f The stainless steel emitter normally does not require cleaning and should NEVER be painted Important Safety Rules This appliance must only be used in a well ventilated area 1 This appliance shall not be installed or used indoors in buildings garages or any other enclosed area 2 DO NOT place articles on or against this appl...

Страница 3: ... be stored indoors the propane cylinder and the heater must be disconnected and the cylinder stored in accordance with the Standard for Storage and Handling of Liquefied Gases 13 The patio heater has been designed with several safety features which include a tip over switch NOTE The plastic container in the base must be filled with sand before use Any modification to the heater not described in th...

Страница 4: ...om Combustible Surfaces Combustible materials are considered to be wood compressed paper plant fibres plastic or other materials that are capable of being ignited and burned 2130mm Hose connection point 1600mm 460mm Cylinder cover Burner head assembly 860mm ...

Страница 5: ...e the 3 parts of reflector segments to overlap together and attach with 3 screws washers and nuts STEP 2 Place round part of reflector over the 3 segments and attach with 6 screws washers and nuts REFLECTOR ASSEMBLY ...

Страница 6: ...tuds to the burner head assembly STEP 4 Feed the hose down the post Secure the burner head assembly to the post using the 4 bolts and washers STEP 5 Connect the regulator to the hose and tighten using 2 spanners STEP 6 Connect the regulator to a gas cylinder and leak test the hose connection then attach the burner head to the post with 4 screws STEP 7 Place 3 washers onto the reflector mounting st...

Страница 7: ...lean burner ports LIGHTING INSTRUCTIONS WARNING White smoke may appear around the radiant head during the first minutes of the initial firing 1 Ensure that the control knob is off Slowly open the gas cylinder valve 2 Push in control knob and turn anti clockwise to HIGH 3 Check for flame at the burner If burner does not light immediately turn control knob to OFF position and try again from the star...

Страница 8: ...ening at ground level and no overhead cover see Example 1 Within a partial enclosure that includes an overhead cover and no more than two walls see Example 2 3 Within a partial enclosure that includes an overhead cover and more than two walls the following will apply At least 25 of the total wall area is completely open and at least 30 of the remaining wall area is open and unrestricted In the cas...

Отзывы: