Important Information
Please read this instructions fully before
using the appliance
Assembly time: approx. 45 mins.
Retain these instructions for future reference.
Use outdoors only.
Do not use the gas smoker or store gas bottles
below ground level. LP gas is heavier than air so
if a leak occurs the gas will collect at a low level
and could ignite in the presence of a flame or
spark.
For use with LPG bottled gas only. A suitable
regulator must be used for butane, propane or
mixes.
Remove plastic wrap from any part before
lighting.
Do not use within 1m of any flammable structure
or surface. Do not use under any combustible
surface.
LP gas cylinders should never be placed directly
underneath the gas smoker.
LP gas cylinders should never be stored or used
in the horizontal position. A leak would be very
serious and liquid could enter the gas line with
serious result.
Never store gas bottles indoors.
Do not move the appliance during use.
Open the gas smoker hood before lighting.
Do not move the gas smoker until it has
completely cooled after use.
This gas smoker must not be left unattended
when lit.
The hood handle can become very hot. Grip only
the centre of the handle. Always use oven gloves
when cooking or carrying out any adjustments to
the gas smoker.
Use purpose designed gas smoker tools with long
and heat resistant handles.
Use caution when opening the hood, as hot
steam inside is released upon opening.
Warning: accessible parts may be very hot. Keep
young children away.
Turn off the gas supply at the gas cylinder after
use.
Never cover a gas smoker until it has completely
cooled.
Use this gas smoker only on a stable and flat
surface.
Before use this gas smoker, perform a leak test.
This is the only safe and sure way to detect any
gas leaking from joints and connections of the gas
smoker after assembly.
Leak test annually, and whenever the gas bottle is
removed or replaced.
Do not store flammable materials near this gas
smoker.
Do not use aerosols near this gas smoker.
Failure to follow the manual’s instructions could
result in serious injury or damage.
Do not modify the appliance. Modification of this
gas smoker may be dangerous, is not permitted
and will nullify any warranty.
This appliance must be kept away from flammable
materials during use.
All the parts sealed by the manufactured or his
agent shall not be manipulated by the user.
If you have any queries regarding these
instructions, contact your local dealer.
Gas and Regulator
This gas smoker is for use with NZ LPG only. LPG
bottles, will supply gas all year round, even on cold
winter days. A spanner may be required to change
gas bottles.
The hose should hang freely with no bends,
twisting, tension, folds, or kinks that could obstruct
free flow of gas. Always inspect the hose for cuts,
cracks, or excessive wear before use.
Apart from the connection point, no part of the
hose should touch any hot gas smoker parts. If
the hose shows any sign of damage it must be
replaced with an Approved hose suitable for use
with LP gas.
Never mount the gas bottle under the gas smoker on
the base shelf as this could result in serious injury to
the user, other people and/or property.
Always place
the gas bottle at the side of the appliance. The
gas bottle should be sited as far away from the
appliance as possible without straining the hose.
This appliance is only suitable for use with LPG and
fitted with the appropriate low-pressure regulator via
a flexible hose. Please consult your dealer for
information regarding a suitable regulator and hose if
a replacement is needed.
9
Содержание KS18784
Страница 4: ...3 4 4x AA AA 1 2 2 3 4...
Страница 5: ...5 6 8x 5 5 2 AA AA B 13 2 B DD BB 8 x 8 x DD 5 13...
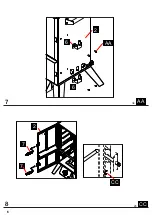
Страница 6: ...7 8 4x 6 6 2 AA AA 7 2 7 CC CC 2x 6...
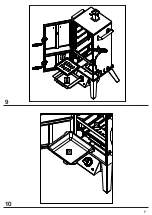
Страница 7: ...9 10 9 2 10 11 7...
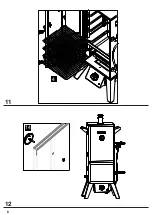
Страница 8: ...11 12 4 14 8...


