


© ANITA
MP03100EN_180912
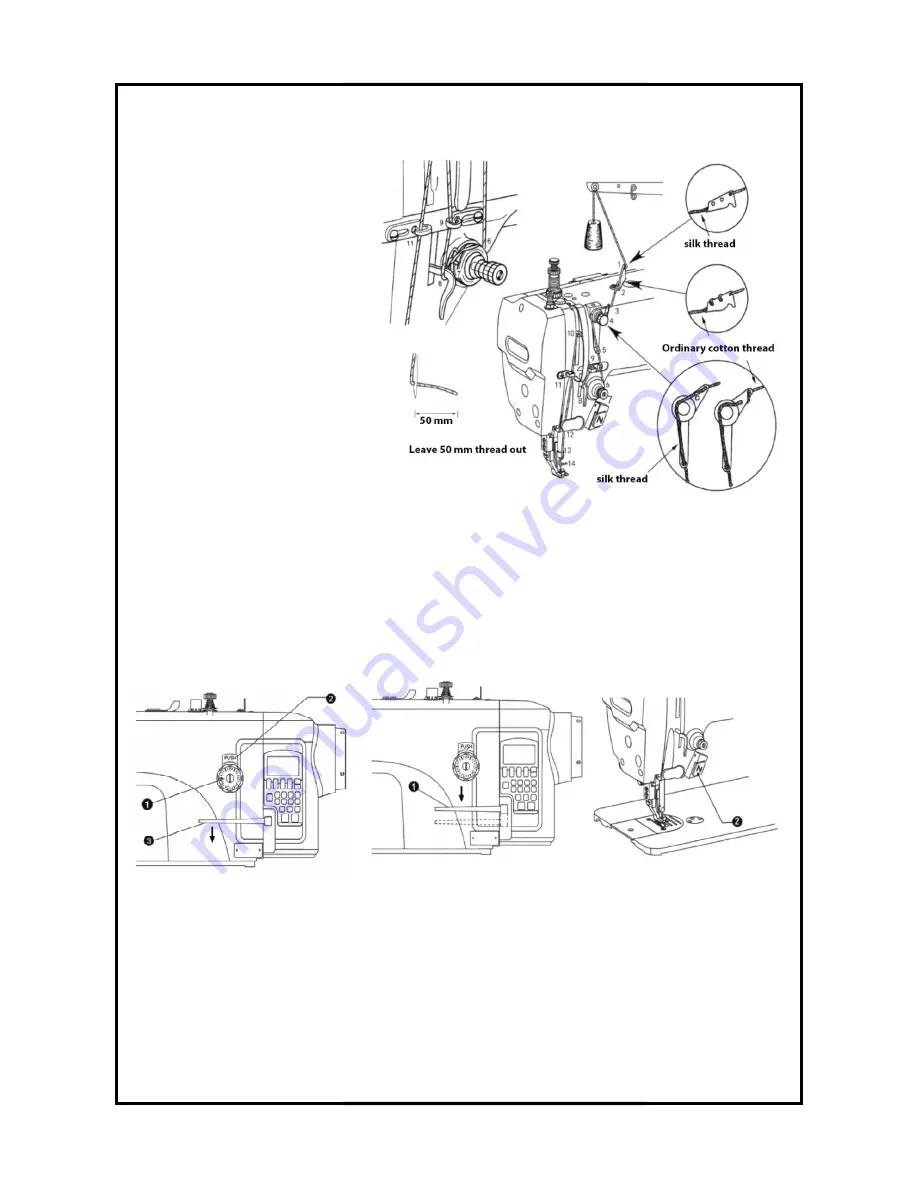
15. THREADING UPPER THREA
Before wear line please let take-
lever rose to the highest position,
so easy to thread and can prevent
the start sewing line fall from the
pinhole. See Fig. (12).
16. ADJUST THE STITCH LE
Push the button (2) of needle gauge, rotate the dial (1). Make sure the number (2) on the dial (1)
align to the vertical line of the button.
* The greater the number. the bigger the stitch length.
* Please put the reverse spanner (3) down at the half place when the NO
big to small. It will be much easier.
17. STITCHING AND REVERS
Press the power button.
Push the pedal down and begin to sew.
During the process of normal sewing, when you
reverse button (2), the machine will begin to back stitch. When you lose it, the machine will feed
normally. See Fig. (14).
Figure 14
HREADING UPPER THREAD
-up,
lever rose to the highest position,
so easy to thread and can prevent
the start sewing line fall from the
ADJUST THE STITCH LENGTH
Push the button (2) of needle gauge, rotate the dial (1). Make sure the number (2) on the dial (1)
align to the vertical line of the button. See Fig. (13).
* The greater the number. the bigger the stitch length.
e put the reverse spanner (3) down at the half place when the NO on the dial (1) turns from
big to small. It will be much easier.
STITCHING AND REVERSE STITCHING
Push the pedal down and begin to sew.
of normal sewing, when you press the reverse spanner (1) or press the auto
reverse button (2), the machine will begin to back stitch. When you lose it, the machine will feed
Figure 12
Figure 13
13
Push the button (2) of needle gauge, rotate the dial (1). Make sure the number (2) on the dial (1)
on the dial (1) turns from
press the reverse spanner (1) or press the auto-
reverse button (2), the machine will begin to back stitch. When you lose it, the machine will feed
www.garudan.cz
Содержание GF-3131-447 MH
Страница 31: ...MP03100EN_180625 A ARM MECHANISM 1 2 ANITA 2 ANITA 4 w w w g a r u d a n c z...
Страница 33: ...MP03100EN_180625 A ARM MECHANISM 2 2 ANITA 2 ANITA 6 w w w g a r u d a n c z...
Страница 37: ...MP03100EN_180625 B NEEDLE BAR AND THREAD TAKE ANITA EAD TAKE UP MECHANISM 2 2 ANITA 10 w w w g a r u d a n c z...
Страница 39: ...MP03100EN_180625 C FEED MECHANISM COMPONENTS ANITA OMPONENTS 1 2 ANITA 12 w w w g a r u d a n c z...
Страница 41: ...MP03100EN_180625 C FEED MECHANISM COMPONENTS ANITA OMPONENTS 2 2 ANITA 14 w w w g a r u d a n c z...
Страница 43: ...MP03100EN_180625 D FEED MECHANISM 1 2 ANITA 1 2 ANITA 16 w w w g a r u d a n c z...
Страница 45: ...MP03100EN_180625 D FEED MECHANISM 2 2 ANITA 2 2 ANITA 18 w w w g a r u d a n c z...
Страница 47: ...MP03100EN_180625 E PRESSER FOOT MECHANISM ANITA ECHANISM ANITA 20 w w w g a r u d a n c z...
Страница 49: ...MP03100EN_180625 F ROTARY HOOK MECHANISM ANITA ECHANISM ANITA 22 w w w g a r u d a n c z...
Страница 51: ...MP03100EN_180625 G THREAD TRIMMER MECHANISM ANITA ECHANISM 1 2 ANITA 24 w w w g a r u d a n c z...
Страница 53: ...MP03100EN_180625 G THREAD TRIMMER MECHANISM ANITA ECHANISM 2 2 ANITA 26 w w w g a r u d a n c z...
Страница 55: ...MP03100EN_180625 H LUBRICATION ANITA ANITA 28 w w w g a r u d a n c z...
Страница 57: ...MP03100EN_180625 I REVERSE FEED COMPONENTS ANITA OMPONENTS ANITA 30 w w w g a r u d a n c z...
Страница 59: ...MP03100EN_180625 J INBUILT FOOT LIFT STRUCTURE ANITA RUCTURE ANITA 32 w w w g a r u d a n c z...
Страница 61: ...MP03100EN_180625 K IMPACT CONTROLLER SYST ANITA PACT CONTROLLER SYSTEM ANITA 34 w w w g a r u d a n c z...
Страница 63: ...MP03100EN_180625 L ACCESSORIES ANITA ANITA 36 w w w g a r u d a n c z...