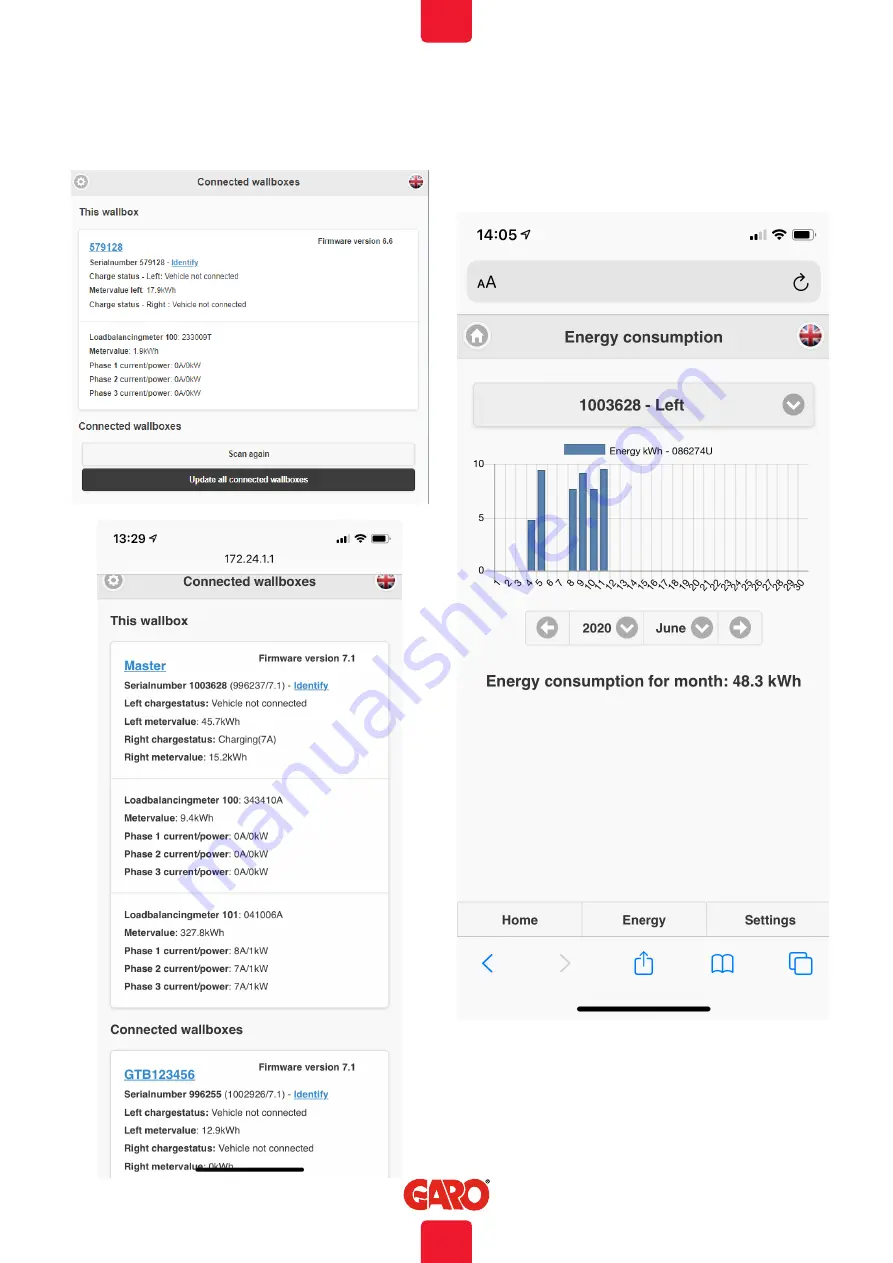
Show connected GTB Twinboxes
Energy information
Information for consumed energy for each side of the GTB
USER MANUAL
26
EN
Страница 1: ...GARO Twinbox GTB Box 203 SE 335 25 Gnosj Phone 46 0 370 33 28 00 info garo se garo se Manual 380231 Assembly instructions End User Instruction EN GARO AB EN...
Страница 2: ...connected in a grid 15 LAN connection via RJ45 17 Electrical diagram 18 USER MANUAL 21 Normal use Charging 21 Resetting Conditioning of RCCB 22 Connecting to GTB Twinbox Wifi access point AP 23 Web in...
Страница 3: ...ey are provided with supervision or prior instruction in how to use the equipment by the person responsible for their safety The GTB Twinbox range of charging stations is designed exclusively for char...
Страница 4: ...ean dry cloth to remove accumulation of dirt and dust Be careful not to damage the circuit boards or components during installation Refer to local standards and regulations not to exceed charging curr...
Страница 5: ...INFORMATION Content GTB Twinbox GARO Twinbox GTB Box 203 SE 335 25 Gnosj Phone 46 0 370 33 28 00 info garo se garo se Manual 380231 Quick start SE GARO AB SE Manual 3X 3X Nycklar 5 EN...
Страница 6: ...1 phase models use L1 for left hand side outlet and L2 for right hand side outlet 1 Select suitable group fuse and cable dimension for the electrical installation Make sure to consider the cable lengt...
Страница 7: ...m 20mm distance between the wall and the GTB Twinbox to ensure correct cooling see picture 3 When GTB twinbox is installed on a pole the holes at the back side of the GTB Twinbox should be covered clo...
Страница 8: ...llation Note it is ok to set different value for left and right hand side SW2 on CC1 controls left hand side and SW2 on CC2 controls right hand side Dip switch SW2 is located at bottom left hand side...
Страница 9: ...device PC Tablet Mobile to the GTB Twinbox Wifi network You find SSID and password on a label inside the front door Type in 172 24 1 1 in your web browser and check that the GTB web interface is visi...
Страница 10: ...ed The cable is connected to terminals on CC2 see picture 11 remote control Enable of the GTB Twinbox can be done in two ways 1 Enable by open circuit default from factory 2 Enable by closed circuit T...
Страница 11: ...ON OFF ON OFF ON OFF ON OFF ON OFF ON OFF 3 3 3 3 3 3 3 2 2 2 2 2 2 2 1 1 1 1 1 1 1 16 A 20 A 25 A 32 A 40 A 50 A 63 A bild 12 Dynamic Load Management DLM for Stand Alone GTB Twinbox DLM reduces char...
Страница 12: ...current transformer Garo GNM3T LP RS485 Note the energy meter s Modbus address must be set to 100 and 101 for a 2nd e meter The energy meter meters continually measures the total energy consumption fo...
Страница 13: ...inbox in the grid should be end terminated and this is set by SW1 Dip 6 on CC2 picture 14 Schematic image with Twinbox placed in the center of the cluster Settings explanation of Dip 5 6 on SW1 CC2 ta...
Страница 14: ...l power to the GTB twinbox 2 Assembly the RFID readers according picture 15 17 Note Both DIP switches should set to ON on both RFID readers see picture 18 A wifi module needs to be installed to the Ma...
Страница 15: ...SW1 Dip 5 on CC2 First and last GTB Twinbox in the grid should be end terminated and this is set by SW1 Dip 6 on CC2 see picture 20 21 Note All GTB Twinboxes must be powered on after the physical inst...
Страница 16: ...ON OFF ON OFF ON OFF ON OFF 6 6 6 6 5 5 5 5 MASTER SLAVE SLAVE SLAVE End term End term Schematic image with Twinbox placed in the center of the cluster INSTALLATION OF STANDALONE GTB TWINBOX SW1 CC2...
Страница 17: ...stalled wifi module It is possible to connect the GTB Twinbox to a LAN via the RJ45 port on the wifi module Default settings is DHCP More options are available in the web interface 660 377 206 Dimensi...
Страница 18: ...P2 Energymeter Right Outlet FB1 RCCB Left Outlet FB2 RCCB Right Outlet FC1 Fuse Left Outlet FC2 Fuse Right Outlet QA1 Contactor Left Outlet QA2 Contactor Right Outlet XN1 N Neutral terminal XPE1 PE T...
Страница 19: ...FB1 40A N 6 2 4 1 3 mA 30 L3 L2 L1 N PE X1 2 1 6 4 5 3 8 7 A1 A2 QA1 2 1 6 4 5 3 8 7 A1 A2 QA2 CT2 CT1 CP PP L1 L2 L3 PE N XD2 CP PP L1 L2 L3 PE N XD1 CT1 CT2 XPE1 XN1 PP 2 CP 2 Red White PP 1 CP 1 Re...
Страница 20: ...PE A B Remote control A B ON SW2 1 2 3 4 5 6 ON E Meter Datalink Fuse 1 blue brown 2 blue red 3 blue yellow 4 blue green 5 white 6 red Connector for WLAN Card CP 2 PP 2 CT2 CP 1 PP 1 CT1 FC1 FC2 XN1 X...
Страница 21: ...ing label When both sides are in use the GTB Twinbox will balance the load equally between both sides In cases where the required power exceeds the available power to the Twinbox the left hand side is...
Страница 22: ...essing the test button every 6 month Procedure to reset condition 1 Disconnect the EV from the Twinbox 2 Open the front door 3 Reset the RCCB B Conditioning means that first press the test button A an...
Страница 23: ...x below for future reference 3 Identify the wallbox s SSID name in the wireless network display on your phone tablet or computer see picture 23 Connect to the Twinbox wireless network and enter the pa...
Страница 24: ...cal network you should use the url chargebox garo se in your web browser Your mobil device needs to be connected to same network as the GTB Twinbox DLM settings Dynamic Load Management require externa...
Страница 25: ...Example of information for left and right hand side USER MANUAL 25 EN...
Страница 26: ...Show connected GTB Twinboxes Energy information Information for consumed energy for each side of the GTB USER MANUAL 26 EN...
Страница 27: ...that need to use the available Ampere in your electrical installation Sauna etc It will prevent overload of your mains fuses require installed external energy meter When one or two external energy met...
Страница 28: ...o the vehicles to avoid overload of the available Ampere power In cases of multiple GTB Twinboxes connected in a grid DLM settings for each box is visible in this meny By choosing to not activate DLM...
Страница 29: ...n in the interface Press save When RFID check is activated you need to hold an active RFID tag against the RFID reader to activate the charging process A ticking sound will indicate that the GTB is wa...
Страница 30: ...connected to same network as the GTB Twinbox Connect GTB Twinbox to a local network via Wi Fi The GTB Twinbox will attempt to connect to the specified Wi Fi network If the data entered is incorrect or...
Страница 31: ...nnected to internet via a local network wifi or ethernet klick on Check for updates and follow the instructions When multiple GTB Twinbox is connected in a grid update for all units can perform at sam...
Страница 32: ...nd cleaning the GTB Twinbox with a soft dry cloth Never use abrasive pads or detergents The RCCB needs to be conditioned every 6 month Please see section Resetting Conditioning of RCCB Technical speci...
Страница 33: ...tivated in web interface or Scheduled charging not active Fast flashing white Indentification signal Error indications Error type Action Solid yellow Charging cable error Check the charging cable Flas...
Страница 34: ...communication with energy meter is up and running Flashing red blue Firmware update in progress Wait for the update process to complete GLB Twin ljud signaler Up beat tone RFID tag is accepted author...
Страница 35: ...GARO AB Box 203 SE 335 25 Gnosj Phone 46 0 370 33 28 00 info garo se garo se EN...