vívosmart
®
Owner's Manual
Introduction
WARNING
See the
Important Safety and Product Information
guide in the
product box for product warnings and other important
information.
Always consult your physician before you begin or modify any
exercise program.
Getting Started
Before you can use the vívosmart device, you must set up the
device on your compatible mobile device or computer.
Select an option:
• Set up the device on your mobile device (
).
• Set up the device on your computer (
).
Mobile Setup
Before you can pair your vívosmart device with your mobile
device, your mobile device must support Bluetooth
®
Smart
compatibility information.
You can use the Garmin Connect
™
Mobile app to pair your
vívosmart device and complete the setup process. This allows
you to share and analyze data and download software updates
from your mobile device.
NOTE:
Unlike other Bluetooth devices that are paired from the
Bluetooth settings on your mobile device, your vívosmart device
must be paired directly through the Garmin Connect Mobile app.
1
Connect the charging clip securely to the device (
2
Plug the USB cable into a power source.
The device turns on and
appears.
3
Go to
www.GarminConnect.com/vivosmart
on your mobile
browser.
4
Install and open the Garmin Connect Mobile app.
5
Follow the instructions on your mobile device to pair your
vívosmart device and complete the setup process.
NOTE:
You can pair your vívosmart device with a different
mobile device after completing the initial setup (
Mobile Device with Your vívosmart Device
Computer Setup
1
Connect the charging clip securely to the device (
2
Plug the USB cable into a USB port on your computer.
The device turns on and
appears.
3
Hold
on the touchscreen until you see
.
4
Go to
www.GarminConnect.com/vivosmart
.
5
Download and install the Garmin Express
™
setup software:
• If you are using a Windows
®
operating system, select
Download for Windows
.
• If you are using a Mac
®
operating system, select
Download for Mac
.
6
Follow the instructions on your computer to pair your
vívosmart device and complete the setup process.
Charging the Device
WARNING
This device contains a lithium-ion battery. See the
Important
Safety and Product Information
guide in the product box for
product warnings and other important information.
NOTICE
To prevent corrosion, thoroughly dry the contacts and the
surrounding area before charging or connecting to a computer.
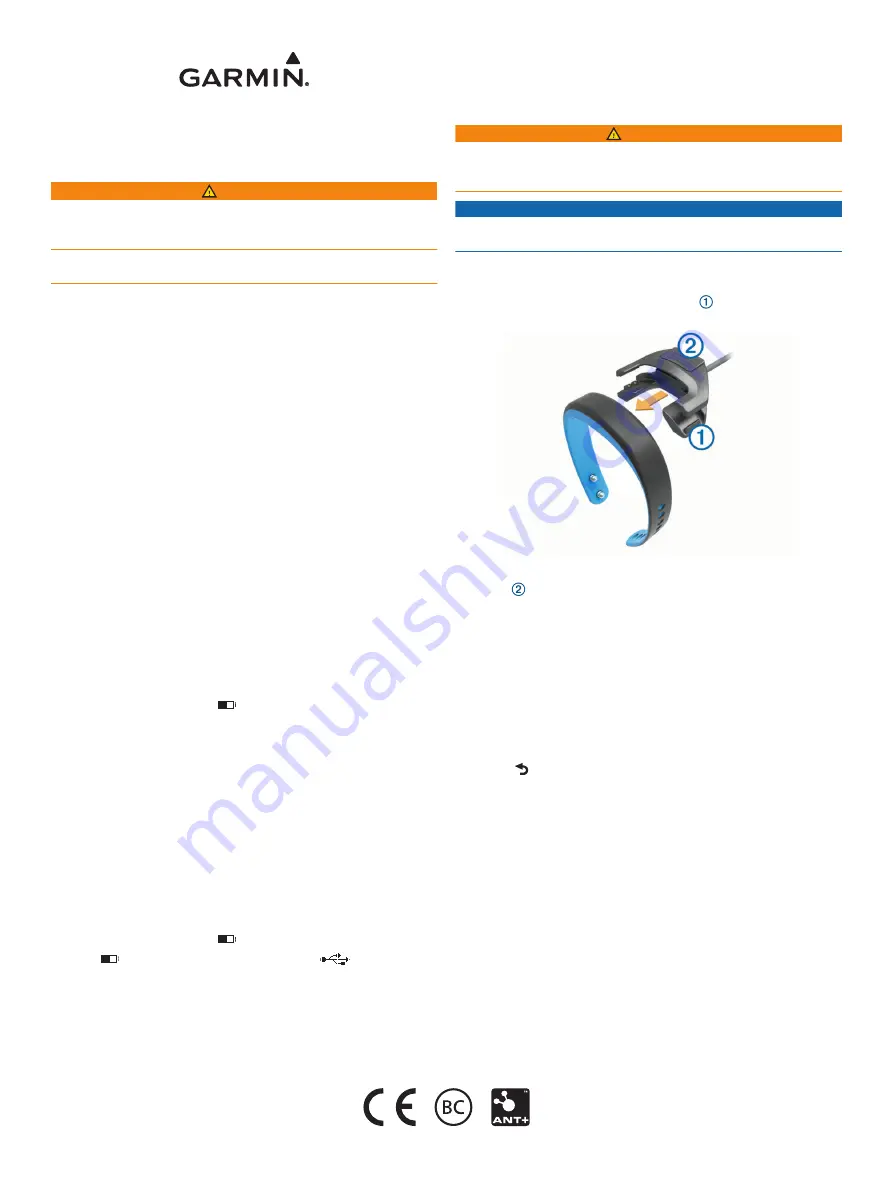
1
Plug the USB cable into a USB port on your computer.
2
Align the charger posts with the contacts on the back of the
device, and connect the charging clip securely to the
device.
3
Charge the device completely.
4
Press to remove the charger.
Using the Touchscreen
• Double tap the touchscreen to wake the device.
NOTE:
The screen turns off when not in use. When the
screen is off, the device is still active and recording data.
• Hold the touchscreen to view the menu.
• Swipe left or right to scroll through the device features and
menu options.
• Tap the touchscreen to make a selection.
• Select to dismiss a notification or return to the previous
screen.
• Make each touchscreen selection a separate action.
Wearing the Device
The device can be worn on your left or right wrist. By default, the
screen is oriented for your left wrist with the clasp toward the
inside of your wrist. You can customize the screen and band
orientation on your Garmin Connect account (
1
Make sure the pegs on the clasp are fully inserted into the
band.
When both pegs are fully inserted, the device fits securely
against your wrist.
2
Slide the keeper over the clasp (optional).
The keeper is a small loop designed to fit over both ends of
the band and the clasp. It provides additional security and
helps keep the band attached during rugged use.
GUID-97AD4247-7CEE-42A5-9363-A52520287566 v6
August 2020


