background image

5

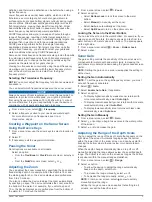
Select 

 > 

Navigate To

.

6

Select an option.

Stopping Navigation

From the Navigation chart or Fishing chart, select 

 > 

Stop 

Navigation

.

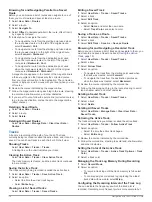
Waypoints

Waypoints are locations you record and store in the device. 

Waypoints can mark where you are, where you are going, or 

where you have been.

Marking Your Present Location as a Waypoint

From any screen, select  .

Creating a Waypoint at a Different Location

1

Select 

Waypoints

 > 

New Waypoint

.

2

Select an option:
• To create the waypoint by entering position coordinates, 

select 

Enter Coordinates

, and enter the coordinates.

• To create the waypoint using a chart, select 

Use Chart

select the location, and select  .

• To create the waypoint using a range (distance) and 

bearing, select 

Enter Range/Bearing

, and enter the 

information.

Marking and Navigating to a Man Overboard Location

From any screen, select   > 

Man Overboard

 > 

Yes

.

The device sets a direct course back to the location.

Measuring Distance on the Map

You can measure the distance between your location and 

another location.

1

Pan the map.

2

Select   > 

Measure Distance

.

The distance between the locations appears in the upper-left 

corner of the screen.

3

If necessary, select   to move the pin and measue the 

distance to another location.

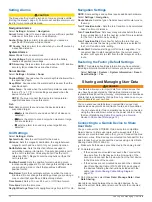
Viewing a List of all Waypoints

Select 

User Data

 > 

Waypoints

.

Editing a Saved Waypoint

1

Select 

User Data

 > 

Waypoints

.

2

Select a waypoint.

3

Select 

Edit Waypoint

.

4

Select an option:
• To add a name, select 

Name

, and enter a name.

• To change the symbol, select 

Symbol

.

• To change the depth, select 

Depth

.

• To change the water temperature, select 

Water Temp.

.

• To change the comment, select 

Comment

.

• To move the position of the waypoint, select 

Position

.

Deleting a Waypoint or an MOB

1

Select 

User Data

 > 

Waypoints

.

2

Select a waypoint or an MOB.

3

Select 

Delete

.

Deleting All Waypoints

Select 

User Data

 > 

Manage Data

 > 

Clear User Data

 > 

Waypoints

 > 

All

.

Routes

A route is a sequence of waypoints or locations that leads you to 

your final destination.

Creating and Navigating a Route Using the Map

The starting point can be your present location or another 

location on the map.

1

Select 

User Data

 > 

Routes

 > 

New

 > 

Route Using Chart

.

2

Pan the map to select the starting location of the route.

3

Select   to add a turn to the route.

4

Repeat to add all of the turns in the route.

5

Select 

 > 

Navigate To

.

6

Select an option.

Creating and Saving a Route

This procedure saves the route and all the waypoints in it. The 

starting point can be your present location or another location.

1

Select 

User Data

 > 

Routes

 > 

New

 > 

Use Chart

.

2

Select the starting location of the route.

3

Follow the onscreen instructions to add a turn.

4

If necessary, repeat step 3 to add more turns.

5

Select the final destination.

Viewing a List of Routes

Select 

User Data

 > 

Routes

.

Editing a Saved Route

You can change the name of a route or change the turns the 

route contains.

1

Select 

User Data

 > 

Routes

.

2

Select a route.

3

Select 

Edit Route

.

4

Select an option:
• To change the name, select 

Name

, and enter the name.

• To select a waypoint from the turn list, select 

Edit Turns

 > 

Use Turn List

, and select a waypoint from the list.

• To select a turn using the chart, select 

Edit Turns

 > 

Use 

Chart

, and select a location on the chart.

Browsing for and Navigating a Saved Route

Before you can browse a list of routes and navigate to one of 

them, you must create and save at least one route.

1

Select 

User Data

 > 

Routes

.

2

Select a route.

3

Select 

Navigate To

.

4

Select an option:
• To navigate the route from the starting point used when 

the route was created, select 

Forward

.

• To navigate the route from the destination point used 

when the route was created, select 

Backward

.

A magenta line appears. In the center of the magenta line is 

a thinner purple line that represents the corrected course 

from your present location to the destination. The corrected 

course is dynamic, and it moves with your boat when you are 

off course.

5

Review the course indicated by the magenta line.

6

Follow the magenta line along each leg in the route, steering 

to avoid land, shallow water, and other obstacles.

7

If you are off course, follow the purple line (corrected course) 

to go to your destination, or steer back to the magenta line 

(direct course).

Navigation with the STRIKER Vivid

9

Содержание STRIKER VIVID

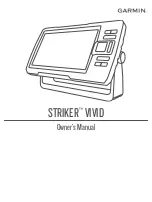
Страница 1: ...STRIKER VIVID Owner sManual ...

Страница 2: ...rmin com for current updates and supplemental information concerning the use of this product Garmin the Garmin logo and Ultrascroll are trademarks of Garmin Ltd or its subsidiaries registered in the USA and other countries ActiveCaptain Garmin ClearVü Garmin Quickdraw and STRIKER are trademarks of Garmin Ltd or its subsidiaries These trademarks may not be used without the express permission of Gar...

Страница 3: ...aypoint on the Map 8 Navigating to a Waypoint 8 Creating and Navigating a Route Using the Map 8 Stopping Navigation 9 Waypoints 9 Marking Your Present Location as a Waypoint 9 Creating a Waypoint at a Different Location 9 Marking and Navigating to a Man Overboard Location 9 Measuring Distance on the Map 9 Viewing a List of all Waypoints 9 Editing a Saved Waypoint 9 Deleting a Waypoint or an MOB 9 ...

Страница 4: ......

Страница 5: ...ns and features discussed in this manual When viewing another screen you can return to the home screen by holding You can customize the layout of the screens Zooming on the STRIKER Vivid 4 You can zoom in and out of the map Select to zoom in Select to zoom out Panning on the STRIKER Vivid 4 You can move the sonar views and maps to view an area other than your present location 1 Select or to start ...

Страница 6: ... Backlight 1 Select Settings System Display Backlight 2 Adjust the backlight TIP From any screen press repeatedly to scroll through the brightness levels This can be helpful when the brightness is so low you cannot see the screen Adjusting the Color Mode 1 Select Settings System Display Color Mode TIP Select Color Mode from any screen to access the color settings 2 Select an option Setting the Bee...

Страница 7: ...you reconnect the app to the STRIKER Vivid device the update is transferred to the device After the transfer is complete you are prompted to install the update 3 When you are prompted by the STRIKER Vivid device select an option to install the update To update the software immediately select OK To delay the update select Cancel When you are ready to install the update select ActiveCaptain Software...

Страница 8: ...f the screen From a sonar screen select Zoom Split Zoom Zoomed depth scale Zoom window Depth range Selecting the Transducer Type If you are connecting a transducer that was not included with the device you may need to set the transducer type to make the sonar function properly Before connecting the transducer you should select the transducer type The transducer name should be listed on the label o...

Страница 9: ...ce displays a magnified area from 5 to 20 m deep You also can allow the device to adjust the zoom automatically by specifying a span The device calculates the zoom area from the bottom of the water For example if you select a span of 10 m the device displays an magnified area from the bottom of the water to 10 m above the bottom 1 From a sonar screen select Zoom 2 Select an option Select Bottom Lo...

Страница 10: ...m the bottom to help define the hardness or softness of the signal A Scope Displays a vertical flasher along the right side of the screen that shows instantaneously the range to targets along a scale Fish Symbols Sets how the sonar interprets suspended targets Turning on the A Scope The a scope is a vertical flasher along the right side of the full screen sonar view This feature expands the most r...

Страница 11: ...r depth and your GPS position 1 Select Quickdraw Map Quickdraw Contours Start Recording 2 When recording is complete select Quickdraw Contours Stop Recording Adding a Label to a Garmin Quickdraw Contours Map You can add labels to a Garmin Quickdraw Contours map to mark hazards or points of interest 1 From the Quickdraw Map select a location 2 Select Add Quickdraw Label 3 Enter text for the label a...

Страница 12: ... indicates poor depth or GPS position and a speed above 32 km h 20 mph Depth Range Shading You can set color ranges on your map to show the water depths where your target fish are currently biting You can set deeper ranges to monitor how quickly the bottom depth changes within a specific depth range You can create up to ten depth ranges For inland fishing a maximum of five depth ranges can help re...

Страница 13: ...ng point can be your present location or another location on the map 1 Select User Data Routes New Route Using Chart 2 Pan the map to select the starting location of the route 3 Select to add a turn to the route 4 Repeat to add all of the turns in the route 5 Select Navigate To 6 Select an option Creating and Saving a Route This procedure saves the route and all the waypoints in it The starting po...

Страница 14: ...k currently being recorded is called the active track 1 Select User Data Tracks Save Active Track 2 Select an option Select the time the active track began Select Entire Log Viewing a List of Saved Tracks Select User Data Tracks Saved Tracks Editing a Saved Track 1 Select User Data Tracks Saved Tracks 2 Select a track 3 Select Edit Track 4 Select an option Select Name and enter the new name Select...

Страница 15: ...r temperature reading from a temperature capable transducer Setting the Water Temperature Offset page 11 Setting the Keel Offset You can enter a keel offset to compensate the water depth reading for the transducer installation location This allows you to view the depth of the water below the keel or the true depth of the water depending on your needs If you want to know the water depth below the k...

Страница 16: ...ect Settings Navigation Route Labels Sets the type of labels shown with route turns on the map Turn Transition Activ Sets the turn transition to be calculated based on time or distance Turn Transition Time Sets how many minutes before the turn that you transition to it as the next leg when Time is selected for the Turn Transition Activ setting Turn Transition Dist Sets how far before the turn that...

Страница 17: ...that the proper size fuse is installed Refer to the label on the cable or the installation instructions for the exact fuse size needed Check the fuse to make sure there is still a connection inside of the fuse You can test the fuse using a multimeter If the fuse is good the multimeter reads 0 ohm Check to make sure the device is receiving at least 12 Vdc To check the voltage measure the female pow...

Страница 18: ...nal waypoint was taken from a map there should be a legend on the map that lists the map datum and position format used to create that map Most often this is found near the map key 2 Select Settings Units 3 Select the correct map datum and position format settings 4 Create the waypoint again My device does not display the correct time Time is set by GPS position and time zone setting 1 Select Sett...

Страница 19: ... Q quickdraw 7 deleting 7 settings 8 R registering the device 13 Route To 8 routes 9 creating 8 9 deleting 10 editing 9 navigating 8 9 navigating parallel to 10 sharing 12 viewing list of 9 S safe depth 12 safe height 12 satellite signals acquiring 1 screen brightness 2 settings 2 8 11 12 system information 11 sharing data 12 13 SideVü 4 smart notifications 3 software updating 3 sonar 3 4 a scope ...

Страница 20: ...support garmin com GUID C3C9935A 44AD 4A64 8690 B6176625C6BC v1 November 2020 ...

Страница 21: ...Quick Start Manual ...

Страница 22: ...CE Before turning on the device you must firmly press the connectors into the appropriate holes in the device If the cables are not pressed far enough into the device the device appears to lose power or stop working Getting the Owner sManual Go to www garmin com manuals STRIKERVivid4 5 Acquiring GPS Satellite Signals The device may need aclear view of the sky to acquire satellite signals The time ...

Страница 23: ...anning Sonar Fishfinder For more information about which transducer is best for your needs go to www garmin com transducers Different sonar views can help you view the fish in the area The sonar views available vary depending on the type of transducer and sounder module connected to the chartplotter For example you can view certain Panoptix sonar screens only if you have a compatible Panoptix tran...

Страница 24: ...ucer select Dual Beam 200 77 kHz If you have a200 50 kHz dual frequency transducer select Dual Frequency 200 50 kHz Ifyou have another type of transducer select it from the list Sonar Frequencies NOTE The frequencies that are available depend on the transducer being used Adjusting the frequency helps adapt the sonar for your particular goals and the present depth of the water Selecting the Transdu...

Страница 25: ...es powered by the source are functioning Check the fuse in the power cable The fuse should be located in a holder that is part of the red wire of the power cable Check that the proper size fuse is installed Refer to the label on the cable or the installation instructions for the exact fuse size needed Check the fuse to make sure there is still a connection inside of the fuse You can Quick Start Ma...

Страница 26: ... Garmin Ltd or its subsidiaries registered in the USA and other countries Garmin ClearVi i Garmin Quickdraw and STRIKER are trademarks of Garmin Ltd or its subsidiaries These trademarks may not be used without the express permission of Garmin R C Printed in Taiwan ii October 2020 190 02783 0LOA ...

Страница 27: ...d 7 40 cm 15 75 in STRIKER Vivid 9 45 cm 17 7 in Compass Safe Distance Distance de sécurité du compas Distanza di sicurezza dalla bussola Sicherheitsabstand zum Kompass Consumo eléctrico máximo Distância segura da bússola Sikkerhedsafstand for kompas Trygg avstand fra et kompass Säkerhetsavstånd till kompass Wi Fi 2 4 GHz 1 8 dBm maximum 3 mm 1 8 in 3 mm 1 8 in ...

Страница 28: ... ECHOMAP eller STRIKER enhed Blå og brune ledninger er bare nødvendig for deling av data med en annen ECHOMAP eller STRIKER enhet Blå och bruna kablar behövs bara för att dela data med en annan ECHOMAP eller STRIKER enhet Fuse 3 0 A 12 Vdc Push cables FIRMLY Not all models have three connectors Poussez les câbles FERMEMENT Tous les modèles ne disposent pas de trois connecteurs Inserire SALDAMENTE ...

Страница 29: ...i fouling paint to the transducer and mounting hardware Mounting Consideration To ensure peak performance with the lowest noise and interference you should route the transducer cable away from ignition wires house batteries and wires trolling motor batteries and wires and high energy wires such as radar audio amplifier and autopilot pump wires Installing the Transducer on a Transom Mounting Locati...

Страница 30: ...a 25 mm 1 in drill bit 15Route the transducer cable to the sounder If you are routing the cable using a pass through hole push it through the pass through hole and install the cable entry cover Installing the Cable Entry Cover page 2 If you are not routing the cable using a pass through hole route the cable up and over the top of the transom You should avoid routing the cable close to electrical w...

Страница 31: ...or other sources of electrical interference The cable must not be pinched when the trolling motor is deployed or stowed Software Update You may need to update the device software when you install the device or add an accessory to the device Loading the New Software on a Memory Card You must copy the software update to a memory card using a computer that is running Windows software NOTE You can con...

Страница 32: ...ies registered in the USA and other countries These trademarks may not be used without the express permission of Garmin Windows is a registered trademark of Microsoft Corporation in the United States and other countries 2017 Garmin Ltd or its subsidiaries support garmin com ...

Страница 33: ...January 2017 GARMIN Transducer Transom Mount Template 8 190 02160 0S_OC Printed in Taiwan ...

Страница 34: ... en productinformatie 8 Vigtige produkt og sikkerhedinformationer 9 Tärkeitä turvallisuus ja tuotetietoja 10 Viktig sikkerhets og produktinformasjon 11 Guiden Viktig säkerhets och produktinformation 12 Ważne informacje dotyczące bezpieczeństwa i produktu 13 Důležité bezpečnostní informace a informace o produktu 14 Правила техники безопасности и сведения об изделии 15 Važne informacije o proizvodu ...

Страница 35: ...on of the export control laws of the United States of America or the export control laws of any other applicable country Limited Warranty THIS LIMITED WARRANTY GIVES YOU SPECIFIC LEGAL RIGHTS AND YOU MAY HAVE OTHER LEGAL RIGHTS WHICH VARY FROM STATE TO STATE OR BY COUNTRY OR PROVINCE GARMIN DOES NOT EXCLUDE LIMIT OR SUSPEND OTHER LEGAL RIGHTS YOU MAY HAVE UNDER THE LAWS OF YOUR STATE OR COUNTRY OR...

Страница 36: ... l adresse www garmin com support si vous avez des questions au sujet de votre appareil Garmin equi per aiutarti In caso di domande sul dispositivo visita ii sito Web dell assistenza per prodotti Garmin all indirizzo www garmin com support prima di contattare ii tuo rivenditore jGarmin esta aqui para ayudarte Antes de contactar con tu distribuidor visita la pagina web del servicio tecnico de Garmi...

Отзывы: