background image

N

Warning: 

This product contains a 

non-user-

replaceable

 lithium-ion battery. Do not remove 

or attempt to remove the battery. Doing so could 

result in risk of battery fire or damage and injury. 
To prevent damage and risk of fire due to high 

temperatures, remove the unit from the vehicle 

or store it out of direct sunlight. For more 

information, see 

www.garmin.com\safety

Check your state and local traffic laws before 

mounting. Currently, state laws in California and 

Minnesota prohibit drivers from using suction 

mounts on their windshields while operating 

motor vehicles. Other Garmin dashboard or 

friction mounting options should be used.

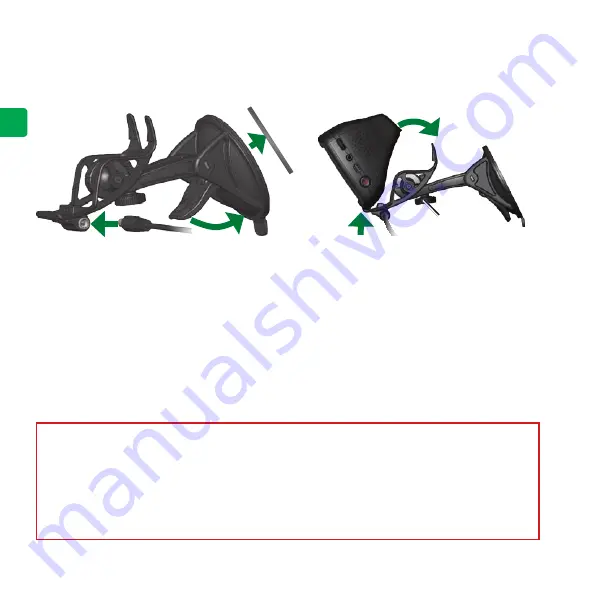
Step 1: Mount Your c340

To ensure a tight grip, clean and dry your windshield before mounting the suction cup. 

4.  Fit the bottom of your c340 into 

the cradle of the suction cup 

mount. 

5.  Tilt your c340 back until it snaps 

in place.

4

Tension knob

5

1.  Plug the small end of the cable into the 

mount and the other end in a 1-Volt 

receptacle in your vehicle.

.  Place the suction cup on the windshield. 
3.  Flip the lever back, toward the 

windshield. 

2

3

1

If necessary, use the tension knob to loosen or tighten the tension in the mount to improve 

your viewing angle. 

Содержание StreetPilot c340

Страница 1: ...StreetPilot c340 quick reference guide guide de référence rapide 2007 Garmin Ltd or its subsidiaries July 2007 190 00437 50 Rev B ...

Страница 2: ...om using suction mounts on their windshields while operating motor vehicles Other Garmin dashboard or friction mounting options should be used Step 1 Mount Your c340 To ensure a tight grip clean and dry your windshield before mounting the suction cup 4 Fit the bottom of your c340 into the cradle of the suction cup mount 5 Tilt your c340 back until it snaps in place 4 Tension knob 5 1 Plug the smal...

Страница 3: ...tton on the side of the unit The first time you turn on the unit follow the on screen instructions to set up your c340 You only have to do this once Step 3 Find Your Destination Tip Touch and to see more choices Touch Where to Select a category Select a destination Touch Go Enjoy the route ...

Страница 4: ...e Map page If you depart from the original route your c340 recalculates the route and provides new route instructions A checkered flag marks your destination Follow the arrows as you take turns Your route is marked with a magenta line You can add a stop via point to your route The c340 gives you directions to the via point and then to your final destination Search for the extra stop Touch Go Touch...

Страница 5: ...Map page to see additional information Trip Information Page Current Route Page Next Turn Page Map Page while Navigating a Route Touch Arrival or Speed to open the Trip Information page Touch Turn In to open the Next Turn page Touch the text bar to open the Current Route page Touch to zoom out Touch to zoom in Touch Menu to return to the Menu page ...

Страница 6: ...You Find After you have found a place you want to save touch Save Touch OK The place is save in My Locations Favorites Finding Saved Places From the Menu page touch Where to My Locations Favorites Select a place Touch Go ...

Страница 7: ...oadcast over the FM Radio Data System For more information about Garmin Traffic Receivers visit www garmin com fmtraffic Connecting the GTM 10 to Your c340 Place your c340 in the mount and plug it into the 12 volt adapter Plug the USB cable from the GTM 10 into the USB connector on the side of the c340 Viewing Traffic Events From the Menu page touch to display a list of traffic events The traffic ...

Страница 8: ...e groove located under the Garmin logo on the faceplate and gently pull off the faceplate 3 Press the Reset button for about 3 seconds 4 Connect the c340 to a power source using the power cable The c340 should automatically turn back on and operate normally More Information For more information about your c340 refer to the English owner s manual located at www garmin com products sp340 Click Manua...

Страница 9: ...r des supports à ventouse sur leur pare brise pendant qu ils conduisent Dans ce cas utiliser les autres options de montage sur tableau de bord ou par friction de Garmin Etape 1 Installation de votre navigateur c340 Afin de garantir une adhérence maximale nettoyez et séchez soigneusement votre parebrise avant d installer la ventouse Si nécessaire utilisez le bouton de réglage de tension pour serrer...

Страница 10: ...ttez votre appareil en marche pour la première fois suivez les informations affichées à l écran pour procéder à l installation de votre navigateur c340 Vous ne devrez accomplir cette étape qu une seule fois Etape 3 Recherche de votre destination Truc Touchez et pour afficher davantage d options Touchez sur Where to Où trouver Sélectionnez une catégorie Sélectionnez une destination Touchez sur Go A...

Страница 11: ...otre itinéraire initial un message vocal vous informe que vous évoluez hors itinéraire le navigateur c340 crée ensuite un nouvel itinéraire Vous pouvez ajouter un point intermédiaire à l itinéraire Le c340 indique comment vous rendre jusqu au point intermédiaire puis jusqu à la destination finale Votre itinéraire est représenté par une ligne rouge Suivez les flèches représentant les virages Un dra...

Страница 12: ...Page Current Route Itinéraire actuel Page Next Turn Prochain virage Page de la carte lors du parcours d un itinéraire Touchez stur Arrival Arrivée ou Speed Vitesse pour ouvrir la page Trip Information Informations sur le trajet Touchez sur Turn In Prochain virage pour ouvrir la page Next Turn Prochain virage Touchez sur la barre de texte pour ouvrir la page Current Route Itinéraire actuel Touchez ...

Страница 13: ... appuyez sur Save Enregistrer Appuyez sur OK dans la fenêtre Le lieu est enregistré dans My Locations Emplacements favoris Favorites Favoris Recherche de lieux enregistrés Sur la page Menu touchez sur Where to Où trouver My Locations Emplacements Favorites Favoris Sélectionnez un lieu Touchez sur Go Allez ...

Страница 14: ... informations routières diffusées sur le système de radiocommunication de données RDS FM Pour plus d informations sur le récepteur FM visitez le site www garmin com fmtraffic Connexion du GTM 10 à votre c340 Connectez le récepteur FM à votre c340 Branchez le câble mini USB dans le connecteur mini USB situé sur le côté du c340 Affichage des événements d informations routiéres Dans la page Menu touc...

Страница 15: ...s USB 2 Insérez l ongle de votre pouce dans la rainure située sous le logo Garmin de la façade de l appareil puis retirez la façade 3 Appuyez sur le bouton Reset pendant environ 3 secondes 4 Branchez le navigateur c340 à une source d alimentation à l aide du câble prévu à cet effet Le navigateur c340 doit automatiquement se remettre sous tension et fonctionner normalement Informations supplémentai...

Страница 16: ...tware updates excluding map data throughout the life of your Garmin products visit the Garmin Web site at www garmin com 2007 Garmin Ltd or its subsidiaries Garmin International Inc 1200 East 151st Street Olathe Kansas 66062 USA Garmin Europe Ltd Liberty House Hounsdown Business Park Southampton Hampshire SO40 9RB UK Garmin Corporation No 68 Jangshu 2nd Road Shijr Taipei County Taiwan www garmin c...

Отзывы: