4
If necessary, select
Channel
, and select a new channel.
5
Select
Send
.
The chartplotter sends information about the call to the radio.
6
On your Garmin VHF radio, select
Call
.
Making an Individual Routine Call to an AIS Target
1
From a chart or 3D chart view, select an AIS target.
2
Select
AIS Vessel
>
Call with Radio
.
3
If necessary, select
Channel
, and select a new channel.
4
Select
Send
.
The chartplotter sends information about the call to the radio.
5
On your Garmin VHF radio, select
Call
.
Media Player
NOTE:
The media player feature is not compatible with all
chartplotter models.
If you have a Garmin Meteor™ media player or a stereo
equipped with FUSION-Link™ connected to the NMEA 2000
network, you can control the stereo using the chartplotter. The
chartplotter should automatically detect the media player when
it is first connected.
You can play media from sources connected to the media
player and sources connected to the NMEA 2000 network. Your
chartplotter and iPod® can be connected using a Garmin
Meteor.
Opening the Media Player
Before you can open the media player, you must have a
compatible device connected to the chartplotter.
From any screen, select
Media
.
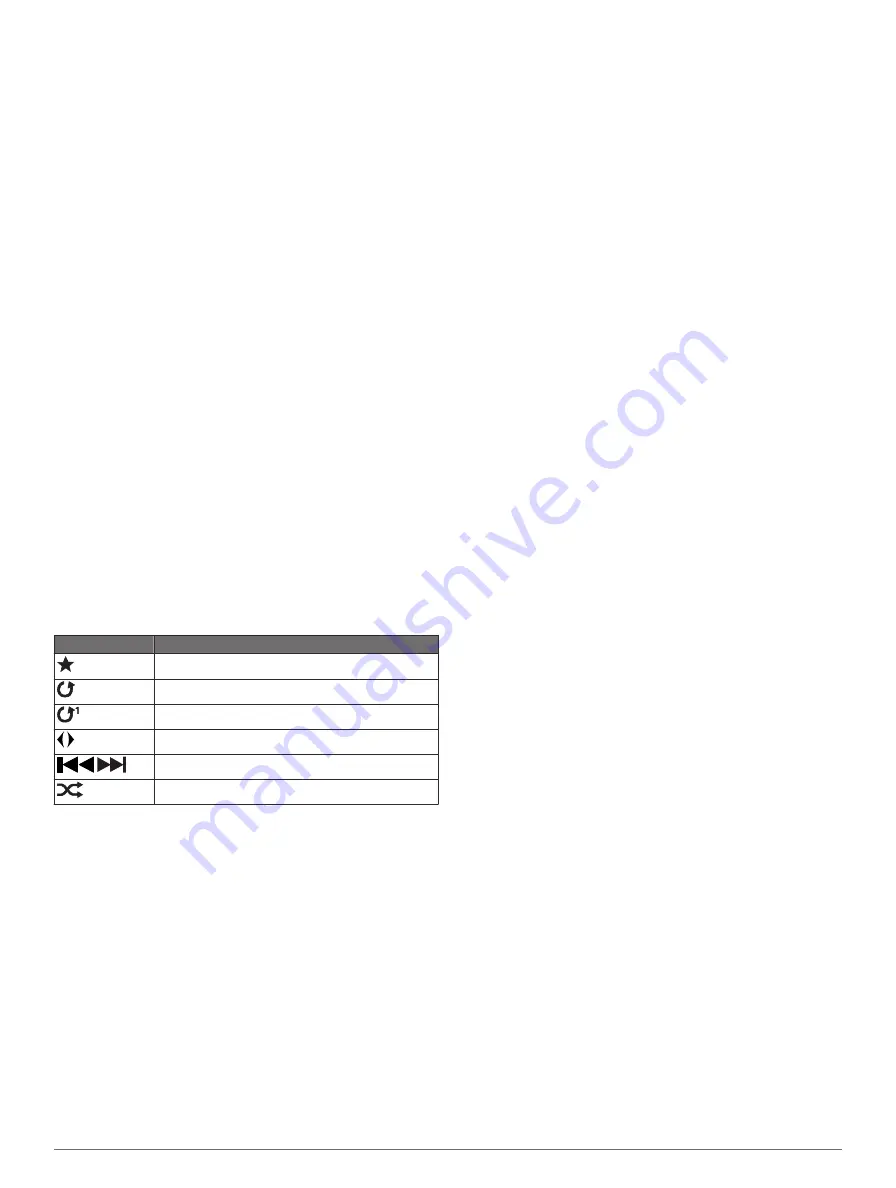
Icons
NOTE:
Not all devices have these icons.
Icon
Description
Saves or deletes a channel as a preset
Repeats all songs
Repeats one song
Scans for stations
Searches for stations or skips songs
Shuffles
Selecting the Media Source
When you have multiple media devices connected on a
network, such as the NMEA 2000 network, you can select the
media source you want to control from your chartplotter.
NOTE:
You can play media only from sources that are
connected to the device.
NOTE:
Not all features are available on all media sources.
1
From the media screen, select
Menu
>
Source
.
NOTE:
The source menu appears only for devices that
support multiple media sources.
2
Select a source.
Connecting a Bluetooth Wireless Device to the
Meteor Media Player
You can wirelessly connect the media player to a Bluetooth
device.
1
Place the Bluetooth device within 33 ft. (10 m) of the media
player.
2
From the media screen, select
BT Devices
or
Bluetooth
Device
.
3
Enable the Discoverable mode on the Bluetooth device.
A list of devices appears.
4
Select the media player from the options on your Bluetooth
device.
Playing Music
Browsing for Music
1
From the media screen, select
Browse
or
Menu
>
Browse
.
2
Select
Select
or select an option.
Enabling Alphabetical Search
You can enable the alphabetical search feature to find a song or
album in a large list.
From the media screen, select
Menu
>
Installation
>
Alpha
Search
.
Setting a Song to Repeat
1
While playing a song, select
Menu
>
Repeat
.
2
If necessary, select
Single
.
Setting All Songs to Repeat
From the media screen, select
Menu
>
Repeat
>
All
.
Setting Songs to Shuffle
1
From the media screen, select
Menu
>
Shuffle
.
2
If necessary, select an option.
Listening to the Radio
Saving a Channel as a Preset
You can save up to 15 AM stations and 15 FM stations as
presets.
1
From the AM, FM, or VHF page, tune the device to a
channel.
2
Select
Menu
>
Presets
>
Add Current Channel
.
Removing a Channel Preset
1
Tune the device to a channel.
2
Select
Menu
>
Presets
>
Remove Current Channel
.
Changing the Tuning Mode
You can change how you select a station for some media types,
such as FM or AM radio.
NOTE:
Not all tuning modes are available for all media sources.
1
From the media screen, select
Menu
>
Tuning Mode
.
2
Select an option.
3
If necessary, select
Select
.
Setting the Tuner Region
1
From the media screen, select
Menu
>
Installation
>
Tuner
Region
.
2
Select an option.
Opening the MTP Source
Before you can open the MTP source, you must connect your
MTP device to a compatible media device.
You can access music on your Media Transfer Protocol (MTP)
device, such as an Android™ device. You can also charge your
phone or media player while it is connected and playing music.
1
Connect your MTP source through USB, such as the stereo,
the external USB plug, or an external dock.
2
From the media screen, select
Menu
>
Source
>
MTP
.
Media Player
25
Содержание nuvi 500-Series
Страница 6: ......