background image

Quick Start

23

Marking Current Position

Marking Current Position

In addition to its use for data entry, the  

ENTER

 key can also be used to capture your present 

position and save it as a user-created waypoint. In order to use this feature, the GPSMAP 196 must be 
receiving a suffi cient number of satellites so as to display an accurate position fi x.

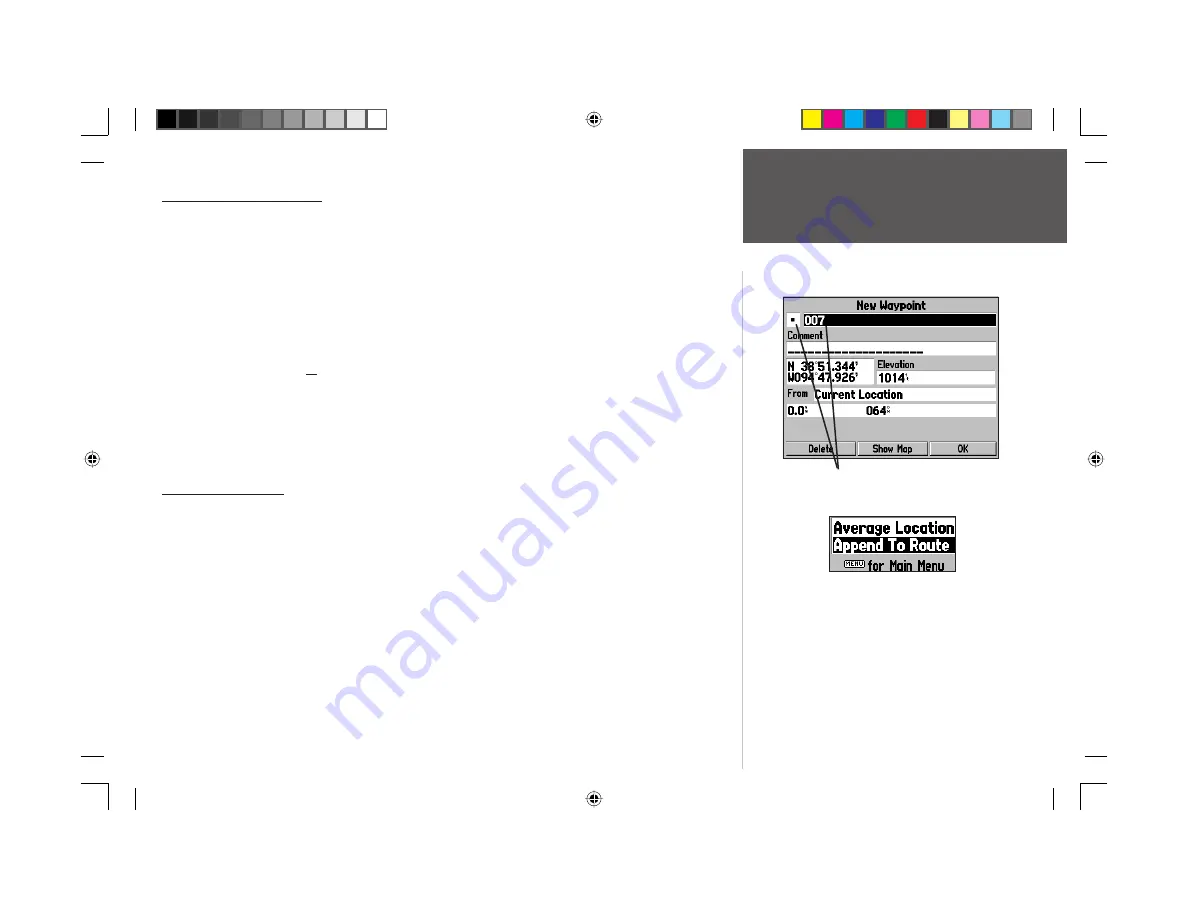
To mark your present position and save it as a user-created waypoint:

1.  Press and hold the 

ENTER

 key for approximately two seconds. A ‘New Waypoint’ page appears with a 

pre-assigned name, a symbol, and position and elevation data for the new waypoint.

2.  The three-digit, pre-assigned name may be changed to any name of up to ten characters in length: 

highlight the identifi er fi eld, press 

ENTER

 and use the 

ARROW KEYPAD 

to enter the desired 

waypoint name. Once all characters for the waypoint name have been entered, press 

ENTER

 to 

validate the name.

3.  To change the waypoint symbol that will appear on the map, highlight the symbol fi eld and press 

ENTER

. A list of available symbols appears. Use the 

ARROW KEYPAD

 to select the desired symbol 

and press 

ENTER

.

4.  To save the new waypoint, highlight the on-screen ‘OK’ button and press 

ENTER

.

Additional Reading

More information about the subjects covered in this manual can be found in the Pilot’s Guide. Some 

suggested additional reading topics include:

• Creating and using routes (fl ight plans).

• Using saved fl ight plans for trip planning.

• Using optional MapSource software products to display additional map detail, support address 

lookup capability, provide automatic road routing, or show nearby points of interest.

• Customizing the user-selectable data fi elds on the Map, HSI or Position pages.

• Changing the page layouts, units of measure, time zone and other unit settings.

Refer to the index located in the Pilot’s Guide for these and other topics.

Highlight the name (or symbol) fi eld and use the 

ARROW

KEYPAD

 to enter the desired waypoint name (or symbol).

From the ‘New Waypoint’ page, press 

MENU

 to display the ‘New 

Waypoint’ options. You can either select the ‘Average Location’ 

feature to improve accuracy of the marked fi x, or add the new 

waypoint to the current route or to a saved route.

190-00283-01_0B.indd   23

2/6/2003, 11:13:10 AM

Содержание GPSMAP GPSMAP 196

Страница 1: ...Quick Start Guide GPSMAP 196 Read This First 190 00283 01_0B indd 1 2 6 2003 11 10 39 AM...

Страница 2: ...cludes a mounting bracket a mounting base and mounting adhesives PC interface cable Cigarette lighter adapter 4 AA batteries Certi cate for a free Jeppesen update Pilot s Guide and Reference manual Qu...

Страница 3: ...unt Adhesives Dash Mount Mounting Bracket Front View Dash Mount Mounting Base PC Interface Cable Yoke Mount Short Clamp Adjustment Knob Allen Wrench GA26C Remote Antenna Cigarette Lighter Adapter Remo...

Страница 4: ...is position i e aligning the small tab located at the base of the antenna with the notch on the unit at the antenna attachment point and pull straight out and away from the unit while ensur ing that t...

Страница 5: ...changed or if stored without batteries To remove the battery lid rotate the D ring 1 4 turn counterclockwise and pull away To reinstall the battery lid place the locking pin into the slot and rotate t...

Страница 6: ...age is con gured for conventional aircraft yokes If you have a center column control Beech models you should remove the clamp assembly from the yoke mount rotate it 90 so that the open end of the clam...

Страница 7: ...des through the clamp frame 5 Insert the washer and Allen head screw into the lower clamp Place the lower clamp onto the end of the short clamp adjustment knob and tighten 6 Replace the rubber padding...

Страница 8: ...yoke 4 Tighten the pivot knob and verify that the clamp adjustment knob is also securely tightened To place the GPSMAP 196 in the yoke mount 1 Locate the three locking tabs molded into the snap in br...

Страница 9: ...allation that allows routing of an external power cord to the GPS unit If you plan to acquire satellites through the vehicle windshield select a location where the unit antenna can get a relatively un...

Страница 10: ...the matching groove located on the right hand side of the unit i e front view antenna side at the back see illustrations below 2 Push the bracket toward the unit so that both the large curved tab at...

Страница 11: ...tab and out of the base To remove the mounting bracket from the GPSMAP 196 1 Holding the unit in place lift and pull the protruding tab on the left hand side of the bracket front view away from the u...

Страница 12: ...ce will display the Main menu The NRST FIND key displays the nearest airports navaids points of communication and airspace boundaries in Aviation mode In other modes or when pressed multiple times in...

Страница 13: ...nsional position includes latitude longitude and altitude Additional satellites are occasionally needed to triangulate your position and even if not needed to determine a position additional satellite...

Страница 14: ...e retained and used for the map display GOTO NAVIGATION When a Goto is initiated both the course line and course guidance are xed at the point where the Goto was started UNITS OF MEASURE The preferred...

Страница 15: ...he Goto button that appears at the bottom of the waypoint information pages SCROLL BAR When viewing a list of items that is too long to display on a single page a scroll bar appears along the right ha...

Страница 16: ...IT keys allows you to quickly select the desired page For example to quickly jump from the Map page to the Panel page press the PAGE key to return from the Panel page to the Map page press the QUIT ke...

Страница 17: ...ute This feature is handy for retrieving navaid frequencies or airport information such as communication frequencies runway information eld elevation available fuels and approach information To view t...

Страница 18: ...ng waypoint information page will appear showing additional waypoint information 3 For airports use the ARROW KEYPAD to select the le tabs across the top of the waypoint informa tion pages and display...

Страница 19: ...rify that the By Name tab is selected for the desired waypoint category as described in step 3 above The rst line under the By Name le tab is an editable eld to enter the name of the desired user wayp...

Страница 20: ...lt four user selectable data elds appear on the right hand side of the screen along with an HSI in Aviation mode The HSI works much like a mechanical HSI indicating the desired course and the deviatio...

Страница 21: ...out the waypoint appears and a Goto can be executed directly from the Map page To select an on screen airport navaid or map item with the cursor 1 Use the ARROW KEYPAD to move the cursor to the desire...

Страница 22: ...ion data easier to read This declutter setting is identi ed by a CLEAR 1 indication below the map scale 2 Press ENTER again the above background map detail is removed from the map display CLEAR 2 appe...

Страница 23: ...f available symbols appears Use the ARROW KEYPAD to select the desired symbol and press ENTER 4 To save the new waypoint highlight the on screen OK button and press ENTER Additional Reading More infor...

Страница 24: ...Quadrangle Abbey Park Industrial Estate Romsey SO51 9DL U K Garmin Corporation No 68 Jangshu 2nd Road Shijr Taipei County Taiwan www garmin com Part Number 190 00283 01 Rev B For the latest free softw...

Отзывы: