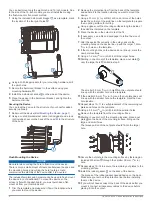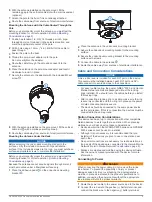
You can bail mount only the eight-inch and 12-inch models. Due
to the size of the 15-inch models, you must install them using
the flush-mount or flat-mount method.
1
Using the included bail-mount bracket as a template, mark
the location of the four pilot holes .
2
Using a drill bit appropriate for your mounting hardware, drill
the pilot holes.
3
Secure the bail-mount bracket to the surface using your
mounting hardware .
4
Install the bail-mount knobs on the sides of the device.
5
Place the device in the bail-mount bracket, and tighten the
bail-mount knobs.
Securing the Device
You can lock the device to the structure of your boat for added
security (optional).
1
).
2
Using a coated braided-steel cable (not included) and a lock
(not included), secure the back of the case to the structure
of the boat.
Flush Mounting the Device
NOTICE
Be careful when cutting the hole to flush mount the device.
There is only a small amount of clearance between the case and
the mounting holes, and cutting the hole too large could
compromise the stability of the device after it is mounted.
The included template and hardware can be used to flush mount
the device in your dashboard. To mount the device so the
screen is flat with the dashboard, you must purchase a flat-
mount kit from your Garmin dealer.
1
Trim the template and make sure it fits in the location where
you want to mount the device.
2
Remove the protective liner from the back of the template
and adhere it to the location where you want to mount the
device.
3
Using a 13 mm (½ in.) drill bit, drill one or more of the holes
inside the corners of the solid line on the template to prepare
the mounting surface for cutting.
4
Using a jigsaw, cut the mounting surface along the inside of
the solid line indicated on the template.
5
Place the device in the cutout to test the fit.
6
If necessary, use a file and sandpaper to refine the size of
the cutout.
7
After the device fits correctly in the cutout, ensure the
mounting holes on the device line up with the larger 7.2 mm
(
9
/
32
in.) holes on the template.
8
If the mounting holes on the device do not line up, mark the
new hole locations.
9
Using a 7.2 mm (
9
/
32
in.) drill bit, drill the larger holes.
10
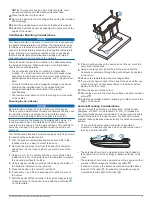
Starting in one corner of the template, place a nut plate
over the larger hole drilled in step 9.
The smaller 3.5 mm (
9
/
64
in.) hole on the nut plate should
line up with the smaller hole on the template.
11
If the smaller 3.5 mm (
9
/
64
in.) hole on the nut plate does not
line up with the smaller hole on the template, mark the new
hole location.
12
Repeat steps 10–11 to verify placement of the remaining nut
plates and holes on the template.
13
Using a 3.5 mm (
9
/
64
in.) drill bit, drill the smaller holes.
14
Remove the template from the mounting surface.
15
Starting in one corner of the mounting location, place a nut
plate on the back of the mounting surface, lining up the
large and small holes.
The raised portion of the nut plate should fit into the larger
hole.
16
Secure the nut plate to the mounting surface by fastening an
included M3 screw through the smaller 3.5 mm (
9
/
64
in.)
hole.
17
Repeat steps 15–16 to secure the remaining nut plates to the
mounting surface.
18
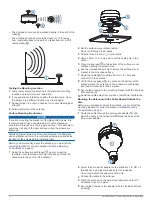
Install the rubber gasket on the back of the device.
The pieces of the rubber gasket have adhesive on the back.
Make sure you remove the protective liner before installing
them on the device.
19
If you will not have access to the back of the device after you
mount it, connect all necessary cables to the device before
placing it into the cutout.
2
GPSMAP 8000 Series Installation Instructions

