background image


34

Creating a Route

Activating a Route

Inverting a Route

Creating and Navigating Routes

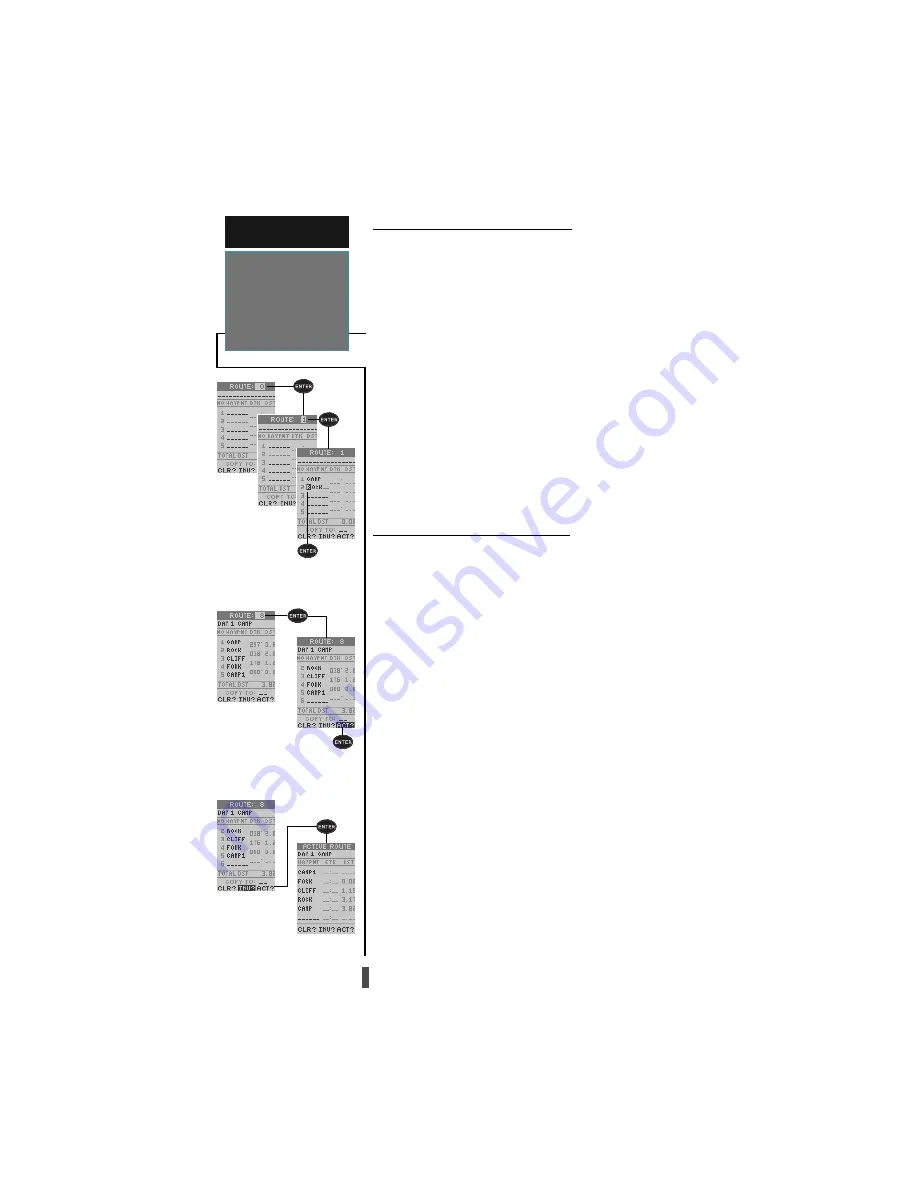
To create a route from the route definition page:

1.  Highlight the route number field, and press 

ENTER.

2.  Enter a route number, and press 

ENTER. (Select an

empty route—without any waypoints listed—when cre-
ating a new route.)

3. Enter the first waypoint of your route, and press

ENTER. As you continue entering the rest of your
waypoints, the list will automatically scroll down.

4. To change the route comment (automatically assigned

to the route based upon the starting and final destina-
tion waypoints), highlight the route comment field and
press 

ENTER. Enter the new comment and press

ENTER.

Whenever you activate a route, it will automatically

select the route leg closest to your position as the active
leg. As you pass each waypoint in the route, the receiver
will automatically sequence and select the next waypoint
as the ‘active to’ waypoint.

Activating and Inverting Routes

After a route has been entered, it can be either acti-

vated in sequence or inverted from the route definition
page. The process of activating or inverting a stored route
takes a storage route (routes 1-19) and copies it into the
active route (route 0) for navigation. The storage route is
no longer needed and will be retained in its original for-
mat under its existing route number.

This system allows you to have an active route that

you may edit during navigation and save as an entirely
new route from the original. You will have to copy the
active route to an unused storage route to save it, since
new route or TracBack activation overwrites route 0.

To activate a route:

1. From the route definition page, highlight the route

number field and press 

ENTER.

2. Enter the route number to be activated, and press

ENTER.

3. Highlight ‘ACT?’, and press 

ENTER.

To activate a route in inverted order:

1. Follow the steps above, but select ‘INV?’, and press

ENTER.

R E F E R E N C E

Creating

& Navigating

Routes

Содержание GPS 12CX

Страница 1: ...GOTO QUIT IN MARK ENTER PAGE OUT ...

Страница 2: ...evision hereto provided that such electronic or printed copy of this manual or revision must contain the complete text of this copyright notice and provided further that any unauthorized commercial distribution of this manual or any revision hereto is strictly prohibited Garmin International Inc 1200 E 151st Street Olathe KS 66062 USA Tel 913 397 8200 FAX 913 397 8282 Garmin Europe Ltd Unit 5 The ...

Страница 3: ...nience Introduction gives a quick overview of the manual and contains the table of contents and the glossary of navigational terms Quick Start introduces you to the basic features of the unit and provides a quick start orientation to the GPS 12CX Reference provides details about the advanced features and op erations of the GPS 12CX by topic The Appendices containsinitializationinstructionsanditems...

Страница 4: ... ance with all necessary FCC standards This equipment generates uses and can radiate radio frequency energy and if not installed and used in accordance with the instructions may cause harmful interference to radio communications However there is no guarantee that interference will not occur in a particular installation If this equipment does cause harmful interference to other equipment which can ...

Страница 5: ...ase 11 Position Page User Selectable Fields 12 13 Map Page Panning and Waypoint Display 14 15 Map Page Setup 16 18 Navigation Pages 19 22 Creating Managing and Using Waypoints 23 29 TracBack Navigation 30 31 Creating and Navigating Routes 32 36 Menu Page Distance and Sun Calculations 37 Menu Page System Setup 38 Menu Page Navigation Setup 39 40 Menu Page Alarms Setup 41 Menu Page Interface Setup 4...

Страница 6: ...ery GPS satellite Alma nac data must be acquired before GPS navigation can begin Bearing The compass direction from your position to a destination Course Made Good CMG The bearing from the active from position your starting point to your present position Crosstrack Error XTK The distance you are off a desire course in either direction Desired Track The compass course between the from and to waypoi...

Страница 7: ...ation The process of traveling from one place to another and knowing where you are in relation to your desired course Position An exact unique location based on a geographic coordinate system Track TRK The direction of movement relative to a ground position Universal Transverse Mercator UTM A grid coordinate system that projects global sections onto a flat surface to measure position in specific z...

Страница 8: ...ified Antenna Part Number 010 10052 00 Helps the GPS 12CX acquire weak satellite signals Great for the car Cigarette Lighter Adapter Part Number 010 10085 00 Plugs into 12 and 24 volt systems to run the GPS 12CX on external battery power PC Software and Cable Kit Part Number 010 10054 00 This DOS based software allows you to easily manage and create waypoint and routes Not Shown Bicycle Mount 010 ...

Страница 9: ...Saver mode To install the batteries 1 Remove the battery cover by turning the thumb loop at the bottom of the unit 1 4 turn counter clockwise 2 Insert the batteries into position The battery pole that you can still see should match the symbol or marked on the case 3 Replace and secure the battery cover by turning the thumb loop 1 4 turn clockwise Battery life varies due to a variety of factors inc...

Страница 10: ... r P e h T R E T N E d n a y r t n e a t a d s m r i f n o c y e k y r t n e a t a d w o l l a o t s d l e i f d e t h g i l h g i h s e t a v i t c a e h T T I U Q s u o i v e r p a o t y a l p s i d e h t s n r u t e r y e k e u l a v s u o i v e r p s d l e i f a t a d a s e r o t s e r r o e g a p e h T N I d n a T U O e s a e r c e d r o e s a e r c n i r e h t i e s y e k e l a c s p a m e h...

Страница 11: ...rcles and a center point The outer circle shows satel lites on level with the horizon the inner circle is 45 above the horizon and the center point represents sat ellites directly overhead Knowing satellite positions will show you the direction of any blocked signals The bottom of the page contains a row of signal strength bars corresponding to each satellite being used Position Page The Position ...

Страница 12: ...the destination waypoint at the top of the page with the bearing BRG and dis tance DST to the waypoint shown below The center of the page contains a compass ring and arrow to show you the direction of the waypoint from the direction you are moving The bottom of the page gives your track TRK speed SPD and a selectable field for estimated time to arrival ETA estimated time enroute ETE course to stee...

Страница 13: ...oints Before we can use our GPS 12CX to guide us somewhere we have to mark a position as a waypoint Your GPS 12CX can hold up to 1000 way points To mark your present position 1 Press the MARK key The mark position page will appear with a default three digit name for the new waypoint in the upper left portion of the page To rename the waypoint 1 Highlight the name field and press ENTER 2 Enter the ...

Страница 14: ...enter of the map The house symbol labeled HOME is the waypoint that you created when you MARKED your position the line connecting the two is called the TRACK LOG 1 Now turn approximately 90 to your left and continue walking for another 2 3 minutes Notice how the dis play changes always keeping the direction that you are traveling toward the top of the map and your track log updates continually lea...

Страница 15: ...ng to the top then continue in that di rection The bearing BRG and distance DST to the desti nation waypoint are displayed at the top of the screen the track TRK and speed SPD are shown below The default ETE field at the bottom of the screen is a user selectable field that can provide a variety of navi gation information As you get closer to HOME you will be alerted to press PAGE The GPS 12CX will...

Страница 16: ...ivate the screen backlighting 1 Briefly press the POWER key twice to activate the first level low one bulb or three times to activate the second level hi two bulbs Either one or two bulb icons will be displayed along the bottom of the Contrast Adjustment Page indicating the level of screen backlighting that you have activated Turning off the Receiver You have now gone through the basic operation o...

Страница 17: ...sky view to help determine if any satellites are being blocked and whether you have a current position fix indicated by 2D NAV or 3D NAV in the status field You can also set the sky view to a track up configuration by changing the orienta tion option on the Map Page See pg 16 for setup instructions When the receiver is looking for a particular satel lite the corresponding signal strength bar will ...

Страница 18: ... been locked onto and your position is now being calculated in lati tude longitude and altitude 3D Diff will appear when you are receiving DGPS corrections in 3D mode Poor Cvg Poor GPS Coverage Poor Cvg Poor GPS Coverage Poor Cvg Poor GPS Coverage Poor Cvg Poor GPS Coverage Poor Cvg Poor GPS Coverage the receiver isn t tracking enough satellites for a 2D or 3D fix due to bad satellite geometry Not...

Страница 19: ... 12CX s memory in four quick steps This will cause all stored data to be de leted including routes waypoints and the track log To erase all stored data 1 Ensure that the GPS 12CX is turned off 2 While holding down the MARK key turn the unit o n Once the unit is on release the keys A warning mes sage will appear with YES highlighted and ask you to confirm your selection 3 If you do wish to complete...

Страница 20: ...r selectable field The following user selectable options are available on the Position Page Trip Odometer TRIP total distance traveled since reset TripTimer TTIME total cumulative time in which a ground speed has been maintained since last reset ElapsedTime ELPSD total time in hours and min utes since last reset Average Speed AVSPD average speed traveled since last reset Maximum Speed MXSPD maximu...

Страница 21: ... has 2D coverage entering your approxi mate altitude will enable the receiver to determine a more accurate position fix To enter an altitude 1 Highlight the ALT field and press ENTER 2 Enter a value and press ENTER Position Field The GPS 12CX displays the current GPS location in degrees minutes decimal minutes default or a vari ety of user selectable position formats See page 39 for more informati...

Страница 22: ...s at the top corners of the map show your bearing and distance to one of three selectable destinations an active destination waypoint a highlighted waypoint or the panning target crosshair If you are not navigating to a waypoint or using the pan ning function the top data fields will not be displayed Your current track and speed are shown at the bottom corners of the display Zooming Changing the M...

Страница 23: ...waypoint name has a six character limit while the comment field has a 16 character limit and there are 16 waypoint symbols available To select a waypoint display option 1 Highlight the symbol field to the right of the name field and press ENTER 2 Move the cursor to the DISPLAY field and press ENTER 3 Using the ROCKER select one of the display options NAME WITH SYMBOL SYMBOL ONLY or COM MENT WITH S...

Страница 24: ...Find City and City Setup from the Map Page by pressing ENTER except when panning or pointing To select a map option 1 Highlight the desired option and press ENTER Map Setup Page and Orientation The map setup page lets you select the Map Page and satellite sky view orientation as well as specify what items are displayed The Map and Satellite Pages may be oriented to NORTH UP TRACK UP the direc tion...

Страница 25: ...o confirm the selection Track Setup Page The track setup page lets you manage the GPS 12CX s track log data You can select whether to record a track log and define how it is recorded Off Disables the track log Wrap Allows the unit to continue updating the tracklog after all track log points are used by eliminating the oldest track log information Fill Records track log information until all track ...

Страница 26: ...the Track Log The rest of the track setup window displays the per centage of available memory currently used to store track log data as well as a function field to clear the track log memory To clear the track log 1 Highlight CLEAR LOG and press ENTER 2 Highlight Yes and press ENTER Note It s a good idea to clear the track log at the beginning of the trail etc in order to make the best use of the ...

Страница 27: ...ss track error the distance and direction you are off course The cross track error XTK is depicted on a course deviation indicator CDI see pg 40 The Highway Page is well suited for boating or some types of off road recreation where straight line navigation is typically possible and maintain ing a specified course is desirable Both pages provide a digital display of the bearing and distance to the ...

Страница 28: ...get back on course and proceed along your route or GOTO Crosstrack Error XTK the distance you are off the desired course in either direction left or right This field will give you a digital readout of the data depicted by the CDI Velocity Made Good VMG the speed you are closing in on a destination along the desired course Also referred to as the vector velocity to your destination Turn TRN the ang...

Страница 29: ...ft right down etc turn toward the arrow un til it points up Then continue in that direction The bottom of the page shows your track TRK speed SPD and a user selectable field for ETE ETA CTS XTK VMG or TRN When you are one minute away from your destina tion based on your current speed and track over ground the GPS 12CX will alert you with a flashing on screen message box REFERENCE Using the Compass...

Страница 30: ...ly steer in the direction the highway leads left or right until the highway leads straight up the page If you do get off the desired course by more than 1 5th of the selected CDI range the exact distance you are off course will be displayed where the CDI scale setting normally appears If you get too far off course the highway has disappeared off either side of the high way display a message box wi...

Страница 31: ...ghlight the waypoint name field and press ENTER 2 Make the appropriate changes and press ENTER 3 If finished changing the waypoint Highlight SAVE and press ENTER Waypoint Symbols The GPS 12CX allows you to select one of 16 sym bols for each waypoint for easy recognition on the map display From the symbol page you may also select how the waypoint appears on the map To select a waypoint symbol 1 Hig...

Страница 32: ...r waypoints already in the route Position Averaging Function The GPS 12CX can use the positioning averaging func tion to help reduce the effects of selective availability and provide more accurate saved positions 1 After you have pressed the MARK key highlight the AVERAGE field and press ENTER The Figure of Merit field will display a value reflecting estimated accuracy of the averaged position Not...

Страница 33: ...tion field and press ENTER Input your position using the ROCKER and press ENTER 6 Press ENTER to confirm the DONE prompt REFERENCE Main Menu Waypoint Definition Page Waypoint Name Reference Waypoint Bearing from Reference Waypoint Waypoint Symbol Position Coordinates Distance from Reference Waypoint Function Prompts The GPS 12CX s advanced way point planning features allow you to create new waypoi...

Страница 34: ...ht RENAME and press ENTER 2 Enter the new waypoint name and press ENTER 3 Press ENTER to confirm the Yes prompt To delete a stored waypoint 1 Highlight DELETE and press ENTER 2 Highlight the Yes prompt and press ENTER Scanning Waypoints As you manually enter a waypoint s name the GPS 12CX s waypoint scanning feature will automatically dis play the first numerical or alphabetical match of the char ...

Страница 35: ... Select the tab that corresponds with the first letter of the waypoint 2 Using the ROCKER move the highlight to the way point list 3 Scroll through the list until the desired waypoint is highlighted 4 Press ENTER to review the waypoint definition page To delete all user defined waypoints 1 Highlight OPT tab and press ENTER 2 Highlight DELETE ALL and press ENTER 3 Highlight the YES prompt and press...

Страница 36: ...nt Page The GPS 12CX s proximity waypoint function warns you when you are getting too close to hazardous way points This function allows you to create up to nine proximity waypoints and designate an alarm circle for each waypoint If you enter this circle a warning message will alert you To enter a proximity waypoint from the Main Menu Page 1 Highlight PROXIMITY WPTS and press ENTER 2 Highlight the...

Страница 37: ...way Page will provide steering guid ance to the destination until either the GOTO is can celled or the unit has resumed navigating the active route To cancel an active GOTO 1 Press the GOTO key 2 Highlight the OPT tab 3 Highlight CANCEL GOTO and press ENTER Man Overboard Function The GPS 12CX s man overboard function MOB lets you simultaneously mark and set a course to a position for quick respons...

Страница 38: ...ight CLEAR LOG press ENTER highlight Yes and press ENTER To activate aTracBack route 1 Press GOTO 2 Highlight the OPT tab 3 Highlight TRACBACK and press ENTER Once the TracBack function has been activated the GPS 12CX will take the track log currently stored in memory and divide it into segments called legs Up to 30 temporary waypoints will be created to mark the most significant features of the t...

Страница 39: ...up page is set to a time interval the TracBack route may not follow your exact path Keeping the cri teria set to automatic will always provide the most detailed TracBack route If the receiver is turned off or you lose satellite coverage during your trip the TracBack route will simply draw a straight line between any point where coverage was lost and where it resumed If the changes in direction and...

Страница 40: ... navigated in smaller segments called legs The waypoint you are going to in a leg is called the active to waypoint and the waypoint immediately behind you is called the active from way point The line between the active to and the active from waypoint is called the active leg Whenever you activate a route with the GPS 12CX it will automatically select the route leg closest to your position as the a...

Страница 41: ...the route comment 1 Highlight the comment field and press ENTER 2 Use the arrow keys to enter a new comment and press ENTER The waypoint list along the left side of the page ac cepts up to 30 waypoints for each route with fields for desired track and distance between legs The total route distance is indicated below the waypoint list The bottom of the route definition page features sev eral functio...

Страница 42: ...nce and select the next waypoint as the active to waypoint Activating and Inverting Routes After a route has been entered it can be either acti vated in sequence or inverted from the route definition page The process of activating or inverting a stored route takes a storage route routes 1 19 and copies it into the active route route 0 for navigation The storage route is no longer needed and will b...

Страница 43: ... also allows you to clear stop navigating or invert the active route without using the route definition page To invert a route from the active route page 1 Highlight INV and press ENTER To stop route navigation 2 Highlight CLR and press ENTER To reactivate the route navigation 3 Highlight ACT and press ENTER Copying and Clearing Routes The route definition page is also used to copy a route to anot...

Страница 44: ...ve an edited version of route 0 save it to an open storage route On RouteGOTOs At the beginning of this section we mentioned that the GPS 12CX will automatically select the route leg closest to your position as the active leg This will give you steering guidance to the desired track desired course of the active leg Note that the first waypoint selected as the destination waypoint will be along the...

Страница 45: ...up The system setup page is used to select the operating mode time offset and screen preferences The GPS 12CX has three operation modes Normal Mode operates the unit at maximum perfomance and provides battery life of up to 24 hours on alkaline batteries Power Save Mode allows the receiver to operate in an energy efficient manner and provides battery life of up to 36 hours on alkaline batteries Sim...

Страница 46: ... 15 30 60 120 or 240 seconds If the timer is set to 0 then the backlight will operate continuously after being activated When the backlight is activated a bulb icon will appear on the satellite status page To set the backlight timer 1 Highlight the LIGHT field and press ENTER 2 Select the desired setting and press ENTER 3 To turn the backlight on and off press the POWER key briefly Tone Setting Th...

Страница 47: ... User Grid option lets you create a user defined position format by establishing factors such as longitude of origin scale and false Easting or Northing To define a user grid 1 Select User Grid and press ENTER 2 Enter values for longitude origin scale and false Easting and Northing and press ENTER 3 Highlight SAVE and press ENTER MapDatums The MAP DATUM field comes with a WGS 84 de fault setting A...

Страница 48: ...ght the CDI field and press ENTER 2 Select the desired setting and press ENTER Units of Measure The GPS 12 CX lets you select statute default nau tical or metric units of measure for all speed and distance readouts To change the unit of measure 1 Highlight the UNITS field and press ENTER 2 Select the desired units of measure and press ENTER Heading Reference The GPS 12CX s heading information can ...

Страница 49: ...ance track from the each waypoint in the active route or from the GOTO destination To set the arrival alarm 1 Highlight the ARRIVAL field and press ENTER 2 Select On Auto or Off and press ENTER 3 If On is selected highlight the distance field press ENTER enter the desired distance and press ENTER The CDI alarm will alert you if your position deviates off course left or right beyond the limits spec...

Страница 50: ...lect a desired setting and press ENTER To disable all interfacing capabilities select the None None setting If you want to output NMEA data without any differential input capability select None NMEA Interface Setup DGPS The last two format settings allow the differential ready GPS 12CX to accept RTCM DGPS corrections in RTCM 104 version 2 0 format Using DGPS corrections will improve receiver accur...

Страница 51: ...ou informed of DGPS activity A Tuning message will be displayed while a beacon receiver is selecting a frequency bit rate and waiting for signal reception Once a valid beacon signal has been received a Receiving message will be displayed If the beacon signal is received and no correction data is being received a No Data message will be dis played If a beacon frequency cannot be tuned and or no sig...

Страница 52: ...ame the unit scans the database just like the waypoint scanning function and displays the next available city with the state displayed below If there are multiple cities with the same name the state or country of the city will be displayed below the city name continue scrolling through the same character to see all of the choices When you have selected a city the location of the city will be displ...

Страница 53: ...e desired value and pressing ENTER You may also enter a new position if you desire from the Position Page REFERENCE Navigation Simulator The GPS 12CX does not track satellites in simulator mode Never attempt to use the simulator mode for actual navigation Putting the GPS 12CX in Putting the GPS 12CX in Putting the GPS 12CX in Putting the GPS 12CX in Putting the GPS 12CX in Simulator Mode Simulator...

Страница 54: ...sting is complete the wel come page will be replaced by the Satellite Page and the EZinit prompt may appear prompting you to select one of two initialization methods Select Country allows you to initialize the receiver by selecting your present position from a list of countries in the GPS 12 CX s internal database This typically provides a position fix in under three minutes AutolocateTM allows th...

Страница 55: ...at the top left corner of the Satellite Page Initialization Troubleshooting If you have trouble initializing the receiver or acquiring a position check the following Does the unit have a clear view of the sky If there are large buildings or mountains nearby or if there is heavy tree cover the receiver may not be re ceiving enough satellite signals to calculate a position Have you selected the righ...

Страница 56: ... 1 5 meters 3 17 ft with DGPS corrections 15 meters 49 ft RMS Velocity Accuracy 0 1 knot RMS steady state Dynamics 6g POWER Input Four 1 5 volt AA batteries or 10 32v DC Power Consumption 1 watt Battery Life Up to 36 hours with 4 AA batteries Internal Backup lithium battery NOTE Alkaline batteries lose a significant amount of their capacity as tem perature decreases If you re using the GPS 12CX in...

Страница 57: ...waypoint symbols such as the GPS II plus GPS 12 and GPS 12XL software version 3 01 or later Part No 010 10142 00 PC Kit Interface Cable PC interface cable with 9 pin D serial data connector Part No 010 10141 00 A combined Cigarette Lighter Adapter and PC Interface Cable is also available as Part No 010 10165 00 The following interface formats are supported by the GPS 12CX for connection to up to t...

Страница 58: ...es do not match Poor GPS Coverage The GPS 12CX cannot acquire the necessary number of satellites to compute a position Try another location with a clearer view of the sky Power Down and Re init The GPS 12CX is not able to calculate a position due to abnormal satellite conditions Turn the unit off and verify the last position shown by other means Try the unit again later possibly in a different loc...

Страница 59: ...int entered does not exist in the database and has been deleted from the route RTCM Input has Failed DGPS data being received has been lost You are no longer receiving the beacon signal Searching the Sky The GPS 12CX is in searching the sky for almanac data or the unit is in AutoLocate mode Stored Data was Lost All waypoints routes time and almanac data has been lost due to battery failure or clea...

Страница 60: ...5 7 9 0 W o t º 5 2 1 1 W 6 º 5 2 8 0 W o t º 5 7 9 0 W 5 º 5 7 6 0 W o t º 5 2 8 0 W 4 º 5 2 5 0 W o t º 5 7 6 0 W 3 º 5 7 3 0 W o t º 5 2 5 0 W 2 º 5 2 2 0 W o t º 5 7 3 0 W 1 º 5 7 0 0 W o t º 5 2 2 0 W 0 5 7 0 0 E o t 5 7 0 0 W t e s f f O e n o Z l a n i d u t i g n o L 1 5 2 2 0 E o t 5 7 0 0 E 2 5 7 3 0 E o t 5 2 2 0 E 3 5 2 5 0 E o t 5 7 3 0 E 4 5 7 6 0 E o t 5 2 5 0 E 5 5 2 8 0 E o t 5 7 ...

Страница 61: ...ew Georgia Islands Easter Isld 6 Easter Island 1967 European 1950 European 1950 Austria Belgium Denmark Finland France Germany Gibraltar Greece Italy Luxembourg Netherlands Norway Portugal Spain Sweden Switzerland European 1979 European 1979 Austria Finland Netherlands Norway Spain Sweden Switzerland Finland Hayfrd Finland Hayford Finland Gandajika Base Gandajika Base Republic of Maldives Geod Dat...

Страница 62: ... Shetland Isl Wales Pico De Las Nv Canary Islands Potsdam Potsdam Germany Ptcairn Ast 67 Pitcairn Astro 67 Pitcairn Is Prov S Am 56 Prov So Amricn 56 Bolivia Chile Colombia Ecuador Guyana Peru Venezuela Prov S Chln 63 Prov So Chilean 63 S Chile Puerto Rico Puerto Rico Virgin Islands Qatar National Qatar National Qatar Qornoq Qornoq South Greenland Reunion Reunion Mascarene Island Rome 1940 Rome 19...

Страница 63: ... 23 Cigarette Lighter Adapter vi Clearing the Map 8 Clearing Routes 35 Contrast 5 Compass Page 21 Copying Routes 35 Creating Routes 34 Custom Navigation Pages 20 D Date and Time Setup 37 Deleting Waypoints 26 DGPS 42 43 Distance and Sun 37 E Editing Routes 36 Elapsed Time 12 Emergency Erase 11 Entering an Altitude 13 EZ Init 10 F Find City 44 G GOTO 15 29 H Heading Reference 40 Highway Page 22 I I...

Страница 64: ... Page 12 Positon Field 13 Positon Formats 39 Power and Data Cables vi Proximity Waypoint Page 28 R Reference Waypoints 26 Renaming Waypoints 26 Reset Odometer 12 Reset Speed Measurement 12 Reset Timer 12 Reset TTIME 12 Routes Clearing Routes 35 Copying Routes 35 Creating Routes 34 Editing Routes 36 Inverting Routes 34 Navigating Routes 34 On Route GOTOs 36 Route Definition Page 33 Route Navigation...

Страница 65: ... Measure 40 User Grid 39 Using the Compass Page 21 Using the Keypad 2 W Waypoints Comments 24 Definition Page 25 Display Option 15 GOTO a Waypoint 15 Nearest Waypoints Page 28 Proximity Waypoint Page 28 Reference Waypoints 26 Renaming Waypoints 26 Waypoint List 27 Waypoint Pages 24 Waypoint Symbols 23 Z Zooming 14 APPENDIX F Index ...

Страница 66: ...L RIGHTS WHICH MAY VARY FROM STATE TO STATE IN NO EVENT SHALL GARMIN BE LIABLE FOR ANY IN CIDENTAL SPECIAL INDIRECT OR CONSEQUENTIAL DAM AGES WHETHER RESULTING FROM THE USE MISUSE OR IN ABILITY TO USE THIS PRODUCT OR FROM DEFECTS IN THE PRODUCT SOME STATES DO NOT ALLOW THE EXCLUSION OF INCIDENTAL OR CONSEQUENTIAL DAMAGES SO THE ABOVE LIMITATIONS MAY NOT APPLY TO YOU To obtain warranty service call...

Страница 67: ...rmin International Inc 1200 E 151st Street Olathe KS USA 66062 GARMIN Europe Ltd Unit 5 The Quadrangle Abbey Park Industrial Estate Romsey SO51 9AQ UK GARMIN Asia Corp 3F No 1 Lane 45 Pao Hsing Road Hsin Tien Taipei Taiwan R O C ...

Отзывы: