background image

GPS A

PPLICATIONS

 > 

23

Garmin Que Applications Guide

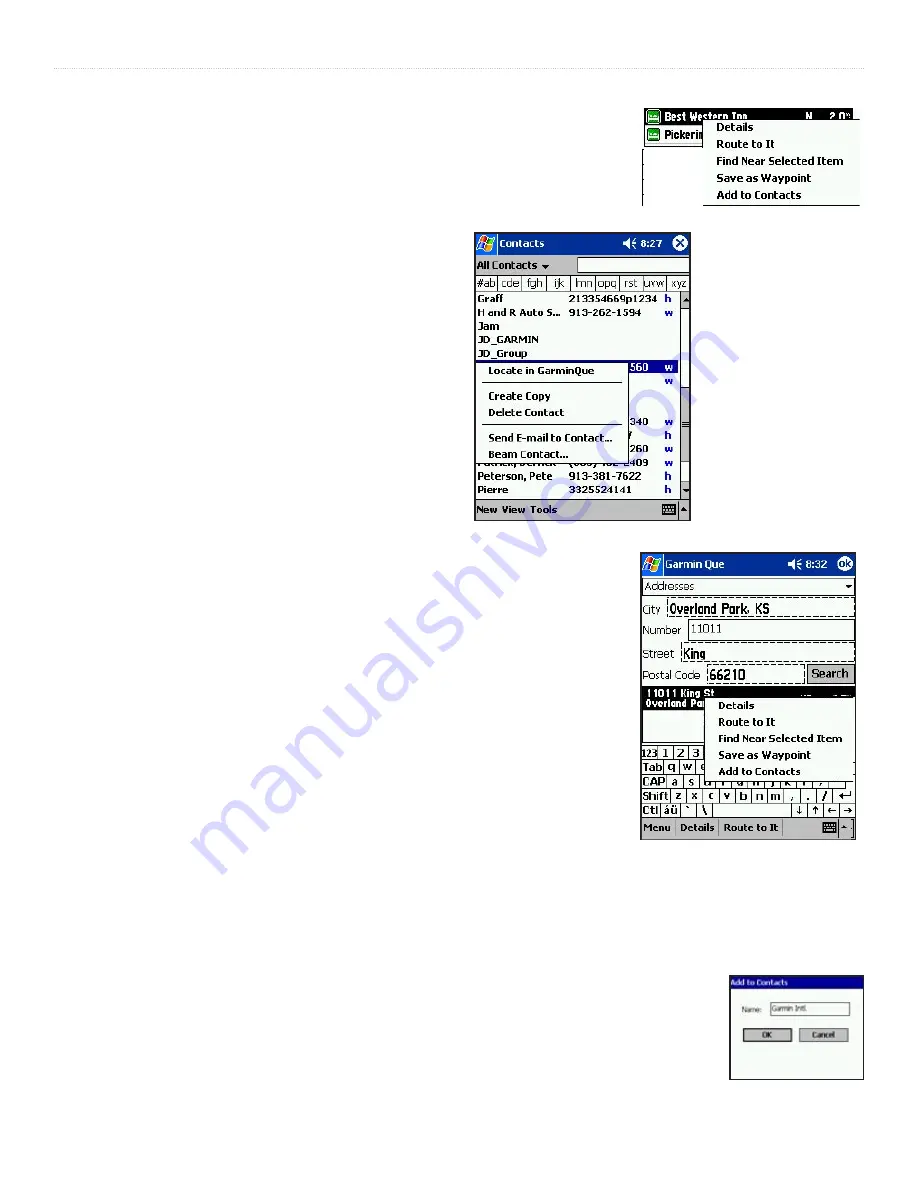
Locate Address in Garmin Que

Selected Find Item Option Menu

Matched Address “Route To It”

To create a Route to a destination using the Find 

feature:

1.  From the Menu tool bar, tap the Find (binoculars) 

icon to display the Find Menu.

2.  Choose a Find category to search for the desired 

destination location. Refer to detailed instructions 

for using the Find feature on page 9.

3.  When you have selected a destination, place the 

stylus on the listing until an options menu appears, 

then either select “Details” or “Route To It”. “Route 

To It” begins route calculation, while the “Details” 

option allows you to view information about the 

destination before tapping the “Route To It” button 

at the bottom of the page.

4.  Tap 

OK

 to return to the Map Page to view the route 

on the map.

To create a Route to a Contact Location using the 

Find Feature:

1.  From the Contacts List, use the stylus to select an 

entry with an address.

2.  Then hold the stylus in place to display the drop-

down menu and select 

Locate in Garmin Que

 to 

display the Find Address Page.

3.  If the address from the Contacts List is in the map 

database, the City, Number, Street and Postal Code 

fields will contain the address data.

4.  Tap 

Search

 to display the best matches.

5.  Highlight your choice and hold the stylus in place to 

display the drop-down menu. 

6.  Select 

Route To It

 to begin the route calculation.

  You can also tap the Main Menu at the bottom of 

the page with the address highlighted and select the 

same option.

  Or... tap the 

Location

 icon on the tool bar to begin 

route calculation.

Note

: If the address from the Contacts List is not in the map 

database, a “No address found” message will appear.  The 

address can be correct, but you may not have map data loaded 

that supports the region where the address is located.  For 

example: If you are in the Los Angeles area and have map data 

loaded to support only that region and you choose an address in 

the Seattle region, without map data for that region, no match 

can be achieved

.

To Add a Find Feature Item to the Contacts List:

1. 

  From the Main Menu for a Find Feature Address, 

Intersection or highlighted Point of Interest, select 

“Add to Contacts” and any item with an address 

will be added to the Contacts 

List. For addresses and 

intersections, you will be 

prompted to enter a name 

before adding to Contacts.

Содержание GPS 10 Deluxe

Страница 1: ...Garmin Que GPS navigation software Windows Mobile for the Pocket PC application guide ...

Страница 2: ...document is subject to change without notice Garmin reserves the right to change or improve its products and to make changes in the content without obligation to notify any person or organization of such changes or improvements Visit the Garmin web site www garmin com for current updates and supplemental information concerning the use and operation of this and other Garmin products Garmin and MapS...

Страница 3: ...stand the operation of your Pocket PC prior to using Garmin Que The operation of the Garmin Que application requires understanding of standard procedures used for the Pocket PC that are not discussed in detail in the Garmin Que Application Guide If you purchased your Pocket PC at the same time as the Garmin GPS receiver and are not yet familiar with its operation it is strongly recommended that yo...

Страница 4: ...ls of Garmin is to provide customers with the most complete and accurate cartography that is available to us at a reasonable cost We use a combination of governmental and private data sources which we identify as required in product literature and copyright messages displayed to the consumer Virtually all data sources contain inaccurate or incomplete data to some degree This is particularly true o...

Страница 5: ... or passengers are likely to impact it in a collision The mounting hardware provided by Garmin is not warranted against collision damage or the consequences thereof WARNING When used in vehicles it is the sole responsibility of the driver of the vehicle to operate the vehicle in a safe manner maintain full surveillance of all driving conditions at all times and not become distracted by the PDA to ...

Страница 6: ...e Settings 12 GPS 10 Properties 12 The Find Feature 13 Searching for Cities 14 Searching for an Address 15 Searching for an Intersection 16 Searching for a Point of Interest 17 Searching for a Waypoint 18 Creating Waypoints 19 Editing Waypoints 20 GPS Info Page 21 Establishing an initial location 21 Routes 22 Creating a Route 22 Route Navigation 24 Customizing Route Navigation 25 Road and Area Avo...

Страница 7: ...es A message window at the top of this page keeps you informed of the status of the GPS receiver When the GPS receiver is not in communication the Map Page will display a No GPS Connected message While the GPS receiver is first turned on the Map Page will then display a Waiting for GPS message until the application connects with the receiver Once connected an Acquiring Satellites message appears u...

Страница 8: ...hile this takes place an Acquiring Satellites message will display at the top of the page When your location has been determined a 3D GPS Location message replaces the original message After you begin moving it changes to display the next street ahead and you can also determine your direction of travel speed and current location by observing the data fields below the message At the base of the pag...

Страница 9: ...ned by the Map Pointer Tapping the stylus on the map places the Map Pointer on any selected location on the map If that location is supported by detailed mapping data a description name or address will display briefly Any location on the map marked by the Map Pointer can be saved as a waypoint by tapping the Waypoint Marker Flag or the Information Page icon in the map tool bar More on waypoints on...

Страница 10: ...hange the information or arrangement of the data fields for mapping or routing tap Done to close the Setup Menu Setting the display of the Mapping Data Fields When you are using the Map Page and not navigating a Route the Data Fields can be setup to display only data useful for navigation using the Map Page To determine the arrangement of the Data Fields 1 Tap and Hold anywhere on a data field to di...

Страница 11: ... same field location To determine the arrangement of the Data Fields 1 Tap and Hold anywhere on a data field to display the Customize window then tap the window to display the tabbed Setup Menu 2 Tap the Routing Tab to display the Setup Menu 3 Follow steps 3 through 5 of the instructions for setting up Mapping Data Fields as explained on the previous page To determine what data to display in each D...

Страница 12: ...ings currently operate the application For instructions on using System Setup see page 10 GPS Properties This page displays when the system is connected to a GPS 10 wireless receiver It provides access to controls for WAAS Auto Off Auto On and battery power level status Find This feature provides you with lists by category of locations contained inthe detailed map and basemap data stored in your d...

Страница 13: ...o activate this feature which automatically scales the map to display both your current location and the next turn in a route during active navigation Detailed Maps To view the list of detailed map data and select maps for display 1 Tap the Detailed Maps tab from the Map Setup Pages 2 Tap the desired detailed map to add or remove a check from the activation box Detailed information for that map wi...

Страница 14: ...ale of 120 feet to 800 miles 2 Repeat for each listed map feature Map Point Settings To set the Text Size for Waypoints Interstate Exits and Points of Interest 1 Tap the Point tab from the Map Setup Pages 2 Select the text size for each type of map item To set the Maximum Zoom level 1 For Maximum Zoom select from OFF AUTO or from an incremental scale of 120 feet to 800 miles 2 Repeat for each list...

Страница 15: ... size when observing the map Marine Settings To set the Text Size for Navaids Spot Soundings and Tide Stations 1 Tap the Marine tab from the Map Setup Pages 2 Select the text size for each type of map item To set the Maximum Zoom level For Maximum Zoom select from OFF AUTO or an increment from a scale of 120 feet to 800 miles Topographic Settings To set the Text Size for Major Intermediate and Min...

Страница 16: ... prompts only select Guidance Only 3 To receive guidance only when desired by pressing a hard button mapped to the Speak Next Instruction option from the Buttons setup select Manual Speak Only See page 34 for instructions on mapping hard buttons To Activate Deactivate the Attention Tone 1 To hear a tone prior to when a message is displayed on the device screen or a voice prompt tap Attention Tone ...

Страница 17: ...ic Degrees or Mils Elevation can be measured in Feet or Meters values Depth can be measured in Feet Meters or Fathoms Buttons Settings You can select hard buttons on the unit to perform specific Que Application functions To use hard buttons to operate Garmin Que features 1 Tap the Arrow Button top or bottom to increase or decrease the map scale or to scroll a list 2 If a Jog Button is provided wit...

Страница 18: ...n guide provided with your PDA GPS 10 Properties When you select the GPS 10 Bluetooth wireless receiver using the Interface GPS Device setup a GPS 10 Properties settings page becomes available when the GPS 10 is connected to your PDA This page also contains a battery level status field and charging indicator For these selections to be enabled or disabled the GPS 10 must be powered On and communica...

Страница 19: ...ter By Name Near Other and Near a Previously Selected Item Near Other selects a new item to replace the Near previously selected item To further refine your search you can select a sub category by tapping the All Types field and choose from the list of options Finally to speed selection from the remaining list use the Containing field to enter a word or part of a word in the title of the item you ...

Страница 20: ...e stylus on the city until the drop down four option menu appears or tap Menu to display a five option menu 6 Tap Details to view the Details Page which displays the city on the map and provides a brief description below the map Tap the Route To It button to create a route to the city from your current location 7 To create a route without first viewing the Details Page tap Route To It from the drop ...

Страница 21: ...cted state or province Select a city If you tap the City field first the Region field is hidden 5 Enter the street address next 6 Tap the Street field to display the Street Name dialog page Enter the first few letters of the street name in the Name field You need not insert North East Avenue Street etc at the beginning or end of the street name 7 When the desired street name appears in the list below th...

Страница 22: ...the City field to display a list of cities in the selected state or province Select a city If you tap the City field first the Region field will be hidden 5 Tap the first Street field to display the Street Name dialog page Enter the first few letters of the street name in the Name field You need not insert North East Avenue Street etc at the beginning or end of the street name 6 When the desired street na...

Страница 23: ...lated to that subject 5 With the list displayed highlight a single Point of Interest item 6 When you tap Details an information page displays showing a location map and detailed information about the item phone number address etc If your PDA is phone enabled tapping the phone number allows you to dial that number 7 After you have viewed details about a Find item that item is added to the Recent Fi...

Страница 24: ...e To It button to create a route to the city from your current location 6 To create a route without first viewing the Details Page tap Route To It from the drop down menu 7 To search for other map items near this city tap Find Near Selected Item from the drop down menu 8 To delete the waypoint from the list tap Delete Waypoint from the drop down menu 9 If you opened the Menu at the bottom of the pa...

Страница 25: ...as a waypoint 1 With the Map Page displayed use the stylus to tap the desired loca tion on the map which causes the Map Pointer white arrow to display If the point on the map has descriptive information in the map database it displays for six seconds 2 Once the Map Pointer is at the desired location tap the Waypoint icon on the tool bar to display the Waypoint Details Page 3 Observe that the waypo...

Страница 26: ...ed altitude To assign a map symbol to a waypoint Adjacent to the Elevation field is a map symbol box Tap the box to display the Map Symbols List and select the desired symbol for your waypoint To change the location of a waypoint 1 Access the desired Waypoint Details Page from the Waypoints List 2 Then tap Menu to display the list of options 3 Select Move to display a map with the waypoint 4 Use th...

Страница 27: ...age appears and your location coordinates display at the top of the left hand column On the right the date and time displays along with your approximate elevation and if you are moving your current speed displays as well When you have sufficient signals from four or more satellites a 3D GPS Location message appears and the approximate elevation also displays at the bottom of the column The accurac...

Страница 28: ...ition to those previously mentioned A route cannot be calculated unless the GPS receiver has determined your current location and you have selected a destination Check the GPS status message at the top of the Map Page before selecting a destination Routes are simulated if the is no GPS connection Creating a Route Before beginning route navigation you must select a destination Once the destination ...

Страница 29: ...ss Page 3 If the address from the Contacts List is in the map database the City Number Street and Postal Code fields will contain the address data 4 Tap Search to display the best matches 5 Highlight your choice and hold the stylus in place to display the drop down menu 6 Select Route To It to begin the route calculation You can also tap the Main Menu at the bottom of the page with the address high...

Страница 30: ... Menu to select the Routes option or just tap the Route icon on the tool bar 2 When the Route Menu displays tap the Turns icon to display the Turns Page Each turn on the route is displayed on this page Each turn entry provides written instructions the distance to the next turn a turn direction arrow the time required to drive to the next turn and the time of arrival at the next turn based on your ...

Страница 31: ... of your particular Pocket PC To set Routing Preferences 1 On the Routing preferences page under Route Preference tap Faster Time Shorter Distance Off Road or Custom If you want this option to display every time you begin a route tap Ask Me My Preferences to place a check mark next to it When the checked this option displays the route preference pop up window before a route is calculated 2 Next is...

Страница 32: ... to place an active check in the box 6 Tap and hold the stylus on a selected Avoid Roads item to View Edit or Delete To select areas to avoid 1 Tap the Add Area button to display the Avoid Areas Setup Page The page will display a map with your current location centered on the map 2 Use the Drag and Zoom tool zoom in on the area you want to avoid or use the Pan Map tool to move to the area on the m...

Страница 33: ...ap the Route icon on the tool bar and then the Route To Home icon on the Routes Menu 4 To change the Home Point tap the Home tab of the Route Preferences Pages and repeat the process above Edit Vias To make turns or stops at points along or near to your route you can add via points that are incorporated into the route To create new waypoints along the Route Edit Vias 1 With a route active open the...

Страница 34: ...urn you want to avoid then tap the turn description and then OK to recalculate the route to avoid the turn To Detour a specified section of a roadway on a Route Tap the Avoidance icon in the upper right corner of the screen to display the Avoidance page Refer to page 26 for detailed instructions Recalculate If you travel off a route you can quickly recalculate the route to get back on track to your...

Страница 35: ...Name it is automatically given a numeral identity You can personalize it by renaming to a title of your choice 4 The next two fields are Track Start Time and Track End Time Tap each field to select a beginning and end time for the saved track 5 From the Track Style field select a color for the track line when displayed on the Map Page 6 Tap Save to save the track to the Saved Tracks list To view and ...

Страница 36: ...ice Make your selection and tap OK to return the Sun and Moon Page To control Sun and Moon graphic animation tap Menu on the Tool Bar then tap your selection Choose from Stop By Hour or By Day The Hunt and Fish Tables The Hunt and Fish Tables provide you with a listing of predicted best times for hunting and fishing for a chosen date and location To access the Hunt and Fish Page 1 From the Map Pag...

Страница 37: ... item on the map and observe the direction and distance in the field above the Tool Bar To Measure Distance between two points on the map 1 Adjust the map scale to include the points you want to measure between See Step 1 above 2 Tap the first item on the map and observe the measurement line connecting your current location to the item Note the Map Pin icon located behind the Current Position Icon 3...

Страница 38: ...d an Odometer totaling distance for all trips Menu options allow you to Reset the Computer Reset the Maximum Speed and Reset the Odometer To access the Trip Computer From the Map Page open the Main Menu and then tap Trip Computer To use the Trip Computer Reset Options 1 From the Trip Computer tap the Menu bar and then tap the desired Reset option to display the option dialog window 2 Tap the Yes o...

Страница 39: ...on Using the Jog Button to change map scale or scroll lists Mny Pocket PC s have a special button on the side of the device used for scrolling lists etc For our purposes we will refer to this button as the Jog Button You can use this button to not only scroll lists but change the map scale up or down when viewing the Map Page Note that for some lists in the Que application an item must be highligh...

Страница 40: ...u and select System Setup 2 Tap the Buttons tab to display the Hard Button Mapping Page 3 To map buttons 1 through 4 for press and release functions tap each field to display a list of featurre options Then tap the feature you desire mapped to that button 4 To map buttons 1 through 4 for press and hold functions tap each field to display a list of feature options Then tap the feature you desire 5 1 ...

Страница 41: ...d To Garmin Que window opens select a storage location from the options in the Map Storage Location dialog and then click the Send button 5 A Sending To Garmin Que window appears and then states The data was successfully saved when transfer is complete 6 Click OK to finish To transfer detailed maps from the Garmin Que to MapSource 1 Open MapSource on your PC 2 Select the Maps tab to display the Map...

Страница 42: ... The data was successfully saved when all waypoints have been received Click OK to transfer the waypoints to the MapSource Waypoints field 6 If you haven t already edited the list of waypoints to remove those you don t want to save you can use the edit feature in MapSource to edit your list 7 Before closing save the list of waypoints to a file on your PC To transfer only Saved Tracks to MapSource on...

Страница 43: ...fares and secondary roads within metro areas CD ROM Accepts downloadable map detail from Garmin PC based MapSource City Selectand City Navigator Data Disks which provide street level detail addresses listings of nearest restaurant hotels ATMs and more Accepts most other MapSource map data as well as U S Topos and Marine charts Navigation features Routes Automatically calculated with turn by turn i...

Страница 44: ...nlock code during MapSource Follow installation instructions on the setup installation Disk Detailed Maps Don t Support Routing These maps are not the type used for auto routing Select maps designed for auto routing Too Many Maps on Data Card The map sets you are trying to load are too Check the space available in the chosen large for the space available in the storage location location and choose...

Страница 45: ... still in the developmental stage with a goal of providing reliable signals with an accuracy of 7 meters 21 22 feet both horizontally and vertically 95 of the time Current tests have shown the actual accuracy to be on the order of 2 3 meters 7 10 feet This accuracy is comparable to DGPS as explained below but without the need for a separate beacon receiver Since all SBAS systems use the same recei...

Страница 46: ... the Product and ensure that the other person agrees to the terms of this License 3 YOU MUST NOT a make copies of the Product except as expressly permitted in Section 2 of this License b translate reverse engineer decompile or disassemble the Product except to the extent the foregoing restriction is expressly prohibited by applicable law c rent lease loan sub license distribute assign or transfer ...

Страница 47: ...manu facturer is GARMIN International Inc 1200 E 151st Street Olathe KS 66062 USA 7 EXPORT CONTROLS You agree not to export or re export the Product to any country in violation of the export control laws of the United States of America 8 GENERAL This License is the entire agreement between us superseding any other agreement or discussions oral or written and may not be changed except by a signed a...

Страница 48: ...hronization 10 D Deleting A Route 24 A Track 29 A Waypoint 20 Detailed Maps 7 Details Pages Find 13 Detours Adding 28 Distance Measuring 31 E Editing Via Points on a Route 22 Waypoints 20 Elevation 20 21 Emergency and Gov Finding 17 Ending a Route Stop Navigation 22 Entertainment Finding 17 F Faster Time Route 25 Find Menus Addresses 15 All Points of Interest 17 Attractions 17 Cities 14 Emergency ...

Страница 49: ...te Route 22 25 Receiver Status 21 Recently Found Places 13 Renaming Waypoints 20 Resetting Trip Information 32 Resume Route Navigation 22 Routes Menu 22 Route Navigation 24 Routing Preferences 25 S Satellite Status Page 21 Saving Routes 24 Saving Tracks 29 Signal Strength 21 Software License Agreement 40 Specifications 37 Start Up 1 Status Messages GPS 21 T Table of Contents iv Text Size 8 Time Syn...

Страница 50: ......

Страница 51: ......

Страница 52: ...151st Street Olathe Kansas 66062 U S A Tel 913 397 8200 Fax 913 397 8282 Garmin Europe Ltd Unit 5 The Quadrangle Abbey Park Industrial Estate Romsey SO51 9AQ U K Tel 44 0870 8501241 Fax 44 0870 8501251 Garmin Corporation No 68 Jangshu 2nd Road Shijr Taipei County Taiwan Tel 886 2 2642 9199 Fax 886 2 2642 9099 ...

Отзывы: