background image

GHP 10V Installation Instructions 

9

Connecting the Devices to a nMEa 2000 

network

Notice

If you have an existing NMEA 2000 network on your boat, it should 

already be connected to power. Do not connect the included NMEA 

2000 power cable to an existing NMEA 2000 network, because only 

one power source should be connected to a NMEA 2000 network.
You can connect the GHC 10 to the CCU through an existing NMEA 

2000 network. If you do not have an existing NMEA 2000 network on 

your boat, all the parts needed to build one are supplied in the GHP 10V 

package (

page 10

).

To use advanced features of the GHP 10V, optional NMEA 

2000-compatible devices, such as a GPS device, can be connected to 

the NMEA 2000 network.
For more information on NMEA 2000, go to 

www.garmin.com

.

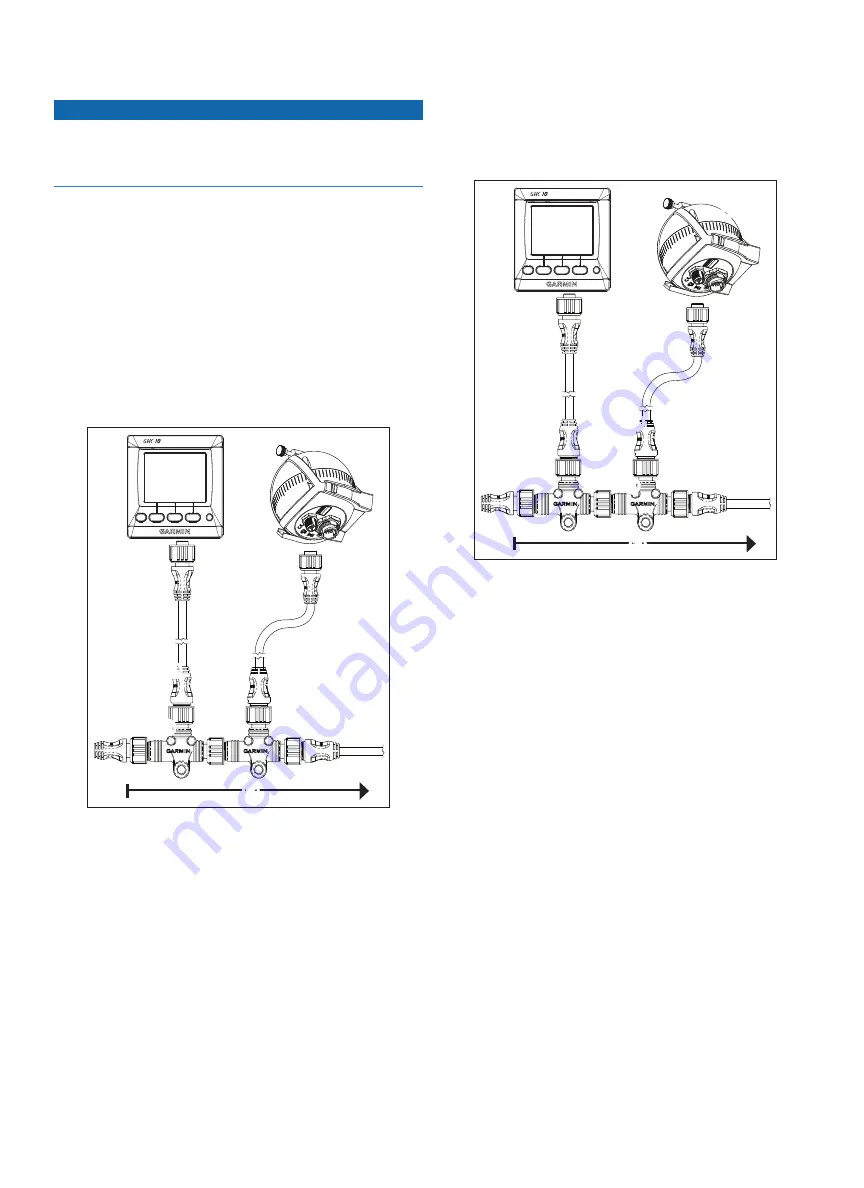
Connecting the GHC 10 to an Existing nMEa 2000 

network

1.  Determine where to connect the GHC 10 

 to your existing NMEA 

2000 backbone 

 (

page 5

).

2.  Disconnect one side of a NMEA 2000 T-connector from the 

network.

3.  If necessary, to extend the NMEA 2000 network backbone, connect 

a NMEA 2000 backbone extension cable (not included) to the side 

of the disconnected T-connector.

4.  Add the included T-connector 

➌ 

for the GHC 10 to the NMEA 

2000 backbone by connecting it to the side of the disconnected 

T-connector or backbone extension cable.

5.  Route the included drop cable 

 to the bottom of the T-connector 

added in step 4, and connect it to the T-connector.

  If the included drop cable is not long enough, you can use a drop 

cable up to 20 ft. (6 m) long (not included). 

6.  Connect the drop cable to the to the GHC 10.
7.  Connect the drop cable to the T-connector you added in step 3, and 

to the GHC 10.


NOTE:

 In order for the autopilot to turn on, the yellow wire from 

the GHC 10 data cable be connected to the yellow wire from the 

CCU interconnect cable, and the black wire from the GHC 10 data 

cable must be connected to the same ground as the CCU (

page 8

).

Connecting the CCu to an Existing nMEa 2000 network

1.  Determine where to connect the CCU 

 to your existing NMEA 

2000 backbone 

 (

page 5

).

2.  Disconnect one side of a NMEA 2000 T-connector from the 

network.

3.  If necessary, to extend the NMEA 2000 network backbone, connect 

a NMEA 2000 backbone extension cable (not included) to the side 

of the disconnected T-connector.

4.  Add the included T-connector 

➌ 

for the CCU to the NMEA 

2000 backbone by connecting it to the side of the disconnected 

T-connector or backbone extension cable.

5.  Route the included drop cable 

 to the bottom of the T-connector 

added in step 4, and connect it to the T-connector.

  If the included drop cable is not long enough, you can use a drop 

cable up to 20 ft. (6 m) long (not included). 

6.  Connect the drop cable to the to the CCU.

Содержание GHP 10V

Страница 1: ...have any questions while using your GHP 10V In the USA go to www garmin com support or contact Garmin USA by phone at 913 397 8200 or 800 800 1020 In the UK contact Garmin Europe Ltd by phone at 0808 2380000 In Europe go to www garmin com support and click Contact Support for in country support information or contact Garmin Europe Ltd by phone at 44 0 870 8501241 Important Safety Information Warni...

Страница 2: ... 10 to an Existing NMEA 2000 Network 9 Connecting the CCU to an Existing NMEA 2000 Network 9 Building a Basic NMEA 2000 Network for the GHC 10 and the CCU 10 Connecting Optional Devices to the GHP 10V Autopilot System 10 NMEA 0183 Connection Considerations 10 Connecting an Optional NMEA 0183 compatible Device to the GHC 10 10 Configuring the GHP 10V 11 About the Sea Trial Wizard 11 Important Sea T...

Страница 3: ...y connects to the CCU through the CCU interconnect cable and connects to the Volvo steering system using a proprietary Volvo connector Serial Number GHC 10 The GHC 10 is the primary interface used to operate the GHP 10V autopilot system Using the GHC 10 you engage and steer the GHP 10V You also set up and customize the GHP 10V using the GHC 10 The GHC 10 connects to a NMEA 2000 network to communic...

Страница 4: ...le NMEA 2000 Extension Cables NMEA 2000 extension cables are available if needed Contact your local Garmin dealer or Garmin Product Support for ordering information Tools Needed Safety glasses Drill and drill bits 3 1 2 in 90 mm hole saw Wire cutters strippers Phillips and flat screwdrivers Cable ties Waterproof wire connectors wire nuts or heat shrink tubing and a heat gun Marine sealant Portable...

Страница 5: ...ect cable connects the CCU to the Autopilot Gateway and provides 9 5 ft 3 m of cable between the CCU and the Autopilot Gateway If the CCU cannot be mounted within 9 5 ft 3 m of the Autopilot Gateway NMEA 2000 cables can be used to extend the connection The CCU interconnect cable must not be cut The CCU interconnect cable connects the CCU to the GHC 10 with a single yellow signal wire page 7 The au...

Страница 6: ...e installed only if you are building a NMEA 2000 network Do not install this cable if there is an existing NMEA 2000 network on your boat page 10 The NMEA 2000 power cable must be connected to a 9 16 Vdc power source CCU Mount the CCU with the cables pointing straight down page 7 CCU power cable The CCU can be connected to a 12 24 Vdc power source The black wire from the GHC 10 data cable must be ...

Страница 7: ...nect cable to the location where you plan to access the Volvo multilink bus page 7 2 Connect the CCU interconnect cable to the Autopilot Gateway after you have installed the gateway 3 Route the wires from the bare wire portion of the cable to the CCU interconnect cable Route the orange and blue wires to the location where you plan to install the alarm page 7 If the cable is not long enough extend ...

Страница 8: ...ll bit to drill a pilot hole as indicated on the template to begin cutting the mounting surface 4 Using the jigsaw or the 3 5in 90 mm hole saw cut the mounting surface along the inside of the dashed line indicated on the flush mount template 5 If necessary use a file and sandpaper to refine the size of the hole 6 Place the GHC 10 into the cutout to confirm that the four mounting holes are correct ...

Страница 9: ...sconnected T connector or backbone extension cable 5 Route the included drop cable to the bottom of the T connector added in step 4 and connect it to the T connector If the included drop cable is not long enough you can use a drop cable up to 20 ft 6 m long not included 6 Connect the drop cable to the to the GHC 10 7 Connect the drop cable to the T connector you added in step 3 and to the GHC 10 N...

Страница 10: ...em To use advanced features of the GHP 10V optional NMEA 2000 compatible or NMEA 0183 compatible devices such as a GPS device can be connected to the NMEA 2000 network or to the GHC 10 through NMEA 0183 NMEA 0183 Connection Considerations To identify the Transfer Tx A and B wires for your NMEA 0183 compatible device consult the installation instructions for your device When connecting NMEA 0183 de...

Страница 11: ...at the boat DOES NOT list The GHC 10 displays a completion message when the calibration is complete 4 Select an option If the calibration completes successfully select Done If the calibration fails select Retry and repeat steps 1 3 Performing the Autotune Procedure Before you can perform the autotune procedure you must have a large stretch of open water available 1 Adjust the throttle so the boat ...

Страница 12: ...ing to constantly adjust the heading at the slightest deviation An overactive autopilot can cause excess wear and tear on the drive unit and drains the battery at a faster than normal rate Select Low Speed Counter or High Speed Counter to adjust how tightly the rudder corrects the turn overshoot If you set this value too high the autopilot can overshoot the turn again when attempting to counter th...

Страница 13: ...the GHC 10 unconnected GHC 10 NMEA 2000 network provides power to the GHC 10 12 VDC power source NMEA 0183 compatible device Wire GHC 10 Wire Color Function NMEA 0183 Compatible Device Wire Function N A Power N A NMEA 0183 ground Blue Tx A Rx White unconnected N A Brown Rx A Tx A Green Rx B Tx B NOTE When connecting a NMEA 0183 device with only one receiving Rx line the NMEA 2000 bus and the NMEA ...

Страница 14: ...e PGN List Group Function 126996 Product Information 127258 Magnetic Variation 127488 Engine Parameters Rapid Update 129025 Position Rapid Update 129026 COG SOG Rapid Update 129283 Cross Track Error 129284 Navigation Data Transmit 059392 ISO Acknowledgment 059904 ISO Request 060928 ISO Address Claim 126208 NMEA Command Request Acknowledge Group Function 126464 Transmit Receive PGN List Group Funct...

Страница 15: ...he vessel when operating below planing speed If you set this value too high the autopilot may be overactive attempting to constantly adjust the heading at the slightest deviation An overactive autopilot can cause excess wear and tear on the drive unit page 12 Rudder Gains Low Speed Counter Allows you to set the rudder gain counter correction for low speeds This setting applies to the vessel when o...

Страница 16: ...ain has been set If this value is too high the autopilot will overcompensate for cross track error If this value is too low the autopilot will allow a large long term cross track error NOTE Advanced configuration settings are available when using the advanced configuration procedure page 12 Other settings are available during normal operation of the GHP 10V See the configuration section of the GHC...

Страница 17: ...GHP 10V Installation Instructions 17 CCU Mounting Template Up when installing on a vertical surface ...

Страница 18: ......

Страница 19: ...or magnetic interference in the area Mount the CCU in the bracket so that the wires hang straight down 4 Mount the GHC 10 by following the directions starting on page 5 5 Mount the Autopilot Gateway by following the directions on page 7 6 Connect the Autopilot Gateway to the Volvo multilink bus page 8 7 Connect the Autopilot Gateway to the CCU using the CCU interconnect cable page 8 8 Connect the ...

Страница 20: ...improvements Visit the Garmin Web site www garmin com for current updates and supplemental information concerning the use and operation of this and other Garmin products Garmin the Garmin logo and GPSMAP are registered trademarks of Garmin Ltd or its subsidiaries registered in the USA and other countries GHP GHC and myGarmin are trademarks of Garmin Ltd or its subsidiaries These trademarks may not...

Отзывы: