Garland P10GSFPBPFE Скачать руководство пользователя страница 29

User Guide

XtraTAP™ Portable Packet Broker | P10GSFPBPFE | 4.22.1

 Taps Settings

The following configuration options may be displayed, modified, enabled or disabled.

Tap Modes
Fail Mode
LFP
Reverse Bypass

1. Edit the Tap Settings, by placing the cursor on the tap and double-press the left mouse button.

The Tap panel will be displayed.

2. Select Edit Tap Settings.

The Configure Inline Appliance panel will be displayed.

3. Select the Tap Mode.
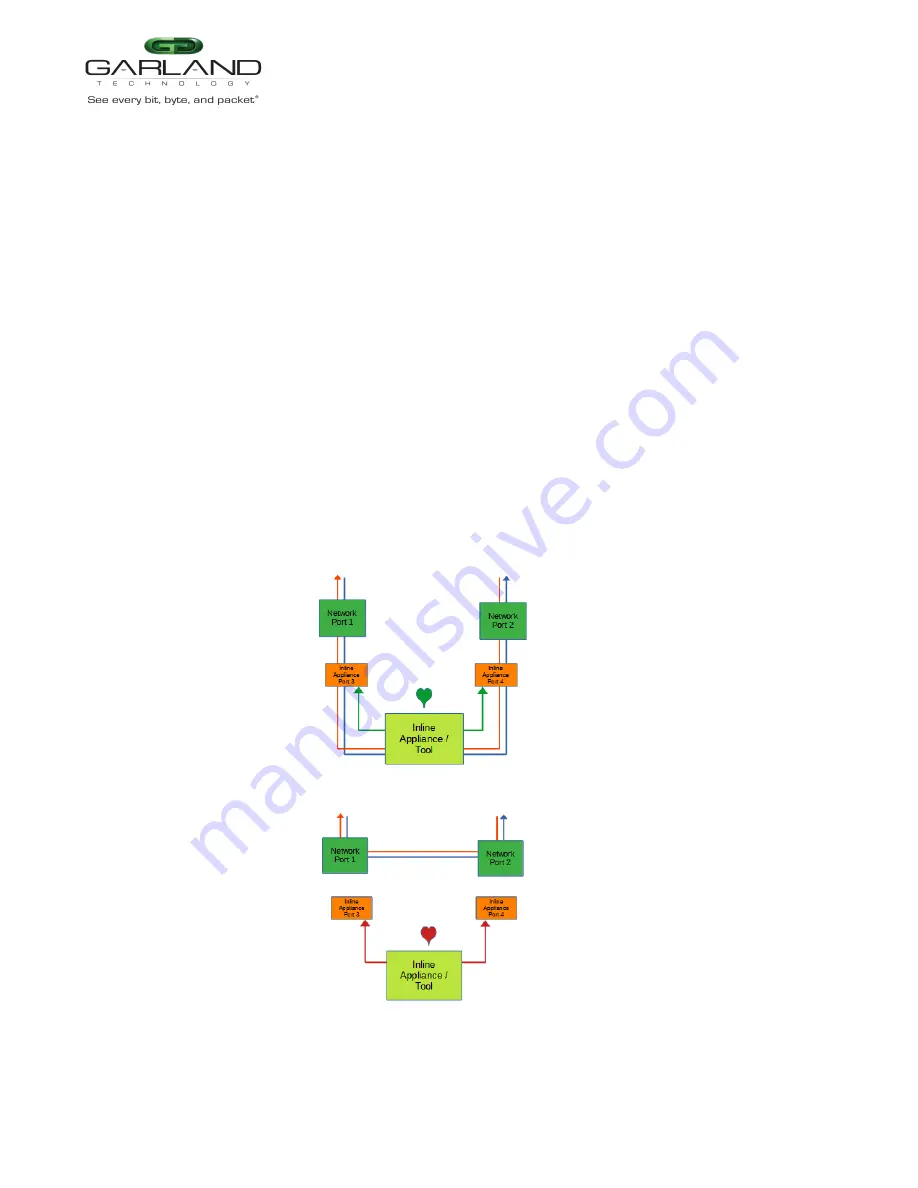
Active

Allows the tap to automatically switch from inline to bypass if an issue occurs

with the inline appliance port(s), loss of link or heartbeats. When the issue with
the inline appliance port(s) is resolved, link and heartbeats restored, the tap will
automatically switch back to inline.

Figure 2 Bypass Mode (Inline)

Figure 3 Bypass Mode (Bypass)

Garland Technology  |  716.242.8500  |  www.garlandtechnology.com
Copyright © 2022 Garland Technology, LLC. All rights reserved.

29

Содержание P10GSFPBPFE

Страница 1: ...User Guide P10GSFPBPFE 12 2022 Release Version 4 22 1 1...

Страница 2: ...Notice The purchased products services and features are stipulated by the contract made between Garland Technology and the customer All or part of the products services and features described in this...

Страница 3: ...er Mode 13 LED Indications 13 2 System 14 System Info 15 General 15 Admin 15 Users 15 Groups 16 Authentication 16 Local Authentication Disable 17 Local Authentication Enable 17 TACACS Primary Authenti...

Страница 4: ...an Mode 31 5 Span Packet Inject Mode 32 6 Breakout Mode 33 7 Filter Mode 34 Packet Broker 35 Filter Templates 36 Config Map 37 Ingress 37 Filters 38 Egress 39 Config Map Save 39 Modify a Config Map 39...

Страница 5: ...p Name 55 Heartbeat Settings 55 Taps Settings 55 Filters 58 Filter Templates 59 Config Map 60 Ingress 61 Filters 61 Egress 62 Config Map Save 62 Modify a Config Map 63 Config Map Statistics 63 Delete...

Страница 6: ...ed on the dashboard The P10GXXBPE supports multiple modes of operation Bypass Span Span Packet Inject Breakout Filter Aggregate Filter Tap and Bypass Filter Bypass Mode LED Indications Port 1 L A1 Net...

Страница 7: ...A2 Span Port Link Activity LED BP N A Port 3 L A Span Port Link Activity LED Port 3 H M N A Port 4 L A Span Port Link Activity LED Port 4 H M N A The L A1 L A2 Port 3 L A and Port 4 L A LEDs only indi...

Страница 8: ...nject Port Link Activity LED BP N A Port 3 L A Span and Packet Inject Port Link Activity LED Port 3 H M N A Port 4 L A Span and Packet Inject Port Link Activity LED Port 4 H M N A The L A1 L A2 Port 3...

Страница 9: ...Network Port Link Activity LED BP N A Port 3 L A Breakout Port Link Activity LED Port 3 H M N A Port 4 L A Breakout Port Link Activity LED Port 4 H M N A The L A1 L A2 Port 3 L A and Port 4 L A LEDs o...

Страница 10: ...Filter Port Link Activity LED BP N A Port 3 L A Filter Port Link Activity LED Port 3 H M N A Port 4 L A Filter Port Link Activity LED Port 4 H M N A The L A1 L A2 Port 3 L A and Port 4 L A LEDs only i...

Страница 11: ...etwork Port Link Activity LED BP N A Port 3 L A Aggregate Port Link Activity LED Port 3 H M N A Port 4 L A Aggregate Port Link Activity LED Port 4 H M N A The L A1 L A2 Port 3 L A and Port 4 L A LEDs...

Страница 12: ...rt Link Activity LED BP N A Port 3 L A Breakout Aggregate Port Link Activity LED Port 3 H M N A Port 4 L A Breakout Aggregate Port Link Activity LED Port 4 H M N A The L A1 L A2 Port 3 L A and Port 4...

Страница 13: ...rk Port Link Activity LED BP Bypass LED Port 3 L A Inline Appliance Link Activity LED Port 3 H M N A Port 4 L A Inline Appliance Link Activity LED Port 4 H M N A The L A1 L A2 Port 3 L A and Port 4 L...

Страница 14: ...General Export Configuration Admin Import Configuration Network Settings Software Upgrade Date Time Reboot Syslog 1 Select System on the Dashboard Menu bar The System panel will be displayed The syst...

Страница 15: ...Chassis Name 4 Enter the desired Key Press Timeout 5 Select Save to save updates 6 Select Cancel to return to the General System Settings panel Admin The following configuration options may be displa...

Страница 16: ...r only the OPER and NOC groups may be deleted 1 Select Groups to create a new group The Create New Group panel will be displayed 2 Enter the Group Name 3 Select the desired privileges 4 Select Save to...

Страница 17: ...IP Address IPv4 or IPv6 3 Enter the Secret Word optional 4 Select Save to save updates 5 Select Cancel to return the Admin Settings panel TACACS Test This option may be used to verify the authenticati...

Страница 18: ...ion of a TACACS user password and authorization group The TACACS Test option will be active only if TACACS authentication has previously been enabled 1 Select TACACS Test The TACACS Test panel will ap...

Страница 19: ...lt system network configurations are as follows IPv4 enabled IPv4 address 10 10 10 200 IPv4 gateway 10 10 10 1 IPv6 is disabled Via the GUI the following options may be displayed modified enabled or d...

Страница 20: ...SL Certificate The Select Certificate and Select Key File panel will appear 2 Select Choose File for Select Certificate 3 Select the desired cert pem file 4 Select Open 5 Select the Choose File for Se...

Страница 21: ...tings 2 Select the desired Timezone using the pull down panel 3 Select Save 4 Select Cancel to return to the Date Time Settings panel UTC 1 Select Edit Settings 2 Select the desired UTC using the pull...

Страница 22: ...Cancel to return to the Date Time Settings panel NTP Authentication Symmetric The system supports an IPv4 or IPv6 address for NTP timing If IPv4 is desired then an IPv4 management interface must be as...

Страница 23: ...ave 9 Select Cancel to return the Syslog Configuration panel Syslog Test 1 Select Syslog Test The GUI message will be displayed Syslog Test Successful 2 Verify the Syslog Test Message on the Syslog se...

Страница 24: ...Export Configuration This option creates a configuration file exportCfg json that may be used to recover a unit The exportCfg json file may be renamed if desired The exportCfg json file does not conta...

Страница 25: ...upgraded An Upgrade Guide is created as part of the standard documentation for each release Please refer to the Upgrade Guide for the procedure Reboot This option allows the unit to be rebooted The t...

Страница 26: ...as a server or router The inline appliance ports are typically connected to an inline appliance or tool to monitor the network traffic Heartbeat packets are transmitted bidirectionally from the inline...

Страница 27: ...be displayed modified enabled or disabled under the Bypass Taps panel Bypass Taps Panel Tap Settings Bypass Tap Name Heartbeat Settings 1 Select Bypass Taps on the Dashboard Menu bar Garland Technolog...

Страница 28: ...o Of Lost HB Packets Heartbeats per Second 1 Select Settings on the Bypass Taps panel The Configure Heartbeat Settings panel will be displayed with the current configuration 2 Enter the No Of Lost HB...

Страница 29: ...ttings The Configure Inline Appliance panel will be displayed 3 Select the Tap Mode Active Allows the tap to automatically switch from inline to bypass if an issue occurs with the inline appliance por...

Страница 30: ...c will go down Figure 5 Bypass Mode Force Inline 4 Select the Fail Mode Closed If power is lost to the unit The traffic will drop between the network ports 5 LFP If enabled and link is lost on one of...

Страница 31: ...e Bypass Taps panel 8 Select Cancel to return the Bypass Taps panel 4 Span Mode In this mode the network port 1 and span ports 2 3 and 4 are defined by the system Port 1 is an ingress only port Ports...

Страница 32: ...and 4 are defined by the system Port 1 is an ingress and egress port The traffic ingressed in port 1 is egressed out ports 2 3 and 4 The traffic ingressed in ports 2 3 and 4 are egressed out port 1 F...

Страница 33: ...and 4 are defined by the system LFP is supported on the network ports in this mode The traffic ingressed in port 1 is egressed out port 3 The traffic ingressed in port 2 is egressed out port 4 Figure...

Страница 34: ...network ports remain on 7 Filter Mode In this mode the unit functions as a 4 port packet broker The traffic that is passed between the ports is determined by the config map s and filter s created Con...

Страница 35: ...ation options may be displayed modified enabled or disabled under the Packet Broker panel Filter Templates Config Maps Statistics 1 Select Packet Broker on the Dashboard Menu bar Garland Technology 71...

Страница 36: ...able to rename a filter applied to a config map if the original template options were modified 1 Select Filter Templates on the Packet Broker Configurations panel The Filter Templates panel will be di...

Страница 37: ...fied by selecting the template name 10 The filter template may be deleted by selecting the Red X Config Map Config maps are unidirectional connections between ingress port s to egress port s and or a...

Страница 38: ...be added in any combination If ports 1 and 2 are added then the traffic from the ports will be aggregated Figure 13 Ingress 2 Remove a port by selecting the Red X Filters 1 Add filters by placing the...

Страница 39: ...3 etc 4 Select Accept once all desired options have been modified 5 Remove a Filter Template by selecting the Red X Egress 1 Add an egress port by placing the cursor on the desired port Select with t...

Страница 40: ...statistics are displayed in the filter match column for each config map The number displayed represents all packets that have passed through the config map 1 Select Refresh to refresh the config map...

Страница 41: ...priority needs to be considered when the same ingress port s is used in multiple config maps to send traffic to multiple egress ports In this case the config map with the highest priority will be cons...

Страница 42: ...he config map 2 Select Save to save updates Method 2 1 Select Set The Set Priority panel will be displayed 2 Enter the priority in the Set New Priority panel 3 Select Set to accept the priority value...

Страница 43: ...config map in the Enable column The green check will change to a red dash 2 Select Save Enable Config Map 1 Select the red dash for the config map in the Enable column The red dash will change to a g...

Страница 44: ...defined by the system however there are no default config maps created between network ports 1 and 2 and filter tap ports 3 and 4 The traffic that is passed to the filter ports is determined by the co...

Страница 45: ...will be disabled on the other network port The RX for both network ports remain on Packet Broker The following configuration options may be displayed modified enabled or disabled under the Packet Brok...

Страница 46: ...ll be displayed Filter Templates Filter templates may be created as a pass all pass by or deny by Pass by and deny by templates may include multiple matching options to filter traffic The options are...

Страница 47: ...2 tmplt 3 etc 4 Enter the description optional 5 Select the Template Type Pass All Pass By or Deny By 6 If pass by or deny by was selected in Step 5 the options will be displayed as follows Source MAC...

Страница 48: ...optional If no name is entered the system will automatically apply a name to the config maps as follows map map 1 map 2 etc 4 Place the cursor in the Name panel and enter the name 5 Select the Check t...

Страница 49: ...combination If multiple filters are added then the top filter is the highest priority The filters are considered from top to bottom A filter may be selected and moved up or down depending on priority...

Страница 50: ...panel and release Ports may be added in any combination If ports 3 and 4 are added then 100 of the traffic will be sent to each port Figure 25 Egress Port s 2 Remove a port by selecting the Red X Con...

Страница 51: ...ct Clear Counters to clear and refresh the config map statistics 3 Select the View Counts icon to display individual statistics 4 Select Refresh Counts to refresh the statistics 5 Select Clear Counts...

Страница 52: ...ree config maps with ingress port 1 The Traffic_A config map is the highest priority 1 the Traffic_B config map is the next priority 2 and finally the Traffic_C is the next priority 3 The Priority of...

Страница 53: ...able for traffic If the config map has a green check then it is enabled If the config map has a red dash then it is disabled Disable Config Map 1 Select the green check for the config map in the Enabl...

Страница 54: ...ine appliance port 3 or between network port 2 and inline appliance port 4 The traffic that is passed to the inline appliance ports is determined by the config map s and filter s created Config maps m...

Страница 55: ...odified enabled or disabled under the Bypass Taps panel Bypass Taps Panel Tap Settings Bypass Tap Name Heartbeat Settings 1 Select Bypass Taps on the Dashboard Menu bar The Bypass Taps panel will be d...

Страница 56: ...ets Default is 10 This is the number of heartbeats that must be lost on the inline appliance ports before any tap will switch to bypass 3 Enter the Heartbeats per Second Default is 10 This is the numb...

Страница 57: ...ed link and heartbeats restored the tap will automatically switch back to inline Figure 28 Bypass Filter Mode Inline Figure 29 Bypass Filter Mode Bypass Force Bypass If selected the tap will switch th...

Страница 58: ...The TX will be disabled on the other network port The RX for both network ports remain on Figure 31 Bypass Filter Mode LFP 6 Reverse Bypass If enabled and the inline appliance port s fail loss of lin...

Страница 59: ...ect Cancel to return the Bypass Taps panel Filters The following configuration options may be displayed modified enabled or disabled under the Filters panel Filter Templates Config Maps Statistics 1 S...

Страница 60: ...eate New Filter Template panel will be displayed 3 Enter the template name If no name is entered the system will automatically apply a name as follows tmplt tmplt 2 tmplt 3 etc 4 Enter the description...

Страница 61: ...displayed along with the new options Any port shaded gray can be used for a config map any port shaded black may not be used 3 Select the Name pencil icon to apply a name optional If no name is entere...

Страница 62: ...te A previously created filter template or the new filter template option may be selected Select with the left mouse button Drag the filter template to the Filter panel and release The filter template...

Страница 63: ...lows iFlt iFlt 2 iFlt 3 etc 4 Select Accept once all desired options have been modified 5 Remove a Filter Template by selecting the red X Egress 1 Add an egress port by placing the cursor on the desir...

Страница 64: ...ts all packets that have passed through the config map 1 Select Refresh to refresh the config map statistics 2 Select Clear Counters to clear and refresh the config map statistics 3 Select the View Co...

Страница 65: ...e bypass filter mode the config maps can only be created from port 1 to port 3 or port 2 to port 4 Multiple egress ports is not allowed The config map with the highest priority will be considered firs...

Страница 66: ...ates Enable Disable Config Map Config maps may be enabled or disabled as desired If a config map is enabled it is in the database and available for traffic If a config map is disabled it is in the dat...

Страница 67: ...e to a green check 2 Select Save 11 Port Info The following configuration options may be displayed or modified under the Port Info panel Port Number Speed Port Description Mode Link SFP Data Set Speed...

Страница 68: ...dates 4 Select Cancel to return to the Port Configuration panel Set Speed 1 Modify the port speed by selecting the pull down panel for the desired port 2 Select the desired speed 3 Select Save to save...

Страница 69: ...The Port Statistics panel will be displayed 2 Update the statistics by selecting Refresh 3 Clear and refresh the statistics by selecting Clear Garland Technology 716 242 8500 www garlandtechnology com...

Отзывы: