


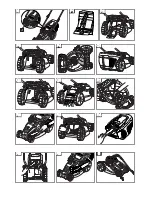
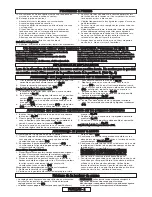


How to Mow
Your product can be used to cut grass using the
following methods:-
1. Grassbox Fitted:- grass is collected effectively and
compacted into the grassbox. (Q1)
2. Mulch Plug Fitted:- grass cuttings are finely chopped
to return nutrients to your lawn (Q2).
3. Rear Discharge:- Effectively cuts long grass with no
need to empty the grassbox (Q3)
How to Mow
1. Start mowing the edge of the lawn nearest to the
power point so the cable is laid out on the lawn you
have already cut.
2. Mow twice a week during the growing season, your lawn
will suffer if more than a third of its length is cut at one time.
Do Not Overload Your Mower
Mowing long thick grass may cause the motor speed to
drop, you will hear a change in the motor sound. If the
motor speed drops you may overload your lawnmower
which may cause damage. When mowing in long thick
grass a first cut with the cutting height set higher will help
reduce the load. See Cutting Height Adjustment.
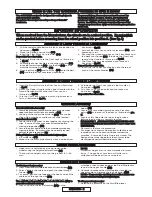
Caring for your Lawnmower
Cleaning
•
USE GLOVES
•
IMPORTANT:- It is very important that you keep your
lawnmower clean. Grass clippings left in any of the air
intakes or under the deck could become a potential
fire hazard.
1. Remove grass from under the deck with brush. (R1)
2. Using a soft brush - remove grass clippings from all
air intakes (R2), the discharge chute (R3) and the
grass box (R4).
3. Using a soft brush, remove grass clippings from the
vision window (R5).
4. Wipe over the surface of your lawnmower with a dry
cloth (R6).
•
IMPORTANT:- Never use water for cleaning your
lawnmower. Do not clean with chemicals, including petrol,
or solvents - some can destroy critical plastic parts.
Storing your Lawnmower:
•
Loosen the Cam Locks to enable the handles to be
folded over the product (S).
•
Store in a dry place where your lawnmower is
protected from damage
At the End of the Mowing Season
1. Replace bolts, nuts or screws, if necessary.
2. Clean your lawnmower thoroughly.
3. Make sure that the electric cable is stored correctly to
prevent damage.
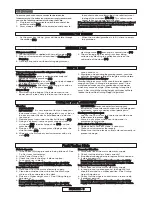
Fault Finding Hints
Fails to Operate
1. Is the correct Starting procedure being followed? See
‘To Start your Lawnmower’
2. Is the Power Turned On?
3. Check the fuse in the plug, if blown replace.
4. Fuse continues to blow?
Immediately disconnect from the mains electricity
supply and consult your GARDENA Service Centre.
Poor Grass Collection
1. Disconnect from the mains electricity supply.
2. Clean the outside of the air intakes, the discharge
chute and the underside of the deck.
3. Raise to a higher height of cut. See Cutting Height
Adjustment.
4. If poor collection persists.
Immediately disconnect from the mains electricity
supply and consult your GARDENA Service Centre.
Excessive Vibration
1. Disconnect from the mains electricity supply.
2. Check that the blade is fitted correctly?
3. If the blade is damaged or worn, replace it with a new one.
4. If vibration persists?
Immediately disconnect from the mains electricity
supply and consult your GARDENA Service Centre.
Lawnmower becomes heavy to push
1. Disconnect from the mains electricity supply.
2. In long grass or uneven ground, the height of cut
should be raised to a higher position. See Cutting
Height Adjustment.
3. Check that the wheels and rollers can rotate freely.
4. If problem persists?
Immediately disconnect from the mains electricity
supply and consult your GARDENA Service Centre.
ENGLISH - 3
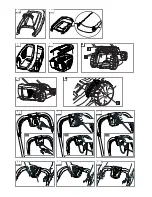
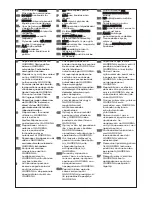
Grassbox Full Window
•
As the grassbox fills up, grass will be visible through
the window (N1).
•
When the window/grassbox is full it is time to empty
the grassbox.
Using as a mulcher
1. Your lawnmower is supplied with a mulching plug. (P1)
2. Stop your lawnmower as described in Starting and
Stopping.
3. Lift safety flap and insert the mulching plug into rear
discharge chute, (P2) ensuring it is securely fitted. (P3)
4. The mulching plug prevents grass from being
collected by blocking the collection chute on the
underside of the deck. (P4)
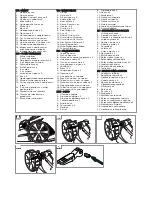
Mulching Plug
To ensure you have a secure connection between the
lawnmower and the extension cable we strongly recommend
you use the following method of attaching the cable:
1. Plug the short connection lead into the socket of the
extension cable. (M1).
2. Form a loop in the end of the extension cable near to
the socket and secure this in the strain relief feature at
the top of the switchbox (M2, M3) This will cause the
socket to hang in a downward direction.
If the short connection lead is damaged, it must be replaced
by the manufacturer, its service agent or similarly qualified
persons in order to avoid a hazard.
CH (Schweiz)


