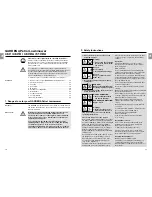
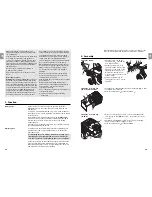
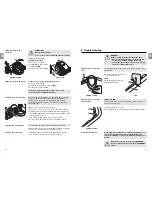
Gardena 4044 Скачать руководство пользователя страница 5

22

GB

23

GB


Starting the mower:


The engine must be filled with petrol (see 

7. Maintenance 

“Filling engine with petrol”

).


1. Place the mower on a level spot on the lawn.


2. 


Only with a cold engine:
46 V / 46 VD:

 Press the primer 

d

 3 times.

46 VDA / 51 VDA:

 Set the rotary lever 

f

 to 

“Choke”

.


3. 


Pull the switch up 

g

 to the handle 

6

 and then pull the start 

cord 

h

 through vigorously.


4. 


After starting the engine feed the starter cord 

h

 back slowly 

(if necessary repeat steps 3. and 4.).


5. 


46 VDA / 51 VDA:

 Set the rotary lever 

f

 to the required  engine 

speed.


6. 


Only push the mower forwards at walking pace.


Starting the mower with a warm engine:


v


46 V / 46 VD:

 Do 

not

 press the primer 

d

.

46 VDA / 51 VDA:

 Set the rotary lever 

f

 to 

max. speed

.


Switching the mower off:


v

 Release the switch 

g

.


Mowing with traction drive:


 46 VD has a single gear rear wheel drive. 46 VDA / 51 VDA has 
a variable rear wheel drive to adjust to your personal walking 
speed.


Starting the traction drive:


1. Start the mower.


2. 


46 VD:

 Pull the drive handle 

down to the handle 

6

ATTENTION! The mower will 
start immediately.

46 VDA / 51 VDA: 

Pull the drive 

lever 

j

 to the handle 

6

The further the drive lever is 
pulled the faster the traction 
drive.


To switch the traction drive off:


v

  Release the drive switch / 

lever 

j

.


3x

d

h

6

g

f

46 V / 46 VD

6

j

46 VD

6

j

46 VDA / 51 VDA

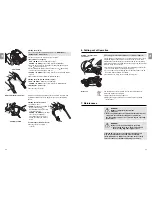
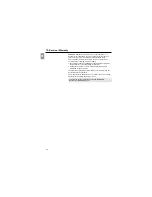
6. Putting out of Operation

Storing  /  transporting 
the mower : 


The storage location must not be accessible to children.


 Let the engine cool down before you store the mower in a closed 
area. With engines that have are not to be used for more than 
30 days first of all empty the petrol tank, soak up the remaining 
petrol with a lint free cloth and then let the engine run until it stops 
because it has run out of fuel.


1. 


Switch off the mower and remove the spark plug connector 

k


(see enclosed engine operating instructions).


2. 


To save space undo both wing nuts 

8

 until the handle can be 

bent and fold the handle 

6

 forward.


3. 


Store mower in a dry, enclosed and secure place.

Disposal:


    The product must not be added to normal household waste. 

It must be disposed of properly. 


1. Empty the petrol tank (see above).


2. 


Empty the engine oil tank (see enclosed engine operating 
instructions).

7. Maintenance


DANGER!
Danger of physical injury from the 
blade bar.

v

  Before any maintenance work wait until the blade bar has 

stopped, wear suitable working gloves and remove 
the spark plug connector (see enclosed engine operating 
instructions).


DANGER!
Injury to persons and damage to property! 

v

  Do not clean the mower, the mulch unit and 

the Collecting Bag under high pressure.


If the lawnmower needs to be tilted for cleaning then it 
may only be lifted in the front and at the handlebar. 
(If the lawnmower is tilted to the side then fuel or oil may 
enter the exhaust or air filter and damage the motor).

k

6

8

Содержание 4044

Страница 1: ...pper FI Käyttöohje Bensiinikäyttöinen ruohonleikkuri N Bruksanvisning Bensindrevet Gressklipper I Istruzioni per l uso Rasaerba a scoppio E Instrucciones de empleo Cortacésped de gasolina P Manual de instruções Máquina de cortar relva a gasolina PL Instrukcja obsługi Kosiarka spalinowa H Használati utasítás Benzines fűnyíró CZ Návod k obsluze Benzínová sekačka na trávu SK Návod na obsluhu Benzínov...

Страница 2: ...g connector See the enclosed engine operating instructions Check each time you use the mower Before using always visually inspect to see that the blades blade bolts and cutter assembly are not worn or damaged Replace worn or damaged blades and bolts in sets to preserve balance Never operate the lawnmower with defective guards or without safety devices for example deflectors and or grass catchers i...

Страница 3: ...e is running or is hot If petrol is spilled during filling the engine must not be started until the spilled petrol has been wiped up and the mower has been removed from the area where the fuel was spilled You must not attempt to start the engine until the petrol vapours have dissipated To avoid the danger of fire keep the engine and exhaust free from grass leaves grease or oil and away from combus...

Страница 4: ...t p falling out Removing the mulch unit v Lift the protective flap o unhook the retaining spring a from the housing and remove the mulch unit p o a p Do not grasp the ejection chute with your hand If the protective flap o is released it will close automatically and cover the ejection chute The protective flap o is designed in such a way that mowing can take place even if the protective flap is clo...

Страница 5: ...6 VDA 51 VDA 6 Putting out of Operation Storing transporting the mower The storage location must not be accessible to children Let the engine cool down before you store the mower in a closed area With engines that have are not to be used for more than 30 days first of all empty the petrol tank soak up the remaining petrol with a lint free cloth and then let the engine run until it stops because it...

Страница 6: ...th do not use any sharp objects ä Cleaning the collecting bag The collecting bag must be checked regularly for damage v Remove grass deposits from inside and outside the collecting bag at every mowing do not use sharp objects Cleaning the mulch unit v Immediately after mulching remove dirt and grass remains from the mulch unit do not use any sharp objects 8 Trouble Shooting DANGER Danger of physic...

Страница 7: ...r or GARDENA Service Imbalance resulting from very dirty blade bar v Clean mower see 7 Maintenance If this does not rectify the fault contact GARDENA Service Fault Possible cause Remedy Lawn is not cleanly cut Blade bar blunt v Have the blade bar replaced Cutting height too low for the lawn or mowing speed too high v Raise cutting height or reduce mowing speed For any other malfunctions please con...

Страница 8: ...g conditions apply The unit must have been handled properly and in keeping with the requirements of the Operating Instructions Neither the purchaser or a non authorised third party have attempted to repair the unit The blade bar spark plug and air filter are consumables and are not included in the guarantee This manufacturer s guarantee does not affect the user s existing warranty claims against t...

Страница 9: ...sulla responsabilità del prodotto non si risponde di danni causati da nostri articoli se originati da riparazioni eseguite non correttamente o da sostituzioni di parti effettuate con materiale non originale GARDENA o comunque da noi non approvato e in ogni caso qualora l intervento non venga eseguito da un centro assistenza GARDENA o da personale specializzato autorizzato Lo stesso vale per le par...

Страница 10: ...iej i standardu specyficznego dla tego typu produktów W przypadku zmiany urządzenia która nie została z nami uzgodniona niniejsza deklaracja traci moc obowiązywania H EU Megfelelőségi nyilatkozat Alulírott a Husqvarna AB 561 82 Huskvarna Sweden igazolja azt hogy az alábbiakban megnevezett készülékek az általunk forgalomba hozott kivitelben teljesítik a harmo nizációs EU irányelvek az EU biztonsági...

Страница 11: ...nglas Dublin 11 Italy Husqvarna Italia S p A Via Como 72 23868 Valmadrera LC Phone 39 0341 203 111 info gardenaitalia it Japan KAKUICHI co Ltd Sumitomo Realty Development Koji machi BLDG 8F 5 1 Nibanncyo chiyoda ku Tokyo 102 0084 Phone 81 0 3 3264 4721 m_ishihara kaku ichi co jp Latvia 8 90 0 A 4 8 B8 8 5C Ï8 E E F 1 7 8 90 0 Lithuania UAB Husqvarna Lietuva Consumer Outdoor Products Ateities pl 77...

Отзывы: