Garage Smart MY LIFTER BASIC LIFTER Скачать руководство пользователя страница 3

LIMITED LIFETIME WARRANTY

Limited Lifetime Warranty

Garage Smart offers a Limited Lifetime 

Warranty on all products. If a defect in the 

hardware, or any component thereof, occurs 

Garage Smart will repair or replace the system, 

or the defective component. There is no cost 

to you beyond the cost of shipping the 

defective item to us. If your Garage Smart 

Product is defective, we will send replacement 

parts or, at our option, replace it at no charge 

to you after the defective product is returned 

to Garage Smart. If we send replacement parts 

for your Garage Smart Product, we may use 

new or reconditioned parts. If we choose to 

replace your Garage Smart Product, we may 

replace it with a new or reconditioned one of 

the same or similar design.

Who Makes This Warranty

Garage Smart

Who Is Covered 

This warranty extends only to the original 

purchaser of the product. This warranty is 

intended for natural persons only and does not 

extend to any corporation, limited liability 

company, or commercial entity.

What Is Covered 

Any defect in material and workmanship from 

personal, normal household use in accordance 

with the Owner’s Manual.

Warranty Does Not Cover:

This warranty does 

not cover installation commercial use, defects 

resulting from accidents, damage while in 

transit to our service location or 

damage resulting from altercations misuses or 

abuse, lack of proper maintenance, 

unauthorized repair or modifications of the 

product, affixing of any attachment not

any such use voids the warranty.
TO THE GREATEST EXTENT PERMITTED 

BY LAW, THIS WARRANTY IS IN LIEU OF 

AND EXCLUDES ALL OTHER 

WARRANTIES NOT EXPRESSLY SET 

FORTH HEREIN, WHETHER EXPRESS OR 

IMPLIED, INCLUDING BUT NOT LIMITED 

TO ANY WARRANTIES OF MERCHANT 

ABILITY AND FINESS FOR A PARTICULAR 

PURPOSE. Limitation of Liability: THE 

SOLE REMEDIES AFFORDED UNDER THIS 

WARRANTYARE REPAIR, REPLACEMENT, 

OR, IF REPAIR OR REPLACEMENT IS NOT 

COMMERCIALLY PRACTICABLE OR 

CANNOT BE TIMELY MADE, A REFUND 

OF THE PURCHASE PRICE. IN NO EVENT 

SHALL THE LIABILITY OF GARAGE 

SMART RELATED TO ANY PRODUCT 

EXCEED THE PURCHASE PRICE OF THE 

PRODUCT. YOUR USE OF GARAGE 

SMART PRODUCTS IS AT YOUR SOLE 

RISK. GARAGE SMART SHALL NOT BE 

LIABLE UNDER ANY CIRCUMSTANCES 

FOR CONSEQUENTIAL, INDIRECT, 

SPECIAL, OR INCIDENTAL 42 DAMAGES 

ARISING FROM OR IN CONNECTION 

WITH THE USE OF ANY GARAGE SMART 

PRODUCT. (SOME STATES DO NOT 

ALLOW THE EXCLUSION OR LIMITATION 

OF INCIDENTAL OR CONSEQUENTIAL 

DAMAGES, SO THE ABOVE LIMITATION 

OR EXCLUSION MAY NOT APPLY TO 

YOU.)

Other Legal Rights 

This warranty gives you specific legal 

rights and you may also have other rights 

which vary from state to state.

provided with the product, staples through 

wiring, pinched or broken wires, broken cables 

power outages, use of extension cords, missing 

or damaged parts or discounted clearance, final 

sale or taped cartons, fire, flood, acts of God, or 

failure to follow the Owner’s Manual. This 

warranty is the only one we will give on your 

Garage Smart Product. There are no other 

express warranties.

Where and How to Obtain Warranty Service

You can obtain warranty service from Garage 

Smart at the address indicated below. It is your 

responsibility to deliver or ship the defective 

product to us at your date of purchase and a 

description of the claimed defect, prior to the 

expiration of the warranty period. To obtain 

information regarding this warranty, you may 

contact us by mail, email, or phone.
Garage Smart 

3000 Sierra Vista Way

Provo, UT 84606
[email protected] or (801) 649-4136

Exceptions and Exclusions

This warranty does not include damage or 

defects resulting from misuse, accident, failure 

to maintain, or any other causes following your 

purchased of the product. Use of the Lifter 

system with any other system or components 

(including affixing non Garage Smart 

attachments or accessories) voids this 

warranty. Failure to follow the owner’s manual 

in installation or use of the Lifter system voids 

the warranty. Unauthorized repair or 

modification voids the warranty.
The Lifter system is intended for personal, 

indoor, home use. Garage Smart does not 

warrant its lift system for commercial use, and

3

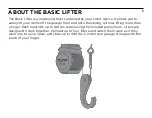
Содержание MY LIFTER BASIC LIFTER

Страница 1: ...BASIC LIFTER ...

Страница 2: ...31 TABLE OF CONTENTS LIMITED LIFETIME WARRANTY SAFETY INFORMATION WARNING ABOUT THE BASIC LIFTER INSTALLATION GUIDE REQUIRED TOOLS PARTS IDENTIFIER INSTALLATION MOUNTING BRACKET POWER ADAPTER EYELET SCREW HOOK PULLEY APP GUIDE FAQS ...

Страница 3: ...HE PURCHASE PRICE IN NO EVENT SHALL THE LIABILITY OF GARAGE SMART RELATED TO ANY PRODUCT EXCEED THE PURCHASE PRICE OF THE PRODUCT YOUR USE OF GARAGE SMART PRODUCTS IS AT YOUR SOLE RISK GARAGE SMART SHALL NOT BE LIABLE UNDER ANY CIRCUMSTANCES FOR CONSEQUENTIAL INDIRECT SPECIAL OR INCIDENTAL 42 DAMAGES ARISING FROM OR IN CONNECTION WITH THE USE OF ANY GARAGE SMART PRODUCT SOME STATES DO NOT ALLOW TH...

Страница 4: ...stand under the Basic Lifter or items lifted by the system 4 Do not use the Basic Lifter to lift people or animals 5 Do not use the Basic Lifter to lift or lower items over people or animals 6 Always balance load before lifting 7 Total lifting capacity for the Basic Lifter system is 100 lbs If your MyLifter cable is tangled damaged or bent STOP using your MyLifter unit IMMEDIATELY 4 ...

Страница 5: ...he FCC Rules These limits are designed to provide reasonable protection against harmful interference in a residential installation This equipment generates uses and can radiate radio frequency energy and if not installed and used in accordance with the instructions may cause harmful interference to radio communications However there is no guarantee that interference will not occur in a particular ...

Страница 6: ...e garage floor and onto the ceiling without lifting more than a finger Each hoist lifts up to 100 lbs when using the included pulley hook Lifters are designed to work together Connect up to four lifters and watch them work as if they were one to raise lower and store up to 400 lbs Control your garage storage with the touch of your finger 6 ...

Страница 7: ...INSTALLATION GUIDE Scan the QR code or follow the link to access the Garage Smart DIY Installation Guides https garagesmart com pages diy installation 7 ...

Страница 8: ...REQUIRED TOOLS Ladder Stud Finder Pencil Tape Measure Drill 1 2 Socket Wrench or Box Wrench Phillips Screwdriver Safety Glasses 8 ...

Страница 9: ...PARTS IDENTIFIER LIFTER Garage Smart Lifter x1 QD Pins x2 Lag Screw x2 Lag Washer x2 Drill Bit x1 Eyelet Screw x1 Carabiner x1 Pulley Hook x1 9 ...

Страница 10: ...PARTS IDENTIFIER POWER ADAPTER Cable Management Screw x2 DC Power Cable x1 Power Adapter x1 Wall Mount Screw x1 Universal Mount x1 attached to Power Adapter Cable Management Clip x2 10 ...

Страница 11: ...m in the location you want to install it The Mounting Bracket needs to be installed in the center of a ceiling joist Center it above the items intended location DO NOT install Mounting Bracket in any other manner than specified in instructions It is designed to be secured to flat ceilings only DO NOT secure to walls or angled ceilings 11 ...

Страница 12: ...TING BRACKET Step 2 Locate Ceiling Joists Use a stud finder to locate the ceiling joist where you plan to place the Mounting Bracket Make sure you have the clearance and adequate spacing for the hard top you will be lifting 12 ...

Страница 13: ...NG BRACKET Step 3 Install The Mounting Bracket Consider which way you want your item and MyLifter to face and mount the bracket accordingly Refer to Figures 1 2a and 1 2b for correct mounting configurations Fig 1 2b Fig 1 2a 13 ...

Страница 14: ...h the center of the joist With a pencil mark an X on the ceiling where you want the two holes to mount your Lifter Figure 1 3 With a drill and the supplied drill bit align the bit on your marks and drill at least a 3 deep pilot hole into the joist Figure 1 4 The pilot hole should drill through the sheetrock and into the wood ceiling joist Fig 1 3 Fig 1 4 14 ...

Страница 15: ... Figure 1 5 As you turn the wrench you should feel resistance If the lag screw turns freely your pilot hole is not in the ceiling joist and must be repositioned on a secure portion of the joist Align the MyLifter unit with the mounting bracket and insert the two quick release pins through the MyLifter unit and mounting bracket Figure 1 6 Fig 1 5 Fig 1 6 15 ...

Страница 16: ...m that the AC cable will reach a power outlet and the DC cable will reach your MyLifter Use the printable screw template to place the two wall mount screws into the desired location Figure 2 1 exactly 2 inches apart 50 8 mm Allow the screw heads to protrude from the wall about 6 35 mm away from the wall Figure 2 2 Fig 2 1 Fig 2 2 16 ...

Страница 17: ...DAPTER Step 2 Placing Power Adapter Line up the product mounting holes with the screws as shown Place the product over the screws and slide to lock into place There is more than one orientation that can be used Fig 2 3 Fig 2 4 17 ...

Страница 18: ...ticker backing Figure 2 5 2 Stick the clip where you want it Figure 2 6 3 Install the screw through the hole Figure 2 7 in the center of the clip 4 Place all wires into the clip Figure 2 8 5 Securely close the clip Figure 2 9 Fig 2 6 Fig 2 5 Fig 2 7 Fig 2 8 Fig 2 9 18 ...

Страница 19: ... Step 4 Plug In Power Adapter 1 Plug the AC cable into a power source Figure 2 11 2 Additional AC Garage Smart products may be powered by connecting their AC cable to the AC outlet on the Power Adapter Figure 2 11 Fig 2 11 Fig 2 10 19 ...

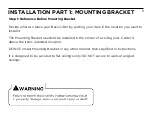
Страница 20: ...INSTALLATION PART 3 EYELET SCREW Fig 3 1 Fig 3 2 Eyelet Screw Eyelet Screw 20 ...

Страница 21: ...a hole Page 16 of Manual Insert the eyelet screw into the ceiling joist turn the eyelet screw using a screwdriver to tighten Figure 3 3 If your ceiling has drywall thread the eyelet screw in until you cannot see the threads then turn it in 3 more complete revolutions If your ceiling does not have drywall thread the eyelet screw in until you cannot see threads Fig 3 3 21 ...

Страница 22: ...PULLEY Fig 4 1 Step 1 Install The Hook Pulley When using the hook extend the cable and run it under the pulley Figure 4 1 Use the provided carabiner to anchor the cable to the eyelet screw about 3 inches away from the lifter 22 ...

Страница 23: ...ER APP GUIDE Step 1 Pairing Your Lifter Download the MyLifter App to your smart device from either Google Play or the Apple App Store Open the App and tap the Add Devices button in the bottom right corner 23 ...

Страница 24: ...t It button at the bottom of the screen You can choose to hide this menu in the future by selecting Don t show this again then selecting Got It After pressing the PAIR button your MyLifter indicator light should change to a faster blinking yellow Then the indicator light should change to a fast green blink sequence that confirms the pairing 24 ...

Страница 25: ...change from a gray outline to a filled in image of a MyLifter This filled in icon indicates that your lifter is paired with your smart device Now that the lifter is PAIRED tap the back arrow on the upper left hand corner which will take you to the main screen Will be getting a higher quality image here 25 ...

Страница 26: ...hen tap Edit in the top right corner Android Users Tap the pencil icon type the new name for your Lifter unit and tap Submit iOS Users Tap the Lifter you want to rename type the new name and select Save Once you tap on the new name of your Lifter you are ready to connect the lifting cable to your lifting accessory Will be getting a higher quality image here 26 ...

Страница 27: ...er from your smart device return to the App main screen and tap Edit in the top right corner Android Users Tap the trash can icon and tap Yes when the dialog box appears iOS Users Tap the minus icon and then Delete Will be getting a higher quality image here 27 ...

Страница 28: ... in relation to its capacity The fuller the bar the closer you are to your weight limit SMART LIFT OR LOWER Tap these buttons to lift and lower your items to your preset high and low points MANUAL LIFT OR LOWER ARROWS Press and hold these arrows to manually lift or lower items at full speed VARIABLE SPEED CONTROLLER Hold down this circle and slide up or down to control the speed that your unit lif...

Страница 29: ... of your lifting lowering hold down the variable speed control slide the circle upward to control the speed of lifting and slide the circle downward to control the speed of lowering 3 To set a preferred low or preferred high point use the manual lift and lower arrows to reach your desired point Tap the SET LOW or SET HIGH button and click Set when the dialog box appears 29 ...

Страница 30: ...p the SMART LOWER or SMART LIFT button The lifter will lift or lower until it reaches your preset position 5 To clear your preferred low or high point tap SET LOW or SET HIGH and tap Clear when the dialog box appears For more features available on your Lifter please visit https garagesmart com pages diy installation 30 ...

Страница 31: ... DO NOT use more than one lifter to lift more than the designed weight limit Why is my load tilting when I place the lifter over the center Not all loads have their balance point in their center Move the lifter a little toward the direction of the lower side of the load until the load lifts level 31 ...

Отзывы: