41
6. Client
1. Introduction
③
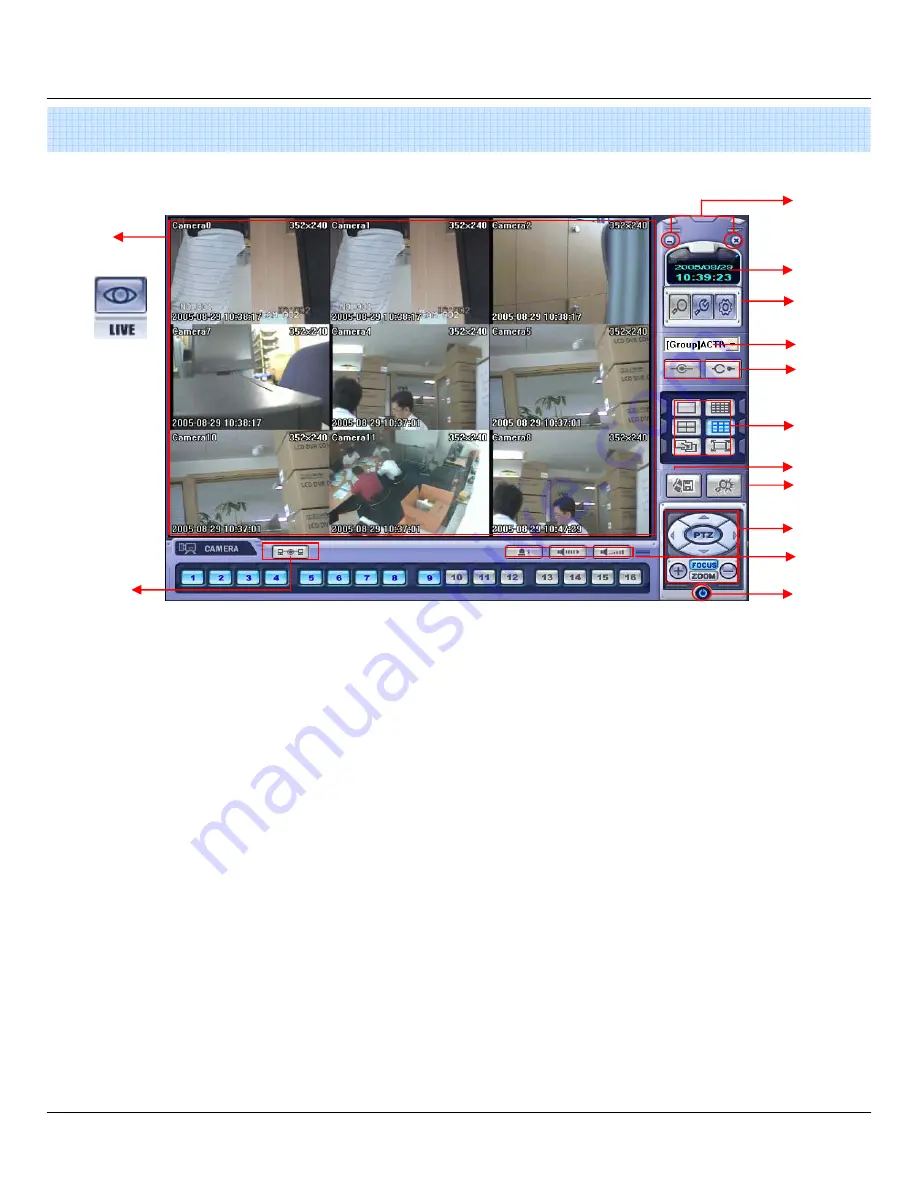
① Main Display : Shows single or multi-channel view of cameras connected to the DVR.
② Camera Selection Buttons : Indicates Camera #; click button to display a selected camera.
③ Minimize / Exit : Minimize DVR Client Window (to taskbar) or Exit Remote Agent.
④ Date/Time Display : Shows current DVR System Date/Time
⑤ SEARCH : Enter Search Mode to Search and Playback Recorded Video
SETUP : Set up properties of Remote Agent, including the list of DVR units to connect to.
CONFIG
: Allows Remote Configuration of a connected DVR unit.
⑥ DVR Selection : Choose a DVR to connect to with the Remote Agent.
⑦ Connect : Connect to selected DVR.
Disconnect : Disconnect from selected DVR.
⑧ Screen Division Selection : Change Screen Division Mode (1/4/9/16ch view, sequence, full screen)
⑨ Begin Saving to AVI file : Begin Saving Live or Playback Images to the local PC in AVI format.
⑩ Event Log Viewer : Display Current Event Log & Jump to Event for Playback.
⑪ PTZ Control Button : Control Camera Pan, Tilt, Zoom, & Focus (for supported PTZ devices only)
⑫ Audio Button and Alarm : Control Bi-Directional Audio, Mute, and Toggle Alarm (On/Off).
⑬ Quit : Exit Remote Agent.
⑭ Connection Status: Indicates the Network Status of a connected DVR.
⑤
④
⑥
⑦
⑧
⑪
⑨
⑩
⑫
①
⑭
⑬
Содержание DIGIMASTER SERIES
Страница 1: ...DIGIMASTER SERIES DVR 4 8 16 Channel Stand Alone DIGITAL VIDEO RECORDER USER S MANUAL...
Страница 44: ...43 2 2 Add Group At site of left upper side right click the Add Group Input the Group name 6 Client...
Страница 45: ...44 Input DVR information name IP port ID PW Set camera position check option and press ADD 6 Client...
Страница 46: ...45 New DVR list is shown on the left upper side 6 Client...
Страница 63: ...62 6 Client...


