background image

USING YOUR  DEVICE

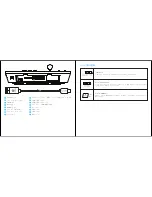
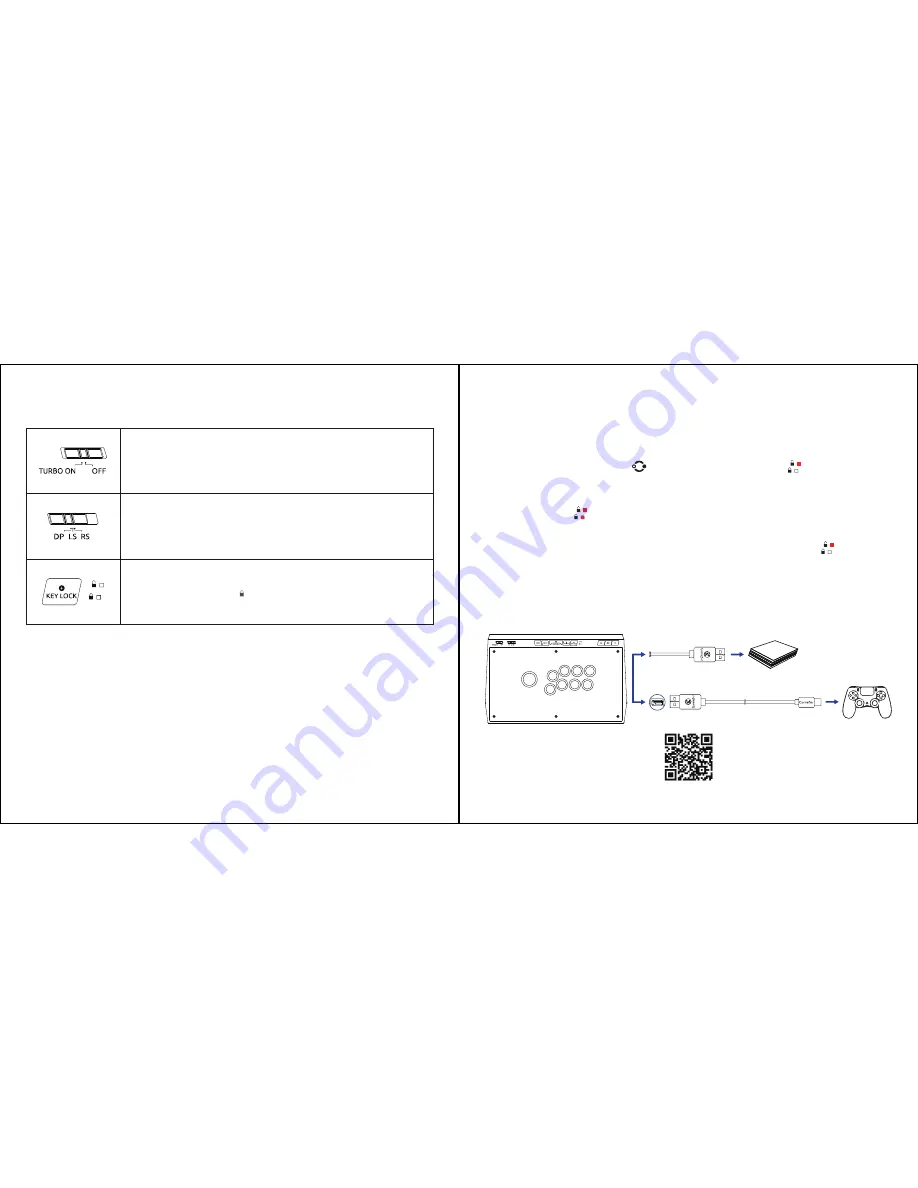
TURBO SWITCH

Pressing one of the 8 action buttons and setting Turbo switch to ON 

simultaneously will enable the Turbo function of this button.

CONTROL STICK SWITCH

Use the Control Stick Switch to shift the joystick’s controller function to 

either left analog stick(LS),D-pad(DP),or right analog stick(RS).

LOCK/UNLOCK BUTTON

Setting this button to lock (   ) will disable the HOME,SHARE,OPTIONS,

L3 and R3 buttons.

CONNECTION

a. Take out the built-in USB cable from the storage space at the back of the GameSir C2 arcade 

fightstick.

b. Plug the USB end into the USB port of the PS4 console.
c. Press and hold the switch button       for 2 secs, the two key lock lights       will flash alternately, 

indicating hat it has changed to console mode and can be connected to PS4 controller.

d. Plug the micro USB end of the 1m USB cable into the micro USB port of the PS4 controller, then 

plug the other USB end into the USB port at the back of the GameSir C2 arcade fightstick. The 
two key lock lights        will both stay on for 3 secs, indicating that the PS4 controller has been 
connected successfully. Then the two key lock lights will return to normal to indicate the key lock 
status. Please press the “HOME” button to start to play the game.

e. If the PS4 controller can not be connected successfully, the two key lock lights       will both flash 

3 times then return to normal to indicate the key lock status. Please remove all the USB cables and 
repeat the steps b, c, d.

* Please turn off the PS4 controller before the connection.
* Please keep the PS4 controller connected to the GameSir C2 arcade fightstick while playing.
* Short press of the Touchpad button will trigger the same function as pressing the PS4 controller 

touchpad.

Connect to PS4/PS4 Slim/PS4 Pro

Video tutorial

Содержание C2

Страница 1: ...GameSir Gaming is Winning 2018 GameSir Inc All rights reserved Product may vary slightly from those pictures User Manual GameSir C2 Universal Arcade Fightstick ...

Страница 2: ...X Nintendo Switch Windows 7 or above Android 4 0 or above REGISTRATION Register your GameSir ID online at https gamesir hk to get real time information on your product s warranty status and a series of exclusive benefits from GameSir YOUR BENEFITS 12 month replacement of the same model from the date you received it Free online technical support at https gamesir hk ...

Страница 3: ...Stick Switch Home Button Options Button Share Button Key Lock Button Key Lock Light L3 R3 Button Switch Button Long Press Touchpad Button Short Press Action Buttons Joystick USB Port Cable Outlet Storage Space Hex Screw Driver USB Cable ...

Страница 4: ...ler d Plug the micro USB end of the 1m USB cable into the micro USB port of the PS4 controller then plug the other USB end into the USB port at the back of the GameSir C2 arcade fightstick The two key lock lights will both stay on for 3 secs indicating that the PS4 controller has been connected successfully Then the two key lock lights will return to normal to indicate the key lock status Please p...

Страница 5: ...play the game e If the Xbox One controller can not be connected successfully the two key lock lights will both flash 3 times then return to normal to indicate the key lock status Please remove all the USB cables and repeat the steps b c d Please keep the Xbox One controller connected to the GameSir C2 arcade fightstick while playing Connect to Nintendo Switch Connect to Xbox One Xbox One S Xbox On...

Страница 6: ...le from the button you would like to replace Press the plastic tabs on each side of the button to remove the button from the top panel d Install the new button from the top panel and rotate the button until you hear a click sound The button is now locked in the top panel e Reconnect the correct color cable to the button according to the following cable assignment label Yellow Orange LB LT RB RT Y ...

Страница 7: ...panel d Use a flat screw driver to secure the center shaft at the bottom of the joystick Then rotate off the small ball at the top of the joystick e Unscrew the 6 screws on the top panel and remove the top panel f Replace the panel wallpaper g Install the top panel action buttons and top screws h Reconnect the correct color cable to the button according to the following cable assignment label Yell...

Страница 8: ...以降 Android4 0 以降 GameSir C2 ユニバーサルアーケードファイトスティック USBケーブル 六角ドライバー 専用 取扱説明書 日本語 パッケージ内容 システム要件 ユーザー登録 https gamesir hk にてGameSir IDを作成して ご購入の製品を登録すると 当製品の品質保証の状態 に関するリアルタイム情報と GameSir会員専用のメリッ トを得ることができます 登録による特典 12ヵ月のメーカー限定保証 https gamesir hk でのマニュアルの閲覧と無料オンラインテクニカルサポート 英語 日本語対応 各部の名称 ...

Страница 9: ...ロック ロック解除ボタン コントローラーと接続専用USB端子 ケーブルアウト 収納ボックス 六角ドライバー USBゲーブル TURBOさせたいボタンを押しながらTURBOスイッチをオンになるとTURBOになります TURBOスイッチ コントロールステックスイッチで ジョイスティ ックのコントローラー機能を左スティ ック LS 方向パッ ド DP または右スティ ック RS のいずれかにシフトします コン トロールステッ クスイッチ コントロールステックスイッチ このボタンを ロック に設定すると HOMEボタン SHAREボタン OPTIONSボタン L3ボタンとR3ボタンが 無効になります ロック ロッ ク解除ボタン デバイスのご利用 ...

Страница 10: ...続失敗する場合では ロックインジケータライト は3回点滅して キーロック状態に戻ります ステップb eをもう一度繰り返して やってみください 使用中にPS4 Dual shockコントローラーがGameSir C2 と接続した状態を保持してください 接続失敗する場合では ロックインジケータライト は3回点滅して キーロック状態に戻ります ステップb eをもう一度繰り返して やってみてください 使用中にXbox OneコントローラーがGameSir C2 と接続した状態を保持してください a USBケーブルを収納ボックスから取り出します b Xbox OneのUSB端子にケーブルを差し込んでください c モード切替ボタン を2秒押し続けると ロックインジケータライト が交互に点滅して GameSir C2 をXbox One接続準備状態になります d もう一つのUSBケーブルは接続専用USB...

Страница 11: ...ードになります ロックインジケータライ トは30秒後急速に3回点 滅してから消灯し キーロック状態に戻ります Xinputモードに戻る場合では もう一度モード切り替え ボタン を2秒押してく ださい Windows PC Androidへの接続 a USBケーブルを収納ボックスから取り出します b GameSir C2のAとXボタンを同時に押してください c AとXボタンを押しながらUSBケーブルをNintendo SwtichドックのUSB端子に差し込みます d GameSir C2はNintendo Swtichをコントロールできます a 収納ボックスからス六角ドライバーを取り出します b 六角ドライバーが底のネジ 7本 を外し ボトムプレートを取り外します 押しボタンの置き換え c ボタンを置き換え必要なケーブルを引き出して 両側のクリップを押し止めてGameSir C2 からボタン...

Страница 12: ...ボトムプレートを取り外します d 新しいボタンを上から取り付け カタ という音が聞こえるまでボタンを調整して ボタンを天板にロッ クされることを確認します e 下記ののゲーブルカラーマップを従って 対応ケーブルをボタンに接続します f ボトムプレートを取り付け ネジをロックします アートワークの置き換え c すべてのケーブルを引き出して 両側のクリップを押し止めてGameSirC2 からのボタンを取り外します d マイナスドライバーでジョイスティックの中軸をしっかり固定して ジョイスティックのトップからボー ルを回転して取り外します ...

Страница 13: ...ny Computer Entertainment Inc This product is not manufactured by Sony Computer Entertainment Inc or Microsoft Inc or Google Inc NOTICE Please read this Precautions carefully CONTAINS SMALL PARTS Keep out of reach of children under the age of 3 Seek immediate medical attention if swallowed or inhaled DO NOT use the product near fire DO NOT expose to direct sunlight or high temperatures DO NOT leav...

Страница 14: ...r Entertainment Inc Microsoft Inc Nintendo IncまたはGoogle Incによって製造されたものではありません ご注意 保護者の方へ必ずお読みく ださい 小さいな部品がありますので3歳未満のお子様には絶対に与えないでください 乳幼児の手の届く ところに置かないでください 万一飲み込んだ場合は すぐに医師に相談してください 火気のある場所では絶対に使用しないでください 長時間直射日光当てたり 高温となる場所に置かないでください 本品を湿気やホコリの多いところに置かないでください 本品に物を当てたり 落下させるような強い衝撃を与えないでください 故障の原因になりますので USB端子を直接手で触ないでください ケーブル部を強く曲げたり引っ張ったり しないでください お手入れの際には 乾いた柔らかい布を使用してください ベンジン シンナーなどの薬品は使用...

Отзывы: