


Checks before initial start-up.
10.3 Pre-operation checks
DANGER
Switch off the power supply before making any connections.
After the installation of the unit, check the following before switching on the circuit breaker:
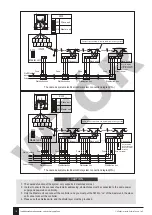
Field wiring
:
Make sure that the field wiring between the local supply panel and unit and valves (when applicable),
unit and room thermostat (when applicable), unit and domestic hot water tank, and unit and backup heater kit have
been connected according to the instructions described in the chapter 9.7 "Field wiring", according to the wiring
diagrams and to local laws and regulations.
Fuses, circuit breakers, or protection devices Check that the fuses or the locally installed protection devices are of
the size and type specified in 14 "Technical specifications". Make sure that no fuses or protection devices have
been bypassed.
Backup heater circuit breaker
:
Do not forget to turn on the backup heater circuit breaker in the switchbox (it
depends on the backup heater type). Refer to the wiring diagram.
Booster heater circuit breaker
:
Do not forget to turn on the booster heater circuit breaker (applies only to units with
optional domestic hot water tank installed).
Ground wiring
:
Make sure that the ground wires have been connected properly and that the ground terminals are
tightened.
Internal wiring
:
Visually check the switch box for loose connections or damaged electrical components.
Mounting
:
Check that the unit is properly mounted, to avoid abnormal noises and vibrations when starting up the unit.
Damaged equipment
:
Check the inside of the unit for damaged components or squeezed pipes.
Refrigerant leak
:
Check the inside of the unit for refrigerant leakage. If there is a refrigerant leak, call your local dealer.
Power supply voltage
:
Check the power supply voltage on the local supply panel. The voltage must correspond to the voltage
on the identification label of the unit.
Air purge valve
:
Make sure the air purge valve is open (at least 2 turns).
Shut-off valves
:
Make sure that the shut-off valves are fully open.
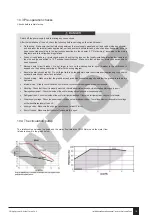
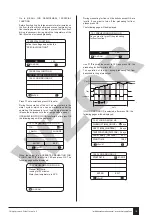
The relationships between the head and the water flow rated,the PMW Return and the water flow
rated are shown in the graph below.
10.4 The circulation pump
© All rights reserved - Galmet Sp. z o.o. Sp. K.
Installation and operation manual - air-water heat pump Prima
139
WZÓR
Содержание Prima
Страница 159: ...9 5 10 4 All rights reserved Galmet Sp z o o Sp K Installation and operation manual air water heat pump Prima 159 W Z R...
Страница 173: ...NOTES All rights reserved Galmet Sp z o o Sp K Installation and operation manual air water heat pump Prima 173 W Z R...
Страница 175: ...i 1 Galmet Sp z o o Sp K Prima 175 W Z R...
Страница 176: ...3 1 3 1 Prima Galmet Sp z o o Sp K 176 W Z R...
Страница 177: ...12 8 3 RCD 30 Galmet Sp z o o Sp K Prima 177 W Z R...
Страница 181: ...5 6 EN378 5 CO2 50 CO2 12 24 50 CO2 500 CO2 12 500 CO2 Galmet Sp z o o Sp K Prima 181 W Z R...
Страница 182: ...B 6 2 6 1 4 B 1000 1500 4 6 8 16 100 3 93 100 100 A 300 300 4 6 8 16 Prima Galmet Sp z o o Sp K 182 W Z R...
Страница 184: ...7 4 7 4 1 500 200 A 1000 1500 4 6 8 16 1 2 500 200 300 7 3 8 10 12 14 16 4 6 Prima Galmet Sp z o o Sp K 184 W Z R...
Страница 185: ...7 4 2 500 500 H B2 C B1 A B1 B2 C 4 6 2500 1000 300 600 8 16 3000 1500 Galmet Sp z o o Sp K Prima 185 W Z R...
Страница 191: ...8 3 1 2 1 CL 2 1 2 2 P_O P_S T solar P_D T5 T1 TBH 1 2 SV1 3 Tbt1 Tbt2 Galmet Sp z o o Sp K Prima 191 W Z R...
Страница 195: ...8 10 PCB B PCB B 4 6 PCB A PCB A 9 3 Galmet Sp z o o Sp K Prima 195 W Z R...
Страница 196: ...12 14 16 1 PCB B PCB A 9 3 1 PCB C PCB B 3 12 14 16 3 PCB B PCB A Prima Galmet Sp z o o Sp K 196 W Z R...
Страница 205: ...0 5 10 15 20 25 0 50 100 150 200 250 300 350 400 2 3 3 70 C 8 1 5 1 40 14 9 4 2 Galmet Sp z o o Sp K Prima 205 W Z R...
Страница 206: ...9 4 3 3 3 3 2 60 9 4 4 Prima Galmet Sp z o o Sp K 206 W Z R...
Страница 207: ...0 3 98 83 98 83 2 2 0 9 5 2 Galmet Sp z o o Sp K Prima 207 W Z R...
Страница 208: ...30 9 7 2 30 0 1 9 7 1 9 6 9 7 B1 13 0 039 30 C 80 20 Prima Galmet Sp z o o Sp K 208 W Z R...
Страница 211: ...9 7 4 1 9 1 9 2 9 1 MCA 9 2 MCA 63 A 2 2 3 3 MFA 2 9 7 3 2 Galmet Sp z o o Sp K Prima 211 W Z R...
Страница 215: ...9 1 9 2 9 1 9 2 9 3 Galmet Sp z o o Sp K Prima 215 W Z R...
Страница 224: ...MENU BACK ON OFF UNLOCK C PCB E8 E0 E2 13 4 10 5 1 99 Prima Galmet Sp z o o Sp K 224 W Z R...
Страница 235: ...11 11 1 50 11 2 10 5 11 12 10 1 24 9 4 4 pH pH 8 0 pH 7 0 Galmet Sp z o o Sp K Prima 235 W Z R...
Страница 236: ...2 12 C T4HMAX T4HMIN T4CMAX T4CMIN T4DHWMAX T4DHWMIN 1 9 4 2 13 13 1 1 13 2 Prima Galmet Sp z o o Sp K 236 W Z R...
Страница 245: ...1 P1 2 1 2 0 1 0 15 0 2 3 4 1 2 1 P1 2 TW_out 3 1 4 5 1 2 3 4 Galmet Sp z o o Sp K Prima 245 W Z R...
Страница 246: ...1 2 LED PN 380 IGBT 3 IGBT IGBT 4 F1 F1 1 2 3 4 5 6 PED PCB 1 5 2 PED 3 IPM Prima Galmet Sp z o o Sp K 246 W Z R...
Страница 247: ...MCE P6 15 15 1 2 3 U V W 4 L1 L2 L3 5 Galmet Sp z o o Sp K Prima 247 W Z R...
Страница 249: ...15 1 2 3 4 5 CO2 6 7 8 9 Galmet Sp z o o Sp K Prima 249 W Z R...
Страница 250: ...11 12 13 14 25 OFN 15 b 10 Prima Galmet Sp z o o Sp K 250 W Z R...
Страница 251: ...17 b c d e g h 80 i j k 18 19 20 16 Galmet Sp z o o Sp K Prima 251 W Z R...
Страница 252: ...20 21 Y 4 A Prima Galmet Sp z o o Sp K 252 W Z R...
Страница 253: ...XT3 XT3 8 10 4 6 K XT3 Galmet Sp z o o Sp K Prima 253 W Z R...
Страница 254: ...XT3 XT3 12 14 16 1 K 40 200 230 12 14 16 3 Prima Galmet Sp z o o Sp K 254 W Z R...
Страница 255: ...Galmet Sp z o o Sp K Prima 255 W Z R...


